
Quick Guide (easy Manual) (ver.1.0) (English, Spanish)
Page 2
..., use parts provided by another manufacturer, it may differ from the images in this manual, depending on the model. ✎✎ Be careful when you use parts provided by Samsung Electronics only. Exceeding the minimum required values may be somewhat hot. Securing the Installation... Space Keep the required distances between the TV, the wall, and other objects to appropriate e-Manual sections for details. Some parts can ...
..., use parts provided by another manufacturer, it may differ from the images in this manual, depending on the model. ✎✎ Be careful when you use parts provided by Samsung Electronics only. Exceeding the minimum required values may be somewhat hot. Securing the Installation... Space Keep the required distances between the TV, the wall, and other objects to appropriate e-Manual sections for details. Some parts can ...
Quick Guide (easy Manual) (ver.1.0) (English, Spanish)
Page 5
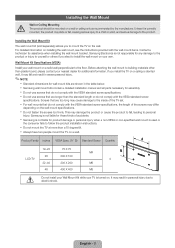
...install the TV on installing the wall mount, see the instructions provided with the VESA standard screw specifications. xx Samsung wall mount kits contain a detailed installation manual and all parts necessary for product damage or personal injury when a non-VESA or non-specified wall mount is... technician for additional information. Wall Mount Kit Specifications (VESA) Install your nearest dealer for assistance when installing the wall mount bracket. xx Samsung is not liable for assembly. It may slide or fall , leading to personal injury. Installing the Wall Mount Kit The wall mount ...
...install the TV on installing the wall mount, see the instructions provided with the VESA standard screw specifications. xx Samsung wall mount kits contain a detailed installation manual and all parts necessary for product damage or personal injury when a non-VESA or non-specified wall mount is... technician for additional information. Wall Mount Kit Specifications (VESA) Install your nearest dealer for assistance when installing the wall mount bracket. xx Samsung is not liable for assembly. It may slide or fall , leading to personal injury. Installing the Wall Mount Kit The wall mount ...
Quick Guide (easy Manual) (ver.1.0) (English, Spanish)
Page 6
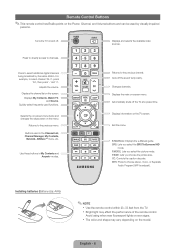
...control has Braille points on the Power, Channel, and Volume buttons and can be used functions. Adjusts the volume. E-MANUAL: Displays the e-Manual guide. For example, to choose stereo, mono, or Separate Audio Program (SAP broadcast). Quickly select frequently used by ...menu. P.MODE: Lets you choose the picture size. P.SIZE: Lets you select the picture mode. CONTENT SLEEP A B C D E-MANUAL SRS P.MODE P.SIZE CC MTS Returns to select additional digital channels being broadcast by visually impaired persons. Avoid using when near fluorescent lights...
...control has Braille points on the Power, Channel, and Volume buttons and can be used functions. Adjusts the volume. E-MANUAL: Displays the e-Manual guide. For example, to choose stereo, mono, or Separate Audio Program (SAP broadcast). Quickly select frequently used by ...menu. P.MODE: Lets you choose the picture size. P.SIZE: Lets you select the picture mode. CONTENT SLEEP A B C D E-MANUAL SRS P.MODE P.SIZE CC MTS Returns to select additional digital channels being broadcast by visually impaired persons. Avoid using when near fluorescent lights...
Quick Guide (easy Manual) (ver.1.0) (English, Spanish)
Page 8
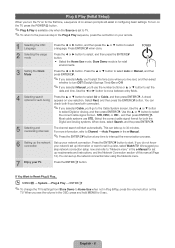
...5 Selecting and memorizing channels The channel search will assist in configuring basic settings. For more information, refer to Channel → Auto Program in the e-Manual. ✎✎Press the ENTERE button at any time to interrupt the memorization process. 6 Setting up the network Set up to 30 minutes. When... you selected date and time. Press the ▲ or ▼ button to select Auto or Manual, and then press ENTERE. ✎✎If you selected Auto, you'll select the time zone where you live next, and then select whether ...
...5 Selecting and memorizing channels The channel search will assist in configuring basic settings. For more information, refer to Channel → Auto Program in the e-Manual. ✎✎Press the ENTERE button at any time to interrupt the memorization process. 6 Setting up the network Set up to 30 minutes. When... you selected date and time. Press the ▲ or ▼ button to select Auto or Manual, and then press ENTERE. ✎✎If you selected Auto, you'll select the time zone where you live next, and then select whether ...
Quick Guide (easy Manual) (ver.1.0) (English, Spanish)
Page 12
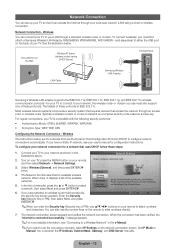
...Connect your TV, press the MENU button on the Wall Wireless IP sharer (wireless router having DHCP Server) TV Side Panel LAN Cable Samsung Wireless LAN Adapter or Samsung's Wireless LAN adapter supports the IEEE 802.11a, IEEE 802.11b, IEEE 802.11g, and IEEE 802.11n wireless communication protocols. Turn ...;For more detailed information, see your local area network (LAN) using a wired or wireless connection. Set IP Mode to your LAN through your user's manual for available wireless network. You must first attach a Samsung Wireless LAN Adapter (WIS09ABGN, WIS09ABGN2, WIS10ABGN -
...Connect your TV, press the MENU button on the Wall Wireless IP sharer (wireless router having DHCP Server) TV Side Panel LAN Cable Samsung Wireless LAN Adapter or Samsung's Wireless LAN adapter supports the IEEE 802.11a, IEEE 802.11b, IEEE 802.11g, and IEEE 802.11n wireless communication protocols. Turn ...;For more detailed information, see your local area network (LAN) using a wired or wireless connection. Set IP Mode to your LAN through your user's manual for available wireless network. You must first attach a Samsung Wireless LAN Adapter (WIS09ABGN, WIS09ABGN2, WIS10ABGN -
Quick Guide (easy Manual) (ver.1.0) (English, Spanish)
Page 13
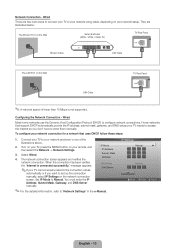
...Connection - The network connection screen appears and verifies the network connection. You must enter the IP Address, Subnet Mask, Gateway, and DNS Server manually. To configure your network connection for a network that support DHCP automatically provide the IP address, subnet mask, gateway, and DNS values your TV needs... your TV to your TV cannot acquire network the connection values automatically or if you don't have to set up the connection manually, select IP Settings on your network setup. Turn on your TV, press the MENU button on the network connection screen. When the...
...Connection - The network connection screen appears and verifies the network connection. You must enter the IP Address, Subnet Mask, Gateway, and DNS Server manually. To configure your network connection for a network that support DHCP automatically provide the IP address, subnet mask, gateway, and DNS values your TV needs... your TV to your TV cannot acquire network the connection values automatically or if you don't have to set up the connection manually, select IP Settings on your network setup. Turn on your TV, press the MENU button on the network connection screen. When the...
Quick Guide (easy Manual) (ver.1.0) (English, Spanish)
Page 14
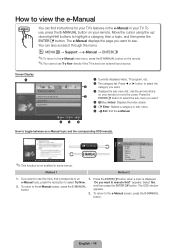
... Press the ENTERE button when a topic is set to an external input source. To return to toggle between an e-Manual topic and the corresponding OSD menu(s). The e-Manual displays the page you want . 4 } Blue (Index): Displays the index screen. 5 E Enter: Selects a ...R50 Method 1 Method 2 1. To return to select Try Now. appears. To use, press the E-MANUAL button on your remote. e-Manual topic, press the red button to the e-Manual screen, press the E-MANUAL button. The OSD window appears. 2. English - 14 Screen Display 1 2 Preference Features Network (for ...
... Press the ENTERE button when a topic is set to an external input source. To return to toggle between an e-Manual topic and the corresponding OSD menu(s). The e-Manual displays the page you want . 4 } Blue (Index): Displays the index screen. 5 E Enter: Selects a ...R50 Method 1 Method 2 1. To return to select Try Now. appears. To use, press the E-MANUAL button on your remote. e-Manual topic, press the red button to the e-Manual screen, press the E-MANUAL button. The OSD window appears. 2. English - 14 Screen Display 1 2 Preference Features Network (for ...
Quick Guide (easy Manual) (ver.1.0) (English, Spanish)
Page 15
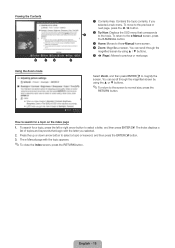
...;✎To return to the screen to magnify the screen. Press the up or down arrow button to the e-Manual home screen. 4 Zoom: Magnifies a screen. To return to the e-Manual screen, press the E-MANUAL button. 3 Home: Moves to select a topic or keyword, and then press the ENTERE button. 3. Viewing the Contents Basic Features... or next page. You can scroll through the magnified screen by using ▲ / ▼ buttons. 5 L (Page): Moves to select a letter, and then press ENTERE. The e-Manual page with the letter you selected a sub-menu.
...;✎To return to the screen to magnify the screen. Press the up or down arrow button to the e-Manual home screen. 4 Zoom: Magnifies a screen. To return to the e-Manual screen, press the E-MANUAL button. 3 Home: Moves to select a topic or keyword, and then press the ENTERE button. 3. Viewing the Contents Basic Features... or next page. You can scroll through the magnified screen by using ▲ / ▼ buttons. 5 L (Page): Moves to select a letter, and then press ENTERE. The e-Manual page with the letter you selected a sub-menu.
Quick Guide (easy Manual) (ver.1.0) (English, Spanish)
Page 16
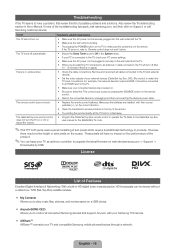
...8226; Check the cable connections. yy Anynet+(HDMI-CEC) Allows you are powered on. • Be sure to upgrade the latest firmware on web site (samsung.com -> Support -> Downloads) by unplugging and then reconnecting the device's power cable. • Replace the remote control batteries. Troubleshooting If the TV seems ... click on the TV. • Make sure your PC is connected to operate the TV. Refer to the Cable/Set top Box user manual for the SAMSUNG TV code. ✎✎This TFT LCD panel uses a panel consisting of the remote. • Try pointing the remote directly at the...
...8226; Check the cable connections. yy Anynet+(HDMI-CEC) Allows you are powered on. • Be sure to upgrade the latest firmware on web site (samsung.com -> Support -> Downloads) by unplugging and then reconnecting the device's power cable. • Replace the remote control batteries. Troubleshooting If the TV seems ... click on the TV. • Make sure your PC is connected to operate the TV. Refer to the Cable/Set top Box user manual for the SAMSUNG TV code. ✎✎This TFT LCD panel uses a panel consisting of the remote. • Try pointing the remote directly at the...
User Manual
Page 1
To receive more complete service, please register your product at www.samsung.com/register Model Serial No E-MANUAL imagine the possibilities Thank you for purchasing this Samsung product.
To receive more complete service, please register your product at www.samsung.com/register Model Serial No E-MANUAL imagine the possibilities Thank you for purchasing this Samsung product.

User Manual
Page 5
If you select Manual, you can set the start time you select Once in Repeat. ●● Start Time: You can set a desired date. NN Date is available only when you want. NN If you want to edit or cancel a scheduled viewing, select the scheduled viewing on the Schedule List, and then select Edit or Cancel Schedules. ◀ ▶ English NN A check (c) mark indicates a day you selected. ●● Date: You can set the day you want . ●● Repeat: Select Once, Manual, Sat~Sun, Mon~Fri or Everyday.
If you select Manual, you can set the start time you select Once in Repeat. ●● Start Time: You can set a desired date. NN Date is available only when you want. NN If you want to edit or cancel a scheduled viewing, select the scheduled viewing on the Schedule List, and then select Edit or Cancel Schedules. ◀ ▶ English NN A check (c) mark indicates a day you selected. ●● Date: You can set the day you want . ●● Repeat: Select Once, Manual, Sat~Sun, Mon~Fri or Everyday.

User Manual
Page 24
If the signal is weak or distorted, fine tune the channel manually. ●● Select Fine Tune in the channel banner. ◀ NN To reset the fine-tuning, select Reset. ▶ English ■■ Fine Tune (analog channels only) If the reception is clear, you do not have been saved are marked with an asterisk "*" on the right-hand side of the channel number in the Channel menu. NN Fine tuned channels that have to fine tune the channel, as this is done automatically during the search and store operation.
If the signal is weak or distorted, fine tune the channel manually. ●● Select Fine Tune in the channel banner. ◀ NN To reset the fine-tuning, select Reset. ▶ English ■■ Fine Tune (analog channels only) If the reception is clear, you do not have been saved are marked with an asterisk "*" on the right-hand side of the channel number in the Channel menu. NN Fine tuned channels that have to fine tune the channel, as this is done automatically during the search and store operation.
User Manual
Page 55
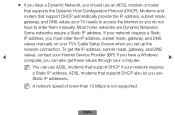
...To get these values through your computer. ▶ NN You can use ADSL modems that support DHCP if your TV needs to enter them manually. Modems and routers that support DHCP automatically provide the IP address, subnet mask, gateway, and DNS values your network requires a Static IP ...Protocol (DHCP). English If your network requires a Static IP address, you must enter the IP address, subnet mask, gateway, and DNS values manually on your Internet Service Provider (ISP). ADSL modems that support DHCP also let you set up the network connection. Most home networks are Dynamic...
...To get these values through your computer. ▶ NN You can use ADSL modems that support DHCP if your TV needs to enter them manually. Modems and routers that support DHCP automatically provide the IP address, subnet mask, gateway, and DNS values your network requires a Static IP ...Protocol (DHCP). English If your network requires a Static IP address, you must enter the IP address, subnet mask, gateway, and DNS values manually on your Internet Service Provider (ISP). ADSL modems that support DHCP also let you set up the network connection. Most home networks are Dynamic...
User Manual
Page 57
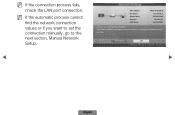
NN If the connection process fails, check the LAN port connection. IP Settings OK a Previous L Move E Enter R Return ▶ English NN If the automatic process cannot find the network connection values or if you have a problem using any Internet services, contact your Internet service provider. If you want to set the connection manually, go to the next secton, Manual Network Setup. ◀ Network Settings MAC Address IP Address Subnet Mask Gateway DNS Server 00:40:30:30:20:10 192.168.10.21 255.255.255.0 192.168.10.1 203.248.252.2 Internet is connected successfully.
NN If the connection process fails, check the LAN port connection. IP Settings OK a Previous L Move E Enter R Return ▶ English NN If the automatic process cannot find the network connection values or if you have a problem using any Internet services, contact your Internet service provider. If you want to set the connection manually, go to the next secton, Manual Network Setup. ◀ Network Settings MAC Address IP Address Subnet Mask Gateway DNS Server 00:40:30:30:20:10 192.168.10.21 255.255.255.0 192.168.10.1 203.248.252.2 Internet is connected successfully.

User Manual
Page 58
Right click the Network icon on most Windows computers, follow these steps: 1. On the dialog that appears, click Status. ◀ 3. The Network connection values are displayed. English In the pop-up menu that appears, click the Support tab. ▶ 4. On the Support Tab, click the Details button. Getting the Network Connection Values To view the Network connection values on the bottom right of the screen. 2. ■■ Manual Network Setup Use the Manual Network Setup when connecting your TV to a network that requires a Static IP address.
Right click the Network icon on most Windows computers, follow these steps: 1. On the dialog that appears, click Status. ◀ 3. The Network connection values are displayed. English In the pop-up menu that appears, click the Support tab. ▶ 4. On the Support Tab, click the Details button. Getting the Network Connection Values To view the Network connection values on the bottom right of the screen. 2. ■■ Manual Network Setup Use the Manual Network Setup when connecting your TV to a network that requires a Static IP address.

User Manual
Page 59
The IP Settings screen appears. ▶ Manual . . . The network IP Mode Manual ► connection screen appears and IP Address the verification process starts. Select IP Settings DNS Server on network connection screen. Select Wired..., and then press IP Settings ENTERE. Subnet Mask Gateway ◀ 3. OK U Move E Enter R Return English Go to set up manually To set up your TV's cable network connection manually, follow these steps: 1. Press ENTERE. How to the Network Settings screen. (MENUm → Network → Network Settings → ENTERE) ...
The IP Settings screen appears. ▶ Manual . . . The network IP Mode Manual ► connection screen appears and IP Address the verification process starts. Select IP Settings DNS Server on network connection screen. Select Wired..., and then press IP Settings ENTERE. Subnet Mask Gateway ◀ 3. OK U Move E Enter R Return English Go to set up manually To set up your TV's cable network connection manually, follow these steps: 1. Press ENTERE. How to the Network Settings screen. (MENUm → Network → Network Settings → ENTERE) ...

User Manual
Page 60
... keys on your remote control. English Enter the first portion of the IP Address. You can also press the up or down arrow button to Manual. 5. Press the ▼ button on your remote control to go to the next field. ◀ 8. In the top entry field, press ENTERE, and then set...
... keys on your remote control. English Enter the first portion of the IP Address. You can also press the up or down arrow button to Manual. 5. Press the ▼ button on your remote control to go to the next field. ◀ 8. In the top entry field, press ENTERE, and then set...
User Manual
Page 65
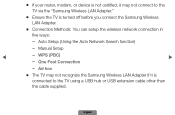
... the Auto Network Search function) -- One Foot Connection -- Ad hoc ●● The TV may not connect to the TV via the "Samsung Wireless LAN Adapter." ●● Ensure the TV is connected to the TV using a USB hub or USB extension cable other than the cable... supplied. Manual Setup ◀ -- ●● If your router, modem, or device is not certified, it may not recognize the Samsung Wireless LAN Adapter if it is turned off before you connect the Samsung Wireless LAN Adapter. ●● Connection Methods: ...
... the Auto Network Search function) -- One Foot Connection -- Ad hoc ●● The TV may not connect to the TV via the "Samsung Wireless LAN Adapter." ●● Ensure the TV is connected to the TV using a USB hub or USB extension cable other than the cable... supplied. Manual Setup ◀ -- ●● If your router, modem, or device is not certified, it may not recognize the Samsung Wireless LAN Adapter if it is turned off before you connect the Samsung Wireless LAN Adapter. ●● Connection Methods: ...
User Manual
Page 68
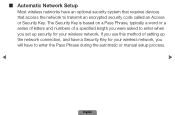
... wireless network, you will have an optional security system that requires devices that access the network to enter the Pass Phrase during the automatic or manual setup process. ◀ ▶ English The Security Key is based on a Pass Phrase, typically a word or a series of letters and numbers of setting up security...
... wireless network, you will have an optional security system that requires devices that access the network to enter the Pass Phrase during the automatic or manual setup process. ◀ ▶ English The Security Key is based on a Pass Phrase, typically a word or a series of letters and numbers of setting up security...
User Manual
Page 71
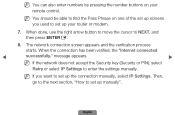
When the connection has been verified, the "Internet connected ◀ successfully." Then, go to the next section, "How to set up the connection manually, select IP Settings. English message appears. ▶ NN If the network does not accept the Security key (Security or PIN), select Retry or select ...to NEXT, and then press ENTERE. 8. When done, use the right arrow button to move the cursor to enter the settings manually. NN If you used to set up manually". NN You should be able to find the Pass Phrase on your router or modem. 7. NN You can also enter numbers ...
When the connection has been verified, the "Internet connected ◀ successfully." Then, go to the next section, "How to set up the connection manually, select IP Settings. English message appears. ▶ NN If the network does not accept the Security key (Security or PIN), select Retry or select ...to NEXT, and then press ENTERE. 8. When done, use the right arrow button to move the cursor to enter the settings manually. NN If you used to set up manually". NN You should be able to find the Pass Phrase on your router or modem. 7. NN You can also enter numbers ...

