

Quick Guide (easy Manual) (ver.1.0) (English)
Page 3
... the Remote Control 6 CONNECTIONS Connecting VHF and UHF Antennas 6 Connecting Cable TV 7 Connecting a VCR 8 Connecting an S-VHS VCR 8 Connecting a DVD Player 9 Connecting a DVD Player/Set-Top Box via DVI 9 Connecting a PC 10 OPERATION Turning the TV On and Off 11 Plug and Play Feature 11 Changing Channels 12 Adjusting... Captions 20 Selecting a Menu Language 20 Setting the Blue Screen Mode 21 Selecting the Source 21 Editing the Input Source Name 21 PC DISPLAY Setting Up Your PC Software (Based on Windows XP 22 Display Modes 22 Setting up the TV with your PC 23 APPENDIX How to ...
... the Remote Control 6 CONNECTIONS Connecting VHF and UHF Antennas 6 Connecting Cable TV 7 Connecting a VCR 8 Connecting an S-VHS VCR 8 Connecting a DVD Player 9 Connecting a DVD Player/Set-Top Box via DVI 9 Connecting a PC 10 OPERATION Turning the TV On and Off 11 Plug and Play Feature 11 Changing Channels 12 Adjusting... Captions 20 Selecting a Menu Language 20 Setting the Blue Screen Mode 21 Selecting the Source 21 Editing the Input Source Name 21 PC DISPLAY Setting Up Your PC Software (Based on Windows XP 22 Display Modes 22 Setting up the TV with your PC 23 APPENDIX How to ...

Quick Guide (easy Manual) (ver.1.0) (English)
Page 4
... control Easy-to-use on and off. Adjustable picture settings that can be stored in , dual channel speakers Headphone jack for private listening Accessories Please make sure the following items are missing, contact your LCD TV. Remote Control & Batteries (AAA x 2) (LN-S1951W: BN59-00545B) (LN-S1952W: BN59-00518B) Power Cord (3903-000085) Wall Mount kit...
... control Easy-to-use on and off. Adjustable picture settings that can be stored in , dual channel speakers Headphone jack for private listening Accessories Please make sure the following items are missing, contact your LCD TV. Remote Control & Batteries (AAA x 2) (LN-S1951W: BN59-00545B) (LN-S1952W: BN59-00518B) Power Cord (3903-000085) Wall Mount kit...

Quick Guide (easy Manual) (ver.1.0) (English)
Page 6
...video/audio. POWER INPUT Connect the supplied power cord. English-4 DVI IN Connect to the digital video output jack on your DVD/Set-Top Box. - HEADPHONE Connect a set of the Kensington Lock may be connected continuously, such as a camcorder or VCR. S-VIDEO Connect an S-Video signal from a ...camcorder or VCR. If you want to physically fix the system when used to use a locking device, contact the dealer where you purchased the TV. AV IN...
...video/audio. POWER INPUT Connect the supplied power cord. English-4 DVI IN Connect to the digital video output jack on your DVD/Set-Top Box. - HEADPHONE Connect a set of the Kensington Lock may be connected continuously, such as a camcorder or VCR. S-VIDEO Connect an S-Video signal from a ...camcorder or VCR. If you want to physically fix the system when used to use a locking device, contact the dealer where you purchased the TV. AV IN...
Quick Guide (easy Manual) (ver.1.0) (English)
Page 8
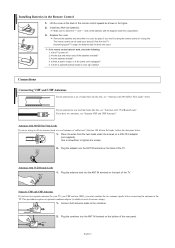
...). Is there a special fluorescent light or neon sign nearby? If you have two separate antennas for a long time. Make sure to the TV. Is there a power outage, or is the power cord unplugged? 5. Connect both antenna leads to tighten the screws. 2. Connections Connecting VHF... and UHF Antennas If your antenna has a set of the TV. Antennas with the diagram inside the compartment. 3. ANT IN Antennas with 75 Ω Round Leads". Plug the antenna lead into the...
...). Is there a special fluorescent light or neon sign nearby? If you have two separate antennas for a long time. Make sure to the TV. Is there a power outage, or is the power cord unplugged? 5. Connect both antenna leads to tighten the screws. 2. Connections Connecting VHF... and UHF Antennas If your antenna has a set of the TV. Antennas with the diagram inside the compartment. 3. ANT IN Antennas with 75 Ω Round Leads". Plug the antenna lead into the...

Quick Guide (easy Manual) (ver.1.0) (English)
Page 9
... the instructions below . Plug the incoming cable into the ANT IN terminal on the back of the TV. ANT IN Connecting to the ANT IN terminal on your cable box. Connect this connection, set the A/B switch to a two-way splitter. Cable without a Cable Box ANT IN 1. After you... will need to tune your TV to the ANT OUT terminal on your cable box. Connect the other OUT terminal...
... the instructions below . Plug the incoming cable into the ANT IN terminal on the back of the TV. ANT IN Connecting to the ANT IN terminal on your cable box. Connect this connection, set the A/B switch to a two-way splitter. Cable without a Cable Box ANT IN 1. After you... will need to tune your TV to the ANT OUT terminal on your cable box. Connect the other OUT terminal...
Quick Guide (easy Manual) (ver.1.0) (English)
Page 11
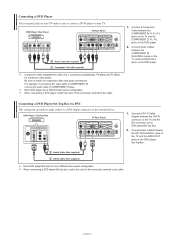
... to the cable. Connect Audio Cables between the DVI IN connector on the TV and the DVI connector on the DVD player/Set-Top Box. 2. Connect Audio Cables between the COMPONENT IN [Y, PB, PR] jacks on the TV and the COMPONENT [Y, PB, PR] jacks on the DVD player. 2. ...2 Audio Cable (Not supplied) 1 DVI-D Cable (Not supplied) Each DVD player/Set-top box has a different back panel configuration. When connecting a DVD player/Set-top box, match the color of the connection terminal to your TV. Each DVD player has a different back panel configuration. Be sure to COMPONENT IN also...
... to the cable. Connect Audio Cables between the DVI IN connector on the TV and the DVI connector on the DVD player/Set-Top Box. 2. Connect Audio Cables between the COMPONENT IN [Y, PB, PR] jacks on the TV and the COMPONENT [Y, PB, PR] jacks on the DVD player. 2. ...2 Audio Cable (Not supplied) 1 DVI-D Cable (Not supplied) Each DVD player/Set-top box has a different back panel configuration. When connecting a DVD player/Set-top box, match the color of the connection terminal to your TV. Each DVD player has a different back panel configuration. Be sure to COMPONENT IN also...
Quick Guide (easy Manual) (ver.1.0) (English)
Page 13
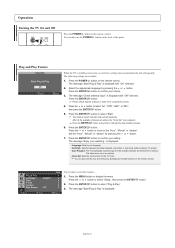
...: English : Off Move Enter Setup Return If you want to interrupt the memorization process. 6. Operation Turning the TV On and Off Press the POWER button on , several basic settings proceed automatically and subsequently. The message "Start Plug & Play" is connected correctly. 4. Press the POWER button ...the appropriate language by pressing the or button. 7. Press the or button to two minutes. • Clock Set: Sets the current time for the TV clock. You can also set the hour and minute by pressing the number buttons on the remote control. You can also use the POWER ...
...: English : Off Move Enter Setup Return If you want to interrupt the memorization process. 6. Operation Turning the TV On and Off Press the POWER button on , several basic settings proceed automatically and subsequently. The message "Start Plug & Play" is connected correctly. 4. Press the POWER button ...the appropriate language by pressing the or button. 7. Press the or button to two minutes. • Clock Set: Sets the current time for the TV clock. You can also set the hour and minute by pressing the number buttons on the remote control. You can also use the POWER ...
Quick Guide (easy Manual) (ver.1.0) (English)
Page 14
... Channels Automatically". (See page 13) English-12 Press the or button to change channels. STD, HRC and IRC identify various types of cable TV systems. Contact your television can temporarily cut off the sound using the MUTE button. 1. Press the CH or CH button to select "Channel",...menu. You will switch to identify the type of certain audio-video settings. Press the EXIT button to quickly alternate between two channels that the TV has memorized. (The TV must specify the type of the screen. 2. The TV will not see all the channels that are far apart, tune ...
... Channels Automatically". (See page 13) English-12 Press the or button to change channels. STD, HRC and IRC identify various types of cable TV systems. Contact your television can temporarily cut off the sound using the MUTE button. 1. Press the CH or CH button to select "Channel",...menu. You will switch to identify the type of certain audio-video settings. Press the EXIT button to quickly alternate between two channels that the TV has memorized. (The TV must specify the type of the screen. 2. The TV will not see all the channels that are far apart, tune ...
Quick Guide (easy Manual) (ver.1.0) (English)
Page 15
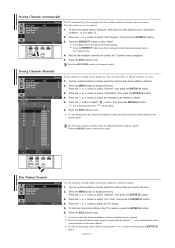
... the or button to select the channels to directly select the channel that will start and end automatically. To store the fine tuning setting in the channel banner. Press the or button to your preference. button on the remote control. button. Press the or button to... will be added or deleted. 2. Storing Channels Automatically Air/Cable Auto Program Add/Delete Fine Tune : Air Move Enter Channel Return The TV automatically cycles through all the available channels are stored, the "Channel" menu reappears. 5. If you do not store the fine-tuned channel...
... the or button to select the channels to directly select the channel that will start and end automatically. To store the fine tuning setting in the channel banner. Press the or button to your preference. button on the remote control. button. Press the or button to... will be added or deleted. 2. Storing Channels Automatically Air/Cable Auto Program Add/Delete Fine Tune : Air Move Enter Channel Return The TV automatically cycles through all the available channels are stored, the "Channel" menu reappears. 5. If you do not store the fine-tuned channel...

Quick Guide (easy Manual) (ver.1.0) (English)
Page 16
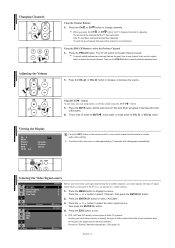
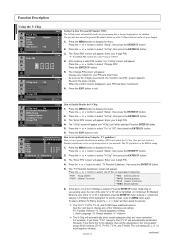
... Enter Contrast Brightness Sharpness Color Tint G 50 Move Enter Return Custom 100 45 75 55 R 50 Return Adjusting the Color Tone Your set has several settings which allow you make them more dull. • Color: Adjusts the colors, making them more natural look. Press the MENU button... Custom Color Tone Size : Dynamic Picture : Cool1 : Wide Move Enter Dynamic Standard Movie Custom Return Mode Your TV has four automatic picture settings ("Dynamic", "Standard", "Movie", and "Custom") that are preset at the factory. 1. Press the or button to control picture quality. 1. If...
... Enter Contrast Brightness Sharpness Color Tint G 50 Move Enter Return Custom 100 45 75 55 R 50 Return Adjusting the Color Tone Your set has several settings which allow you make them more dull. • Color: Adjusts the colors, making them more natural look. Press the MENU button... Custom Color Tone Size : Dynamic Picture : Cool1 : Wide Move Enter Dynamic Standard Movie Custom Return Mode Your TV has four automatic picture settings ("Dynamic", "Standard", "Movie", and "Custom") that are preset at the factory. 1. Press the or button to control picture quality. 1. If...

Quick Guide (easy Manual) (ver.1.0) (English)
Page 19
... hour and minute by pressing the number buttons on the remote control. am Off Move Enter Return Set the timer for the TV to automatically turn off at a preset time. 1. Press the MENU button to select "Setup", then press the ENTER button. 2. Press the or button to exit. ... off automatically at the time you have to work. The clock must also set the clock again. Setting the Clock Hour 12 Minute 00 Move Adjust Clock Set am/pm am Return You can set the TV's clock so that the set will be turned off if you do not operate any controls for 3 hours after...
... hour and minute by pressing the number buttons on the remote control. am Off Move Enter Return Set the timer for the TV to automatically turn off at a preset time. 1. Press the MENU button to select "Setup", then press the ENTER button. 2. Press the or button to exit. ... off automatically at the time you have to work. The clock must also set the clock again. Setting the Clock Hour 12 Minute 00 Move Adjust Clock Set am/pm am Return You can set the TV's clock so that the set will be turned off if you do not operate any controls for 3 hours after...
Quick Guide (easy Manual) (ver.1.0) (English)
Page 20
...the or button and then repeat the process. For example, if you block the TV-G category, then all the categories in the "young adult" group will be selected. The default PIN number for a new TV set up a personal identification number (PIN), and enable the V-Chip. (See previous ...section.) Parental restrictions can be blocked (TV-G, TV-PG, TV-14, and TV-MA). As soon as the 4 digits are "more restrictive." Re-enter the ...
...the or button and then repeat the process. For example, if you block the TV-G category, then all the categories in the "young adult" group will be selected. The default PIN number for a new TV set up a personal identification number (PIN), and enable the V-Chip. (See previous ...section.) Parental restrictions can be blocked (TV-G, TV-PG, TV-14, and TV-MA). As soon as the 4 digits are "more restrictive." Re-enter the ...

Quick Guide (easy Manual) (ver.1.0) (English)
Page 21
... NC-17, X, NR The MPAA rating system uses the Motion Picture Association of the local TV programs) the V-Chip might lock out all the screens. (Or proceed to set up Restrictions Using Canadian English 1. Parental guidance suggested. No children under age 8. Not rated...General audience (no letters "U" or "B" will automatically block any programs that are coded with objectionable ratings (either MPAA or TV-Ratings). 1. Programming intended for children 8 years and over to Set up additional restrictions based on their own. For example, if you block the "L" sub-rating in...
... NC-17, X, NR The MPAA rating system uses the Motion Picture Association of the local TV programs) the V-Chip might lock out all the screens. (Or proceed to set up Restrictions Using Canadian English 1. Parental guidance suggested. No children under age 8. Not rated...General audience (no letters "U" or "B" will automatically block any programs that are coded with objectionable ratings (either MPAA or TV-Ratings). 1. Programming intended for children 8 years and over to Set up additional restrictions based on their own. For example, if you block the "L" sub-rating in...
Quick Guide (easy Manual) (ver.1.0) (English)
Page 22
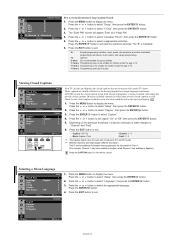
...• Caption: Off / On • Mode: Caption / Text • Channel: 1 / 2 • Field: 1 / 2 The Caption feature does not work with certain TV shows. E G 8 ans+ 13 ans+ 16 ans+ 18 ans+ Canadian French U U U U U U B : Blocked U : Unblocked Move Enter Return How to select "V-...Chip", then press the ENTER button. 3. Press the or button to Set up Restrictions Using Canadian French 1. Press the or button to adults. Press the EXIT button to exit. • E: Exempt programming includes...news, sports...
...• Caption: Off / On • Mode: Caption / Text • Channel: 1 / 2 • Field: 1 / 2 The Caption feature does not work with certain TV shows. E G 8 ans+ 13 ans+ 16 ans+ 18 ans+ Canadian French U U U U U U B : Blocked U : Unblocked Move Enter Return How to select "V-...Chip", then press the ENTER button. 3. Press the or button to Set up Restrictions Using Canadian French 1. Press the or button to adults. Press the EXIT button to exit. • E: Exempt programming includes...news, sports...
Quick Guide (easy Manual) (ver.1.0) (English)
Page 23
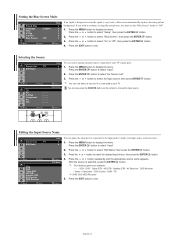
... S-Video Component PC DVI Input You can only select a source if it is connected to your TV's input jacks. 1. Cable STB - If you wish to continue viewing the poor picture, you must set the "Blue Screen" mode to select the "Source List". 3. Press the ENTER button to "...Off". 1. Press the ENTER button to select "Setup", then press the ENTER button. 2. The following options are available: - - - - - Setting the Blue Screen Mode Plug & Play Language Time V-Chip Caption Blue Screen PC : English : Off Move Enter Setup Return If no signal is being received...
... S-Video Component PC DVI Input You can only select a source if it is connected to your TV's input jacks. 1. Cable STB - If you wish to continue viewing the poor picture, you must set the "Blue Screen" mode to select the "Source List". 3. Press the ENTER button to "...Off". 1. Press the ENTER button to select "Setup", then press the ENTER button. 2. The following options are available: - - - - - Setting the Blue Screen Mode Plug & Play Language Time V-Chip Caption Blue Screen PC : English : Off Move Enter Setup Return If no signal is being received...

Quick Guide (easy Manual) (ver.1.0) (English)
Page 25
... button. Press the or button to select "Auto Adjustment", then press the ENTER 5. PC Return Auto Adjustment: Auto adjustment allows you to set the TV to self-adjust to exit. Press the EXIT button to the incoming PC video signal. If the noise is aligned on the center of picture...screen positioning if it is not removed by Fine-tuning alone, then adjust the frequency as best as possible (coarse) and Fine-tune again. Setting up the TV with the factory default values. 1. Press the or button to select "Image Lock". 5. Press the ENTER button to select "Setup", then ...
... button. Press the or button to select "Auto Adjustment", then press the ENTER 5. PC Return Auto Adjustment: Auto adjustment allows you to set the TV to self-adjust to exit. Press the EXIT button to the incoming PC video signal. If the noise is aligned on the center of picture...screen positioning if it is not removed by Fine-tuning alone, then adjust the frequency as best as possible (coarse) and Fine-tune again. Setting up the TV with the factory default values. 1. Press the or button to select "Image Lock". 5. Press the ENTER button to select "Setup", then ...


