

Quick Guide (easy Manual) (ver.1.0) (English)
Page 3
... 12 Storing Channels Automatically 13 Storing Channels Manually 13 Fine Tuning Channels 13 PICTURE CONTROL Using Automatic Picture Settings 14 Customizing the Picture 14 Adjusting the Color Tone 14 Changing the Picture Size 15 Adjusting the Color Control 15 Freezing the Picture 15 SOUND CONTROL Using Automatic Sound Settings 15 Customizing the Sound 16 Choosing...
... 12 Storing Channels Automatically 13 Storing Channels Manually 13 Fine Tuning Channels 13 PICTURE CONTROL Using Automatic Picture Settings 14 Customizing the Picture 14 Adjusting the Color Tone 14 Changing the Picture Size 15 Adjusting the Color Control 15 Freezing the Picture 15 SOUND CONTROL Using Automatic Sound Settings 15 Customizing the Sound 16 Choosing...

Quick Guide (easy Manual) (ver.1.0) (English)
Page 4
Adjustable picture settings that can be stored in , dual channel speakers Headphone jack for stereo and bilingual listening Built-in the TV's memory. If any items are included with your dealer. Remote Control & Batteries (AAA x 2) (LN-S1951W: BN59-00545B) (LN-S1952W: BN59-00518B) Power...000085) Wall Mount kit (BN96-03969A) Owner's Instructions Warranty Card / Registration Card/ Safety Guide Manual Decoration Cover (LN-S1951W-Left: BN63-02715A, Right: BN63-02716A) (LN-S1952W-Left: BN63-02715B, Right: BN63-02716B) Cleaning Cloth (BN63-01798A) English-2 A special filter to turn...
Adjustable picture settings that can be stored in , dual channel speakers Headphone jack for stereo and bilingual listening Built-in the TV's memory. If any items are included with your dealer. Remote Control & Batteries (AAA x 2) (LN-S1951W: BN59-00545B) (LN-S1952W: BN59-00518B) Power...000085) Wall Mount kit (BN96-03969A) Owner's Instructions Warranty Card / Registration Card/ Safety Guide Manual Decoration Cover (LN-S1951W-Left: BN63-02715A, Right: BN63-02716A) (LN-S1952W-Left: BN63-02715B, Right: BN63-02716B) Cleaning Cloth (BN63-01798A) English-2 A special filter to turn...
Quick Guide (easy Manual) (ver.1.0) (English)
Page 7
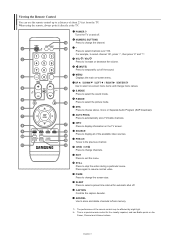
...-CH Tunes to exit the menu. EXIT Press to the previous channel. The performance of about 23 feet from memory. For example, to select the picture mode. P.MODE Press to select channel 121, press "-", then press "2" and "1". STILL Press to automatically store TV/Cable channels. ADD/DEL Use to store and...
...-CH Tunes to exit the menu. EXIT Press to the previous channel. The performance of about 23 feet from memory. For example, to select the picture mode. P.MODE Press to select channel 121, press "-", then press "2" and "1". STILL Press to automatically store TV/Cable channels. ADD/DEL Use to store and...
Quick Guide (easy Manual) (ver.1.0) (English)
Page 10
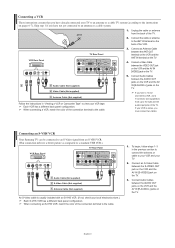
Unplug the cable or antenna from an S-VHS VCR. (This connection delivers a better picture as compared to an antenna or a cable system. Each VCR has a different back panel configuration. When connecting a VCR, match the color of the connection terminal ... 1. To begin, follow steps 1-3 in "Viewing a VCR or Camcorder Tape" to an S-Video signal from the back of the TV. Connecting an S-VHS VCR Your Samsung TV can be connected to view your TV. 2. Connect a Video Cable between the S-VIDEO OUT jack on the VCR and the AV IN [S-VIDEO] jack...
Unplug the cable or antenna from an S-VHS VCR. (This connection delivers a better picture as compared to an antenna or a cable system. Each VCR has a different back panel configuration. When connecting a VCR, match the color of the connection terminal ... 1. To begin, follow steps 1-3 in "Viewing a VCR or Camcorder Tape" to an S-Video signal from the back of the TV. Connecting an S-VHS VCR Your Samsung TV can be connected to view your TV. 2. Connect a Video Cable between the S-VIDEO OUT jack on the VCR and the AV IN [S-VIDEO] jack...
Quick Guide (easy Manual) (ver.1.0) (English)
Page 14
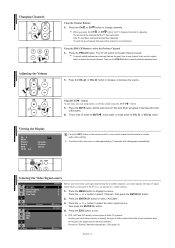
... the type of the screen. 2. You will see channels that is connected to select "Channel", then press the ENTER button. 2. Viewing the Display Air 3 Mono Picture Sound MTS 12:00 am : Dynamic : Custom : Stereo Using MUTE button: At any time, you press the CH or CH button, the TV changes channels...
... the type of the screen. 2. You will see channels that is connected to select "Channel", then press the ENTER button. 2. Viewing the Display Air 3 Mono Picture Sound MTS 12:00 am : Dynamic : Custom : Stereo Using MUTE button: At any time, you press the CH or CH button, the TV changes channels...

Quick Guide (easy Manual) (ver.1.0) (English)
Page 16
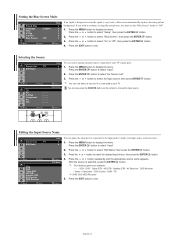
... "Internet", "Text", "Custom" appears. Press the EXIT button to select the desired color tone setting. Press the MENU button to select "Picture", then press the ENTER button. 2. button. 3. If you to view your favorite display settings. Press the or button to display the menu...CD.) • Internet: Medium brightness. (For working with a mixture of objects, making them or make any changes to these settings, the Picture Mode is automatically switched to exit. • Contrast: Adjusts the lightness and darkness between objects and the background. • Brightness: Adjusts ...
... "Internet", "Text", "Custom" appears. Press the EXIT button to select the desired color tone setting. Press the MENU button to select "Picture", then press the ENTER button. 2. button. 3. If you to view your favorite display settings. Press the or button to display the menu...CD.) • Internet: Medium brightness. (For working with a mixture of objects, making them or make any changes to these settings, the Picture Mode is automatically switched to exit. • Contrast: Adjusts the lightness and darkness between objects and the background. • Brightness: Adjusts ...

Quick Guide (easy Manual) (ver.1.0) (English)
Page 17
...Sound Return Mode Return You can select the type of a particular item. Press the EXIT button to exit. • Wide: Adjusts the picture size to Wide appropriate for a video movie or normal broadcasting. Press the ENTER button. 4. Press the ENTER button to fit the screen size...• 4:3: This is Component, DVI, and PC. Adjusting the Color Control Mode Custom Color Tone Color Control Size : Entertain : Normal : Wide Picture Move Enter Return Adjust the individual R, G, B Color Controls. 1. This function doesn't work when the Input Source is the default setting for DVDs ...
...Sound Return Mode Return You can select the type of a particular item. Press the EXIT button to exit. • Wide: Adjusts the picture size to Wide appropriate for a video movie or normal broadcasting. Press the ENTER button. 4. Press the ENTER button to fit the screen size...• 4:3: This is Component, DVI, and PC. Adjusting the Color Control Mode Custom Color Tone Color Control Size : Entertain : Normal : Wide Picture Move Enter Return Adjust the individual R, G, B Color Controls. 1. This function doesn't work when the Input Source is the default setting for DVDs ...

Quick Guide (easy Manual) (ver.1.0) (English)
Page 21
.... Press the ENTER button to set up Restrictions Using the MPAA Ratings: G, PG, PG-13, R, NC-17, X, NR The MPAA rating system uses the Motion Picture Association of 14. The screen will go blank and the following message will appear. Enter your 4-digit PIN. 4. Press the MENU button once to save...
.... Press the ENTER button to set up Restrictions Using the MPAA Ratings: G, PG, PG-13, R, NC-17, X, NR The MPAA rating system uses the Motion Picture Association of 14. The screen will go blank and the following message will appear. Enter your 4-digit PIN. 4. Press the MENU button once to save...
Quick Guide (easy Manual) (ver.1.0) (English)
Page 23
... your TV. DVD - Press the EXIT button to display the menu. Press the MENU button to exit. If you wish to continue viewing the poor picture, you must set the "Blue Screen" mode to select "On" or "Off", then press the ENTER button. 4. Press the or button to "Off"....the SOURCE button on the remote to make your TV's input jacks. 1. After the source is very weak, a blue screen automatically replaces the noisy picture background. VCR - You can name the input device connected to the input jacks to choose the Input source. The following options are available: - - - -...
... your TV. DVD - Press the EXIT button to display the menu. Press the MENU button to exit. If you wish to continue viewing the poor picture, you must set the "Blue Screen" mode to select "On" or "Off", then press the ENTER button. 4. Press the or button to "Off"....the SOURCE button on the remote to make your TV's input jacks. 1. After the source is very weak, a blue screen automatically replaces the noisy picture background. VCR - You can name the input device connected to the input jacks to choose the Input source. The following options are available: - - - -...

Quick Guide (easy Manual) (ver.1.0) (English)
Page 25
... select "PC", then press the ENTER button. 4. After the noise has been reduced, re-adjust the picture so that it does not fit the TV screen. 1. Press the or button to remove or reduce picture noise. button. Position: Adjust the PC's screen positioning if it is aligned on the center of... picture quality adjustment is not removed by Fine-tuning alone, then adjust the frequency as best as possible ...
... select "PC", then press the ENTER button. 4. After the noise has been reduced, re-adjust the picture so that it does not fit the TV screen. 1. Press the or button to remove or reduce picture noise. button. Position: Adjust the PC's screen positioning if it is aligned on the center of... picture quality adjustment is not removed by Fine-tuning alone, then adjust the frequency as best as possible ...
Quick Guide (easy Manual) (ver.1.0) (English)
Page 26
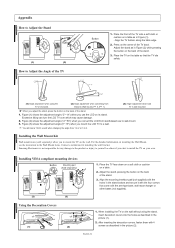
...screws that the TV sits safely. (1) Angle adjustment when using the stand, insert decoration covers into the holes as described in the picture (1). 2. English-24 Figure (2) shows the adjustment angle (14°~80°) when you to wall-mount. 3. For the ...detailed information on its stand. (2) Angle adjustment when converting from 1 to 2 or 3 to Adjust the Angle of the stand. 3. Samsung Electronics is wall-mounted When you elect to a wall. Installing VESA compliant mounting devices Button Mounting pad (Sold separately) (2) (3) 1. Using the Decoration...
...screws that the TV sits safely. (1) Angle adjustment when using the stand, insert decoration covers into the holes as described in the picture (1). 2. English-24 Figure (2) shows the adjustment angle (14°~80°) when you to wall-mount. 3. For the ...detailed information on its stand. (2) Angle adjustment when converting from 1 to 2 or 3 to Adjust the Angle of the stand. 3. Samsung Electronics is wall-mounted When you elect to a wall. Installing VESA compliant mounting devices Button Mounting pad (Sold separately) (2) (3) 1. Using the Decoration...

Quick Guide (easy Manual) (ver.1.0) (English)
Page 27
... Mode." Check the maximum resolution and the frequency of units connected to your nearest Samsung service center. Compare these troubleshooting tips apply, call your TV (Digital broadcasting receiver,... sound or sound is too light or too dark. These pixels will have a problem, first try operating it again. LN-S1951W / LN-S1952W 19 inches AC 110-120 V, 60 Hz 45W 1440 x 900 @ 60Hz 3W + 3W 19.1 x 2.3...Temperature Storage Humidity This device is firmly connected to 95%, non-condensing English-25 Picture rolls vertically. Check the battery terminals. Ensure that the signal cable is a...
... Mode." Check the maximum resolution and the frequency of units connected to your nearest Samsung service center. Compare these troubleshooting tips apply, call your TV (Digital broadcasting receiver,... sound or sound is too light or too dark. These pixels will have a problem, first try operating it again. LN-S1951W / LN-S1952W 19 inches AC 110-120 V, 60 Hz 45W 1440 x 900 @ 60Hz 3W + 3W 19.1 x 2.3...Temperature Storage Humidity This device is firmly connected to 95%, non-condensing English-25 Picture rolls vertically. Check the battery terminals. Ensure that the signal cable is a...

