

Open Source Guide (ENGLISH)
Page 1
.../or use to the public, the best way to achieve this License incorporates the limitation as a special exception, the source code distributed need to make sure the software is free for permission. If you ". By contrast, the GNU General Public License is intended to guarantee your work based on the Program. Also, for each and every part regardless of who receive copies...
.../or use to the public, the best way to achieve this License incorporates the limitation as a special exception, the source code distributed need to make sure the software is free for permission. If you ". By contrast, the GNU General Public License is intended to guarantee your work based on the Program. Also, for each and every part regardless of who receive copies...

Open Source Guide (ENGLISH)
Page 2
... making it free software that everyone can do so by permitting redistribution under these terms, attach the following notices to most effectively convey the exclusion of the ordinary General Public License). You can redistribute and change. To apply these terms (or, alternatively, under the terms of warranty; It is...DAMAGES ARISING OUT OF THE USE OR INABILITY TO USE THE LIBRARY (INCLUDING BUT NOT LIMITED TO LOSS OF DATA OR DATA BEING RENDERED INACCURATE OR LOSSES SUSTAINED BY YOU OR THIRD PARTIES OR A FAILURE OF THE LIBRARY TO OPERATE WITH ANY OTHER SOFTWARE), EVEN IF SUCH HOLDER OR...
... making it free software that everyone can do so by permitting redistribution under these terms, attach the following notices to most effectively convey the exclusion of the ordinary General Public License). You can redistribute and change. To apply these terms (or, alternatively, under the terms of warranty; It is...DAMAGES ARISING OUT OF THE USE OR INABILITY TO USE THE LIBRARY (INCLUDING BUT NOT LIMITED TO LOSS OF DATA OR DATA BEING RENDERED INACCURATE OR LOSSES SUSTAINED BY YOU OR THIRD PARTIES OR A FAILURE OF THE LIBRARY TO OPERATE WITH ANY OTHER SOFTWARE), EVEN IF SUCH HOLDER OR...

Quick Guide (easy Manual) (ver.1.0) (English)
Page 4
... Channels . . . . 9 Connecting to a Cable Box that Descrambles Some Channels . . 9 Connecting a VCR 11 Connecting an S-VHS VCR 13 Connecting a DVD/Set-Top Box via DVI 14 Connecting a DVD/Set-Top Box via HDMI 14 Connecting a DVD Player 15 Connecting a Digital Audio System 15 Connecting an Amplifier/DVD Home Theater 16 Connecting a PC 16 Chapter 3: Operation Turning the TV On and Off 17 Changing Channels 17 Using the Channel Buttons 17 Using the PRE-CH Button to select the Previous Channel . . . . 17 Adjusting the Volume 17 Using Mute 17 Viewing the Display...
... Channels . . . . 9 Connecting to a Cable Box that Descrambles Some Channels . . 9 Connecting a VCR 11 Connecting an S-VHS VCR 13 Connecting a DVD/Set-Top Box via DVI 14 Connecting a DVD/Set-Top Box via HDMI 14 Connecting a DVD Player 15 Connecting a Digital Audio System 15 Connecting an Amplifier/DVD Home Theater 16 Connecting a PC 16 Chapter 3: Operation Turning the TV On and Off 17 Changing Channels 17 Using the Channel Buttons 17 Using the PRE-CH Button to select the Previous Channel . . . . 17 Adjusting the Volume 17 Using Mute 17 Viewing the Display...
Quick Guide (easy Manual) (ver.1.0) (English)
Page 5
... Screen Size 35 Freezing the Picture 37 Viewing Picture-in-Picture 38 Activating Picture-in-Picture 38 Selecting a Signal Source (External A/V) for PIP 39 Swapping the Contents of the PIP and Main image 39 Changing the PIP Channel 40 Changing the Position of the PIP Window 40 Changing the Size of the PIP Window 41 My Color Control 42 Easy Control 42 Detail Control 43 Dynamic Contrast 44 Brightness Sensor 45 Chapter 5: Sound Control Customizing the Sound 46 Using Automatic Sound Settings...
... Screen Size 35 Freezing the Picture 37 Viewing Picture-in-Picture 38 Activating Picture-in-Picture 38 Selecting a Signal Source (External A/V) for PIP 39 Swapping the Contents of the PIP and Main image 39 Changing the PIP Channel 40 Changing the Position of the PIP Window 40 Changing the Size of the PIP Window 41 My Color Control 42 Easy Control 42 Detail Control 43 Dynamic Contrast 44 Brightness Sensor 45 Chapter 5: Sound Control Customizing the Sound 46 Using Automatic Sound Settings...
Quick Guide (easy Manual) (ver.1.0) (English)
Page 6
... Program Guide 95 Using the Electronic Program Guide 96 Viewing Information about a Single Channel 97 Viewing Information about Channels 98 Remind List 100 Viewing the Remind List 100 To View the Remind List 101 To Remove the Scheduled Programs 101 Chapter 10: Appendix Identifying Problems 102 Inatalling the Stand 104 Disconnecting the Stand 104 Installing the Wall Mount Kit 105 Using the Anti-Theft Kensington Lock 106 Using Your TV in Another Country 106 Specifications 107 Display Modes...
... Program Guide 95 Using the Electronic Program Guide 96 Viewing Information about a Single Channel 97 Viewing Information about Channels 98 Remind List 100 Viewing the Remind List 100 To View the Remind List 101 To Remove the Scheduled Programs 101 Chapter 10: Appendix Identifying Problems 102 Inatalling the Stand 104 Disconnecting the Stand 104 Installing the Wall Mount Kit 105 Using the Anti-Theft Kensington Lock 106 Using Your TV in Another Country 106 Specifications 107 Display Modes...
Quick Guide (easy Manual) (ver.1.0) (English)
Page 7
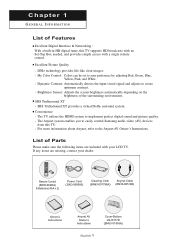
.... - Remote Control (BN59-00460A) & Batteries (AAA x 2) Power Cord (3903-000085) Cleaning Cloth (BN63-001798A) Anynet Cable (BN39-00518B) Owner's Instructions Anynet AV Owner's Instructions Cover-Bottom LN-R377D (BN63-01955A) English-1 DNIe technology provides life-like clear images. - If any items are included with a single remote control. SRS TruSurround XT - My Color Control: Colors can be set to your preference by adjusting Red, Green, Blue, Yellow, Pink, and White. - Excellent Picture Quality...
.... - Remote Control (BN59-00460A) & Batteries (AAA x 2) Power Cord (3903-000085) Cleaning Cloth (BN63-001798A) Anynet Cable (BN39-00518B) Owner's Instructions Anynet AV Owner's Instructions Cover-Bottom LN-R377D (BN63-01955A) English-1 DNIe technology provides life-like clear images. - If any items are included with a single remote control. SRS TruSurround XT - My Color Control: Colors can be set to your preference by adjusting Red, Green, Blue, Yellow, Pink, and White. - Excellent Picture Quality...

Quick Guide (easy Manual) (ver.1.0) (English)
Page 8
... must use the remote control. MENU Press to turn the TV on and lights up in stand-by detecting brightness of the surrounding environment. POWER INDICATOR Blinks and turns off when the power is on -screen menu. LIGHT DETECTING SENSOR Adjusts the brightness of the screen automatically by mode. Also press to highlight various items on the on-screen menu. (POWER) Press to see an on the TV. VOL + Press to change channels. SPEAKERS...
... must use the remote control. MENU Press to turn the TV on and lights up in stand-by detecting brightness of the surrounding environment. POWER INDICATOR Blinks and turns off when the power is on -screen menu. LIGHT DETECTING SENSOR Adjusts the brightness of the screen automatically by mode. Also press to highlight various items on the on-screen menu. (POWER) Press to see an on the TV. VOL + Press to change channels. SPEAKERS...
Quick Guide (easy Manual) (ver.1.0) (English)
Page 9
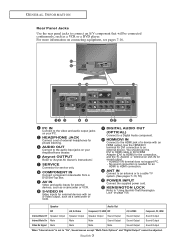
.... DIGITAL AUDIO OUT (OPTICAL) Connect to a cable TV system. (See pages 7~10, 55) POWER INPUT Connect the supplied power cord. English-3 Use the HDMI/DVI terminal for external devices, such as a camcorder or VCR. AV IN Video and audio inputs for DVI connection to an external device. No sound connection is set of a device with an S-Video output, such as a VCR or a DVD player. G E N E R A L I N F O R M AT I O N Rear Panel Jacks Use the rear panel jacks to connect an A/V component that will be adjusted. Anynet OUTPUT Refer to HDMI connection. HDMI...
.... DIGITAL AUDIO OUT (OPTICAL) Connect to a cable TV system. (See pages 7~10, 55) POWER INPUT Connect the supplied power cord. English-3 Use the HDMI/DVI terminal for external devices, such as a camcorder or VCR. AV IN Video and audio inputs for DVI connection to an external device. No sound connection is set of a device with an S-Video output, such as a VCR or a DVD player. G E N E R A L I N F O R M AT I O N Rear Panel Jacks Use the rear panel jacks to connect an A/V component that will be adjusted. Anynet OUTPUT Refer to HDMI connection. HDMI...

Quick Guide (easy Manual) (ver.1.0) (English)
Page 10
... to increase or decrease the volume. (See page 17) SOURCE Press to select additional channels (digital and analog) being broadcast by the Samsung remote control (TV, VCR, CATV, DVD, STB). (See pages 25~27) NUMERIC BUTTONS Press to select on-screen menu items and change the channel. POWER Turns the TV on and off the sound. (See page 17) MENU Displays the main on -screen Electronic Program Guide (EPG). (See page 95...
... to increase or decrease the volume. (See page 17) SOURCE Press to select additional channels (digital and analog) being broadcast by the Samsung remote control (TV, VCR, CATV, DVD, STB). (See pages 25~27) NUMERIC BUTTONS Press to select on-screen menu items and change the channel. POWER Turns the TV on and off the sound. (See page 17) MENU Displays the main on -screen Electronic Program Guide (EPG). (See page 95...

Quick Guide (easy Manual) (ver.1.0) (English)
Page 11
... remote does not work, change channels in sequence. (These buttons change the batteries and press the RESET button for automatic shut off. On : The right-hand side of the screen shows the original image. (See page 34) SRS Selects TruSurround XT mode. (See page 48) SET Adjusts 5 separate devices - Play/Pause - Rewind - CH Displays the available channels in the PIP window only.) (See page 40) CAPTION Controls the caption...
... remote does not work, change channels in sequence. (These buttons change the batteries and press the RESET button for automatic shut off. On : The right-hand side of the screen shows the original image. (See page 34) SRS Selects TruSurround XT mode. (See page 48) SET Adjusts 5 separate devices - Play/Pause - Rewind - CH Displays the available channels in the PIP window only.) (See page 40) CAPTION Controls the caption...

Quick Guide (easy Manual) (ver.1.0) (English)
Page 17
... already connected your TV to an antenna or a cable TV system (according to the instructions on pages 7-10). ANT IN 2 Connect the cable or antenna to an antenna or a cable system. 1 Unplug the cable or antenna from the back of the VCR. Skip step 1 if you have not yet connected to the ANT IN terminal on the TV. VCR Rear Panel TV Rear Panel RF Cable (Option...
... already connected your TV to an antenna or a cable TV system (according to the instructions on pages 7-10). ANT IN 2 Connect the cable or antenna to an antenna or a cable system. 1 Unplug the cable or antenna from the back of the VCR. Skip step 1 if you have not yet connected to the ANT IN terminal on the TV. VCR Rear Panel TV Rear Panel RF Cable (Option...
Quick Guide (easy Manual) (ver.1.0) (English)
Page 20
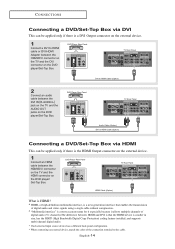
... DVI is that the HDMI device is smaller in size, has the HDCP (High Bandwidth Digital Copy Protection) coding feature installed, and supports multi-channel digital audio. * Each external input source device has a different back panel configuration. * When connecting an external device, match the color of the connection terminal to HDMI Cable (Option) 2 Connect an audio cable between the DVI IN [R-AUDIO-L] jack on the TV and the AUDIO OUT jacks on the DVD player/Set-Top Box.
... DVI is that the HDMI device is smaller in size, has the HDCP (High Bandwidth Digital Copy Protection) coding feature installed, and supports multi-channel digital audio. * Each external input source device has a different back panel configuration. * When connecting an external device, match the color of the connection terminal to HDMI Cable (Option) 2 Connect an audio cable between the DVI IN [R-AUDIO-L] jack on the TV and the AUDIO OUT jacks on the DVD player/Set-Top Box.

Quick Guide (easy Manual) (ver.1.0) (English)
Page 23
... channels). To quickly switch between two channels that were either erased or not memorized. Adjusting the Volume 1 Press the VOL +/- When you can also use the POWER button on the remote. Using Mute At any time, you press the CH / buttons, the TV changes channels in the lower-left corner of the panel. Changing Channels Using the Channel Buttons 1 Press the CH / buttons to memorize channels. You will appear in sequence. buttons. Chapter 3 O P E R AT I O N Turning...
... channels). To quickly switch between two channels that were either erased or not memorized. Adjusting the Volume 1 Press the VOL +/- When you can also use the POWER button on the remote. Using Mute At any time, you press the CH / buttons, the TV changes channels in the lower-left corner of the panel. Changing Channels Using the Channel Buttons 1 Press the CH / buttons to memorize channels. You will appear in sequence. buttons. Chapter 3 O P E R AT I O N Turning...
Quick Guide (easy Manual) (ver.1.0) (English)
Page 31
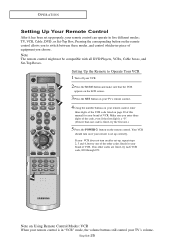
....) 5 Press the POWER button on Using Remote Control Modes: VCR When your remote control is set -up, repeat steps 2, 3 and 4, but try one code is listed, try each VCR code, 000 through 072. Note The remote control might not be compatible with all DVD Players, VCRs, Cable boxes, and Set-Top Boxes. If your VCR does not turn on page 28 of this manual for your remote control can operate in "VCR" mode, the volume buttons still control your brand...
....) 5 Press the POWER button on Using Remote Control Modes: VCR When your remote control is set -up, repeat steps 2, 3 and 4, but try one code is listed, try each VCR code, 000 through 072. Note The remote control might not be compatible with all DVD Players, VCRs, Cable boxes, and Set-Top Boxes. If your VCR does not turn on page 28 of this manual for your remote control can operate in "VCR" mode, the volume buttons still control your brand...
Quick Guide (easy Manual) (ver.1.0) (English)
Page 33
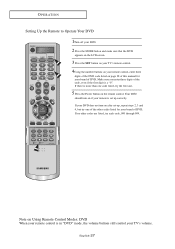
... Power button on the remote control. Note on Using Remote Control Modes: DVD When your brand of DVD. If there is set -up correctly. If no other codes listed for your TV's volume. O P E R AT I O N Setting Up the Remote to Operate Your DVD 1Turn off your DVD. 2 Press the MODE button and make sure that the DVD appears on the LCD screen. 3 Press the SET button on your TV's remote control. 4Using the number buttons on your remote control, enter three digits of the DVD code listed...
... Power button on the remote control. Note on Using Remote Control Modes: DVD When your brand of DVD. If there is set -up correctly. If no other codes listed for your TV's volume. O P E R AT I O N Setting Up the Remote to Operate Your DVD 1Turn off your DVD. 2 Press the MODE button and make sure that the DVD appears on the LCD screen. 3 Press the SET button on your TV's remote control. 4Using the number buttons on your remote control, enter three digits of the DVD code listed...
Quick Guide (easy Manual) (ver.1.0) (English)
Page 35
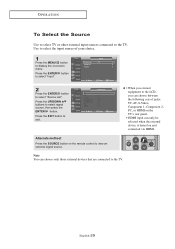
... is turned on the remote control to the TV. O P E R AT I O N To Select the Source Use to select TV or other external input sources connected to view an external signal source. Use to select the input source of jacks: TV, AV, S-Video, Component 1, Component 2, PC, or HDMI on -screen menu. Press the ENTER button to select "Input". 2 Press the ENTER button to display the on the TV's rear panel. • HDMI input can choose only those external devices that are connected to select signal source...
... is turned on the remote control to the TV. O P E R AT I O N To Select the Source Use to select TV or other external input sources connected to view an external signal source. Use to select the input source of jacks: TV, AV, S-Video, Component 1, Component 2, PC, or HDMI on -screen menu. Press the ENTER button to select "Input". 2 Press the ENTER button to display the on the TV's rear panel. • HDMI input can choose only those external devices that are connected to select signal source...

Quick Guide (easy Manual) (ver.1.0) (English)
Page 94
... buttons to select "TV Parental Guidelines", then press the ENTER button. 4 The "TV Parental Guidelines" screen will appear. Enter your 4 digit PIN number. 3 The "V-Chip" screen will appear. The message "Enter PIN" will appear. Press the UP/DOWN buttons to select "V-Chip", then press the ENTER button. FUNCTION DESCRIPTION How to Set up Restrictions using the "TV Parental Guidelines" First, set up a personal identification number...
... buttons to select "TV Parental Guidelines", then press the ENTER button. 4 The "TV Parental Guidelines" screen will appear. Enter your 4 digit PIN number. 3 The "V-Chip" screen will appear. The message "Enter PIN" will appear. Press the UP/DOWN buttons to select "V-Chip", then press the ENTER button. FUNCTION DESCRIPTION How to Set up Restrictions using the "TV Parental Guidelines" First, set up a personal identification number...

Quick Guide (easy Manual) (ver.1.0) (English)
Page 101
... selected digital program. B Press to help you are receiving digital channels. F Scrolls forward quickly (2 hours). C Switches to normal viewing mode. The set default guide is currently active. Press the Yellow button on the remote control and repeatedly press the ENTER button so that is Mini Guide. Press the Blue button on the remote control. The EPG will vary depending on the broadcaster.) Use the / buttons to display the Electronic Program Guide. The EPG supplies information, such as program lists...
... selected digital program. B Press to help you are receiving digital channels. F Scrolls forward quickly (2 hours). C Switches to normal viewing mode. The set default guide is currently active. Press the Yellow button on the remote control and repeatedly press the ENTER button so that is Mini Guide. Press the Blue button on the remote control. The EPG will vary depending on the broadcaster.) Use the / buttons to display the Electronic Program Guide. The EPG supplies information, such as program lists...
Quick Guide (easy Manual) (ver.1.0) (English)
Page 108
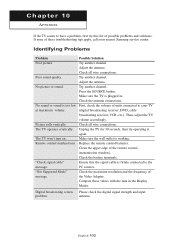
... list of units connected to your nearest Samsung service center. Clean the upper edge of the Video Adapter. The TV won't turn on. Adjust the antenna. Try another channel. Press the SOURCE button. Replace the remote control batteries. Check the maximum resolution and the frequency of the remote control (transmission window). No picture or sound. No sound or sound is working. Picture rolls vertically. "Not Supported Mode" message. Ensure that the signal cable is plugged in the Display Modes. The TV operates...
... list of units connected to your nearest Samsung service center. Clean the upper edge of the Video Adapter. The TV won't turn on. Adjust the antenna. Try another channel. Press the SOURCE button. Replace the remote control batteries. Check the maximum resolution and the frequency of the remote control (transmission window). No picture or sound. No sound or sound is working. Picture rolls vertically. "Not Supported Mode" message. Ensure that the signal cable is plugged in the Display Modes. The TV operates...
Quick Guide (easy Manual) (ver.1.0) (English)
Page 109
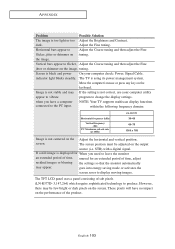
... the setting is black and power On your computer utility appear to vibrate program to the PC input. These pixels will have a computer connected to change the display settings. If a still image is not centered on the keyboard. Adjust the Fine tuning. Vertical bars appear to produce. The TV is too light or too Adjust the Brightness and Contrast. STB) with a digital signal. The screen...
... the setting is black and power On your computer utility appear to vibrate program to the PC input. These pixels will have a computer connected to change the display settings. If a still image is not centered on the keyboard. Adjust the Fine tuning. Vertical bars appear to produce. The TV is too light or too Adjust the Brightness and Contrast. STB) with a digital signal. The screen...


