

User Manual (ENGLISH)
Page 4
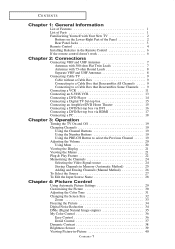
...Parts 1 Familiarizing Yourself with Your New TV 2 Buttons on the Lower-Right Part of the Panel 2 Rear Panel Jacks 3 Remote Control 4 Installing Batteries in the Remote Control 6 If the remote control doesn't work 6 Chapter 2: Connections Connecting VHF and UHF Antennas 7 Antennas with 300-ohm Flat Twin Leads 7 Antennas with...and Erasing Channels (Manual Method 26 To Select the Source 27 To Edit the Input Source Name 28 Chapter 4: Picture Control Using Automatic Picture Settings 29 Customizing the Picture 30 Adjusting the Color Tone 31 Changing the Screen Size 32 Zoom 33 Freezing...
...Parts 1 Familiarizing Yourself with Your New TV 2 Buttons on the Lower-Right Part of the Panel 2 Rear Panel Jacks 3 Remote Control 4 Installing Batteries in the Remote Control 6 If the remote control doesn't work 6 Chapter 2: Connections Connecting VHF and UHF Antennas 7 Antennas with 300-ohm Flat Twin Leads 7 Antennas with...and Erasing Channels (Manual Method 26 To Select the Source 27 To Edit the Input Source Name 28 Chapter 4: Picture Control Using Automatic Picture Settings 29 Customizing the Picture 30 Adjusting the Color Tone 31 Changing the Screen Size 32 Zoom 33 Freezing...
User Manual (ENGLISH)
Page 6
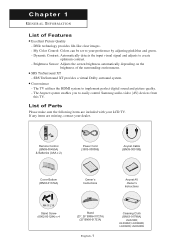
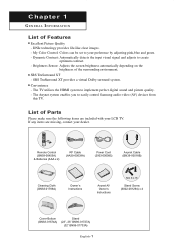
...Remote Control (BN59-00455A) & Batteries (AAA x 2) Power Cord (3903-000085) Anynet Cable (BN39-00518B) Cover-Bottom (BN63-01674A) Owner's Instructions Anynet AV Owner's Instructions M4 X L16 Stand Screw (6002-001294) x 4 Stand (23", 26" BN96-01727A) (32" BN96-01733A) English-1 Cleaning Cloth (BN63-01798A) LN-R238W, LN-R268W, LN-R2668W, LN-R328W, LN... environment. SRS TruSurround XT provides a virtual Dolby surround system. My Color Control: Colors can be set to easily control Samsung audio-video (AV) devices from this TV. The Anynet system enables you to your LCD TV.
...Remote Control (BN59-00455A) & Batteries (AAA x 2) Power Cord (3903-000085) Anynet Cable (BN39-00518B) Cover-Bottom (BN63-01674A) Owner's Instructions Anynet AV Owner's Instructions M4 X L16 Stand Screw (6002-001294) x 4 Stand (23", 26" BN96-01727A) (32" BN96-01733A) English-1 Cleaning Cloth (BN63-01798A) LN-R238W, LN-R268W, LN-R2668W, LN-R328W, LN... environment. SRS TruSurround XT provides a virtual Dolby surround system. My Color Control: Colors can be set to easily control Samsung audio-video (AV) devices from this TV. The Anynet system enables you to your LCD TV.
User Manual (ENGLISH)
Page 7
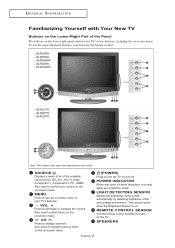
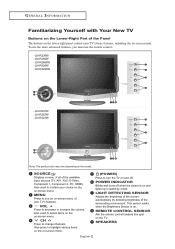
... a menu of all of the screen automatically by mode. VOL + Press to change channels. POWER INDICATOR Blinks and turns off . REMOTE CONTROL SENSOR Aim the remote control towards this spot on the model. SPEAKERS English-2 LN-R267W - G E N E R A L I N F O R M AT I O N Familiarizing Yourself with Your New TV Buttons on... of your TV's features. - This sensor works when the Brightness Sensor is on -screen menu. LN-R268W - Also used to see an on -screen menu. LN-R327W Note: The product color may vary depending on the TV. MENU Press to select items on the...
... a menu of all of the screen automatically by mode. VOL + Press to change channels. POWER INDICATOR Blinks and turns off . REMOTE CONTROL SENSOR Aim the remote control towards this spot on the model. SPEAKERS English-2 LN-R267W - G E N E R A L I N F O R M AT I O N Familiarizing Yourself with Your New TV Buttons on... of your TV's features. - This sensor works when the Brightness Sensor is on -screen menu. LN-R268W - Also used to see an on -screen menu. LN-R327W Note: The product color may vary depending on the TV. MENU Press to select items on the...

User Manual (ENGLISH)
Page 9
...(See page 19) MUTE Press to temporarily cut off the sound. (See page 20) MENU Displays the main on-screen menu. (See page 21) CAPTION Controls the caption decoder. (See page 71) PIP Picture-in-Picture ON/OFF. (See page 40) SLEEP Press to select a time for the TV to turn... to increase or decrease the volume. (See page 20) SOURCE Press to display all of about 23 feet from the TV. G E N E R A L I N F O R M AT I O N Remote Control You can use the remote control up to select on-screen menu items and change menu values. Press again to resume normal video. (See page 34) NUMBER BUTTONS Press...
...(See page 19) MUTE Press to temporarily cut off the sound. (See page 20) MENU Displays the main on-screen menu. (See page 21) CAPTION Controls the caption decoder. (See page 71) PIP Picture-in-Picture ON/OFF. (See page 40) SLEEP Press to select a time for the TV to turn... to increase or decrease the volume. (See page 20) SOURCE Press to display all of about 23 feet from the TV. G E N E R A L I N F O R M AT I O N Remote Control You can use the remote control up to select on-screen menu items and change menu values. Press again to resume normal video. (See page 34) NUMBER BUTTONS Press...

User Manual (ENGLISH)
Page 11
... or a neon sign nearby? Are the plus and minus ends of the batteries with the diagram inside the compartment. 3 Replace the cover. The remote control can be using the remote control for about 23 feet from the TV. (Assuming typical TV usage, the batteries last for a long time. English-6 G E N E R A L I N F O R...match the "+" and "-" ends of the batteries reversed? 3. Make sure to about one year.) If the remote control doesn't work Check the following: 1. Remove the batteries and store them in the Remote Control 1 Slide the cover out completely. 2 Install two AAA size batteries.
... or a neon sign nearby? Are the plus and minus ends of the batteries with the diagram inside the compartment. 3 Replace the cover. The remote control can be using the remote control for about 23 feet from the TV. (Assuming typical TV usage, the batteries last for a long time. English-6 G E N E R A L I N F O R...match the "+" and "-" ends of the batteries reversed? 3. Make sure to about one year.) If the remote control doesn't work Check the following: 1. Remove the batteries and store them in the Remote Control 1 Slide the cover out completely. 2 Install two AAA size batteries.
User Manual (ENGLISH)
Page 26
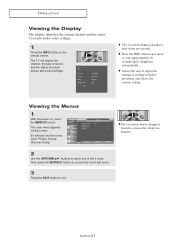
... the EXIT button to his/her preference and shows the current settings. Allows the user to adjust the settings according to exit. The on the remote control. The main menu appears on , press the MENU button. Press the INFO button once more or wait approximately 10 seconds and it disappears automatically. O P E R AT...
... the EXIT button to his/her preference and shows the current settings. Allows the user to adjust the settings according to exit. The on the remote control. The main menu appears on , press the MENU button. Press the INFO button once more or wait approximately 10 seconds and it disappears automatically. O P E R AT...

User Manual (ENGLISH)
Page 27
Press the ENTER button. 4 Press the UP/DOWN buttons to confirm your choice. 3 The message "Check antenna input." English-22 is displayed with "OK" selected. 2 Select the appropriate language by pressing the UP/DOWN buttons. O P E R AT I O N Plug & Play Feature When the TV is displayed with "OK" selected. Press the ENTER button to select "Air", "STD", "HRC", or "IRC", then press the ENTER button. The message "Start Plug & Play" is initially powered on, several basic customer settings proceed automatically and subsequently. 1 Press the POWER button on the remote control.
Press the ENTER button. 4 Press the UP/DOWN buttons to confirm your choice. 3 The message "Check antenna input." English-22 is displayed with "OK" selected. 2 Select the appropriate language by pressing the UP/DOWN buttons. O P E R AT I O N Plug & Play Feature When the TV is displayed with "OK" selected. Press the ENTER button to select "Air", "STD", "HRC", or "IRC", then press the ENTER button. The message "Start Plug & Play" is initially powered on, several basic customer settings proceed automatically and subsequently. 1 Press the POWER button on the remote control.
User Manual (ENGLISH)
Page 31
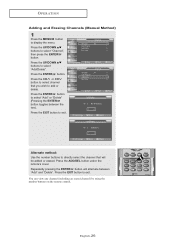
... button to select channel that will alternate between the two). Press the ADD/DEL button under the remote's cover. You can view any channel (including an erased channel) by using the number buttons on the remote control. Press the CH or CH button to select "Add" or "Delete" (Pressing the ENTER button toggles...
... button to select channel that will alternate between the two). Press the ADD/DEL button under the remote's cover. You can view any channel (including an erased channel) by using the number buttons on the remote control. Press the CH or CH button to select "Add" or "Delete" (Pressing the ENTER button toggles...
User Manual (ENGLISH)
Page 32
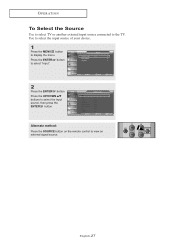
Press the UP/DOWN buttons to view an external signal source. Alternate method: Press the SOURCE button on the remote control to select the Input source, then press the ENTER button. O P E R AT I O N To Select the Source Use to select TV or another external input source connected to select "Input". 2 Press the ENTER button. Press the ENTER button to the TV. English-27 Use to select the input source of your choice. 1 Press the MENU button to display the menu.
Press the UP/DOWN buttons to view an external signal source. Alternate method: Press the SOURCE button on the remote control to select the Input source, then press the ENTER button. O P E R AT I O N To Select the Source Use to select TV or another external input source connected to select "Input". 2 Press the ENTER button. Press the ENTER button to the TV. English-27 Use to select the input source of your choice. 1 Press the MENU button to display the menu.

User Manual (ENGLISH)
Page 34
... the settings according to personal preference (see "Customizing the Picture, page 30). Alternate method: Simply press the P.MODE button on the remote control to select one of the standard picture settings. • Choose Dynamic to increase the clarity and sharpness of the picture. • Choose... activate either Dynamic, Standard, Movie, or Custom by pressing P.MODE (or by making a selection from the menu). Chapter 4 PICTURE CONTROL Using Automatic Picture Settings Your TV has four automatic picture settings ("Dynamic", "Standard", "Movie", and "Custom") that are preset at the factory.
... the settings according to personal preference (see "Customizing the Picture, page 30). Alternate method: Simply press the P.MODE button on the remote control to select one of the standard picture settings. • Choose Dynamic to increase the clarity and sharpness of the picture. • Choose... activate either Dynamic, Standard, Movie, or Custom by pressing P.MODE (or by making a selection from the menu). Chapter 4 PICTURE CONTROL Using Automatic Picture Settings Your TV has four automatic picture settings ("Dynamic", "Standard", "Movie", and "Custom") that are preset at the factory.

User Manual (ENGLISH)
Page 45
... This product has one in the PIP screen. For example, you turn the TV off while watching in PIP mode and turn it on the remote control repeatedly to simultaneously watch one TV channel in the main screen, and a different one built-in tuner, which does not allow PIP to function in...
... This product has one in the PIP screen. For example, you turn the TV off while watching in PIP mode and turn it on the remote control repeatedly to simultaneously watch one TV channel in the main screen, and a different one built-in tuner, which does not allow PIP to function in...
User Manual (ENGLISH)
Page 48
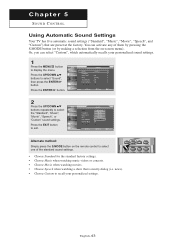
... are preset at the factory. Press the ENTER button. 2 Press the UP/DOWN buttons repeatedly to select "Sound", then press the ENTER button. Chapter 5 SOUND CONTROL Using Automatic Sound Settings Your TV has five automatic sound settings ("Standard", "Music", "Movie", "Speech", and "Custom") that is mostly dialog (i.e. Press the UP/DOWN... "Custom" sound settings. Press the EXIT button to select one of them by pressing the S.MODE button (or by making a selection from the on the remote control to exit.
... are preset at the factory. Press the ENTER button. 2 Press the UP/DOWN buttons repeatedly to select "Sound", then press the ENTER button. Chapter 5 SOUND CONTROL Using Automatic Sound Settings Your TV has five automatic sound settings ("Standard", "Music", "Movie", "Speech", and "Custom") that is mostly dialog (i.e. Press the UP/DOWN... "Custom" sound settings. Press the EXIT button to select one of them by pressing the S.MODE button (or by making a selection from the on the remote control to exit.
User Manual (ENGLISH)
Page 50
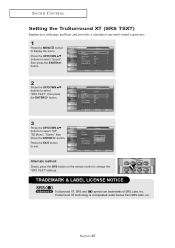
... & LABEL LICENSE NOTICE TruSurround XT, SRS and symbol are trademarks of SRS Labs, Inc. Alternate method: Simply press the SRS button on the remote control to display the menu. SOUND CONTROL Setting the TruSurround XT (SRS TSXT) Emphasizes midrange and bass and provides a simulated surround-sound experience. 1 Press the MENU button to change...
... & LABEL LICENSE NOTICE TruSurround XT, SRS and symbol are trademarks of SRS Labs, Inc. Alternate method: Simply press the SRS button on the remote control to display the menu. SOUND CONTROL Setting the TruSurround XT (SRS TSXT) Emphasizes midrange and bass and provides a simulated surround-sound experience. 1 Press the MENU button to change...

User Manual (ENGLISH)
Page 51
... SAP to listen to exit. Press the EXIT button to the Separate Audio Program, which is usually a foreign-language translation. SOUND CONTROL Choosing a Multi-Channel Sound (MTS) Soundtrack Depending on the remote control to change channels, MTS is usually a foreign-language translation. Press the UP/DOWN buttons to select "Sound", then press the...
... SAP to listen to exit. Press the EXIT button to the Separate Audio Program, which is usually a foreign-language translation. SOUND CONTROL Choosing a Multi-Channel Sound (MTS) Soundtrack Depending on the remote control to change channels, MTS is usually a foreign-language translation. Press the UP/DOWN buttons to select "Sound", then press the...

User Manual (ENGLISH)
Page 67
...". 5 Press ENTER button. English-62 The Change PIN screen will appear. Press the UP/DOWN buttons to exit. If you forget the PIN, press the remote-control buttons (with the unit "Off") in the following sequence, which resets the PIN to 0-0-0-0: POWER OFF ➔ MUTE ➔ 8 ➔ 2 ➔ 4 ➔ POWER ON. Re...
...". 5 Press ENTER button. English-62 The Change PIN screen will appear. Press the UP/DOWN buttons to exit. If you forget the PIN, press the remote-control buttons (with the unit "Off") in the following sequence, which resets the PIN to 0-0-0-0: POWER OFF ➔ MUTE ➔ 8 ➔ 2 ➔ 4 ➔ POWER ON. Re...
User Manual (ENGLISH)
Page 76
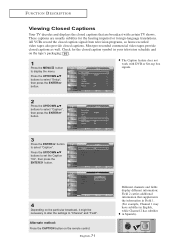
... Caption feature does not work with certain TV shows. Misspellings and unusual 3characters sometimes occur during PcrelossetdhecaEpNtiToEnRtransbmuitstsoinons, especially tothsoesleecot f"Cliavpetieovne"n. ENTER button. 4 Depending on the remote control. FUNCTION DESCRIPTION Viewing Closed Captions Your TV decodes and displays the closed captions that supplements the information in Field 1. (For example, Channel 1 may be necessary...
... Caption feature does not work with certain TV shows. Misspellings and unusual 3characters sometimes occur during PcrelossetdhecaEpNtiToEnRtransbmuitstsoinons, especially tothsoesleecot f"Cliavpetieovne"n. ENTER button. 4 Depending on the remote control. FUNCTION DESCRIPTION Viewing Closed Captions Your TV decodes and displays the closed captions that supplements the information in Field 1. (For example, Channel 1 may be necessary...
User Manual (ENGLISH)
Page 80
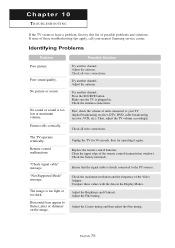
...adjust the Fine tuning. Check the battery terminals. If none of units connected to your nearest Samsung service center. Identifying Problems Problem Poor picture Poor sound quality. Remote control malfunctions "Check signal cable" message. Try another channel. Ensure that the signal cable is plugged... channel. First, check the volume of these values with the data in . Check the maximum resolution and the frequency of the remote control (transmission window). Check all wire connections. Chapter 10 TROUBLESHOOTING If the TV seems to have a problem, first try operating it ...
...adjust the Fine tuning. Check the battery terminals. If none of units connected to your nearest Samsung service center. Identifying Problems Problem Poor picture Poor sound quality. Remote control malfunctions "Check signal cable" message. Try another channel. Ensure that the signal cable is plugged... channel. First, check the volume of these values with the data in . Check the maximum resolution and the frequency of the remote control (transmission window). Check all wire connections. Chapter 10 TROUBLESHOOTING If the TV seems to have a problem, first try operating it ...
User Manual (ENGLISH)
Page 4
...Parts 1 Familiarizing Yourself with Your New TV 2 Buttons on the Lower-Right Part of the Panel 2 Rear Panel Jacks 3 Remote Control 4 Installing Batteries in the Remote Control 6 If the remote control doesn't work 6 Chapter 2: Connections Connecting VHF and UHF Antennas 7 Antennas with 300-ohm Flat Twin Leads 7 Antennas with...and Erasing Channels (Manual Method 26 To Select the Source 27 To Edit the Input Source Name 28 Chapter 4: Picture Control Using Automatic Picture Settings 29 Customizing the Picture 30 Adjusting the Color Tone 31 Changing the Screen Size 32 Zoom 33 Freezing...
...Parts 1 Familiarizing Yourself with Your New TV 2 Buttons on the Lower-Right Part of the Panel 2 Rear Panel Jacks 3 Remote Control 4 Installing Batteries in the Remote Control 6 If the remote control doesn't work 6 Chapter 2: Connections Connecting VHF and UHF Antennas 7 Antennas with 300-ohm Flat Twin Leads 7 Antennas with...and Erasing Channels (Manual Method 26 To Select the Source 27 To Edit the Input Source Name 28 Chapter 4: Picture Control Using Automatic Picture Settings 29 Customizing the Picture 30 Adjusting the Color Tone 31 Changing the Screen Size 32 Zoom 33 Freezing...
User Manual (ENGLISH)
Page 6
... to easily control Samsung audio-video (AV) devices from this TV. If any items are included with your LCD TV. My Color Control: Colors can be set to implement perfect digital sound and picture quality. - SRS TruSurround XT provides a virtual Dolby surround system. The Anynet system enables you to create optimum contrast. - Remote Control (BN59...
... to easily control Samsung audio-video (AV) devices from this TV. If any items are included with your LCD TV. My Color Control: Colors can be set to implement perfect digital sound and picture quality. - SRS TruSurround XT provides a virtual Dolby surround system. The Anynet system enables you to create optimum contrast. - Remote Control (BN59...
User Manual (ENGLISH)
Page 7
... Aim the remote control towards this spot on -screen menu. MENU Press to turn the TV on and lights up in stand-by detecting brightness of your choice on the on the model. Also used to select items on the on the TV. LN-R2668W - LN-R237W - LN-R327W Note: The ... brightness of the screen automatically by mode. LN-R268W - CH Press to decrease or increase the volume. This sensor works when the Brightness Sensor is on and off when the power is on -screen menu of the surrounding environment. To use the more advanced features, you must use the remote control. -
... Aim the remote control towards this spot on -screen menu. MENU Press to turn the TV on and lights up in stand-by detecting brightness of your choice on the on the model. Also used to select items on the on the TV. LN-R2668W - LN-R237W - LN-R327W Note: The ... brightness of the screen automatically by mode. LN-R268W - CH Press to decrease or increase the volume. This sensor works when the Brightness Sensor is on and off when the power is on -screen menu of the surrounding environment. To use the more advanced features, you must use the remote control. -

