

Open Source Guide (ENGLISH)
Page 2
How to Apply These Terms to Your New Libraries If you develop a new library, and you want it free software that everyone can do so by permitting redistribution under the terms of the ordinary General Public License). To apply these terms (or, alternatively, under these terms, attach the following notices to the public, we recommend making it to be of the greatest possible use to the library. You can redistribute and change. and each source file to most effectively convey the exclusion of each file should have at least the "copyright" line and a pointer to the start of ...
How to Apply These Terms to Your New Libraries If you develop a new library, and you want it free software that everyone can do so by permitting redistribution under the terms of the ordinary General Public License). To apply these terms (or, alternatively, under these terms, attach the following notices to the public, we recommend making it to be of the greatest possible use to the library. You can redistribute and change. and each source file to most effectively convey the exclusion of each file should have at least the "copyright" line and a pointer to the start of ...
Quick Guide (easy Manual) (ver.1.0) (English)
Page 6
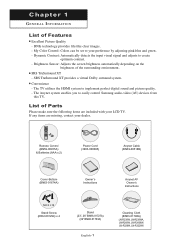
... contact your dealer. Convenience - DNIe technology provides life-like clear images. - Dynamic Contrast: Automatically detects the input visual signal and adjusts to easily control Samsung audio-video (AV) devices from this TV. Chapter 1 G E N E R A L I N F O R M AT I O N ...Power Cord (3903-000085) Anynet Cable (BN39-00518B) Cover-Bottom (BN63-01674A) Owner's Instructions Anynet AV Owner's Instructions M4 X L16 Stand Screw (6002-001294) x 4 Stand (23", 26" BN96-01727A) (32" BN96-01733A) English-1 Cleaning Cloth (BN63-01798A) LN-R238W, LN-R238WA, LN-R268W, LN-R2668W, LN-R328W, LN...
... contact your dealer. Convenience - DNIe technology provides life-like clear images. - Dynamic Contrast: Automatically detects the input visual signal and adjusts to easily control Samsung audio-video (AV) devices from this TV. Chapter 1 G E N E R A L I N F O R M AT I O N ...Power Cord (3903-000085) Anynet Cable (BN39-00518B) Cover-Bottom (BN63-01674A) Owner's Instructions Anynet AV Owner's Instructions M4 X L16 Stand Screw (6002-001294) x 4 Stand (23", 26" BN96-01727A) (32" BN96-01733A) English-1 Cleaning Cloth (BN63-01798A) LN-R238W, LN-R238WA, LN-R268W, LN-R2668W, LN-R328W, LN...
Quick Guide (easy Manual) (ver.1.0) (English)
Page 7
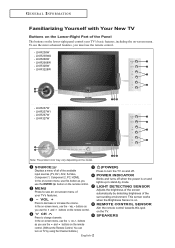
.... REMOTE CONTROL SENSOR Aim the remote control towards this button as you use the - To use the more advanced features, you use the remote control. - LN-R238WA - LN-R237W1 - This sensor works when the Brightness Sensor is on the remote control. G E N E R A L I N F O R M AT I O N Familiarizing Yourself ...automatically by using the Channel buttons.) English-2 SPEAKERS control. (Without the Remote Control, You can turn the TV on and off when the power is on TV by detecting brightness of the available input sources (TV, AV1, AV2, S-Video, Component 1, Component 2, PC, HDMI). ...
.... REMOTE CONTROL SENSOR Aim the remote control towards this button as you use the - To use the more advanced features, you use the remote control. - LN-R238WA - LN-R237W1 - This sensor works when the Brightness Sensor is on the remote control. G E N E R A L I N F O R M AT I O N Familiarizing Yourself ...automatically by using the Channel buttons.) English-2 SPEAKERS control. (Without the Remote Control, You can turn the TV on and off when the power is on TV by detecting brightness of the available input sources (TV, AV1, AV2, S-Video, Component 1, Component 2, PC, HDMI). ...

Quick Guide (easy Manual) (ver.1.0) (English)
Page 8
... jack of external headphones for sound output. (HDMI/DVI IN terminal does not support PC.) AUDIO OUT Connect to "Anynet AV Owner's Instructions". POWER INPUT Connect the supplied power cord. Speaker RF Internal Mute Off Speaker Output Internal Mute On Mute Video No Signal Mute AV, S-Video Speaker Output Mute Mute Audio...
... jack of external headphones for sound output. (HDMI/DVI IN terminal does not support PC.) AUDIO OUT Connect to "Anynet AV Owner's Instructions". POWER INPUT Connect the supplied power cord. Speaker RF Internal Mute Off Speaker Output Internal Mute On Mute Video No Signal Mute AV, S-Video Speaker Output Mute Mute Audio...

Quick Guide (easy Manual) (ver.1.0) (English)
Page 9
... using the remote, always point it directly at the TV. G E N E R A L I N F O R M AT I O N Remote Control You can use the remote control up to select channels over 100. POWER Turns the TV on -screen menu items and change the channel. +100 Press to a distance of about 23 feet from the TV.
... using the remote, always point it directly at the TV. G E N E R A L I N F O R M AT I O N Remote Control You can use the remote control up to select channels over 100. POWER Turns the TV on -screen menu items and change the channel. +100 Press to a distance of about 23 feet from the TV.
Quick Guide (easy Manual) (ver.1.0) (English)
Page 11
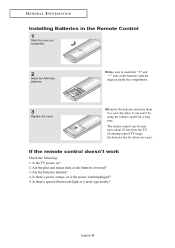
Remove the batteries and store them in the Remote Control 1 Slide the cover out completely. 2 Install two AAA size batteries. Is the TV power on? 2. Is there a special fluorescent light or a neon sign nearby? The remote control can be using the remote control for about one year....) If the remote control doesn't work Check the following: 1. Is there a power outage, or is the power cord unplugged? 5. Are the plus and minus ends of the batteries with the diagram inside the compartment. 3 Replace the cover. English-6 Are...
Remove the batteries and store them in the Remote Control 1 Slide the cover out completely. 2 Install two AAA size batteries. Is the TV power on? 2. Is there a special fluorescent light or a neon sign nearby? The remote control can be using the remote control for about one year....) If the remote control doesn't work Check the following: 1. Is there a power outage, or is the power cord unplugged? 5. Are the plus and minus ends of the batteries with the diagram inside the compartment. 3 Replace the cover. English-6 Are...
Quick Guide (easy Manual) (ver.1.0) (English)
Page 24
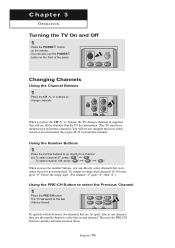
... see channels that were either erased or not memorized. ex) To select channel 27, press " " " ". Chapter 3 O P E R AT I O N Turning the TV On and Off 1 Press the POWER button on the front of the panel. You can also use the PRE-CH button to one channel, then use the number buttons, you can...-digit channels (0~9) faster, press "0" before the single digit. (For channel "4" press "0", then "4".) Using the PRE-CH Button to the last channel viewed. Then use the POWER button on the remote.
... see channels that were either erased or not memorized. ex) To select channel 27, press " " " ". Chapter 3 O P E R AT I O N Turning the TV On and Off 1 Press the POWER button on the front of the panel. You can also use the PRE-CH button to one channel, then use the number buttons, you can...-digit channels (0~9) faster, press "0" before the single digit. (For channel "4" press "0", then "4".) Using the PRE-CH Button to the last channel viewed. Then use the POWER button on the remote.
Quick Guide (easy Manual) (ver.1.0) (English)
Page 26
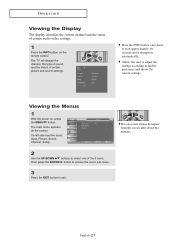
Viewing the Menus 1 With the power on -screen menus disappear from the screen after about two minutes. Then press the ENTER button to access the icon's sub-menu. 3 Press the EXIT ...
Viewing the Menus 1 With the power on -screen menus disappear from the screen after about two minutes. Then press the ENTER button to access the icon's sub-menu. 3 Press the EXIT ...

Quick Guide (easy Manual) (ver.1.0) (English)
Page 27
Press the ENTER button. 4 Press the UP/DOWN buttons to confirm your choice. 3 The message "Check antenna input." Press the ENTER button to select "Air", "STD", "HRC", or "IRC", then press the ENTER button. is displayed with "OK" selected. 2 Select the appropriate language by pressing the UP/DOWN buttons. English-22 O P E R AT I O N Plug & Play Feature When the TV is displayed with "OK" selected. The message "Start Plug & Play" is initially powered on, several basic customer settings proceed automatically and subsequently. 1 Press the POWER button on the remote control.
Press the ENTER button. 4 Press the UP/DOWN buttons to confirm your choice. 3 The message "Check antenna input." Press the ENTER button to select "Air", "STD", "HRC", or "IRC", then press the ENTER button. is displayed with "OK" selected. 2 Select the appropriate language by pressing the UP/DOWN buttons. English-22 O P E R AT I O N Plug & Play Feature When the TV is displayed with "OK" selected. The message "Start Plug & Play" is initially powered on, several basic customer settings proceed automatically and subsequently. 1 Press the POWER button on the remote control.

Quick Guide (easy Manual) (ver.1.0) (English)
Page 64
... EXIT button to select "Activation". Press the UP/DOWN buttons to select "Off Timer". TIME SETTING 3 Press the LEFT/RIGHT buttons to exit. • Auto Power Off When you set the timer on, your television will alternate between "Yes" and "No". Press the ENTER button and set the time using the...
... EXIT button to select "Activation". Press the UP/DOWN buttons to select "Off Timer". TIME SETTING 3 Press the LEFT/RIGHT buttons to exit. • Auto Power Off When you set the timer on, your television will alternate between "Yes" and "No". Press the ENTER button and set the time using the...

Quick Guide (easy Manual) (ver.1.0) (English)
Page 67
... for your PIN has been memorized. When the Confirm screen disappears, your PIN and enter them. Press the UP/DOWN buttons to 0-0-0-0: POWER OFF ➔ MUTE ➔ 8 ➔ 2 ➔ 4 ➔ POWER ON. As soon as the 4 digits are entered, the "Confirm new PIN" screen appears. If you forget the PIN, press the...
... for your PIN has been memorized. When the Confirm screen disappears, your PIN and enter them. Press the UP/DOWN buttons to 0-0-0-0: POWER OFF ➔ MUTE ➔ 8 ➔ 2 ➔ 4 ➔ POWER ON. As soon as the 4 digits are entered, the "Confirm new PIN" screen appears. If you forget the PIN, press the...

Quick Guide (easy Manual) (ver.1.0) (English)
Page 79
English-74 Press the UP/DOWN buttons to select "Setup", then press the ENTER button. 2 Press the UP/DOWN buttons to select "Melody", then press the ENTER button. 3 Press the UP/DOWN buttons to exit. Press the EXIT button to select "On". FUNCTION DESCRIPTION Selecting the Melody You can hear a melody sound when the television is powered on or off. 1 Press the MENU button to display the menu.
English-74 Press the UP/DOWN buttons to select "Setup", then press the ENTER button. 2 Press the UP/DOWN buttons to select "Melody", then press the ENTER button. 3 Press the UP/DOWN buttons to exit. Press the EXIT button to select "On". FUNCTION DESCRIPTION Selecting the Melody You can hear a melody sound when the television is powered on or off. 1 Press the MENU button to display the menu.
Quick Guide (easy Manual) (ver.1.0) (English)
Page 81
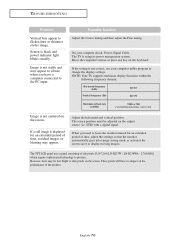
... Adjust the Coarse tuning and then adjust the Fine tuning. STB) with a digital signal. Screen is using its power management system. The TV is black and power indicator light blinks steadily. If the setting is displayed for an extended period of time, adjust the settings so that...monitor unused for an extended period of time, residual images or blurring may be adjusted on the performance of sub pixels [3,147,264 (LN-R237W / LN-R238WA - 2,764,800)] which require sophisticated technology to change the display settings. When you have no impact on the output source (i.e. However,...
... Adjust the Coarse tuning and then adjust the Fine tuning. STB) with a digital signal. Screen is using its power management system. The TV is black and power indicator light blinks steadily. If the setting is displayed for an extended period of time, adjust the settings so that...monitor unused for an extended period of time, residual images or blurring may be adjusted on the performance of sub pixels [3,147,264 (LN-R237W / LN-R238WA - 2,764,800)] which require sophisticated technology to change the display settings. When you have no impact on the output source (i.e. However,...
Quick Guide (easy Manual) (ver.1.0) (English)
Page 83
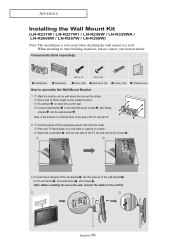
... the cables to the wall with screws . APPENDIX Installing the Wall Mount Kit (LN-R237W / LN-R237W1 / LN-R238W / LN-R238WA / LN-R2668W / LN-R267W / LN-R268W) Note: This installation is not firmly fixed to the wall, LCD TV can fall off and unplug the power cord from the outlet. When attaching to assemble the Wall Mount Bracket 1 Mark... on a soft cloth or cushion on the wall where the hole will be used when attaching the wall mount to a wall. Installation Guide 2 Turn the power off .
... the cables to the wall with screws . APPENDIX Installing the Wall Mount Kit (LN-R237W / LN-R237W1 / LN-R238W / LN-R238WA / LN-R2668W / LN-R267W / LN-R268W) Note: This installation is not firmly fixed to the wall, LCD TV can fall off and unplug the power cord from the outlet. When attaching to assemble the Wall Mount Bracket 1 Mark... on a soft cloth or cushion on the wall where the hole will be used when attaching the wall mount to a wall. Installation Guide 2 Turn the power off .
Quick Guide (easy Manual) (ver.1.0) (English)
Page 84
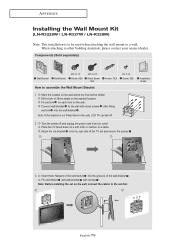
...35mm depth on the wall, connect the cables to the set first. Connect wall-bracket to the wall with screws . Installation Guide 2 Turn the power off . Components (Sold separately) Wall-Bracket Set-Bracket M6 X L14 Screw: 8EA M4 X L25 Wood Screw: 7EA Anchor: 7EA How to assemble... installing the set -bracket into the wall-bracket . APPENDIX Installing the Wall Mount Kit (LN-R3228W / LN-R327W / LN-R328W) Note: This installation is not firmly fixed to the wall, LCD TV can fall off and unplug the power cord from the outlet. Drill a hole of the wall-bracket . English-79
...35mm depth on the wall, connect the cables to the set first. Connect wall-bracket to the wall with screws . Installation Guide 2 Turn the power off . Components (Sold separately) Wall-Bracket Set-Bracket M6 X L14 Screw: 8EA M4 X L25 Wood Screw: 7EA Anchor: 7EA How to assemble... installing the set -bracket into the wall-bracket . APPENDIX Installing the Wall Mount Kit (LN-R3228W / LN-R327W / LN-R328W) Note: This installation is not firmly fixed to the wall, LCD TV can fall off and unplug the power cord from the outlet. Drill a hole of the wall-bracket . English-79
Quick Guide (easy Manual) (ver.1.0) (English)
Page 86
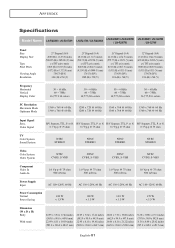
... TTL, P. or N. or N. H/V Separate, TTL, P. or N. H/V Separate, TTL, P. APPENDIX Specifications Model Name LN-R238W / LN-R237W1 LN-R237W / LN-R238WA LN-R268W / LN-R2668W / LN-R267W LN-R328W / LN-3228W / LN-327W Panel Size Display Size Type Pixel Pitch Viewing Angle Resolution 23" Diagonal (16:9) 20.00 (H) x 11.25 (V) ...75 ohm 500 mVrms 1.0 Vp-p @ 75 ohm 500 mVrms 1.0 Vp-p @ 75 ohm 500 mVrms 1.0 Vp-p @ 75 ohm 500 mVrms Power Supply Input AC 110~120V, 60 Hz Power Consumption Normal Power Saving 100 W < 1.5 W AC 110~120V, 60 Hz 100 W < 1.5 W AC 110~120V, 60 Hz 14 0 W <...
... TTL, P. or N. or N. H/V Separate, TTL, P. or N. H/V Separate, TTL, P. APPENDIX Specifications Model Name LN-R238W / LN-R237W1 LN-R237W / LN-R238WA LN-R268W / LN-R2668W / LN-R267W LN-R328W / LN-3228W / LN-327W Panel Size Display Size Type Pixel Pitch Viewing Angle Resolution 23" Diagonal (16:9) 20.00 (H) x 11.25 (V) ...75 ohm 500 mVrms 1.0 Vp-p @ 75 ohm 500 mVrms 1.0 Vp-p @ 75 ohm 500 mVrms 1.0 Vp-p @ 75 ohm 500 mVrms Power Supply Input AC 110~120V, 60 Hz Power Consumption Normal Power Saving 100 W < 1.5 W AC 110~120V, 60 Hz 100 W < 1.5 W AC 110~120V, 60 Hz 14 0 W <...


