Lnr238wa No Power - Samsung LN R238WA
Lnr238wa No Power

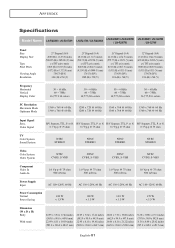
Related Manual Pages


Similar Questions

Tv Power Board Problem - 2nd Time
1. LN40A550 TV has power board symtoms again. Had TV fixed for power board replacemnt via repair sho...
1. LN40A550 TV has power board symtoms again. Had TV fixed for power board replacemnt via repair sho...
(Posted by kmackey 12 years ago)

T.v. Power Switch
I've had my television for just over 2 years. Recently, when we turn on the Power button (from remot...
I've had my television for just over 2 years. Recently, when we turn on the Power button (from remot...
(Posted by cwalter1820 12 years ago)

Won't Power On
The TV does not power on. It does couple of clicking sounds and does not turn on. The standby light ...
The TV does not power on. It does couple of clicking sounds and does not turn on. The standby light ...
(Posted by swt1221 12 years ago)