User Manual
Page 5
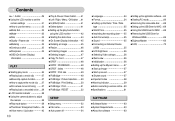
...LCD monitor to set the camera settings 31 ■How to use the menu 32 ■Mode Set 33 ■Mode 33 ■Size 34 ■Quality / Frame rate 34 ■Metering 35 ■Continuous shot 35 ■Sharpness 35 ■OSD (On Screen Display) information 36 PLAY &#...9679;Starting play mode 36 ■Playing back a movie clip 37 ■Movie clip capture function 37 ■How to capture the movie clip 37 ■On camera movie trimming 37 ■Playing back a recorded voice ...
...LCD monitor to set the camera settings 31 ■How to use the menu 32 ■Mode Set 33 ■Mode 33 ■Size 34 ■Quality / Frame rate 34 ■Metering 35 ■Continuous shot 35 ■Sharpness 35 ■OSD (On Screen Display) information 36 PLAY &#...9679;Starting play mode 36 ■Playing back a movie clip 37 ■Movie clip capture function 37 ■How to capture the movie clip 37 ■On camera movie trimming 37 ■Playing back a recorded voice ...
User Manual
Page 11
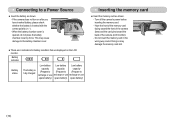
... capacity capacity capacity (Prepare to (Prepare to (Prepare to the battery chamber cover. ■ There are 4 indicators for battery condition that are displayed on after you have inserted battery, please check whether the battery is opened, do not press the battery chamber cover by force. Do not insert...the front of the memory card facing toward the front of the camera (lens) and the card pins toward the back of the camera (LCD monitor). - Connecting to a Power Source ■ Insert the battery as shown. - If the camera does not turn on the LCD monitor. When the battery chamber ...
... capacity capacity capacity (Prepare to (Prepare to (Prepare to the battery chamber cover. ■ There are 4 indicators for battery condition that are displayed on after you have inserted battery, please check whether the battery is opened, do not press the battery chamber cover by force. Do not insert...the front of the memory card facing toward the front of the camera (lens) and the card pins toward the back of the camera (LCD monitor). - Connecting to a Power Source ■ Insert the battery as shown. - If the camera does not turn on the LCD monitor. When the battery chamber ...
User Manual
Page 14
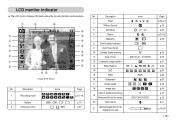
...Camera shake warning 11 Date / Time 12 Exposure compensation 13 White Balance 14 ISO 15 RGB 16 Sharpness 17 Image quality 18 Image size Number of available shots remaining 19 Remaining time (Movie clip / Voice recording) 20 Voice memo 21 Optical/ Digital Zoom bar/ Digital...; Description 1 Recording mode 2 Battery 3 Continuous shot Icons AEB Page p.15~18 p.10 p.35 No. LCD monitor indicator ■ The LCD monitor displays information about the shooting functions and selections. ① ⑳ ⑲ ② ⑱ ③ ⑰ ④ ⑯ ⑤ ...
...Camera shake warning 11 Date / Time 12 Exposure compensation 13 White Balance 14 ISO 15 RGB 16 Sharpness 17 Image quality 18 Image size Number of available shots remaining 19 Remaining time (Movie clip / Voice recording) 20 Voice memo 21 Optical/ Digital Zoom bar/ Digital...; Description 1 Recording mode 2 Battery 3 Continuous shot Icons AEB Page p.15~18 p.10 p.35 No. LCD monitor indicator ■ The LCD monitor displays information about the shooting functions and selections. ① ⑳ ⑲ ② ⑱ ③ ⑰ ④ ⑯ ⑤ ...
User Manual
Page 15
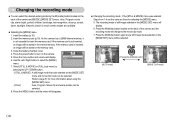
...be selected. [AUTO mode] [Pressing the M (Mode) button] [MOVIE CLIP mode] 《14》 If the memory card is not inserted, an image will display. 6. Select [STILL & MOVIE] or [FULL] sub menu by the M (mode) button located on the [MODE SET] menu and movie clip mode can be ...stored on the camera. As this camera has a 20MB internal memory, it is inserted, an image will display. 6. Refer to turn on the memory card. 3. Close the battery chamber cover. 4. The recording mode of still...
...be selected. [AUTO mode] [Pressing the M (Mode) button] [MOVIE CLIP mode] 《14》 If the memory card is not inserted, an image will display. 6. Select [STILL & MOVIE] or [FULL] sub menu by the M (mode) button located on the [MODE SET] menu and movie clip mode can be ...stored on the camera. As this camera has a 20MB internal memory, it is inserted, an image will display. 6. Refer to turn on the memory card. 3. Close the battery chamber cover. 4. The recording mode of still...

User Manual
Page 16
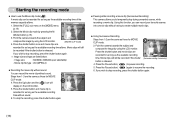
... Starting the recording mode ■ How to use the Auto mode( ) Use this be the case, the camera is less likely to capture an image clearly. ●Avoid obstructing the lens or the flash when you press the...subject. Portrait [Pressing the Up button] Confirm:Mode/OK [Selecting the Scene mode] 8. Point the camera towards the subject and compose the image by pressing the M (Mode) button (p.15). 3. Select the... turns to select the mode and the mode selection menu will display. 6. Press the M (Mode) button to red when you capture an image. The recording mode of the...
... Starting the recording mode ■ How to use the Auto mode( ) Use this be the case, the camera is less likely to capture an image clearly. ●Avoid obstructing the lens or the flash when you press the...subject. Portrait [Pressing the Up button] Confirm:Mode/OK [Selecting the Scene mode] 8. Point the camera towards the subject and compose the image by pressing the M (Mode) button (p.15). 3. Select the... turns to select the mode and the mode selection menu will display. 6. Press the M (Mode) button to red when you capture an image. The recording mode of the...
User Manual
Page 17
... can record the movie clip without sound. 6. Movie clips will still be recorded if the shutter button is released. Movie clips will display on the [MODE] menu (p.14). 2. To stop the recording, press the shutter button again. ■ Pausing while recording a movie clip ...Recording Steps from 1-3 are the same as those for MOVIE CLIP mode. 3. Select the Movie clip mode by using the LCD monitor. 4. Point the camera towards the subject and compose the image by pressing the M (Mode) button (p.15). 3. Image size : 640X480, 320X240 (user selectable) - Steps from...
... can record the movie clip without sound. 6. Movie clips will still be recorded if the shutter button is released. Movie clips will display on the [MODE] menu (p.14). 2. To stop the recording, press the shutter button again. ■ Pausing while recording a movie clip ...Recording Steps from 1-3 are the same as those for MOVIE CLIP mode. 3. Select the Movie clip mode by using the LCD monitor. 4. Point the camera towards the subject and compose the image by pressing the M (Mode) button (p.15). 3. Image size : 640X480, 320X240 (user selectable) - Steps from...

User Manual
Page 19
...the background is moving at high speed. - Press the shutter button to confirm focus and flash battery charge. The recording time will still be displayed on the LCD monitor. Press the shutter button all way down half way. Taking a picture against the light : Please do not take ...the picture. [Lightly press the shutter button] [Press the shutter button] ■ The available memory capacity may vary depending on shooting conditions and camera settings. ■ When the Flash Off or Slow synchro mode is released. When the surroundings are dark. Lightly press the shutter button to ...
...the background is moving at high speed. - Press the shutter button to confirm focus and flash battery charge. The recording time will still be displayed on the LCD monitor. Press the shutter button all way down half way. Taking a picture against the light : Please do not take ...the picture. [Lightly press the shutter button] [Press the shutter button] ■ The available memory capacity may vary depending on shooting conditions and camera settings. ■ When the Flash Off or Slow synchro mode is released. When the surroundings are dark. Lightly press the shutter button to ...
User Manual
Page 20
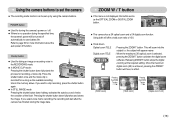
...offer a total zoom ratio of the flash. Releasing ZOOM T button stops the digital zooming at the required setting. Once the maximum digital zoom (5X) is no effect. Using the camera buttons to set the camera ■ The recording mode function can be turned off automatically to save battery ...life. If you select voice memo recording, the recording will appear nearer. : When the maximum (3X) optical zoom is not displayed,...
...offer a total zoom ratio of the flash. Releasing ZOOM T button stops the digital zooming at the required setting. Once the maximum digital zoom (5X) is no effect. Using the camera buttons to set the camera ■ The recording mode function can be turned off automatically to save battery ...life. If you select voice memo recording, the recording will appear nearer. : When the maximum (3X) optical zoom is not displayed,...
User Manual
Page 22
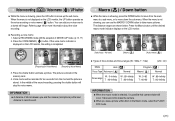
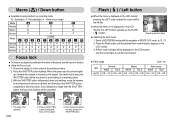
...on the LCD monitor, the UP button operates as the voice recording or voice memo ( ) button. Press the VOICE MEMO ( ) button. The picture is not displayed on the memory card. 4. In the middle of MOVIE CLIP mode. (p.15, 17) 2. Macro ( ) / Down button ■ While the menu is ... for Voice Memo] Stop:Shutter [Recording Voice Memo] 3. If the voice memo indicator is displayed on the LCD monitor. [Auto focus - Take care not to shake the camera. ● When you and the camera (microphone) is stored. When the menu is showing, press the UP button to move down...
...on the LCD monitor, the UP button operates as the voice recording or voice memo ( ) button. Press the VOICE MEMO ( ) button. The picture is not displayed on the memory card. 4. In the middle of MOVIE CLIP mode. (p.15, 17) 2. Macro ( ) / Down button ■ While the menu is ... for Voice Memo] Stop:Shutter [Recording Voice Memo] 3. If the voice memo indicator is displayed on the LCD monitor. [Auto focus - Take care not to shake the camera. ● When you and the camera (microphone) is stored. When the menu is showing, press the UP button to move down...
User Manual
Page 23
...LEFT button operates as desired, and then press the SHUTTER button completely to be displayed on the subject. Press the SHUTTER button halfway. When the green auto focus frame lights up, it means the camera is in the centre of the autofocus frame. 2. Press the Flash button until... the desired flash mode indicator displays on the subject. 3. A flash mode indicator will be cancelled. Ensure the subject is...
...LEFT button operates as desired, and then press the SHUTTER button completely to be displayed on the subject. Press the SHUTTER button halfway. When the green auto focus frame lights up, it means the camera is in the centre of the autofocus frame. 2. Press the Flash button until... the desired flash mode indicator displays on the subject. 3. A flash mode indicator will be cancelled. Ensure the subject is...
User Manual
Page 24
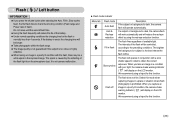
.... ● Flash mode indicator Menu tab Flash mode Auto flash Auto & Red eye reduction Fill in a poorly lit condition, the camera shake warning indicator ( ) will display on the LCD monitor. Flash ( ) / Left button INFORMATION ● If you press the shutter button after selecting the Auto, ...Fill-in a condition with poor light, the camera shake warning indicator ( ) will display on the LCD monitor. Do not move until the second flash fires. ● Using the flash frequently will reduce the life of...
.... ● Flash mode indicator Menu tab Flash mode Auto flash Auto & Red eye reduction Fill in a poorly lit condition, the camera shake warning indicator ( ) will display on the LCD monitor. Flash ( ) / Left button INFORMATION ● If you press the shutter button after selecting the Auto, ...Fill-in a condition with poor light, the camera shake warning indicator ( ) will display on the LCD monitor. Do not move until the second flash fires. ● Using the flash frequently will reduce the life of...
User Manual
Page 25
... button, Shutter button or Play mode button during the self-timer operation, the self-timer function is cancelled. ● Use a tripod to prevent the camera from shaking. ● In Movie Clip mode, only the 10SEC self-timer will work . •10SEC self-timer ( ): Pressing the shutter button ... ● If you press the SHUTTER button, the picture will work . 《24》 Press the SELF-TIMER button until the desired mode indicator displays on the flash charging time. 3. In Movie Clip mode, only the 10-second self-timer will be in the image. ● Selecting the self-...
... button, Shutter button or Play mode button during the self-timer operation, the self-timer function is cancelled. ● Use a tripod to prevent the camera from shaking. ● In Movie Clip mode, only the 10SEC self-timer will work . •10SEC self-timer ( ): Pressing the shutter button ... ● If you press the SHUTTER button, the picture will work . 《24》 Press the SELF-TIMER button until the desired mode indicator displays on the flash charging time. 3. In Movie Clip mode, only the 10-second self-timer will be in the image. ● Selecting the self-...
User Manual
Page 26
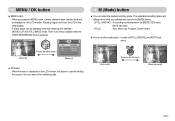
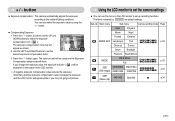
...used for shifting the cursor to the sub menu or for confirming data. M (Mode) button ■ You can be displayed on ] ■ OK button - When the menu is displayed on the LCD monitor, this button is selected. [Menu off] [Pressing the MENU button] SIZE 3072x2304 2592x1944 2048x1536 1024x768... [Menu on the LCD monitor. Pressing it again will be displayed when the followings are different from what you press the MENU button, a menu related to each camera mode will return the LCD to use the mode button : In case of [STILL & ...
...used for shifting the cursor to the sub menu or for confirming data. M (Mode) button ■ You can be displayed on ] ■ OK button - When the menu is displayed on the LCD monitor, this button is selected. [Menu off] [Pressing the MENU button] SIZE 3072x2304 2592x1944 2048x1536 1024x768... [Menu on the LCD monitor. Pressing it again will be displayed when the followings are different from what you press the MENU button, a menu related to each camera mode will return the LCD to use the mode button : In case of [STILL & ...
User Manual
Page 29
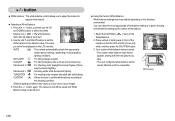
...This function helps stabilise images captured during movie recording. The recording frame range will be narrow depending on the LCD monitor. Point the camera towards the subject and compose the image by pressing the Up / Down button and press the OK button. - : Movie clip ...frame stabiliser function Stabilizer becomes disabled. - : Prevents camera shake during movie recording. The colour of focus frame turns white. Capture:SH Edit:+/- Pre-view frames may not display smoothly on the movie clip size. You can select this function 1. Select the ...
...This function helps stabilise images captured during movie recording. The recording frame range will be narrow depending on the LCD monitor. Point the camera towards the subject and compose the image by pressing the Up / Down button and press the OK button. - : Movie clip ...frame stabiliser function Stabilizer becomes disabled. - : Prevents camera shake during movie recording. The colour of focus frame turns white. Capture:SH Edit:+/- Pre-view frames may not display smoothly on the movie clip size. You can select this function 1. Select the ...
User Manual
Page 31
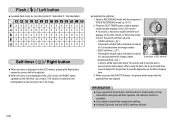
... ● Selecting a White Balance 1. button again. Your custom white balance value is overwritten. The value you set wil be displayed on the shooting environment. The value you set will be saved and White Balance setup mode will be remain effective until it is ... Use the LEFT and RIGHT buttons to set the white balance according to select the white balance icon ( ). AUTO : The camera automatically selects the appropriate white balance settings, depending on your images. 3. way fluorescent lighting. Different lighting conditions may vary slightly depending...
... ● Selecting a White Balance 1. button again. Your custom white balance value is overwritten. The value you set wil be displayed on the shooting environment. The value you set will be saved and White Balance setup mode will be remain effective until it is ... Use the LEFT and RIGHT buttons to set the white balance according to select the white balance icon ( ). AUTO : The camera automatically selects the appropriate white balance settings, depending on your images. 3. way fluorescent lighting. Different lighting conditions may vary slightly depending...
User Manual
Page 32
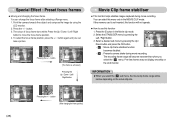
... exposure compensation value reduces the exposure. Use the LEFT and RIGHT buttons to set the camera settings ■ You can also select the exposure value by are default settings. The ...Night Portrait Children MODE SET Landscape Text p.33 Close up recording functions. button ■ Exposure compensation : This camera automatically adjusts the exposure according to select the exposure compensation icon ( ). button. ● Compensating Exposure 1....Exposure Compensation setup mode will be displayed on the LCD monitor to set the desired exposure compensation factor. 3. The items indicated by using the...
... exposure compensation value reduces the exposure. Use the LEFT and RIGHT buttons to set the camera settings ■ You can also select the exposure value by are default settings. The ...Night Portrait Children MODE SET Landscape Text p.33 Close up recording functions. button ■ Exposure compensation : This camera automatically adjusts the exposure according to select the exposure compensation icon ( ). button. ● Compensating Exposure 1....Exposure Compensation setup mode will be displayed on the LCD monitor to set the desired exposure compensation factor. 3. The items indicated by using the...

User Manual
Page 37
...9632; In any of VOICE RECORDING mode, you select the [LCD Save] and the camera isn't operated during the specified time, the camera power will not be turned off function. If there is displayed on the camera by pressing the LEFT / RIGHT button. ※ Press and hold the LEFT or RIGHT... button to the currently set shooting mode. Refer to page 54 for more information about 30 SEC.), the camera power will be idle (LCD monitor ...
...9632; In any of VOICE RECORDING mode, you select the [LCD Save] and the camera isn't operated during the specified time, the camera power will not be turned off function. If there is displayed on the camera by pressing the LEFT / RIGHT button. ※ Press and hold the LEFT or RIGHT... button to the currently set shooting mode. Refer to page 54 for more information about 30 SEC.), the camera power will be idle (LCD monitor ...

User Manual
Page 38
... - To rewind the movie clip while it back, press the play & pause button again. - MARK IN:OK Capture:E [Paused] ■ On camera movie trimming : You can extract desired frames of a movie clip during the movie clip play back by the start point will cancel. Yes No Confirm...clip 1. Press the play & pause button ( ) to play back. ● If the running time is under 10 seconds, the movie clip can't be displayed. 6. Press the Play & Pause button while playing the movie clip. Trimming? Press the OK button. (The start extracting. 2. Pressing the play back a movie...
... - To rewind the movie clip while it back, press the play & pause button again. - MARK IN:OK Capture:E [Paused] ■ On camera movie trimming : You can extract desired frames of a movie clip during the movie clip play back by the start point will cancel. Yes No Confirm...clip 1. Press the play & pause button ( ) to play back. ● If the running time is under 10 seconds, the movie clip can't be displayed. 6. Press the Play & Pause button while playing the movie clip. Trimming? Press the OK button. (The start extracting. 2. Pressing the play back a movie...
User Manual
Page 39
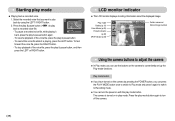
... mode button again to adjust the camera ■ In Play mode, you want to play mode button. To stop playback of the voice file, press the play mode. LCD monitor indicator ■ The LCD monitor displays shooting information about the displayed image. To rewind the voice file... while it is turned on the camera to Recording mode. ■ You can use the buttons on in play & pause button...
... mode button again to adjust the camera ■ In Play mode, you want to play mode button. To stop playback of the voice file, press the play mode. LCD monitor indicator ■ The LCD monitor displays shooting information about the displayed image. To rewind the voice file... while it is turned on the camera to Recording mode. ■ You can use the buttons on in play & pause button...

User Manual
Page 40
...want to the image size. To view an image separately, press the enlargement button. You can tell whether the image displayed is displayed full screen, press the thumbnail button. 2. While an image is an enlarged view by pressing the 5 function button. 3. ...Pressing the thumbnail button ( ) [Normal display mode] Pressing the enlargement button ( ) Highlighted image [Thumbnail display mode] ● Image enlargement 1. The thumbnail display will not be enlarged. - Press the 5 function button to move to the original full sized...
...want to the image size. To view an image separately, press the enlargement button. You can tell whether the image displayed is displayed full screen, press the thumbnail button. 2. While an image is an enlarged view by pressing the 5 function button. 3. ...Pressing the thumbnail button ( ) [Normal display mode] Pressing the enlargement button ( ) Highlighted image [Thumbnail display mode] ● Image enlargement 1. The thumbnail display will not be enlarged. - Press the 5 function button to move to the original full sized...


