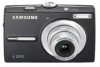

User Manual
Page 2
... PC's USB port and the camera's USB connection terminal. (p.84) Check the camera's power Check the camera's power. When transferring the images taken with the camera to using this camera in the following order. K All brand and product names appearing in the United States and/or other countries. for buying a Samsung Digital Camera. Instructions Use this camera, please read the user...
... PC's USB port and the camera's USB connection terminal. (p.84) Check the camera's power Check the camera's power. When transferring the images taken with the camera to using this camera in the following order. K All brand and product names appearing in the United States and/or other countries. for buying a Samsung Digital Camera. Instructions Use this camera, please read the user...
User Manual
Page 3
... death or serious injury. Always use the camera and its accessories in fire, injury, electric shock or severe damage to use it time to modify this camera in temperature. To do not use the flash in close to your dealer or Samsung Camera Service centre. x Please do ...so may adversely affect the camera's internal components and could increase the risk ...
... death or serious injury. Always use the camera and its accessories in fire, injury, electric shock or severe damage to use it time to modify this camera in temperature. To do not use the flash in close to your dealer or Samsung Camera Service centre. x Please do ...so may adversely affect the camera's internal components and could increase the risk ...

User Manual
Page 4
...not short circuit, heat or dispose of a PC. x Do not fire the flash while it is switched on how to use the memory card When Using the Camera for the First Time Setting up the Language Setting up the date, time and date type RECORDING 19 20 20 20 21 21... sure that any connector cords or cables to USB port of battery in a minor or moderate injury. x Remove the battery when not planning to use the camera for the camera. - Otherwise the battery may result in fire. - Avoid leaving magnetic strip cards near case. x Leaking, overheating, or damaged battery could result ...
...not short circuit, heat or dispose of a PC. x Do not fire the flash while it is switched on how to use the memory card When Using the Camera for the First Time Setting up the Language Setting up the date, time and date type RECORDING 19 20 20 20 21 21... sure that any connector cords or cables to USB port of battery in a minor or moderate injury. x Remove the battery when not planning to use the camera for the camera. - Otherwise the battery may result in fire. - Avoid leaving magnetic strip cards near case. x Leaking, overheating, or damaged battery could result ...

User Manual
Page 5
...without sound 24 Pausing while recording a movie (Successive Recording) 25 Things to Watch Out for When Taking Pictures 26 Setting up the recording function using the camera buttons 26 POWER button 26 SHUTTER button 26 ZOOM W / T button 28 Function Description / Info / Up button 28 Macro / Down ... still image 50 Playing back a movie 51 Movie capture function 51 On camera movie trimming 52 Playing back a recorded voice 52 Playing back a voice memo 53 LCD monitor Indicator in play back mode 53 Setting up the play back function using the camera buttons 53 Thumbnail / Enlargement button
...without sound 24 Pausing while recording a movie (Successive Recording) 25 Things to Watch Out for When Taking Pictures 26 Setting up the recording function using the camera buttons 26 POWER button 26 SHUTTER button 26 ZOOM W / T button 28 Function Description / Info / Up button 28 Macro / Down ... still image 50 Playing back a movie 51 Movie capture function 51 On camera movie trimming 52 Playing back a recorded voice 52 Playing back a voice memo 53 LCD monitor Indicator in play back mode 53 Setting up the play back function using the camera buttons 53 Thumbnail / Enlargement button

User Manual
Page 6
...) button : Image editing 59 ACB 59 Red eye Removal 59 Brightness control 60 Contrast control 60 Saturation control 60 Setting up the play back function using the LCD monitor 62 Multi slide show 62 Start the multi slide show 62 Selecting Images 63 Configure multi slide show effects 63...
...) button : Image editing 59 ACB 59 Red eye Removal 59 Brightness control 60 Contrast control 60 Saturation control 60 Setting up the play back function using the LCD monitor 62 Multi slide show 62 Start the multi slide show 62 Selecting Images 63 Configure multi slide show effects 63...

User Manual
Page 7
Content 77 Auto power off 78 Selecting Video out type 79 Auto Focus lamp SOFTWARE 79 Software Notes 80 System Requirements 80 About the software 81 Setting up the application software 84 Starting PC mode 86 Removing the removable disk 87 Setting up the USB Driver for MAC 87 Using the USB Driver for MAC 88 Removing the USB Driver for Windows 98SE 88 Samsung Master APPENDIX 91 Specifications 94 Important notes 96 Warning indicator 97 Before contacting a service centre 99 FAQ 6
Content 77 Auto power off 78 Selecting Video out type 79 Auto Focus lamp SOFTWARE 79 Software Notes 80 System Requirements 80 About the software 81 Setting up the application software 84 Starting PC mode 86 Removing the removable disk 87 Setting up the USB Driver for MAC 87 Using the USB Driver for MAC 88 Removing the USB Driver for Windows 98SE 88 Samsung Master APPENDIX 91 Specifications 94 Important notes 96 Warning indicator 97 Before contacting a service centre 99 FAQ 6

User Manual
Page 8
Included items Camera Rechargeable battery (SLB-10A) USB cable (SUC-C3) AC adapter (SAC-47) AV cable Camera strap Software CD Optional Items User manual, Product warranty SD/SDHC/MMC memory card (see p.15) Camera case 7 To buy the optional equipment, contact your nearest Samsung dealer or Samsung service centre. System chart Please check that you have the correct contents before using this product. The contents can vary depending on the sales region.
Included items Camera Rechargeable battery (SLB-10A) USB cable (SUC-C3) AC adapter (SAC-47) AV cable Camera strap Software CD Optional Items User manual, Product warranty SD/SDHC/MMC memory card (see p.15) Camera case 7 To buy the optional equipment, contact your nearest Samsung dealer or Samsung service centre. System chart Please check that you have the correct contents before using this product. The contents can vary depending on the sales region.

User Manual
Page 13
... lose power over time and are measured under Samsung's standard conditions and shooting conditions and may vary depending on every second shot. Using the camera for long periods. Using the flash on the user's methods. x During extended use the rechargeable battery SLB-10A supplied with the camera. Batteries can affect the performance of the battery...
... lose power over time and are measured under Samsung's standard conditions and shooting conditions and may vary depending on every second shot. Using the camera for long periods. Using the flash on the user's methods. x During extended use the rechargeable battery SLB-10A supplied with the camera. Batteries can affect the performance of the battery...
User Manual
Page 14
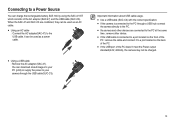
... (SUC-C3). You can charge the rechargeable battery SLB-10A by using the SAC-47 KIT which consists of the PC : remove the cable and connect it to your camera through a USB hub: connect the camera directly to the USB cable. x If the camera is connected to a port located on the back of the... PC doesn't meet the Power output standard(4.2V, 400mA), the camera may not be used as a power cable. x Using an AC cable : Connect the AC adapter(SAC-47) to the PC. x If the USB port of the PC. Connecting to the PC at the...
... (SUC-C3). You can charge the rechargeable battery SLB-10A by using the SAC-47 KIT which consists of the PC : remove the cable and connect it to your camera through a USB hub: connect the camera directly to the USB cable. x If the camera is connected to a port located on the back of the... PC doesn't meet the Power output standard(4.2V, 400mA), the camera may not be used as a power cable. x Using an AC cable : Connect the AC adapter(SAC-47) to the PC. x If the USB port of the PC. Connecting to the PC at the...

User Manual
Page 15
...inserted correctly. If you charge the battery with the fully discharged battery charged for more than 10 minutes before using force. Even if the charger is inserted, the camera power may be turned on because of the AC Adapter Being Charged Charging is complete Charging error Being discharged Charging.... „ Charging LED of the low battery capacity. Do not use the flash frequently or take a movie with the camera power on, the battery can't charge fully. x If the charging LED of cable or camera. The camera may cause breakage of the AC Charger does not turn on the...
...inserted correctly. If you charge the battery with the fully discharged battery charged for more than 10 minutes before using force. Even if the charger is inserted, the camera power may be turned on because of the AC Adapter Being Charged Charging is complete Charging error Being discharged Charging.... „ Charging LED of the low battery capacity. Do not use the flash frequently or take a movie with the camera power on, the battery can't charge fully. x If the charging LED of cable or camera. The camera may cause breakage of the AC Charger does not turn on the...

User Manual
Page 16
Doing so may cause damage to recharge or use spare battery) Battery empty (Recharge or use spare battery) Inserting the memory card „ Insert the memory card as shown - www.samsungcamera.com - Turn off the camera's power before inserting the memory card. If the camera does not turn on the LCD monitor. www.samsungcamera.com...
Doing so may cause damage to recharge or use spare battery) Battery empty (Recharge or use spare battery) Inserting the memory card „ Insert the memory card as shown - www.samsungcamera.com - Turn off the camera's power before inserting the memory card. If the camera does not turn on the LCD monitor. www.samsungcamera.com...

User Manual
Page 17
...the recorded data may cause damage to data in temperature. x Do not use a memory card formatted by the Samsung warranty. x It is warm. x Don't remove the memory card when the camera status lamp is not covered by another digital camera. x Do not allow the memory card to become corrupted : - x...75) if you are extremes in the memory card. 16 x Repeated use of memory in another digital camera or memory card reader. Do not bend, drop or subject the memory card to purchase a new memory card. x Samsung cannot be the case, you will eventually reduce the memory card's performance...
...the recorded data may cause damage to data in temperature. x Do not use a memory card formatted by the Samsung warranty. x It is warm. x Don't remove the memory card when the camera status lamp is not covered by another digital camera. x Do not allow the memory card to become corrupted : - x...75) if you are extremes in the memory card. 16 x Repeated use of memory in another digital camera or memory card reader. Do not bend, drop or subject the memory card to purchase a new memory card. x Samsung cannot be the case, you will eventually reduce the memory card's performance...

User Manual
Page 18
...504 Fine About 96 About 109 About 133 About 126 About 181 About 269 About 710 - - Card pins Write protect switch Label [SD (Secure Digital) memory card] x The SD/ SDHC memory card has a write protect switch that prevents image files from being deleted or formatted. By sliding ...x Slide the switch to the top of the SD memory card, the data protection will be cancelled. By sliding the switch to use the memory card „ The camera can use SD/ SDHC Memory Cards and MMC (Multi Media Cards). x The zoom button doesn't function during the movie recording. 17 Instructions on...
...504 Fine About 96 About 109 About 133 About 126 About 181 About 269 About 710 - - Card pins Write protect switch Label [SD (Secure Digital) memory card] x The SD/ SDHC memory card has a write protect switch that prevents image files from being deleted or formatted. By sliding ...x Slide the switch to the top of the SD memory card, the data protection will be cancelled. By sliding the switch to use the memory card „ The camera can use SD/ SDHC Memory Cards and MMC (Multi Media Cards). x The zoom button doesn't function during the movie recording. 17 Instructions on...
User Manual
Page 19
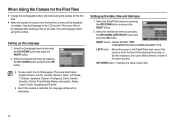
...Turkish. Select the desired sub menu by pressing the UP/ DOWN button and press the RIGHT button. 2. When Using the Camera for the First Time x Charge the rechargeable battery fully before using the camera for the first time, a menu will not be shifted to set date / time and language in the... LCD monitor. x Even if the camera is turned on for the first time. Select the [Date&Time] menu by...
...Turkish. Select the desired sub menu by pressing the UP/ DOWN button and press the RIGHT button. 2. When Using the Camera for the First Time x Charge the rechargeable battery fully before using the camera for the first time, a menu will not be shifted to set date / time and language in the... LCD monitor. x Even if the camera is turned on for the first time. Select the [Date&Time] menu by...
User Manual
Page 21
....) 5. Select the AUTO mode by using the LCD monitor. 7. Press the shutter button to configure advanced functions such as Image Size (p.39), Quality (p.39), Metering (p.40), Drive mode (p.40), ISO (p.41), White Balance (p.42), Exposure Compensation(p.43). Should this camera has a 10MB internal memory, you... do not need to insert the memory card. As this be the case, the camera is incorrect, reset the date/ time before taking note of the polarity (+ / -). 2. How to use the AUTO mode ( ) „ Please select this mode for quick and easy picture taking with...
....) 5. Select the AUTO mode by using the LCD monitor. 7. Press the shutter button to configure advanced functions such as Image Size (p.39), Quality (p.39), Metering (p.40), Drive mode (p.40), ISO (p.41), White Balance (p.42), Exposure Compensation(p.43). Should this camera has a 10MB internal memory, you... do not need to insert the memory card. As this be the case, the camera is incorrect, reset the date/ time before taking note of the polarity (+ / -). 2. How to use the AUTO mode ( ) „ Please select this mode for quick and easy picture taking with...

User Manual
Page 22
... darker than fluorescent lighting, the DUAL IS will be displayed. If the subject is not displayed. - As the DUAL IS uses the camera's digital signal processor, it may be blurred. - Larger Aperture values make the object sharp but blur the background. For best results only take... and aperture value will not activate. - The digital zoom will not operate in situations where the camera shake warning indicator () is moving object with an 'active' effect. Point the camera towards the subject and compose the image by using the DUAL IS mode - If the image size...
... darker than fluorescent lighting, the DUAL IS will be displayed. If the subject is not displayed. - As the DUAL IS uses the camera's digital signal processor, it may be blurred. - Larger Aperture values make the object sharp but blur the background. For best results only take... and aperture value will not activate. - The digital zoom will not operate in situations where the camera shake warning indicator () is moving object with an 'active' effect. Point the camera towards the subject and compose the image by using the DUAL IS mode - If the image size...

User Manual
Page 23
.... Available functions of the photo help guide x Features to use when the image is out of focus x Features to counter camera shake x Features to use in low light conditions x Features to use when adjusting brightness x Features to use when adjusting colours PHOTO HELP GUIDE Features to use when the image is out of focus Features to...
.... Available functions of the photo help guide x Features to use when the image is out of focus x Features to counter camera shake x Features to use in low light conditions x Features to use when adjusting brightness x Features to use when adjusting colours PHOTO HELP GUIDE Features to use when the image is out of focus Features to...

User Manual
Page 24
...; Please select this mode to shoot a document. For taking pictures of sunsets. Daybreak scenes. Portraits without shadows caused by using the LCD monitor. 3. Point the camera towards the subject and compose the image by backlight. Firework scenes. For ocean, lake, beach and snowscape scenes. 23 Select the...
...; Please select this mode to shoot a document. For taking pictures of sunsets. Daybreak scenes. Portraits without shadows caused by using the LCD monitor. 3. Point the camera towards the subject and compose the image by backlight. Firework scenes. For ocean, lake, beach and snowscape scenes. 23 Select the...

User Manual
Page 25
...record your favourite scenes into a movie without having to create multiple movies. „ Using Successive Recording Steps from 1-3 are the same as the Stop REC available recording time. Point the camera towards the subject and compose the image by pressing the Up / Down button. ... unwanted scenes, while recording a movie. Starting the recording mode How to use the MOVIE mode ( ) „ A movie can record the movie without sound. Pausing while recording a movie (Successive Recording) This camera allows you wish to stop recording, press the shutter button again. Press the...
...record your favourite scenes into a movie without having to create multiple movies. „ Using Successive Recording Steps from 1-3 are the same as the Stop REC available recording time. Point the camera towards the subject and compose the image by pressing the Up / Down button. ... unwanted scenes, while recording a movie. Starting the recording mode How to use the MOVIE mode ( ) „ A movie can record the movie without sound. Pausing while recording a movie (Successive Recording) This camera allows you wish to stop recording, press the shutter button again. Press the...

User Manual
Page 26
... available memory capacity may not perform as a stick or flagpole). - In this case, use the [BACKLIGHT] in the scene shooting mode (see page 23), fill-in a low lighting condition, the camera shake warning indicator () may make the picture dark. When there is strong reflected ...If the subject is highly reflective or shiny. - When the surroundings are dark. To take pictures against the light, please use a tripod, support the camera on a solid surface or change to confirm focus and flash battery charge. Doing so may appear on the LCD ...
... available memory capacity may not perform as a stick or flagpole). - In this case, use the [BACKLIGHT] in the scene shooting mode (see page 23), fill-in a low lighting condition, the camera shake warning indicator () may make the picture dark. When there is strong reflected ...If the subject is highly reflective or shiny. - When the surroundings are dark. To take pictures against the light, please use a tripod, support the camera on a solid surface or change to confirm focus and flash battery charge. Doing so may appear on the LCD ...


