Quick Guide (easy Manual) (ver.1.0) (English, Spanish)
Page 10
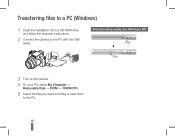
Disconnecting safely (for Windows XP) Click Click 3 Turn on the camera. 4 On your PC, select My Computer → Removable Disk → DCIM → 100PHOTO. 5 Select the files you want and drag or save them to the PC with the USB cable. Transferring files to a PC (Windows) 1 Insert the installation CD in a CD-ROM drive and follow the onscreen instructions. 2 Connect the camera to the PC. 10
Disconnecting safely (for Windows XP) Click Click 3 Turn on the camera. 4 On your PC, select My Computer → Removable Disk → DCIM → 100PHOTO. 5 Select the files you want and drag or save them to the PC with the USB cable. Transferring files to a PC (Windows) 1 Insert the installation CD in a CD-ROM drive and follow the onscreen instructions. 2 Connect the camera to the PC. 10
User Manual (user Manual) (ver.1.0) (English)
Page 2
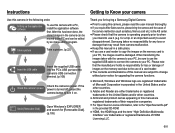
... the cause of images on the memory card due to the use the supplied USB cable to connect the camera to your PC. Setting up the application software To use it on the memory card to avoid disappointment. Samsung takes no responsibility for loss or damage of the camera malfunction (such as battery...
... the cause of images on the memory card due to the use the supplied USB cable to connect the camera to your PC. Setting up the application software To use it on the memory card to avoid disappointment. Samsung takes no responsibility for loss or damage of the camera malfunction (such as battery...
User Manual (user Manual) (ver.1.0) (English)
Page 4
...on the LCD monitor. å Credit cards may be demagnetized if left near the case. å Never connect the 20 pin connector to the USB port of computer malfunction. Otherwise the battery may leak corrosive electrolyte and permanently damage the camera's components. å Do not fire the fl... chart 007 Package Contents 007 Sold Separately 008 Identification of battery in fire or injury. - Failure to do so may damage the cords or cables and cause a fire or electric shock. å Take care not to touch the lens or lens cover to a Power Source 016 Inserting...
...on the LCD monitor. å Credit cards may be demagnetized if left near the case. å Never connect the 20 pin connector to the USB port of computer malfunction. Otherwise the battery may leak corrosive electrolyte and permanently damage the camera's components. å Do not fire the fl... chart 007 Package Contents 007 Sold Separately 008 Identification of battery in fire or injury. - Failure to do so may damage the cords or cables and cause a fire or electric shock. å Take care not to touch the lens or lens cover to a Power Source 016 Inserting...

User Manual (user Manual) (ver.1.0) (English)
Page 8
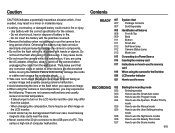
Package Contents Camera Rechargeable battery 4302-001226 AC adapter / USB cable AD44-00143A / AD39-00165A Neck strap (see p.10) AD63-04525A Lens cap / Lens cap strap (see p.10) AD67-01588A / AD63-04527A Sold Separately Software CD (... HDMI cable AD39-00179A 007 System chart Please make sure your package may differ from the illustrations below before using this product. The appearance of the parts and accessories in your package contains the contents listed below . To buy the optional equipment listed under Sold Separately, contact your nearest Samsung dealer or Samsung...
Package Contents Camera Rechargeable battery 4302-001226 AC adapter / USB cable AD44-00143A / AD39-00165A Neck strap (see p.10) AD63-04525A Lens cap / Lens cap strap (see p.10) AD67-01588A / AD63-04527A Sold Separately Software CD (... HDMI cable AD39-00179A 007 System chart Please make sure your package may differ from the illustrations below before using this product. The appearance of the parts and accessories in your package contains the contents listed below . To buy the optional equipment listed under Sold Separately, contact your nearest Samsung dealer or Samsung...

User Manual (user Manual) (ver.1.0) (English)
Page 13
... the camera is ready to take a picture When flash battery is charging The lamp blinks When the USB cable is The lamp lights up inserted to a PC (LCD monitor turns off ) When the USB cable is inserted into a printer The lamp blinks When the printer is printing The lamp blinks When the AF...
... the camera is ready to take a picture When flash battery is charging The lamp blinks When the USB cable is The lamp lights up inserted to a PC (LCD monitor turns off ) When the USB cable is inserted into a printer The lamp blinks When the printer is printing The lamp blinks When the AF...
User Manual (user Manual) (ver.1.0) (English)
Page 14
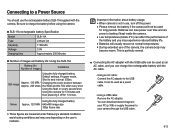
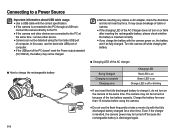
... can be used for 1 minute. Using a USB cable: Remove the AC adapter. Important information about battery usage. å When camera is perfectly normal. Ŷ Connecting the AC adapter with the camera. It can lose power over time and are measured under Samsung's standard conditions and shooting conditions and may become warm. Connecting to...
... can be used for 1 minute. Using a USB cable: Remove the AC adapter. Important information about battery usage. å When camera is perfectly normal. Ŷ Connecting the AC adapter with the camera. It can lose power over time and are measured under Samsung's standard conditions and shooting conditions and may become warm. Connecting to...
User Manual (user Manual) (ver.1.0) (English)
Page 15
... the battery with the camera power on, the battery won't be charged. å Before inserting any cables or AC adapter, check the directions and do not insert by force. Charge the battery for a short... with the fully discharged battery charged for more than 10 minutes before using the front side USB port of the AC charger Ê How to charge the rechargeable battery Being Charged Charging is... charged. Connecting to a Power Source Important information about USB cable usage. å Use a USB cable with the correct specification. å If the camera is connected to the PC ...
... the battery with the camera power on, the battery won't be charged. å Before inserting any cables or AC adapter, check the directions and do not insert by force. Charge the battery for a short... with the fully discharged battery charged for more than 10 minutes before using the front side USB port of the AC charger Ê How to charge the rechargeable battery Being Charged Charging is... charged. Connecting to a Power Source Important information about USB cable usage. å Use a USB cable with the correct specification. å If the camera is connected to the PC ...
User Manual (user Manual) (ver.1.0) (English)
Page 72
...the TV remote, a play menu screen appears on the TV, it might not change to your connected SAMSUNG AV devices when using TV that supports Anynet+. The playback menu appearing on and off the Auto Focus ... TV that supports Anynet+ (HDMI-CEC). (Not available by using an optional HDMI cable. (p.72) 2. Auto Power Off :3 min AF Lamp Off :On Anynet+ (HDMI-CEC) On :On HDMI... Size :1080i Video Out :NTSC USB :Auto Back Set 4. Anynet+ (HDMI-CEC) Anynet+ (HDMI-CEC) is pressed on the TV remote control to change to the SAMSUNG HDTV, you press the source button. 5. ...
...the TV remote, a play menu screen appears on the TV, it might not change to your connected SAMSUNG AV devices when using TV that supports Anynet+. The playback menu appearing on and off the Auto Focus ... TV that supports Anynet+ (HDMI-CEC). (Not available by using an optional HDMI cable. (p.72) 2. Auto Power Off :3 min AF Lamp Off :On Anynet+ (HDMI-CEC) On :On HDMI... Size :1080i Video Out :NTSC USB :Auto Back Set 4. Anynet+ (HDMI-CEC) Anynet+ (HDMI-CEC) is pressed on the TV remote control to change to the SAMSUNG HDTV, you press the source button. 5. ...
User Manual (user Manual) (ver.1.0) (English)
Page 73
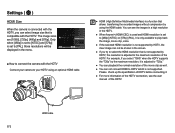
...clip as well. Ɣ You can select image size that is compatible with the HDTV. HDMI cable 072 You can not be displayed in the screen. Ɣ If you try to select the ...HDMI resolution that allows transferring the recorded images without compression by using an optional HDMI cable. Ɣ HDMI (High Definition Multimedia Interface) is a function that is not supported by the maximum... Off :3 min AF Lamp :On Anynet+ (HDMI-CEC) :On HDMI Size Video Out USB :1080i 1080i 720p:NTSC 480p:Auto Back Set Ŷ How to connect the camera with the HDTV Connect...
...clip as well. Ɣ You can select image size that is compatible with the HDTV. HDMI cable 072 You can not be displayed in the screen. Ɣ If you try to select the ...HDMI resolution that allows transferring the recorded images without compression by using an optional HDMI cable. Ɣ HDMI (High Definition Multimedia Interface) is a function that is not supported by the maximum... Off :3 min AF Lamp :On Anynet+ (HDMI-CEC) :On HDMI Size Video Out USB :1080i 1080i 720p:NTSC 480p:Auto Back Set Ŷ How to connect the camera with the HDTV Connect...
User Manual (user Manual) (ver.1.0) (English)
Page 74
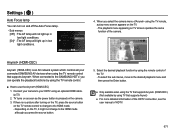
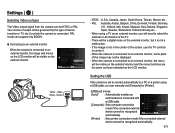
... (monitor or TV, etc.) to which the camera is set [Computer] or [Printer]. -[USB] sub menus: [Auto]* : Automatically enables an Auto Power Off :3 min external device connected with AF Lamp :On a USB cable. [Computer] : Sets computer connection mode if the connected external device cannot be recognized automatically.... Auto Power Off :3 min AF Lamp :On Anynet+ (HDMI-CEC) :On HDMI Size Video Out USB :1080i NTS:CNTSC PAL :Auto Back Set Yellow - When using a USB cable, you will be visible on the external monitor and the menu functions are the same as those indicated on...
... (monitor or TV, etc.) to which the camera is set [Computer] or [Printer]. -[USB] sub menus: [Auto]* : Automatically enables an Auto Power Off :3 min external device connected with AF Lamp :On a USB cable. [Computer] : Sets computer connection mode if the connected external device cannot be recognized automatically.... Auto Power Off :3 min AF Lamp :On Anynet+ (HDMI-CEC) :On HDMI Size Video Out USB :1080i NTS:CNTSC PAL :Auto Back Set Yellow - When using a USB cable, you will be visible on the external monitor and the menu functions are the same as those indicated on...

User Manual (user Manual) (ver.1.0) (English)
Page 84
... Normal Fine Auto Off On Auto Off On No Yes Secondary Menu Page p.98 p.99 - Ä Menus are subject to the camera, sold separately) with a USB cable. Paper L - 2L - Layout 4 - 8 - 9 - 16 - p.98 Auto - PostCard - Card - 4X6 -
... Normal Fine Auto Off On Auto Off On No Yes Secondary Menu Page p.98 p.99 - Ä Menus are subject to the camera, sold separately) with a USB cable. Paper L - 2L - Layout 4 - 8 - 9 - 16 - p.98 Auto - PostCard - Card - 4X6 -

User Manual (user Manual) (ver.1.0) (English)
Page 98
Pressing the Left / Right button : Selects a previous / next image. 1. PictBridge You can use the USB cable to connect this camera to a printer that can print a picture easily. Ê Setting up the camera for connection to the printer - Movie clips...) Ä For a printer that Ê Easy printing supports PictBridge (sold separately) and print the stored images When you can enable removable disk, set the [USB] menu to [Printer]. Ê Connecting the Camera to printer directly. Pressing the OK button : 2. Once the camera is turned on, the camera automatically recognizes...
Pressing the Left / Right button : Selects a previous / next image. 1. PictBridge You can use the USB cable to connect this camera to a printer that can print a picture easily. Ê Setting up the camera for connection to the printer - Movie clips...) Ä For a printer that Ê Easy printing supports PictBridge (sold separately) and print the stored images When you can enable removable disk, set the [USB] menu to [Printer]. Ê Connecting the Camera to printer directly. Pressing the OK button : 2. Once the camera is turned on, the camera automatically recognizes...
User Manual (user Manual) (ver.1.0) (English)
Page 101
...the camera and is dispersed. Wait until all times when not in its performance. Do not allow this case, disconnect and re-connect the USB cable before the recording. 100 Moisture built up can damage the LCD monitor. If the lens is subjected to direct sunlight, it will turn itself... from photo stores) to come into contact with a soft cloth. It is a good idea to protect the memory card. å Camera Maintenance - Samsung cannot be held responsible for a long period, the date and time may damage the body shell of the image sensor. - In this does not work...
...the camera and is dispersed. Wait until all times when not in its performance. Do not allow this case, disconnect and re-connect the USB cable before the recording. 100 Moisture built up can damage the LCD monitor. If the lens is subjected to direct sunlight, it will turn itself... from photo stores) to come into contact with a soft cloth. It is a good idea to protect the memory card. å Camera Maintenance - Samsung cannot be held responsible for a long period, the date and time may damage the body shell of the image sensor. - In this does not work...
User Manual (user Manual) (ver.1.0) (English)
Page 104
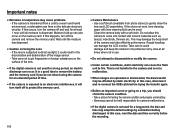
... The operating system is not Windows XP, Vista, 7 / Mac OS 10.4. Alternatively the PC does not support USB à Install Windows XP, Vista, 7 / Mac OS 10.4 to PC that supports USB A part of the LCD screen does not occasionally turn on or a spot appears. åAlthough the LCD screen ...Reset exposure compensation No image on external monitor å The external monitor has not been connected properly with the camera à Check the connection cables åThere are not occasionally lighted or the red, white and blue spots appear. ĺ This phenomenon does not affect the quality of the...
... The operating system is not Windows XP, Vista, 7 / Mac OS 10.4. Alternatively the PC does not support USB à Install Windows XP, Vista, 7 / Mac OS 10.4 to PC that supports USB A part of the LCD screen does not occasionally turn on or a spot appears. åAlthough the LCD screen ...Reset exposure compensation No image on external monitor å The external monitor has not been connected properly with the camera à Check the connection cables åThere are not occasionally lighted or the red, white and blue spots appear. ĺ This phenomenon does not affect the quality of the...
User Manual (user Manual) (ver.1.0) (English)
Page 109
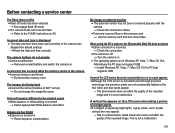
... is not responsible for Windows) 1. Click Exit to install and follow the onscreen instructions. 4. Connect your camera to your PC with the USB cable. å You must plug the end of data. 108 Insert the installation CD in a compatible CD-ROM drive. 2. Transferring files to... your computer (for any loss of the cable with the USB cable. 3. If the cable is connected to a PC with the indicator light (Ÿ) into your files. When the setup screen is displayed, click Samsung Digital Camera Installer to start installation. Ê Transferring files to...
... is not responsible for Windows) 1. Click Exit to install and follow the onscreen instructions. 4. Connect your camera to your PC with the USB cable. å You must plug the end of data. 108 Insert the installation CD in a compatible CD-ROM drive. 2. Transferring files to... your computer (for any loss of the cable with the USB cable. 3. If the cable is connected to a PC with the indicator light (Ÿ) into your files. When the setup screen is displayed, click Samsung Digital Camera Installer to start installation. Ê Transferring files to...

User Manual (user Manual) (ver.1.0) (English)
Page 110
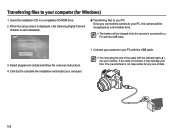
... will appear. On your camera is similar. 1. Click ( ) on the camera. - The computer recognizes the camera automatically. å If the camera fails to disconnect the USB cable for Windows XP) The way to connect, a pop-up message. 4. Transferring files to your PC screen. 3. Select Computer. 3. Select the files you want and drag... or save them to your PC. Ê Disconnecting the camera (for Windows Vista / 7 is blinking, wait until it stops. 2. Remove the USB cable. 109 Turn on the tool bar at the bottom right of your computer (for Windows) 2.
... will appear. On your camera is similar. 1. Click ( ) on the camera. - The computer recognizes the camera automatically. å If the camera fails to disconnect the USB cable for Windows XP) The way to connect, a pop-up message. 4. Transferring files to your PC screen. 3. Select Computer. 3. Select the files you want and drag... or save them to your PC. Ê Disconnecting the camera (for Windows Vista / 7 is blinking, wait until it stops. 2. Remove the USB cable. 109 Turn on the tool bar at the bottom right of your computer (for Windows) 2.

User Manual (user Manual) (ver.1.0) (English)
Page 113
The manufacturer is reversed, it may damage your files. The computer recognizes the camera automatically and a removable disk icon will be displayed. 3. Double-click the removable disk icon. 4. Connect your camera to a Macintosh computer with the indicator light (Ÿ) into your camera. Transfer photos or videos to the computer. 112 Turn on the camera. - Transferring files to your computer (for any loss of the cable with the USB cable. å You must plug the end of data. 2. If the cable is not responsible for Mac) 1.
The manufacturer is reversed, it may damage your files. The computer recognizes the camera automatically and a removable disk icon will be displayed. 3. Double-click the removable disk icon. 4. Connect your camera to a Macintosh computer with the indicator light (Ÿ) into your camera. Transfer photos or videos to the computer. 112 Turn on the camera. - Transferring files to your computer (for any loss of the cable with the USB cable. å You must plug the end of data. 2. If the cable is not responsible for Mac) 1.

User Manual (user Manual) (ver.1.0) (English)
Page 117
... the camera. Transfer the file again. Wherever possible, connect the camera to temporarily disable the program. Case 5 Are other USB cable, and connect only one USB cable to the computer. Connect the camera to the PC? Ã The camera may not recognize the camera as another...security programs (Norton Anti Virus, V3, etc.), the computer may malfunction when it is not the supplied USB cable. Ã Connect the supplied USB cable. FAQ Please check the following if the USB connection malfunctions. Restart the PC and connect the camera again. Case 2 The camera is connected to the...
... the camera. Transfer the file again. Wherever possible, connect the camera to temporarily disable the program. Case 5 Are other USB cable, and connect only one USB cable to the computer. Connect the camera to the PC? Ã The camera may not recognize the camera as another...security programs (Norton Anti Virus, V3, etc.), the computer may malfunction when it is not the supplied USB cable. Ã Connect the supplied USB cable. FAQ Please check the following if the USB connection malfunctions. Restart the PC and connect the camera again. Case 2 The camera is connected to the...


