Quick Guide (ENGLISH)
Page 2
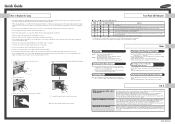
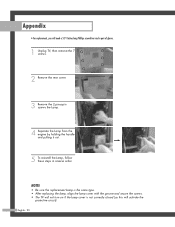
... the replacement Lamp is Off TIMER LAMP STAND BY/TEMP Indication Standby state. You'll occasionally hear it out. 2 Remove the Lamp cover. 3 Remove the screws securing the Lamp by holding screw on the rear of the lamp can be replaced from ...lamp replacement. For projection TV, you can watch TV for lamp regulation and usage is marked on picture quality. Example 2 : Viewing TV with DLP remote control. All projection TV use a screwdriver to remove the screw. 4 Separate the Lamp from Home Theater. Quick Guide How to Replace the Lamp • A Projection TV lamp...
... the replacement Lamp is Off TIMER LAMP STAND BY/TEMP Indication Standby state. You'll occasionally hear it out. 2 Remove the Lamp cover. 3 Remove the screws securing the Lamp by holding screw on the rear of the lamp can be replaced from ...lamp replacement. For projection TV, you can watch TV for lamp regulation and usage is marked on picture quality. Example 2 : Viewing TV with DLP remote control. All projection TV use a screwdriver to remove the screw. 4 Separate the Lamp from Home Theater. Quick Guide How to Replace the Lamp • A Projection TV lamp...
User Manual (ENGLISH)
Page 3
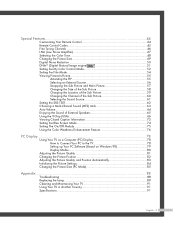
...Codes 45 Fine Tuning Channels 46 LNA (Low Noise Amplifier 47 Selecting the Color Tone 48 Changing the Picture Size 49 Digital Noise Reduction 50 DNIeTM (Digital Natural Image engine) 51 Setting the My Color Control Mode 52 Setting the Film Mode 54 Viewing Picture-In-Picture 55 ...the Picture Quality and Position Automatically 83 Initializing the Picture Settings 84 Changing the Picture Size (PC Mode 85 Appendix...88 Troubleshooting 88 Replacing the Lamp 89 Cleaning and Maintaining Your TV 91 Using Your TV in Another Country 91 Specifications ...91 English - 3
...Codes 45 Fine Tuning Channels 46 LNA (Low Noise Amplifier 47 Selecting the Color Tone 48 Changing the Picture Size 49 Digital Noise Reduction 50 DNIeTM (Digital Natural Image engine) 51 Setting the My Color Control Mode 52 Setting the Film Mode 54 Viewing Picture-In-Picture 55 ...the Picture Quality and Position Automatically 83 Initializing the Picture Settings 84 Changing the Picture Size (PC Mode 85 Appendix...88 Troubleshooting 88 Replacing the Lamp 89 Cleaning and Maintaining Your TV 91 Using Your TV in Another Country 91 Specifications ...91 English - 3
User Manual (ENGLISH)
Page 89
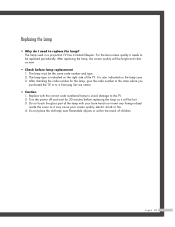
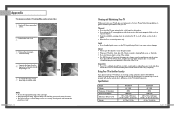
... 30 minutes before lamp replacement 1. Replace with your bare hands nor insert any foreign object inside the cover as it may cause poor screen quality, electric shock or fire. 4. Do not place the old lamp near flammable objects or within the reach of the TV. The lamp used in a projection TV has a limited lifespan. Replacing the Lamp • Why do...
... 30 minutes before lamp replacement 1. Replace with your bare hands nor insert any foreign object inside the cover as it may cause poor screen quality, electric shock or fire. 4. Do not place the old lamp near flammable objects or within the reach of the TV. The lamp used in a projection TV has a limited lifespan. Replacing the Lamp • Why do...
User Manual (ENGLISH)
Page 90
...replacement Lamp is the same type. • After replacing the lamp, align the lamp cover with the groove and secure the screws. • The TV will not turn on if the lamp cover is not correctly closed (as this will need a 5.91 Inches-long Phillips screwdriver and a pair of gloves. 1 Unplug TV, then remove the 7 screws. 2 Remove the rear... cover. 3 Remove the 2 press-pin screws the Lamp. 4 Separate the Lamp from the engine by holding the handle and pulling it out. 5 To reinstall the Lamp, follow these steps in reverse ...
...replacement Lamp is the same type. • After replacing the lamp, align the lamp cover with the groove and secure the screws. • The TV will not turn on if the lamp cover is not correctly closed (as this will need a 5.91 Inches-long Phillips screwdriver and a pair of gloves. 1 Unplug TV, then remove the 7 screws. 2 Remove the rear... cover. 3 Remove the 2 press-pin screws the Lamp. 4 Separate the Lamp from the engine by holding the handle and pulling it out. 5 To reinstall the Lamp, follow these steps in reverse ...
User Manual (ENGLISH)
Page 2
Table of Contents Your New Wide TV 6 List of Features ...6 Accessories ...6 Front Panel Buttons 7 Front Panel Information Window 8 Rear Panel Jacks ...9 Remote Control ...10 Installing Batteries in ...Low Noise Amplifier 47 Selecting the Color Tone 48 Changing the Picture Size 49 Digital Noise Reduction 50 DNIeTM (Digital Natural Image engine) 51 Setting the My Color Control Mode 52 Setting the Film ...Size (PC Mode 89 Appendix...92 Troubleshooting 92 Replacing the Lamp 93 Cleaning and Maintaining Your TV 95 Using Your TV in Another Country 95 Specifications ...95 English - 3
Table of Contents Your New Wide TV 6 List of Features ...6 Accessories ...6 Front Panel Buttons 7 Front Panel Information Window 8 Rear Panel Jacks ...9 Remote Control ...10 Installing Batteries in ...Low Noise Amplifier 47 Selecting the Color Tone 48 Changing the Picture Size 49 Digital Noise Reduction 50 DNIeTM (Digital Natural Image engine) 51 Setting the My Color Control Mode 52 Setting the Film ...Size (PC Mode 89 Appendix...92 Troubleshooting 92 Replacing the Lamp 93 Cleaning and Maintaining Your TV 95 Using Your TV in Another Country 95 Specifications ...95 English - 3
User Manual (ENGLISH)
Page 47
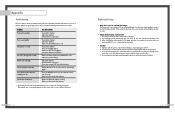
...off and wait for the DLP Projection TV is also indicated on the right side of the TV. The lamp used for 30 minutes before replacing the lamp as new. • Check before lamp replacement 1. It is composed of the lamp with the correct code numbered lamp to avoid damage to be the... the best screen quality it may occasionally appear on . The lamp type is not a defect of possible problems and solutions. The TV won't switch on the screen, but it again. Appendix Troubleshooting If the TV seems to a Samsung Service center. • Caution 1. Possible Solution Try another channel...
...off and wait for the DLP Projection TV is also indicated on the right side of the TV. The lamp used for 30 minutes before replacing the lamp as new. • Check before lamp replacement 1. It is composed of the lamp with the correct code numbered lamp to avoid damage to be the... the best screen quality it may occasionally appear on . The lamp type is not a defect of possible problems and solutions. The TV won't switch on the screen, but it again. Appendix Troubleshooting If the TV seems to a Samsung Service center. • Caution 1. Possible Solution Try another channel...
User Manual (ENGLISH)
Page 48
NOTES • Be sure the replacement Lamp is the same type. • After replacing the lamp, align the lamp cover with the groove and secure the screws. • The TV will not turn on top of the cabinet. • This DLP Projection TV projects the image onto a large screen by holding the...an optical system. Appendix • For replacement, you will need a 5.91 Inches-long Phillips screwdriver and a pair of gloves. 1 Unplug TV, then remove the 7 screws. 2 Remove the rear cover. 3 Remove the 2 press-pin screws the Lamp. 4 Separate the Lamp from your TV with a clean, dry cloth. Placement ...
NOTES • Be sure the replacement Lamp is the same type. • After replacing the lamp, align the lamp cover with the groove and secure the screws. • The TV will not turn on top of the cabinet. • This DLP Projection TV projects the image onto a large screen by holding the...an optical system. Appendix • For replacement, you will need a 5.91 Inches-long Phillips screwdriver and a pair of gloves. 1 Unplug TV, then remove the 7 screws. 2 Remove the rear cover. 3 Remove the 2 press-pin screws the Lamp. 4 Separate the Lamp from your TV with a clean, dry cloth. Placement ...


