Owner Instructions
Page 4
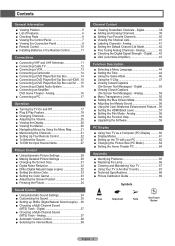
...Edit the Input Source Name 27 Picture Control ■ Using Automatic Picture Settings 28 ■ Making Detailed Picture Settings 30 ■ Changing the Screen Size 31 ■ Digital Noise Reduction 32 ■ DNIe (Digital Natural Image engine 32 ■ Setting the Active Color 33 ■... engine) ... 36 ■ Choosing a Multi-Channel Sound (MTS) Track - Analog 54 ■ Menu Transparency Level 55 ■ Setting the Blue Screen Mode 55 ■ Adjusting the Melody Sound 56 ■ Using the Color Weakness Enhancement Feature ... 56 ■ Setting the HDMI Black Level 57 &#...
...Edit the Input Source Name 27 Picture Control ■ Using Automatic Picture Settings 28 ■ Making Detailed Picture Settings 30 ■ Changing the Screen Size 31 ■ Digital Noise Reduction 32 ■ DNIe (Digital Natural Image engine 32 ■ Setting the Active Color 33 ■... engine) ... 36 ■ Choosing a Multi-Channel Sound (MTS) Track - Analog 54 ■ Menu Transparency Level 55 ■ Setting the Blue Screen Mode 55 ■ Adjusting the Melody Sound 56 ■ Using the Color Weakness Enhancement Feature ... 56 ■ Setting the HDMI Black Level 57 &#...

Owner Instructions
Page 5
... may cause an increase in the internal temperature of time, sit as far back from the screen as possible. < Top view> < Side view> 56˝ screen : At least 6.6 feet 61˝ screen : At least 7.2 feet 67˝ screen : At least 8 feet ➢ When installing the product, make sure to keep it away from ...the guidelines below for ventilation purposes. If viewing for an extended period of the product, resulting in a shortened component life and degraded performance. 56˝ screen : At least 6.6 feet 61˝ screen : At least 7.2 feet 67˝ screen : At least 8 feet English - 5
... may cause an increase in the internal temperature of time, sit as far back from the screen as possible. < Top view> < Side view> 56˝ screen : At least 6.6 feet 61˝ screen : At least 7.2 feet 67˝ screen : At least 8 feet ➢ When installing the product, make sure to keep it away from ...the guidelines below for ventilation purposes. If viewing for an extended period of the product, resulting in a shortened component life and degraded performance. 56˝ screen : At least 6.6 feet 61˝ screen : At least 7.2 feet 67˝ screen : At least 8 feet English - 5
Owner Instructions
Page 6
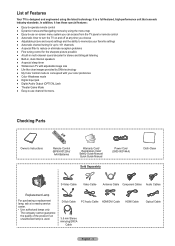
... TV is a full-featured, high-performance unit that exceeds industry standards. It is designed and engineered using the menu map ● Easy-to-use on-screen menu system you can access from the TV panel or remote control ● Automatic timer to -use channel list menu.
... TV is a full-featured, high-performance unit that exceeds industry standards. It is designed and engineered using the menu map ● Easy-to-use on-screen menu system you can access from the TV panel or remote control ● Automatic timer to -use channel list menu.
Owner Instructions
Page 7
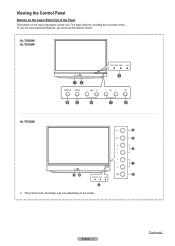
English - 7 Continued... To use the more advanced features, you must use the remote control. Viewing the Control Panel Buttons on the Lower-Right Part of the Panel The buttons on the lower-right panel control your TV's basic features, including the on the model. HL-T5656W HL-T6156W HL-T6756W ➢ The product color and shape may vary depending on -screen menu.
English - 7 Continued... To use the more advanced features, you must use the remote control. Viewing the Control Panel Buttons on the Lower-Right Part of the Panel The buttons on the lower-right panel control your TV's basic features, including the on the model. HL-T5656W HL-T6156W HL-T6756W ➢ The product color and shape may vary depending on -screen menu.

Owner Instructions
Page 8
...buttons on the remote control. 8 (ENTER) Press to confirm a selection. ➢ ● You can use the channel selection buttons to see an on-screen menu of the set is not properly shut. Indication The picture will shut off when the power is on and lights up , so normal brightness...the inside the set is not operating normally. Indicator Light Key ( : On, : Blinking, : Off) STAND BY/TEMP TIMER LAMP Standby state. In the on-screen menu, use the ◄ and ► buttons on the rear of the TV. A cooling fan inside lamp from a camcorder or video game. English - 8 ...
...buttons on the remote control. 8 (ENTER) Press to confirm a selection. ➢ ● You can use the channel selection buttons to see an on-screen menu of the set is not properly shut. Indication The picture will shut off when the power is on and lights up , so normal brightness...the inside the set is not operating normally. Indicator Light Key ( : On, : Blinking, : Off) STAND BY/TEMP TIMER LAMP Standby state. In the on-screen menu, use the ◄ and ► buttons on the rear of the TV. A cooling fan inside lamp from a camcorder or video game. English - 8 ...
Owner Instructions
Page 10
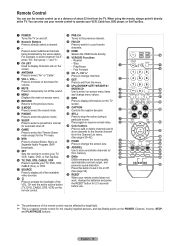
... channels. When using the remote, always point it On or Off. (See page 36) m RESET When your remote control does not work, change the screen size. g CAPTION Controls the caption decoder. Stop - f INFO Press to stop the action during a particular scene. P.MODE Press to select the picture ... sound mode. ! English - 10 Press to increase or decrease the volume. 7 MUTE Press to temporarily cut off . 2 Numeric Buttons Press to select on -screen menu. 9 RETURN Returns to the previous menu. 0 S.MODE Press to / from the menu. Rewind - e UP▲/DOWN▼/LEFT◄/RIGHT►/...
... channels. When using the remote, always point it On or Off. (See page 36) m RESET When your remote control does not work, change the screen size. g CAPTION Controls the caption decoder. Stop - f INFO Press to stop the action during a particular scene. P.MODE Press to select the picture ... sound mode. ! English - 10 Press to increase or decrease the volume. 7 MUTE Press to temporarily cut off . 2 Numeric Buttons Press to select on -screen menu. 9 RETURN Returns to the previous menu. 0 S.MODE Press to / from the menu. Rewind - e UP▲/DOWN▼/LEFT◄/RIGHT►/...
Owner Instructions
Page 15
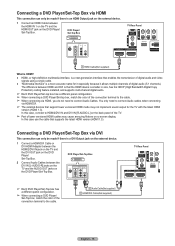
... mode may not implement sound output for it especially because it allows multiple channels of lower versioned HDMI cables may cause annoying flickers or no screen display. DVD Player/Set-Top Box TV Rear Panel ➢ Each DVD Player/Set-Top box has a different panel configuration. ➢ When connecting a DVD Player...
... mode may not implement sound output for it especially because it allows multiple channels of lower versioned HDMI cables may cause annoying flickers or no screen display. DVD Player/Set-Top Box TV Rear Panel ➢ Each DVD Player/Set-Top box has a different panel configuration. ➢ When connecting a DVD Player...
Owner Instructions
Page 20
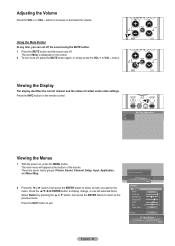
The word Mute is displayed on the screen. 2 To turn mute off . Press the INFO button on , press the MENU button. No Time Information Air 3 Viewing the Menus 1 With the power on the ... Tone Cool1 Detailed Settings Size 16:9 Picture Enter English - 20 button. Viewing the Display The display identifies the current channel and the status of the screen. There are seven menu groups: Picture, Sound, Channel, Setup, Input, Application, and Menu Map. 2 Press the ◄ or ► button, then press the ENTER button...
The word Mute is displayed on the screen. 2 To turn mute off . Press the INFO button on , press the MENU button. No Time Information Air 3 Viewing the Menus 1 With the power on the ... Tone Cool1 Detailed Settings Size 16:9 Picture Enter English - 20 button. Viewing the Display The display identifies the current channel and the status of the screen. There are seven menu groups: Picture, Sound, Channel, Setup, Input, Application, and Menu Map. 2 Press the ◄ or ► button, then press the ENTER button...

Owner Instructions
Page 21
... main menu will appear. 3 Press the button to select Antenna, then press the ENTER button. The menu map will appear at the bottom of the screen. 2 Press the ◄ or ► button to select Air or Cable, then press the ENTER button. Selecting the Video Signal-source Before your television can...
... main menu will appear. 3 Press the button to select Antenna, then press the ENTER button. The menu map will appear at the bottom of the screen. 2 Press the ◄ or ► button to select Air or Cable, then press the ENTER button. Selecting the Video Signal-source Before your television can...

Owner Instructions
Page 30
...your personal preferences. Press the ◄ or ► button until you reach the optimal setting. Reset: The previously adjusted colors will refresh the adjusted screen. Press the ▲ or ▼ button to select Detailed Settings, then press the ENTER button. 2 Select the required option by pressing the &#... Black Adjust: Off/Low/Medium/High You can directly select the black level on the screen to adjust the screen depth. ● Dynamic Contrast: Off/Low/Medium/High You can adjust the screen contrast so that the optimal contrast is in Dynamic or Standard mode, the Detailed Settings ...
...your personal preferences. Press the ◄ or ► button until you reach the optimal setting. Reset: The previously adjusted colors will refresh the adjusted screen. Press the ▲ or ▼ button to select Detailed Settings, then press the ENTER button. 2 Select the required option by pressing the &#... Black Adjust: Off/Low/Medium/High You can directly select the black level on the screen to adjust the screen depth. ● Dynamic Contrast: Off/Low/Medium/High You can adjust the screen contrast so that the optimal contrast is in Dynamic or Standard mode, the Detailed Settings ...

Owner Instructions
Page 31
... button to exit. 16:9: Sets the picture to 16:9 wide mode. Zoom1: Magnifies the size of the picture on the screen by expanding it both horizontally and vertically. Just Scan Use the function to see the full image without any truncation when DTV(1080i), HDMI (1080i,... stored separately according to its input mode. ● When watching an HD(High Definition 720p, 1080i, 1080p) signal, you can move the picture on the screen. Zoom2: Expands the Zoom1 format picture. Wide Fit : Enlarges the aspect ratio of 16:9, Zoom1, Zoom2, and 4:3 can be selected. &#...
... button to exit. 16:9: Sets the picture to 16:9 wide mode. Zoom1: Magnifies the size of the picture on the screen by expanding it both horizontally and vertically. Just Scan Use the function to see the full image without any truncation when DTV(1080i), HDMI (1080i,... stored separately according to its input mode. ● When watching an HD(High Definition 720p, 1080i, 1080p) signal, you can move the picture on the screen. Zoom2: Expands the Zoom1 format picture. Wide Fit : Enlarges the aspect ratio of 16:9, Zoom1, Zoom2, and 4:3 can be selected. &#...
Owner Instructions
Page 32
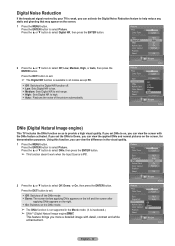
... you set DNIe to on, you can activate the Digital Noise Reduction feature to help reduce any static and ghosting that may appear on the screen. 1 Press the MENU button. Using this function, you can view the applied DNIe and normal pictures on the DNIe mode. ➢ The DNIe...ENTER button to provide a high visual quality. Digital Noise Reduction If the broadcast signal received by your TV is weak, you can view the screen with detail, contrast and white enhancement. Picture Enter Picture Tint G50 R50 Color Tone Cool1 Detailed Settings Size 16:9 Digital NR DNIe Active Color ...
... you set DNIe to on, you can activate the Digital Noise Reduction feature to help reduce any static and ghosting that may appear on the screen. 1 Press the MENU button. Using this function, you can view the applied DNIe and normal pictures on the DNIe mode. ➢ The DNIe...ENTER button to provide a high visual quality. Digital Noise Reduction If the broadcast signal received by your TV is weak, you can view the screen with detail, contrast and white enhancement. Picture Enter Picture Tint G50 R50 Color Tone Cool1 Detailed Settings Size 16:9 Digital NR DNIe Active Color ...

Owner Instructions
Page 33
... ▲ or ▼ button to select Picture. Setting the Active Color If you select Standard or Movie in PC mode. ➢ When you turn on -screen picture. 1 Press the MENU button. Press the ENTER button to select Off or On, then press the ENTER button. Press the ENTER button to select...
... ▲ or ▼ button to select Picture. Setting the Active Color If you select Standard or Movie in PC mode. ➢ When you turn on -screen picture. 1 Press the MENU button. Press the ENTER button to select Off or On, then press the ENTER button. Press the ENTER button to select...

Owner Instructions
Page 34
...9650; or ▼ button to select Sound, then press the ENTER button. Press the EXIT button to select one of the screen. 1 Press the MENU button. Picture Tint G50 Color Tone Detailed Settings Size Digital NR DNIe Active Color Color Gamut Position Reset R50...", "Music", "Movie", "Speech", and "Custom") that is mostly dialog (i.e., news). Choose Custom to adjust the screen position. English - 34 Adjusting the Screen Position You can select "Custom", which automatically recalls your personalized settings (See page 35). Press the ◄ or ► button...
...9650; or ▼ button to select Sound, then press the ENTER button. Press the EXIT button to select one of the screen. 1 Press the MENU button. Picture Tint G50 Color Tone Detailed Settings Size Digital NR DNIe Active Color Color Gamut Position Reset R50...", "Music", "Movie", "Speech", and "Custom") that is mostly dialog (i.e., news). Choose Custom to adjust the screen position. English - 34 Adjusting the Screen Position You can select "Custom", which automatically recalls your personalized settings (See page 35). Press the ◄ or ► button...
Owner Instructions
Page 46
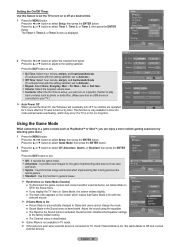
... ◄ or ► button to a game console such as PlayStationTM or XboxTM, you display the TV menu in Game Mode, the screen shakes slightly. ● The mark ( ) appears on the screen which may occur if a TV is on by selecting game menu. 1 Press the MENU button. On Time Off Time Repeat 12...
... ◄ or ► button to a game console such as PlayStationTM or XboxTM, you display the TV menu in Game Mode, the screen shakes slightly. ● The mark ( ) appears on the screen which may occur if a TV is on by selecting game menu. 1 Press the MENU button. On Time Off Time Repeat 12...

Owner Instructions
Page 47
... the ▲ or ▼ button to enter your current 4-digit PIN. ➢ The default PIN for children. Setup V-Chip ► Caption Menu Transparency Medium Blue Screen Off Melody Medium Color Weakness PC Home Theater PC Off HDMI Black Level Normal Film Mode Off 2 Press the ▲ or ▼ button.
... the ▲ or ▼ button to enter your current 4-digit PIN. ➢ The default PIN for children. Setup V-Chip ► Caption Menu Transparency Medium Blue Screen Off Melody Medium Color Weakness PC Home Theater PC Off HDMI Black Level Normal Film Mode Off 2 Press the ▲ or ▼ button.

Owner Instructions
Page 48
... Change PIN ► Setup Enter Change PIN Return Enter Current PIN * Enter new PIN. Setup V-Chip ► Caption Menu Transparency Medium Blue Screen Off Melody Medium Color Weakness PC Home Theater PC Off HDMI Black Level Normal Film Mode Off Setup Enter V-Chip Return Enter PIN * 3 The...to select Setup, then press the ENTER button. Press the number buttons to select Change PIN, then press the ENTER button. 4 The Change PIN screen will appear. Setting Up Your Personal ID Number (PIN) 1 Press the MENU button. Press the ▲ or ▼ button to enter your...
... Change PIN ► Setup Enter Change PIN Return Enter Current PIN * Enter new PIN. Setup V-Chip ► Caption Menu Transparency Medium Blue Screen Off Melody Medium Color Weakness PC Home Theater PC Off HDMI Black Level Normal Film Mode Off Setup Enter V-Chip Return Enter PIN * 3 The...to select Setup, then press the ENTER button. Press the number buttons to select Change PIN, then press the ENTER button. 4 The Change PIN screen will appear. Setting Up Your Personal ID Number (PIN) 1 Press the MENU button. Press the ▲ or ▼ button to enter your...

Owner Instructions
Page 49
Press the ▲ or ▼ button to select TV Parental Guidelines, then press the ENTER button. 4 The TV Parental Guidelines screen will appear. Press the ▲ or ▼ button to select V-Chip, then press the ENTER button. 2 Press the ▲ or ▼ ...PIN), and enable the V-Chip. (See previous section.) Parental restrictions can be set is displayed. Setup V-Chip ► Caption Menu Transparency Medium Blue Screen Off Melody Medium Color Weakness PC Home Theater PC Off HDMI Black Level Normal Film Mode Off Setup Enter V-Chip Return Enter PIN * 3 The ...
Press the ▲ or ▼ button to select TV Parental Guidelines, then press the ENTER button. 4 The TV Parental Guidelines screen will appear. Press the ▲ or ▼ button to select V-Chip, then press the ENTER button. 2 Press the ▲ or ▼ ...PIN), and enable the V-Chip. (See previous section.) Parental restrictions can be set is displayed. Setup V-Chip ► Caption Menu Transparency Medium Blue Screen Off Melody Medium Color Weakness PC Home Theater PC Off HDMI Black Level Normal Film Mode Off Setup Enter V-Chip Return Enter PIN * 3 The ...

Owner Instructions
Page 50
... the ENTER button to select MPAA Rating, then press the ENTER button. Return V-Chip Lock On TV Parental Guidelines MPAA Rating ► 8 The MPAA Rating screen will automatically be blocked. Press the ▲ or ▼ button to activate the restriction selected. Press the ENTER button to select an appropriate restriction. Children...
... the ENTER button to select MPAA Rating, then press the ENTER button. Return V-Chip Lock On TV Parental Guidelines MPAA Rating ► 8 The MPAA Rating screen will automatically be blocked. Press the ▲ or ▼ button to activate the restriction selected. Press the ENTER button to select an appropriate restriction. Children...

Owner Instructions
Page 51
..."Canadian English" (for Canada Models) 9 Press the ▲ or ▼ button to select Canadian English, then press the ENTER button. 10 The Canadian English screen will appear. Press the ▲ or ▼ button to select Return, then press the ENTER button. G: General. 8 ans+: Not ... (for Canada Models) 11 Press the ▲ or ▼ button to select Canadian French, then press the ENTER button. 12 The Canadian French screen will appear. For example, if you block 8 ans+ category, then 13 ans+, 16 ans+ and 18 ans+ will automatically be suitable for viewers...
..."Canadian English" (for Canada Models) 9 Press the ▲ or ▼ button to select Canadian English, then press the ENTER button. 10 The Canadian English screen will appear. Press the ▲ or ▼ button to select Return, then press the ENTER button. G: General. 8 ans+: Not ... (for Canada Models) 11 Press the ▲ or ▼ button to select Canadian French, then press the ENTER button. 12 The Canadian French screen will appear. For example, if you block 8 ans+ category, then 13 ans+, 16 ans+ and 18 ans+ will automatically be suitable for viewers...


