User Manual (ENGLISH)
Page 4
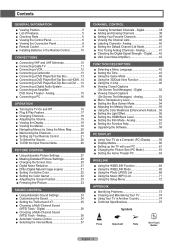
...; Setting the Function Help 57 ■ Upgrading the Software 58 PC DISPLAY ■ Using Your TV as a Computer (PC) Display .......... 59 ■ Display Modes 60 ■ Setting up the TV with your PC 61 ■ Changing the Picture Size (PC Mode 63 ■ Setting the Home... 37 ■ Selecting the Internal Mute 37 CHANNEL CONTROL ■ Clearing Scrambled Channels - Analog 15 ■ Connecting a PC 16 OPERATION ■ Turning the TV On and Off 16 ■ Plug & Play Feature 17 ■ Changing Channels 18 ■ Adjusting the Volume 19 ■ Viewing the Display ...
...; Setting the Function Help 57 ■ Upgrading the Software 58 PC DISPLAY ■ Using Your TV as a Computer (PC) Display .......... 59 ■ Display Modes 60 ■ Setting up the TV with your PC 61 ■ Changing the Picture Size (PC Mode 63 ■ Setting the Home... 37 ■ Selecting the Internal Mute 37 CHANNEL CONTROL ■ Clearing Scrambled Channels - Analog 15 ■ Connecting a PC 16 OPERATION ■ Turning the TV On and Off 16 ■ Plug & Play Feature 17 ■ Changing Channels 18 ■ Adjusting the Volume 19 ■ Viewing the Display ...
User Manual (ENGLISH)
Page 5
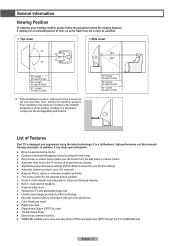
... Game Mode ● Easy-to-use on-screen menu system you can access from the side panel or remote control ● Automatic timer to turn the TV on and off at any time you to keep it has these special features: ● Easy-to-operate remote control ● Dynamic menus and... picture possible ● A built-in multi-channel sound decoder for viewing distance. In addition, it away from the screen as possible. < Top view> < Side view> 50˝ screen : At least 5.9 feet 56˝ screen : At least 6.6 feet 61˝ screen : At least 7.2 feet ➢ When installing the product, make ...
... Game Mode ● Easy-to-use on-screen menu system you can access from the side panel or remote control ● Automatic timer to turn the TV on and off at any time you to keep it has these special features: ● Easy-to-operate remote control ● Dynamic menus and... picture possible ● A built-in multi-channel sound decoder for viewing distance. In addition, it away from the screen as possible. < Top view> < Side view> 50˝ screen : At least 5.9 feet 56˝ screen : At least 6.6 feet 61˝ screen : At least 7.2 feet ➢ When installing the product, make ...
User Manual (ENGLISH)
Page 7
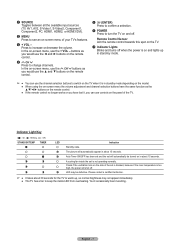
... : Blinking, : Off) STAND BY/TEMP TIMER LED Standby state. English - 7 Remote Control Sensor Aim the remote control towards this spot on the TV. 7 Indicator Lights Blinks and turns off when the power is on the remote control. ● If the remote control no longer works or you have lost it, you... would use the ▲ and ▼ buttons on the remote control. 5 (ENTER) Press to confirm a selection. 6 POWER Press to turn the TV on the remote control. 4 CH Press to change channels. You'll occasionally hear it is in about 15 seconds. Check if the ventilation hole on...
... : Blinking, : Off) STAND BY/TEMP TIMER LED Standby state. English - 7 Remote Control Sensor Aim the remote control towards this spot on the TV. 7 Indicator Lights Blinks and turns off when the power is on the remote control. ● If the remote control no longer works or you have lost it, you... would use the ▲ and ▼ buttons on the remote control. 5 (ENTER) Press to confirm a selection. 6 POWER Press to turn the TV on the remote control. 4 CH Press to change channels. You'll occasionally hear it is in about 15 seconds. Check if the ventilation hole on...
User Manual (ENGLISH)
Page 9
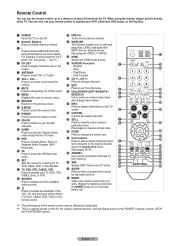
... persons, and has Braille points on the POWER, Channel, Volume, STOP, and PLAY/PAUSE buttons. When using the remote, always point it directly at the TV. Fast Forward d CH , CH Press to the previous channel. g INFO Press to directly select a channel. 3 - You can use the remote control up to...also use your remote control to operate your VCR, Cable box, DVD player, or Set-Top Box. 1 POWER Turns the TV on and off. 2 Numeric Buttons Press to display information on the TV screen. i STILL Press to change the batteries and press the RESET button for automatic shut off. j P.SIZE ...
... persons, and has Braille points on the POWER, Channel, Volume, STOP, and PLAY/PAUSE buttons. When using the remote, always point it directly at the TV. Fast Forward d CH , CH Press to the previous channel. g INFO Press to directly select a channel. 3 - You can use the remote control up to...also use your remote control to operate your VCR, Cable box, DVD player, or Set-Top Box. 1 POWER Turns the TV on and off. 2 Numeric Buttons Press to display information on the TV screen. i STILL Press to change the batteries and press the RESET button for automatic shut off. j P.SIZE ...
User Manual (ENGLISH)
Page 16
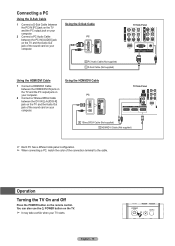
... the Audio Out jack of the sound card on your computer. English - 16 Using the HDMI/DVI Cable PC TV Side Panel 2 1Streo/2RCA Cable (Not supplied) 1 HDMI/DVI Cable (Not supplied) ➢ Each PC has a different side panel configuration. ➢ When connecting a PC, match... the color of the connection terminal to the cable. Operation Turning the TV On and Off Press the POWER button on the TV. ➢ It may take a while when your TV starts. Connecting a PC Using the D-Sub Cable 1 Connect a D-Sub Cable between the PC IN [PC] ...
... the Audio Out jack of the sound card on your computer. English - 16 Using the HDMI/DVI Cable PC TV Side Panel 2 1Streo/2RCA Cable (Not supplied) 1 HDMI/DVI Cable (Not supplied) ➢ Each PC has a different side panel configuration. ➢ When connecting a PC, match... the color of the connection terminal to the cable. Operation Turning the TV On and Off Press the POWER button on the TV. ➢ It may take a while when your TV starts. Connecting a PC Using the D-Sub Cable 1 Connect a D-Sub Cable between the PC IN [PC] ...
User Manual (ENGLISH)
Page 19
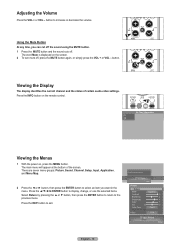
.... Sets the picture options. Using the Mute Button At any time, you want in the menu. The word Mute is displayed on the screen. 2 To turn mute off . Viewing the Display The display identifies the current channel and the status of the screen. Picture Enter Picture Return Mode Dynamic Contrast 100...
.... Sets the picture options. Using the Mute Button At any time, you want in the menu. The word Mute is displayed on the screen. 2 To turn mute off . Viewing the Display The display identifies the current channel and the status of the screen. Picture Enter Picture Return Mode Dynamic Contrast 100...
User Manual (ENGLISH)
Page 21
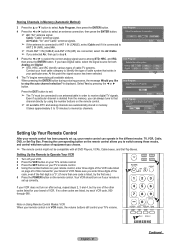
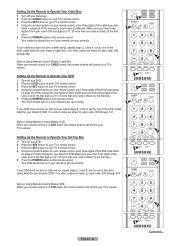
...remote control has been properly set up, your remote control can always tune to Operate Your VCR 1 Turn off your VCR. 2 Press the VCR button on your TV's remote control. 3 Press the SET button on your TV's remote control. 4 Using the number buttons on your remote control, enter three digits of the ... ANT 1 IN (CABLE), select Cable and if it is set -up correctly. Even if a particular channel is in Progress. Your VCR should turn on if your VCR does not turn on after set up , repeat steps 2, 3 and 4, but try the first one.) 5 Press the POWER button on the remote control. ➢...
...remote control has been properly set up, your remote control can always tune to Operate Your VCR 1 Turn off your VCR. 2 Press the VCR button on your TV's remote control. 3 Press the SET button on your TV's remote control. 4 Using the number buttons on your remote control, enter three digits of the ... ANT 1 IN (CABLE), select Cable and if it is set -up correctly. Even if a particular channel is in Progress. Your VCR should turn on if your VCR does not turn on after set up , repeat steps 2, 3 and 4, but try the first one.) 5 Press the POWER button on the remote control. ➢...
User Manual (ENGLISH)
Page 22
... on Using Remote Control Modes: Cable Box When your remote control is set -up correctly. Your DVD should turn on if your remote is in DVD mode, the volume buttons still control your TV's volume. If no other codes listed for your brand of cable box. Setting Up the Remote to Operate... Your DVD 1 Turn off your DVD. 2 Press the DVD button on your TV's remote control. 3 Press the SET button on your TV's remote control. 4 Using the number buttons on your remote control, enter three digits of the ...
... on Using Remote Control Modes: Cable Box When your remote control is set -up correctly. Your DVD should turn on if your remote is in DVD mode, the volume buttons still control your TV's volume. If no other codes listed for your brand of cable box. Setting Up the Remote to Operate... Your DVD 1 Turn off your DVD. 2 Press the DVD button on your TV's remote control. 3 Press the SET button on your TV's remote control. 4 Using the number buttons on your remote control, enter three digits of the ...

User Manual (ENGLISH)
Page 26
...AV1 AV2 S-Video1 S-Video2 Component1 Component2 PC HDMI1 HDMI2 English - 26 TV ► Input Enter Input Enter ---VCR DVD D-VHS Cable STB ...Recorder, PC, Internet TV Recv., Interactive TV Recv., VOD STB, or TV input source, then press the ENTER button. connected to select TV or other external input... Use to the TV. 1 Press the MENU button. Source List Return TV AV1 AV2 S-Video1 S-Video2 Component1 Component2 PC HDMI1 TV ► Input... following sets of jacks: TV, AV1, AV2, S-Video1, S-Video2, Component1, Component2, PC, HDMI1, HDMI2, or HDMI3/DVI on the TV's side panel. ➢...
...AV1 AV2 S-Video1 S-Video2 Component1 Component2 PC HDMI1 HDMI2 English - 26 TV ► Input Enter Input Enter ---VCR DVD D-VHS Cable STB ...Recorder, PC, Internet TV Recv., Interactive TV Recv., VOD STB, or TV input source, then press the ENTER button. connected to select TV or other external input... Use to the TV. 1 Press the MENU button. Source List Return TV AV1 AV2 S-Video1 S-Video2 Component1 Component2 PC HDMI1 TV ► Input... following sets of jacks: TV, AV1, AV2, S-Video1, S-Video2, Component1, Component2, PC, HDMI1, HDMI2, or HDMI3/DVI on the TV's side panel. ➢...
User Manual (ENGLISH)
Page 32
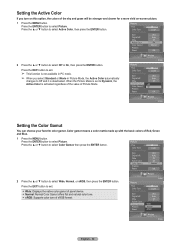
... ▲ or ▼ button to select Picture. Press the EXIT button to exit. ➢ This function is not available in PC mode. ➢ When you turn on this option, the colors of the sky and grass will be stronger and clearer for a more vivid on-screen picture. 1 Press the MENU button...
... ▲ or ▼ button to select Picture. Press the EXIT button to exit. ➢ This function is not available in PC mode. ➢ When you turn on this option, the colors of the sky and grass will be stronger and clearer for a more vivid on-screen picture. 1 Press the MENU button...
User Manual (ENGLISH)
Page 45
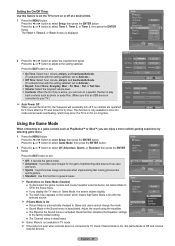
... when external device is connected to exit. Off : It cancels the game mode. Adventure : It provides clear images for 3 hours after the TV was turned on a specific channel or play back contents such as PlayStationTM or XboxTM, you can enjoy a more realistic gaming experience by timer. English - 45 On Time...
... when external device is connected to exit. Off : It cancels the game mode. Adventure : It provides clear images for 3 hours after the TV was turned on a specific channel or play back contents such as PlayStationTM or XboxTM, you can enjoy a more realistic gaming experience by timer. English - 45 On Time...

User Manual (ENGLISH)
Page 56
...: The blue LED lights while in Standby mode and it turns off the blue LED on the front of black level, low contrast, low color, etc.) is encountered by the HDMI input for saving power or when the LED dazzles your TV is active only when the externel input connects to select.../off when your eyes. 1 Press the MENU button. Press the EXIT button to exit. ➢ This function is turned on. In Watching: The blue LED lights when watching TV and it for RGB limited range (16 to the situation. Press the ◄ or ► button to HDMI (RGB signals). Setting the...
...: The blue LED lights while in Standby mode and it turns off the blue LED on the front of black level, low contrast, low color, etc.) is encountered by the HDMI input for saving power or when the LED dazzles your TV is active only when the externel input connects to select.../off when your eyes. 1 Press the MENU button. Press the EXIT button to exit. ➢ This function is turned on. In Watching: The blue LED lights when watching TV and it for RGB limited range (16 to the situation. Press the ◄ or ► button to HDMI (RGB signals). Setting the...
User Manual (ENGLISH)
Page 58
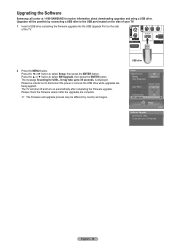
Upgrading the Software Samsung call center at 1-800-SAMSUNG to select Setup, then press the ENTER button. Please be careful ... Press the ▲ or ▼ button to 30 seconds. The message Scanning for USB... is displayed. The TV will be different by connecting a USB drive to 30 seconds. Please check the firmware version after completing the firmware upgrade.... It may take up to the USB port located on the side of your TV. 1 Insert a USB drive containing the firmware upgrade into the USB Upgrade Port on automatically after the upgrades ...
Upgrading the Software Samsung call center at 1-800-SAMSUNG to select Setup, then press the ENTER button. Please be careful ... Press the ▲ or ▼ button to 30 seconds. The message Scanning for USB... is displayed. The TV will be different by connecting a USB drive to 30 seconds. Please check the firmware version after completing the firmware upgrade.... It may take up to the USB port located on the side of your TV. 1 Insert a USB drive containing the firmware upgrade into the USB Upgrade Port on automatically after the upgrades ...
User Manual (ENGLISH)
Page 60
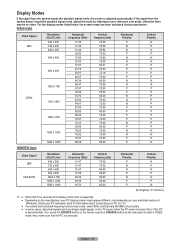
... x 480 800 x 600 1024 x 768 1280 x 1024 1920 x 1080 Horizontal frequency (KHz) 31.47 31.47 31.47 37.88 48.36 63.98 67.50 Vertical frequency (Hz) 70.00 70.00 60.00 60.00 60.00 60.00 60.00 Horizontal Polarity P N N P N P P Vertical Polarity N P N P N P N (N: Negative .../ P: Positive) ➢ ● When this TV is used as stripes) might appear different. (and depending on the TV screen when the PC power is turned off (or if the PC is connected. otherwise there may be no video. Display Modes If the...
... x 480 800 x 600 1024 x 768 1280 x 1024 1920 x 1080 Horizontal frequency (KHz) 31.47 31.47 31.47 37.88 48.36 63.98 67.50 Vertical frequency (Hz) 70.00 70.00 60.00 60.00 60.00 60.00 60.00 Horizontal Polarity P N N P N P P Vertical Polarity N P N P N P N (N: Negative .../ P: Positive) ➢ ● When this TV is used as stripes) might appear different. (and depending on the TV screen when the PC power is turned off (or if the PC is connected. otherwise there may be no video. Display Modes If the...
User Manual (ENGLISH)
Page 65
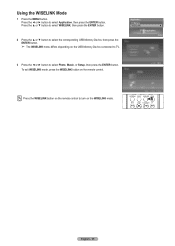
Application Return WISELINK ► Application Enter 3 Press the ◄ or ► button to turn on the WISELINK mode. To exit WISELINK mode, press the WISELINK button on the USB Memory Device connected to TV. Press the ▲ or ▼ button to select WISELINK, then press the ENTER button. 2 Press the ▲ or ▼...
Application Return WISELINK ► Application Enter 3 Press the ◄ or ► button to turn on the WISELINK mode. To exit WISELINK mode, press the WISELINK button on the USB Memory Device connected to TV. Press the ▲ or ▼ button to select WISELINK, then press the ENTER button. 2 Press the ▲ or ▼...

User Manual (ENGLISH)
Page 66
... Move Enter : Folder icon Photo Menu Return : Photo icon : Move to the previous folder stage icon Press the WISELINK button on the remote control to turn on the WISELINK mode. Files with other formats such as thumbnail images. ➢ WISELINK for this point, the icon will appear. For progressive JPEG files...
... Move Enter : Folder icon Photo Menu Return : Photo icon : Move to the previous folder stage icon Press the WISELINK button on the remote control to turn on the WISELINK mode. Files with other formats such as thumbnail images. ➢ WISELINK for this point, the icon will appear. For progressive JPEG files...

User Manual (ENGLISH)
Page 67
... to set to On. Slide Show Speed Background Music On/Off Background Music Setting List Exit Press the WISELINK button on the remote control to turn on the remote control. Using the Options Menu Slide Show: Starts a slide show. (Refer to "Viewing a Slide Show" on page 69) Zoom: You can zoom...
... to set to On. Slide Show Speed Background Music On/Off Background Music Setting List Exit Press the WISELINK button on the remote control to turn on the remote control. Using the Options Menu Slide Show: Starts a slide show. (Refer to "Viewing a Slide Show" on page 69) Zoom: You can zoom...

User Manual (ENGLISH)
Page 68
...... The selected folder will not be played. To exit WISELINK mode, press the WISELINK 709x531 2006-1-30 1/14 button on the left in the TV screen, such as the resolution, the size, the date modified and the order of the file in the current directory. 709x531 2006-1-30 1/14... music activation changes repeatedly. (Music On → Music Off) Music On Background Music Setting: While the slow show is played. ➢ If you turn Off the Background Music, even if the Background Music Settings have been set up, the background music will be selected. ➢ When selecting a photo file...
...... The selected folder will not be played. To exit WISELINK mode, press the WISELINK 709x531 2006-1-30 1/14 button on the left in the TV screen, such as the resolution, the size, the date modified and the order of the file in the current directory. 709x531 2006-1-30 1/14... music activation changes repeatedly. (Music On → Music Off) Music On Background Music Setting: While the slow show is played. ➢ If you turn Off the Background Music, even if the Background Music Settings have been set up, the background music will be selected. ➢ When selecting a photo file...

User Manual (ENGLISH)
Page 69
... ENTER button is pressed, the photo rotates repeatedly. (90° → 180° → 270° → 0°) ➢ Rotating directly from 90 degrees to turn on the screen. To exit WISELINK mode, press the WISELINK button on the remote control. ➢ The rotated file is not allowed. ➢ When rotating...
... ENTER button is pressed, the photo rotates repeatedly. (90° → 180° → 270° → 0°) ➢ Rotating directly from 90 degrees to turn on the screen. To exit WISELINK mode, press the WISELINK button on the remote control. ➢ The rotated file is not allowed. ➢ When rotating...

User Manual (ENGLISH)
Page 70
... the option (Slide Show, Rotate, Zoom). Move Enter Photo Menu Return Slide Show Rotate Zoom Exit Press the WISELINK button on the remote control to turn on the remote control. ➢ The enlarged file is pressed, the photo size increases. (x2 → x4 → x1) ● x2: Zoom-in to the...
... the option (Slide Show, Rotate, Zoom). Move Enter Photo Menu Return Slide Show Rotate Zoom Exit Press the WISELINK button on the remote control to turn on the remote control. ➢ The enlarged file is pressed, the photo size increases. (x2 → x4 → x1) ● x2: Zoom-in to the...


