
User Manual (ENGLISH)
Page 6
...Side Panel Jacks ...13 Rear Panel Jacks ...14 Remote Control...15 Connections 18 Connecting VHF and UHF Antennas 18 Antennas with 75-ohm Round Leads 18 Connecting Cable TV 19 Cable without a.../Audio jack 21 Connecting CableCARD 22 Connecting a Camcorder 23 Connecting a DVD Player 24 Connecting to HDMI (High Definition Multimedia Interface 24 Connecting to Y, PB, PR 24 Connecting to Audio and Video Jacks...Timer 48 Viewing an External Signal Source 49 Assigning Names to External Input Mode 50 Channel Control 52 Selecting Your Favorite Channels 52 Viewing the Channel Lists 53 Adding...
...Side Panel Jacks ...13 Rear Panel Jacks ...14 Remote Control...15 Connections 18 Connecting VHF and UHF Antennas 18 Antennas with 75-ohm Round Leads 18 Connecting Cable TV 19 Cable without a.../Audio jack 21 Connecting CableCARD 22 Connecting a Camcorder 23 Connecting a DVD Player 24 Connecting to HDMI (High Definition Multimedia Interface 24 Connecting to Y, PB, PR 24 Connecting to Audio and Video Jacks...Timer 48 Viewing an External Signal Source 49 Assigning Names to External Input Mode 50 Channel Control 52 Selecting Your Favorite Channels 52 Viewing the Channel Lists 53 Adding...

User Manual (ENGLISH)
Page 14
Your New Wide TV Rear Panel Jacks Œ CableCARDTM Insert a CableCARD into the slot. (Refer to page 22) ´...) ¨ VIDEO/AUDIO OUTPUT jacks Sends video/audio signals from the TV to pages 18~20) ı POWER IN Connect the supplied power cord. An optional HDMI/DVI cable will be necessary to make this purpose, which allow you ...Net (IEEE1394) S400 MPEG Connect to pages 116~130) Æ ANTENNA terminals Two independent cables or antennas can also be connected to the HDMI jack of a device with separate analog audio inputs. Use "ANT 1 IN (CABLE)" and "ANT 2 IN (AIR)" terminals to ...
Your New Wide TV Rear Panel Jacks Œ CableCARDTM Insert a CableCARD into the slot. (Refer to page 22) ´...) ¨ VIDEO/AUDIO OUTPUT jacks Sends video/audio signals from the TV to pages 18~20) ı POWER IN Connect the supplied power cord. An optional HDMI/DVI cable will be necessary to make this purpose, which allow you ...Net (IEEE1394) S400 MPEG Connect to pages 116~130) Æ ANTENNA terminals Two independent cables or antennas can also be connected to the HDMI jack of a device with separate analog audio inputs. Use "ANT 1 IN (CABLE)" and "ANT 2 IN (AIR)" terminals to ...

User Manual (ENGLISH)
Page 24
... IN jacks on the TV and the COMPONENT (Y/PB/PR or Y/CB/CR) OUT jacks on the DVD player. 2 Connect a set of audio cables between the HDMI IN 2 (or HDMI 1/DVI IN) jack on the TV and the HDMI OUT jack on the DVD player. TV Rear Panel Connecting to HDMI (High Definition Multimedia Interface...) 1 Connect an HDMI cable between the COMPONENT (1 or 2) AUDIO (L, R) IN jacks on the TV and the AUDIO OUT jacks on ...
... IN jacks on the TV and the COMPONENT (Y/PB/PR or Y/CB/CR) OUT jacks on the DVD player. 2 Connect a set of audio cables between the HDMI IN 2 (or HDMI 1/DVI IN) jack on the TV and the HDMI OUT jack on the DVD player. TV Rear Panel Connecting to HDMI (High Definition Multimedia Interface...) 1 Connect an HDMI cable between the COMPONENT (1 or 2) AUDIO (L, R) IN jacks on the TV and the AUDIO OUT jacks on ...

User Manual (ENGLISH)
Page 26
.... Incoming Cable or Antenna English - 26 DTV Set-Top Box TV Rear Panel 2 1 DTV Set-Top Box Connections Connecting a DTV Set-Top Box Connecting to DVI (Digital Visual Interface) 1 Connect an HDMI/DVI cable between the HDMI 1/DVI IN jack on the TV and the DVI OUT jack on the Set-Top Box. 2 ... source's power is on, or you will be sure to select it in the TV menu's source list. • The HDMI 1/DVI IN jack is not compatible with PC. TV Rear Panel 1 2 NOTES • Please be unable to match the color coded input terminals and cable jacks. • Component Video separates the video...
.... Incoming Cable or Antenna English - 26 DTV Set-Top Box TV Rear Panel 2 1 DTV Set-Top Box Connections Connecting a DTV Set-Top Box Connecting to DVI (Digital Visual Interface) 1 Connect an HDMI/DVI cable between the HDMI 1/DVI IN jack on the TV and the DVI OUT jack on the Set-Top Box. 2 ... source's power is on, or you will be sure to select it in the TV menu's source list. • The HDMI 1/DVI IN jack is not compatible with PC. TV Rear Panel 1 2 NOTES • Please be unable to match the color coded input terminals and cable jacks. • Component Video separates the video...

User Manual (ENGLISH)
Page 27
...VIDEO/AUDIO input jacks on the TV and VIDEO or S-VIDEO/AUDIO output jacks on the VCR. DTV Set-Top Box TV Rear Panel 3 Connecting to HDMI (High Definition Multimedia Interface) 1 Connect an HDMI cable between the HDMI IN 2 (or HDMI 1/DVI IN) jack on the TV and the HDMI OUT jack on the Set-...Top Box. Incoming Cable or Antenna TV Rear Panel 2 Connect the Video/Audio cables ...
...VIDEO/AUDIO input jacks on the TV and VIDEO or S-VIDEO/AUDIO output jacks on the VCR. DTV Set-Top Box TV Rear Panel 3 Connecting to HDMI (High Definition Multimedia Interface) 1 Connect an HDMI cable between the HDMI IN 2 (or HDMI 1/DVI IN) jack on the TV and the HDMI OUT jack on the Set-...Top Box. Incoming Cable or Antenna TV Rear Panel 2 Connect the Video/Audio cables ...

User Manual (ENGLISH)
Page 28
...OPTICAL)" jack on the market today. Connections Connecting a Digital Audio System There are many types of an audio system is shown below. TV Rear Panel NOTES • OPTICAL: converts the electric signal into an optical light signal, and transmits it through glass fibers. • When...Digital Audio 1 Out (Optical) terminal: Decrease the gain (volume) of the TV, and adjust the volume level with the audio system's volume control. Audio System RF AV S-Video Component PC HDMI Internal Speakers Internal Mute Off Internal Mute On Active Inactive Active Inactive Audio Out...
...OPTICAL)" jack on the market today. Connections Connecting a Digital Audio System There are many types of an audio system is shown below. TV Rear Panel NOTES • OPTICAL: converts the electric signal into an optical light signal, and transmits it through glass fibers. • When...Digital Audio 1 Out (Optical) terminal: Decrease the gain (volume) of the TV, and adjust the volume level with the audio system's volume control. Audio System RF AV S-Video Component PC HDMI Internal Speakers Internal Mute Off Internal Mute On Active Inactive Active Inactive Audio Out...

User Manual (ENGLISH)
Page 29
... adjust the volume level with the volume control on the audio amplifier. • If using the HDMI/DVI, PC, or Component input on the TV, the audio output signal is available only when the TV's Internal Mute is set to on. (Refer to page 86) • Please be sure to an Analog Amplifier... 1 The "AV OUT (AUDIO L/R)" jacks cannot be used for external speakers. You must hook them up to an amplifier. TV Rear Panel 1 Amplifier...
... adjust the volume level with the volume control on the audio amplifier. • If using the HDMI/DVI, PC, or Component input on the TV, the audio output signal is available only when the TV's Internal Mute is set to on. (Refer to page 86) • Please be sure to an Analog Amplifier... 1 The "AV OUT (AUDIO L/R)" jacks cannot be used for external speakers. You must hook them up to an amplifier. TV Rear Panel 1 Amplifier...

User Manual (ENGLISH)
Page 49
...signal source. Press the ENTER button to select a AV2 AV3 ------- the TV, you connect equipment to †PC ---- or † button to...first. • HDMI input can choose between viewing signals from connected equipment, such as a VCR, DVD, Set-Top Box or the TV source (broadcast or...S-Video1 ---- Alternate method Press the SOURCE button on the TV's side panel. Setting the Signal Source 1 Press the ... the remote control to select "Source List", then press the ENTER Source List Return TV √ button. or † button to switch between Input the following sets of...
...signal source. Press the ENTER button to select a AV2 AV3 ------- the TV, you connect equipment to †PC ---- or † button to...first. • HDMI input can choose between viewing signals from connected equipment, such as a VCR, DVD, Set-Top Box or the TV source (broadcast or...S-Video1 ---- Alternate method Press the SOURCE button on the TV's side panel. Setting the Signal Source 1 Press the ... the remote control to select "Source List", then press the ENTER Source List Return TV √ button. or † button to switch between Input the following sets of...

User Manual (ENGLISH)
Page 63
... press Mode 16:9 the ENTER button. NOTES • You can select the 16:9, 4:3 and Wide Fit screen sizes in the DTV Component (720p, 1080i) or HDMI (720p, 1080i) mode. • When Double ( , ) mode has been set in 4:3 format to 4:3 normal mode. English - 63 Horizontal zoom(Wide Fit) sets the optical picture...
... press Mode 16:9 the ENTER button. NOTES • You can select the 16:9, 4:3 and Wide Fit screen sizes in the DTV Component (720p, 1080i) or HDMI (720p, 1080i) mode. • When Double ( , ) mode has been set in 4:3 format to 4:3 normal mode. English - 63 Horizontal zoom(Wide Fit) sets the optical picture...

User Manual (ENGLISH)
Page 71
... operates. Swap does not operate X : PIP doesn't operate Sub Main ATSC (Air DTV) QAM (Cable DTV) NTSC (Analog) AV1 AV2 AV3 S-Video1 S-Video2 Component1 Component2 HDMI PC D-Net ATSC (Air DTV) X X X ▲ ▲ ▲ ▲▲ X QAM (Cable DTV) X X X ▲ ▲ ▲ ▲...9650; O ▲ ▲ ▲ ▲▲ X NOTES • PIP is only available in RF (TV) mode. • The PIP swap function is only supported in RF (TV) mode. (Analog) English - 71 Swapping the Sub (PIP) Picture and Main Picture 1 Press the MENU button....
... operates. Swap does not operate X : PIP doesn't operate Sub Main ATSC (Air DTV) QAM (Cable DTV) NTSC (Analog) AV1 AV2 AV3 S-Video1 S-Video2 Component1 Component2 HDMI PC D-Net ATSC (Air DTV) X X X ▲ ▲ ▲ ▲▲ X QAM (Cable DTV) X X X ▲ ▲ ▲ ▲...9650; O ▲ ▲ ▲ ▲▲ X NOTES • PIP is only available in RF (TV) mode. • The PIP swap function is only supported in RF (TV) mode. (Analog) English - 71 Swapping the Sub (PIP) Picture and Main Picture 1 Press the MENU button....
User Manual (ENGLISH)
Page 132
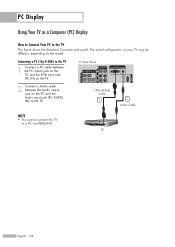
... jack on the PC and the Audio input jack (PC AUDIO IN) on the TV. 15Pin (D-Sub) Cable 1 2 Audio Cable NOTE • You cannot connect this TV to the TV This figure shows the Standard Connector-jack panel. TV Rear Panel 2 Connect a Audio cable between the PC output jack on the PC and ...the RGB input jack (PC IN) on the model. The actual configuration on your TV may be different, depending on the TV. PC Display Using Your TV as a Computer (PC) Display How...
... jack on the PC and the Audio input jack (PC AUDIO IN) on the TV. 15Pin (D-Sub) Cable 1 2 Audio Cable NOTE • You cannot connect this TV to the TV This figure shows the Standard Connector-jack panel. TV Rear Panel 2 Connect a Audio cable between the PC output jack on the PC and ...the RGB input jack (PC IN) on the model. The actual configuration on your TV may be different, depending on the TV. PC Display Using Your TV as a Computer (PC) Display How...


