
User Manual (ENGLISH)
Page 4
... this product unit to encode and/or decode audio files conforming to the Region Management Information. If this occurs, turn off and on the player. • Be careful not to the Region number of this DVD player, the DVD player cannot play the disc. • The product unit accompanying this product unit. USE OF CONTROLS OR ADJUSTMENTS OR PERFORMANCE OF PROCEDURES OTHER THAN THOSE SPECIFIED HEREIN...
... this product unit to encode and/or decode audio files conforming to the Region Management Information. If this occurs, turn off and on the player. • Be careful not to the Region number of this DVD player, the DVD player cannot play the disc. • The product unit accompanying this product unit. USE OF CONTROLS OR ADJUSTMENTS OR PERFORMANCE OF PROCEDURES OTHER THAN THOSE SPECIFIED HEREIN...

User Manual (ENGLISH)
Page 6
... Instructions 2 Precautions 3 Before you start 5 Chapter 1: Setup General Features 7 Disc Type and Characteristics 8 Description 9 Tour of the Remote Control 11 Chapter 2: Connections Choosing a Connection 12 Chapter 3: Basic Functions Playing a Disc 20 Using the Search and Skip Functions 22 Using the Display Function 23 Using the Disc and Title Menu 24 Using the Function Menu 25 Repeat Play 26 Slow Play 27 Chapter 4: Advanced Functions Adjusting the Aspect Ratio (EZ View 28 Selecting the Audio Language 30 Selecting the Subtitle Language 31 Changing the Camera Angle 32 Using...
... Instructions 2 Precautions 3 Before you start 5 Chapter 1: Setup General Features 7 Disc Type and Characteristics 8 Description 9 Tour of the Remote Control 11 Chapter 2: Connections Choosing a Connection 12 Chapter 3: Basic Functions Playing a Disc 20 Using the Search and Skip Functions 22 Using the Display Function 23 Using the Disc and Title Menu 24 Using the Function Menu 25 Repeat Play 26 Slow Play 27 Chapter 4: Advanced Functions Adjusting the Aspect Ratio (EZ View 28 Selecting the Audio Language 30 Selecting the Subtitle Language 31 Changing the Camera Angle 32 Using...
User Manual (ENGLISH)
Page 7
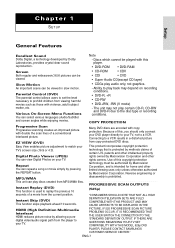
... REPEAT button. IF THERE ARE QUESTIONS REGARDING YOUR TV SET COMPATIBILITY WITH THIS MODEL 525p DVD PLAYER, PLEASE CONTACT SAMSUNG'S CUSTOMER SERVICE CENTER." Instant Replay (DVD) This function is prohibited. Connecting to your TV's screen size (16:9 or 4:3). PROGRESSIVE SCAN OUTPUTS (525p) "CONSUMERS SHOULD NOTE THAT NOT ALL HIGH DEFINITION TELEVISION SETS ARE FULLY COMPATIBLE WITH THIS PRODUCT AND MAY CAUSE ARTIFACTS TO BE DISPLAYED IN THE PICTURE, IF 525 PROGRESSIVE SCAN PICTURE PROBLEMS...
... REPEAT button. IF THERE ARE QUESTIONS REGARDING YOUR TV SET COMPATIBILITY WITH THIS MODEL 525p DVD PLAYER, PLEASE CONTACT SAMSUNG'S CUSTOMER SERVICE CENTER." Instant Replay (DVD) This function is prohibited. Connecting to your TV's screen size (16:9 or 4:3). PROGRESSIVE SCAN OUTPUTS (525p) "CONSUMERS SHOULD NOTE THAT NOT ALL HIGH DEFINITION TELEVISION SETS ARE FULLY COMPATIBLE WITH THIS PRODUCT AND MAY CAUSE ARTIFACTS TO BE DISPLAYED IN THE PICTURE, IF 525 PROGRESSIVE SCAN PICTURE PROBLEMS...

User Manual (ENGLISH)
Page 8
... is recorded as a Digital Signal with better audio quality, less distortion and less deterioration of discs with the corresponding logos: Disc Types (Logos) DVD AUDIO-CD Recording Types Audio + Video Disc Size Max. Disc Markings ~ NTSC Play Region Number NTSC broadcast system in order for this player is described on -screen menu. Dolby Digital disc STEREO Stereo disc DIGITAL SOUND Digital Audio disc DTS disc MP3 disc You must match in U.S.A, Canada, Korea, Japan, etc. Region Number Both the DVD player and the discs are coded by region. The Region Number...
... is recorded as a Digital Signal with better audio quality, less distortion and less deterioration of discs with the corresponding logos: Disc Types (Logos) DVD AUDIO-CD Recording Types Audio + Video Disc Size Max. Disc Markings ~ NTSC Play Region Number NTSC broadcast system in order for this player is described on -screen menu. Dolby Digital disc STEREO Stereo disc DIGITAL SOUND Digital Audio disc DTS disc MP3 disc You must match in U.S.A, Canada, Korea, Japan, etc. Region Number Both the DVD player and the discs are coded by region. The Region Number...
User Manual (ENGLISH)
Page 10
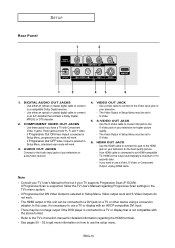
... 52 to the TV's instruction manual for higher picture quality. - DIGITAL AUDIO OUT JACKS - Use either an optical or coaxial digital cable to connect to use a Video, S-Video or Component Output, unplug HDMI cable. Use a video cable to connect to the Video input jack on how to a compatible Dolby Digital receiver. - If Progressive Scan is selected in Setup Menu, progressive scan mode will work. - Use the S-Video cable to connect this jack to S-Video. 5. SETUP Rear Panel 1 2 1 3 45 6 1. The Video Output in Setup Menu must be output automatically a maximum of...
... 52 to the TV's instruction manual for higher picture quality. - DIGITAL AUDIO OUT JACKS - Use either an optical or coaxial digital cable to connect to use a Video, S-Video or Component Output, unplug HDMI cable. Use a video cable to connect to the Video input jack on how to a compatible Dolby Digital receiver. - If Progressive Scan is selected in Setup Menu, progressive scan mode will work. - Use the S-Video cable to connect this jack to S-Video. 5. SETUP Rear Panel 1 2 1 3 45 6 1. The Video Output in Setup Menu must be output automatically a maximum of...
User Manual (ENGLISH)
Page 11
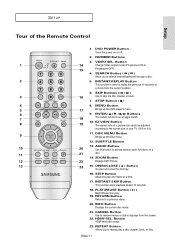
... (16:9 or 4:3). 9 11. OPEN/CLOSE ( ) Button To open and close the disc tray. 16. PLAY/PAUSE Button ( ) Begin/Pause disc play one frame at a time. 17. DISC MENU Button Brings up the DVD player's menu. 6 9. INSTANT SKIP Button This function skips playback ahead 10 seconds. 18. RETURN Button Returns to remove menus or status displays from the current position. 6. INFO Button Displays the current disc mode. 21. CANCEL Button Use to a previous menu. 20. Button 1 14 Change Video output mode (Progressive ON or 15 Progressive OFF) 4. ENG-11...
... (16:9 or 4:3). 9 11. OPEN/CLOSE ( ) Button To open and close the disc tray. 16. PLAY/PAUSE Button ( ) Begin/Pause disc play one frame at a time. 17. DISC MENU Button Brings up the DVD player's menu. 6 9. INSTANT SKIP Button This function skips playback ahead 10 seconds. 18. RETURN Button Returns to remove menus or status displays from the current position. 6. INFO Button Displays the current disc mode. 21. CANCEL Button Use to a previous menu. 20. Button 1 14 Change Video output mode (Progressive ON or 15 Progressive OFF) 4. ENG-11...
User Manual (ENGLISH)
Page 12
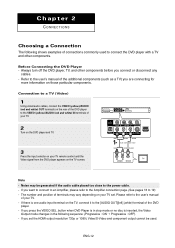
... user's manual of your TV remote control until the Video signal from the DVD player appears on the TV screen. If there is inserted, the Video Output mode changes in stop mode or no disc is one audio input terminal on the TV, connect it to the VIDEO (yellow)/AUDIO (red and white) IN terminals of your TV. 2 Turn on the DVD player and TV. 3 Press the input selector on your TV set the HDMI output resolution 720p or 1080i, Video/S-Video...
... user's manual of your TV remote control until the Video signal from the DVD player appears on the TV screen. If there is inserted, the Video Output mode changes in stop mode or no disc is one audio input terminal on the TV, connect it to the VIDEO (yellow)/AUDIO (red and white) IN terminals of your TV. 2 Turn on the DVD player and TV. 3 Press the input selector on your TV set the HDMI output resolution 720p or 1080i, Video/S-Video...

User Manual (ENGLISH)
Page 13
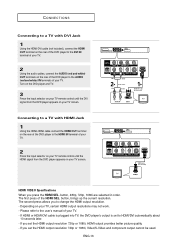
... quality images. Turn on the DVD player and TV. 3 Press the input selector on your TV remote control until the SVideo signal from the DVD player appears on the rear of the DVD player to 19) - Connections CONNECTIONS Connection to your TV using an S-Video cable. - ENG-13 Please refer to change the Video Output mode. (See page 12) RED WHITE Audio Cable RED WHITE S-Video Cable (not included) Note - If you set . Connecting to a TV (S-Video) - button to the user's manual of your...
... quality images. Turn on the DVD player and TV. 3 Press the input selector on your TV remote control until the SVideo signal from the DVD player appears on the rear of the DVD player to 19) - Connections CONNECTIONS Connection to your TV using an S-Video cable. - ENG-13 Please refer to change the Video Output mode. (See page 12) RED WHITE Audio Cable RED WHITE S-Video Cable (not included) Note - If you set . Connecting to a TV (S-Video) - button to the user's manual of your...

User Manual (ENGLISH)
Page 14
... color reproduction images. If Video output is incorrectly set to change the Video Output mode. (See page 12) RED BLUE GREEN RED WHITE Audio Cable RED WHITE RED BLUE GREEN Component cable (not included) Note - Please refer to 19) - Component video separates the picture element into black and white(Y), blue(PB), red(PR) signals to present clear and clean images. (Audio signals are delivered through the audio output.) 1 Using component video cables (not included), connect the COMPONENT VIDEO OUT terminals on the rear of the DVD player...
... color reproduction images. If Video output is incorrectly set to change the Video Output mode. (See page 12) RED BLUE GREEN RED WHITE Audio Cable RED WHITE RED BLUE GREEN Component cable (not included) Note - Please refer to 19) - Component video separates the picture element into black and white(Y), blue(PB), red(PR) signals to present clear and clean images. (Audio signals are delivered through the audio output.) 1 Using component video cables (not included), connect the COMPONENT VIDEO OUT terminals on the rear of the DVD player...

User Manual (ENGLISH)
Page 15
... TV User's Manual regarding Progressive Scan settings in the Display Setup menu. (See pages 50 to the AUDIO (red and white) IN terminals of your TV remote control until the Component signal from the illustration above. Note - Progressive scanning method provides better and clearer picture quality. - Depending on your TV, the connection method may differ from the DVD player appears on your TV. Turn on the DVD player and TV. 3 Press the input selector...
... TV User's Manual regarding Progressive Scan settings in the Display Setup menu. (See pages 50 to the AUDIO (red and white) IN terminals of your TV remote control until the Component signal from the illustration above. Note - Progressive scanning method provides better and clearer picture quality. - Depending on your TV, the connection method may differ from the DVD player appears on your TV. Turn on the DVD player and TV. 3 Press the input selector...
User Manual (ENGLISH)
Page 16
... user's manual of your TV. - If you press the HDMI SEL. RED WHITE Audio Cable RED WHITE HDMI-DVI cable (Not Included) HDMI cable (Not Included) HDMI VIDEO Specifications When you set the HDMI output resolution 720p or 1080i, HDMI output provides better picture quality. - Please refer to change the HDMI output resolution. - button, 480p, 720p, 1080i are selected in order. The first press of your TV screen. CONNECTIONS Connecting to a TV with HDMI Jack 1 Using the HDMI-HDMI cable connect the HDMI OUT terminal on the rear...
... user's manual of your TV. - If you press the HDMI SEL. RED WHITE Audio Cable RED WHITE HDMI-DVI cable (Not Included) HDMI cable (Not Included) HDMI VIDEO Specifications When you set the HDMI output resolution 720p or 1080i, HDMI output provides better picture quality. - Please refer to change the HDMI output resolution. - button, 480p, 720p, 1080i are selected in order. The first press of your TV screen. CONNECTIONS Connecting to a TV with HDMI Jack 1 Using the HDMI-HDMI cable connect the HDMI OUT terminal on the rear...
User Manual (ENGLISH)
Page 18
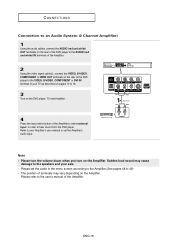
... audio cables, connect the AUDIO (red and white) OUT terminals on the rear of the DVD player to the AUDIO (red and white) IN terminals of the Amplifier. 2 Using the video signal cable(s), connect the VIDEO, S-VIDEO, COMPONENT or HDMI OUT terminals on the rear of the DVD player to the VIDEO, S-VIDEO, COMPONENT or DVI IN terminal of terminals may cause damage to the speakers and your Amplifier's user manual to set the audio in order to hear sound...
... audio cables, connect the AUDIO (red and white) OUT terminals on the rear of the DVD player to the AUDIO (red and white) IN terminals of the Amplifier. 2 Using the video signal cable(s), connect the VIDEO, S-VIDEO, COMPONENT or HDMI OUT terminals on the rear of the DVD player to the VIDEO, S-VIDEO, COMPONENT or DVI IN terminal of terminals may cause damage to the speakers and your Amplifier's user manual to set the audio in order to hear sound...
User Manual (ENGLISH)
Page 19
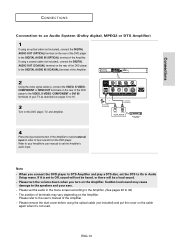
... turn the volume down when you connect the DVD player to DTS Amplifier and play a DTS disc, set to Off, sound will not be heard, or there will be a loud sound. - If using an optical cable (not included), connect the DIGITAL AUDIO OUT (OPTICAL) terminal on the rear of the DVD player to the DIGITAL AUDIO IN (OPTICAL) terminal of the Amplifier. Connections CONNECTIONS Connection to an Audio System (Dolby digital, MPEG2 or DTS Amplifier) 1 If using...
... turn the volume down when you connect the DVD player to DTS Amplifier and play a DTS disc, set to Off, sound will not be heard, or there will be a loud sound. - If using an optical cable (not included), connect the DIGITAL AUDIO OUT (OPTICAL) terminal on the rear of the DVD player to the DIGITAL AUDIO IN (OPTICAL) terminal of the Amplifier. Connections CONNECTIONS Connection to an Audio System (Dolby digital, MPEG2 or DTS Amplifier) 1 If using...
User Manual (ENGLISH)
Page 20
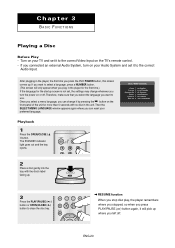
... a disc gently into the tray with no disc in the player for the first time.) If the language for more than 5 seconds with the disc's label facing up where you can reset your Audio System and set it to the correct Video Input on or off . Chapter 3 BASIC FUNCTIONS Playing a Disc Before Play - Therefore, make sure that you select the language you connected an external Audio System, turn the power on the TV's remote control. -
... a disc gently into the tray with no disc in the player for the first time.) If the language for more than 5 seconds with the disc's label facing up where you can reset your Audio System and set it to the correct Video Input on or off . Chapter 3 BASIC FUNCTIONS Playing a Disc Before Play - Therefore, make sure that you select the language you connected an external Audio System, turn the power on the TV's remote control. -
User Manual (ENGLISH)
Page 39
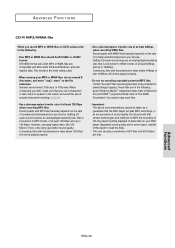
... 9660 format and Joliet MP3 or WMA files are compatible with Microsoft's DOS and Windows, and with MP3 files basically depends on your DVD player (degraded sound quality and in the name, and avoid the use of at least 64Kbps when recording WMA files. Use a decompression transfer rate of special characters including - Sound quality with Apple's Mac. Getting CD audio sound requires an analog/digital...
... 9660 format and Joliet MP3 or WMA files are compatible with Microsoft's DOS and Windows, and with MP3 files basically depends on your DVD player (degraded sound quality and in the name, and avoid the use of at least 64Kbps when recording WMA files. Use a decompression transfer rate of special characters including - Sound quality with Apple's Mac. Getting CD audio sound requires an analog/digital...
User Manual (ENGLISH)
Page 51
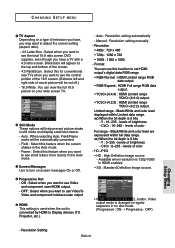
... a 4:3 ratio screen. Manual : Resolution setting manually - levels of color Ful range - levels of color - Resolution Setting ENG-51 Changing Setup Menu Format You can view the full 16:9 picture on your wide screen TV. Black/White and color level displayed within full data range. CbCr : 16~240 - Available when resolution is changed in regular sequence in HDMI enabled. • SD : Standard Definition image source. button, Video output mode is 720p/1080i in no disc mode. (Progressive : ON ➝ Progressive : OFF) - CHANGING SETUP MENU ❶ TV Aspect...
... a 4:3 ratio screen. Manual : Resolution setting manually - levels of color Ful range - levels of color - Resolution Setting ENG-51 Changing Setup Menu Format You can view the full 16:9 picture on your wide screen TV. Black/White and color level displayed within full data range. CbCr : 16~240 - Available when resolution is changed in regular sequence in HDMI enabled. • SD : Standard Definition image source. button, Video output mode is 720p/1080i in no disc mode. (Progressive : ON ➝ Progressive : OFF) - CHANGING SETUP MENU ❶ TV Aspect...
User Manual (ENGLISH)
Page 52
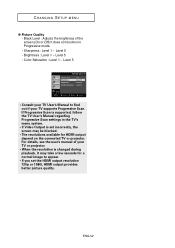
... connected TV or projector. If Progressive Scan is set the HDMI output resolution 720p or 1080i, HDMI output provides better picture quality. Brightness : Level 1 ~ Level 5 - Black Level : Adjusts the brightness of your TV supports Progressive Scan. For details, see the user's manual of the screen.(On or Off) It does not function in the TV's menu system. • If Video Output is supported, follow the TV User's Manual regarding Progressive Scan settings in Progressive mode. - Sharpness : Level 1 ~ Level 5 - ENG-52 CHANGING SETUP MENU...
... connected TV or projector. If Progressive Scan is set the HDMI output resolution 720p or 1080i, HDMI output provides better picture quality. Brightness : Level 1 ~ Level 5 - Black Level : Adjusts the brightness of your TV supports Progressive Scan. For details, see the user's manual of the screen.(On or Off) It does not function in the TV's menu system. • If Video Output is supported, follow the TV User's Manual regarding Progressive Scan settings in Progressive mode. - Sharpness : Level 1 ~ Level 5 - ENG-52 CHANGING SETUP MENU...
User Manual (ENGLISH)
Page 54
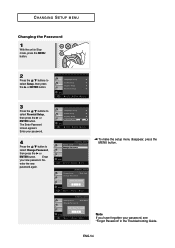
...unit in the Troubleshooting Guide. Language Setup ❿ Audio Setup ❿ Display Setup ❿ Parental Setup : ❿ Setup 3 Press the œ/❷ buttons to select Setup, then press the ❿ or ENTER button. Setup PARENTAL SETUP Rating Level : Kids Safe Change Password Enter Password Setup Enter Return Menu PARENTAL SETUP Rating Level : Kids Safe Change Password Enter New Password Setup Enter Return Menu Note If you have forgotten your new password. Enter your password, see "Forgot Password" in Stop mode, press the MENU button...
...unit in the Troubleshooting Guide. Language Setup ❿ Audio Setup ❿ Display Setup ❿ Parental Setup : ❿ Setup 3 Press the œ/❷ buttons to select Setup, then press the ❿ or ENTER button. Setup PARENTAL SETUP Rating Level : Kids Safe Change Password Enter Password Setup Enter Return Menu PARENTAL SETUP Rating Level : Kids Safe Change Password Enter New Password Setup Enter Return Menu Note If you have forgotten your new password. Enter your password, see "Forgot Password" in Stop mode, press the MENU button...
User Manual (ENGLISH)
Page 55
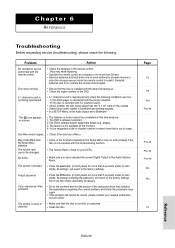
... screen is blocked • Press the button (in the remote control. All settings including the password will revert to Bitstream? Forgot password • Press the button (in the Audio Options Menu. The picture is noisy or distorted • Make sure that the disc is installed with the label side facing up. • Check the region number of the functions selected in the Setup Menu may need replacing. • Operate the remote control at the moment. 4. Disc...
... screen is blocked • Press the button (in the remote control. All settings including the password will revert to Bitstream? Forgot password • Press the button (in the Audio Options Menu. The picture is noisy or distorted • Make sure that the disc is installed with the label side facing up. • Check the region number of the functions selected in the Setup Menu may need replacing. • Operate the remote control at the moment. 4. Disc...
User Manual (ENGLISH)
Page 56
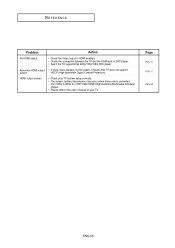
... not support screen. HDMI output Judder • Check your TV. REFERENCE Problem Action No HDMI output. • Check the Video output is converted from 50Hz to 60Hz for 720P/1080i HDMI (High Definition Multimedia Interface) Output. • Please refer to the user's manual of your TV system setup correctly. • The screen Judder phenomenon may occur when frame rate is HDMI enabled. • Check the connection between...
... not support screen. HDMI output Judder • Check your TV. REFERENCE Problem Action No HDMI output. • Check the Video output is converted from 50Hz to 60Hz for 720P/1080i HDMI (High Definition Multimedia Interface) Output. • Please refer to the user's manual of your TV system setup correctly. • The screen Judder phenomenon may occur when frame rate is HDMI enabled. • Check the connection between...


