
Owner Instructions
Page 3
...reduce the degree of brightness and contrast of the screen when displaying a still image. To prevent this manual to the screen. English - 3 Burn-in 4:3 format for a long period of time may leave ...screen caused by the Warranty. This image retention is making a 'cracking' noise. Avoid operating the TV at heights under 6500ft. The product is also known as "screen burn". To avoid such image...Image retention Do not display a still image (such as on a video game) on the plasma display panel for more than a certain period of time may produce partial after long periods of...
...reduce the degree of brightness and contrast of the screen when displaying a still image. To prevent this manual to the screen. English - 3 Burn-in 4:3 format for a long period of time may leave ...screen caused by the Warranty. This image retention is making a 'cracking' noise. Avoid operating the TV at heights under 6500ft. The product is also known as "screen burn". To avoid such image...Image retention Do not display a still image (such as on a video game) on the plasma display panel for more than a certain period of time may produce partial after long periods of...
Owner Instructions
Page 5
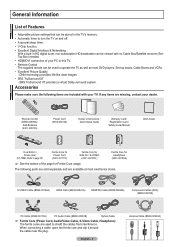
...-00061B) Optical Cable ➢ Ferrite Core (Power Cord, Audio/Video Cable, S-Video Cable, Headphone) The ferrite cores are missing, contact your TV. English - 5 Antenna Cable (BN39-00333A) DNIe technology provides life-like clear images. • SRS TruSurround XT - Accessories Please make sure...00599A) / AAA Batteries (4301-000103) Power Cord (3903-000144) Owner's Instructions / Quick Setup Guide Warranty Card / Registration Card / Safety Guide Manual Cloth-Clean Cover-Bottom / Screws (2ea) (FP-T5084, Refer to page 79) Ferrite Core for Power Cord (3301-001110) Ferrite Core for ...
...-00061B) Optical Cable ➢ Ferrite Core (Power Cord, Audio/Video Cable, S-Video Cable, Headphone) The ferrite cores are missing, contact your TV. English - 5 Antenna Cable (BN39-00333A) DNIe technology provides life-like clear images. • SRS TruSurround XT - Accessories Please make sure...00599A) / AAA Batteries (4301-000103) Power Cord (3903-000144) Owner's Instructions / Quick Setup Guide Warranty Card / Registration Card / Safety Guide Manual Cloth-Clean Cover-Bottom / Screws (2ea) (FP-T5084, Refer to page 79) Ferrite Core for Power Cord (3301-001110) Ferrite Core for ...

Owner Instructions
Page 16
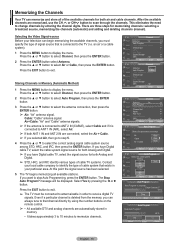
.... Month Day Year -- -- ---- English - 16 Continued... Set current date and time. is completed. 14 Channels were memorized. Clock Mode :Manual Auto Move Enter Skip Move Plug & Play Set current date and time. Select the time zone in which you live . Press the ENTER button.... OK Air : 9 , Cable : 5. If clock is complete. 5 The TV will automatically disappear after several seconds. After all of the available channels. Press the ENTER button when channel memorization is not automatically set the current...
.... Month Day Year -- -- ---- English - 16 Continued... Set current date and time. is completed. 14 Channels were memorized. Clock Mode :Manual Auto Move Enter Skip Move Plug & Play Set current date and time. Select the time zone in which you live . Press the ENTER button.... OK Air : 9 , Cable : 5. If clock is complete. 5 The TV will automatically disappear after several seconds. After all of the available channels. Press the ENTER button when channel memorization is not automatically set the current...
Owner Instructions
Page 19
..., and IRC identify various types of cable TV systems. Contact your local cable company to identify the type of the available channels for memorizing channels: selecting a broadcast source, memorizing the channels (automatic) and adding and deleting channels (manual). Even if a particular channel is connected ... Strength LNA : On Move Enter Return T V Auto Program Select the antennas to display the menu. Memorizing the Channels Your TV can memorize and store all available stations. Selecting the Video Signal-source Before your particular area. There are memorized, use the...
..., and IRC identify various types of cable TV systems. Contact your local cable company to identify the type of the available channels for memorizing channels: selecting a broadcast source, memorizing the channels (automatic) and adding and deleting channels (manual). Even if a particular channel is connected ... Strength LNA : On Move Enter Return T V Auto Program Select the antennas to display the menu. Memorizing the Channels Your TV can memorize and store all available stations. Selecting the Video Signal-source Before your particular area. There are memorized, use the...
Owner Instructions
Page 20
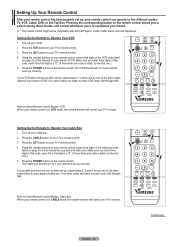
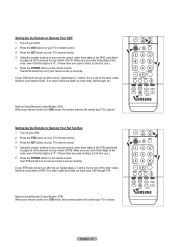
... control. 3 Press the SET button on your TV's remote control. 4 Using the number buttons on your remote control, enter three digits of the VCR code listed on page 23 of this manual for your remote control can operate in CABLE mode, the volume buttons still control your remote control is listed, ...try the first one of VCR. Setting Up the Remote to Operate Your VCR 1 Turn off your cable box. 2 Press the CABLE button on your TV's remote control. 3...
... control. 3 Press the SET button on your TV's remote control. 4 Using the number buttons on your remote control, enter three digits of the VCR code listed on page 23 of this manual for your remote control can operate in CABLE mode, the volume buttons still control your remote control is listed, ...try the first one of VCR. Setting Up the Remote to Operate Your VCR 1 Turn off your cable box. 2 Press the CABLE button on your TV's remote control. 3...
Owner Instructions
Page 21
... control. 3 Press the SET button on your TV's remote control. 4 Using the number buttons on your remote control, enter three digits of the DVD code listed on page 24 of this manual for your brand of the code, even if the first digit is a "0". (If more than one code is listed, try... 4, but try one of the other codes are listed, try each code, 000 through 141. If no other codes listed for your TV's volume. Note on page 23 of this manual for your brand of the code, even if the first digit is a "0". (If more than one code is in STB mode...
... control. 3 Press the SET button on your TV's remote control. 4 Using the number buttons on your remote control, enter three digits of the DVD code listed on page 24 of this manual for your brand of the code, even if the first digit is a "0". (If more than one code is listed, try... 4, but try one of the other codes are listed, try each code, 000 through 141. If no other codes listed for your TV's volume. Note on page 23 of this manual for your brand of the code, even if the first digit is a "0". (If more than one code is in STB mode...

Owner Instructions
Page 41
...▲ Air 6 A ▼ Air 7 Air 9 Air 11 Air 13 ▼ Move Clear Clear Clear Clear Clear Adjust Return Use fine tuning to manually adjust a particular channel for optimal reception. 1 Press the MENU button to assign the new name. Press the EXIT button to exit. ➢ The names ...number of digital broadcasting channels are automatically assigned and thus cannot be selected. Press the EXIT button to exit. ➢ Only analog TV channels can labeled so that their call letters appear whenever the channel is selected. 1 Press the MENU button to display the menu....
...▲ Air 6 A ▼ Air 7 Air 9 Air 11 Air 13 ▼ Move Clear Clear Clear Clear Clear Adjust Return Use fine tuning to manually adjust a particular channel for optimal reception. 1 Press the MENU button to assign the new name. Press the EXIT button to exit. ➢ The names ...number of digital broadcasting channels are automatically assigned and thus cannot be selected. Press the EXIT button to exit. ➢ Only analog TV channels can labeled so that their call letters appear whenever the channel is selected. 1 Press the MENU button to display the menu....
Owner Instructions
Page 46
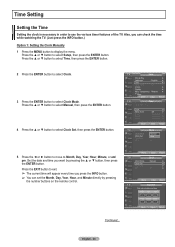
... the date and time you press the INFO button. ➢ You can check the time while watching the TV. (Just press the INFO button.) Option 1: Setting the Clock Manually 1 Press the MENU button to display the menu. Move Adjust Return Continued... Move Enter Return T V Clock... date and time. Hour Minute am / pm. Press the ▲ or ▼ button to select Manual, then press the ENTER button. 4 Press the ▲ or ▼ button to use the various timer features of the TV. Month Day Year -- -- ---- T V Setup Plug & Play ► Language Time : English &#...
... the date and time you press the INFO button. ➢ You can check the time while watching the TV. (Just press the INFO button.) Option 1: Setting the Clock Manually 1 Press the MENU button to display the menu. Move Adjust Return Continued... Move Enter Return T V Clock... date and time. Hour Minute am / pm. Press the ▲ or ▼ button to select Manual, then press the ENTER button. 4 Press the ▲ or ▼ button to use the various timer features of the TV. Month Day Year -- -- ---- T V Setup Plug & Play ► Language Time : English &#...

Owner Instructions
Page 47
..., then press the ENTER button. 6 Press the ▲ or ▼ button to select Auto, then press the ENTER button. If this occurs, set the time manually. ➢ Antenna or Cable must be set the time automatically. Press the EXIT button to exit. ➢ Depending on the broadcast station and signal, the...
..., then press the ENTER button. 6 Press the ▲ or ▼ button to select Auto, then press the ENTER button. If this occurs, set the time manually. ➢ Antenna or Cable must be set the time automatically. Press the EXIT button to exit. ➢ Depending on the broadcast station and signal, the...

Owner Instructions
Page 72
...2 channel audio. Optical Cable HDMI 1.3 Cable HDMI 1.3 Cable ➢ Connect the Optical cable between the Digital Audio Out (Optical) jack on your Samsung TV's remote. You will only hear sound from the Home Theater's Front Left and Right speakers and the subwoofer. About Anynet+ What is a function that... of the home theater and the HDMI OUT jack of the corresponding Anynet+ device using an HDMI cable. Please see the home theater's user manual for more information. ➢ Some HDMI cables may not support Anynet+ functions. ➢ Anynet+ works when the AV device supporting Anynet+ ...
...2 channel audio. Optical Cable HDMI 1.3 Cable HDMI 1.3 Cable ➢ Connect the Optical cable between the Digital Audio Out (Optical) jack on your Samsung TV's remote. You will only hear sound from the Home Theater's Front Left and Right speakers and the subwoofer. About Anynet+ What is a function that... of the home theater and the HDMI OUT jack of the corresponding Anynet+ device using an HDMI cable. Please see the home theater's user manual for more information. ➢ Some HDMI cables may not support Anynet+ functions. ➢ Anynet+ works when the AV device supporting Anynet+ ...

Owner Instructions
Page 74
...corresponding device is connected, the play control menu of the connected device. Press the REC button. Shows the play control menu of the TV. Record (Device_Name) Menu (Device_Name) Operation Connect (Device_Name) Receiver Setup Starts a recording. (This menu works only for using Anynet+. ....) ➢ You can make a recording of the Anynet+ devices connected to the recording devices users manual. After switching to the device, while playing a file After switching to TV. ➢ The REC button works only while in Anynet+ Mode Device Type Anynet+ Device Device with...
...corresponding device is connected, the play control menu of the connected device. Press the REC button. Shows the play control menu of the TV. Record (Device_Name) Menu (Device_Name) Operation Connect (Device_Name) Receiver Setup Starts a recording. (This menu works only for using Anynet+. ....) ➢ You can make a recording of the Anynet+ devices connected to the recording devices users manual. After switching to the device, while playing a file After switching to TV. ➢ The REC button works only while in Anynet+ Mode Device Type Anynet+ Device Device with...
Owner Instructions
Page 77
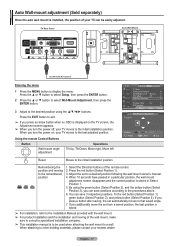
... position. If you turn the power on the TV screen, the Adjustment screen appears. ➢ When you additionally move the set from a saved position, the last position is saved. ➢ For installation, refer to the Installation Manual provided with the wall mount. ➢ For... product installation and the installation and moving to the remembered position 1. TV Rear Panel Auto Wall-Mount EX-LINK Cable (Not supplied) Entering the menu 1...
... position. If you turn the power on the TV screen, the Adjustment screen appears. ➢ When you additionally move the set from a saved position, the last position is saved. ➢ For installation, refer to the Installation Manual provided with the wall mount. ➢ For... product installation and the installation and moving to the remembered position 1. TV Rear Panel Auto Wall-Mount EX-LINK Cable (Not supplied) Entering the menu 1...

Owner Instructions
Page 78
... they may cause damage to follow the product installation instructions. ➢ Our 57" and 63" models do not comply with the VESA standard screw specifications. When attaching to other building materials...result in the table above. ➢ When purchasing our wall mount kit, a detailed installation manual and all parts necessary for this model. ➢ Do not exceed 15 degrees tilt when ... screw specifications, the length of accidents. ➢ Samsung is not liable for wall mount kits as shown in severe personal injury. Product Family LCD-TV PDP-TV inch 23 ~ 26 32 ~ 40 46 ~ ...
... they may cause damage to follow the product installation instructions. ➢ Our 57" and 63" models do not comply with the VESA standard screw specifications. When attaching to other building materials...result in the table above. ➢ When purchasing our wall mount kit, a detailed installation manual and all parts necessary for this model. ➢ Do not exceed 15 degrees tilt when ... screw specifications, the length of accidents. ➢ Samsung is not liable for wall mount kits as shown in severe personal injury. Product Family LCD-TV PDP-TV inch 23 ~ 26 32 ~ 40 46 ~ ...


