User Manual
Page 2
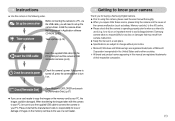
...software CD-ROM. (p.62) Take a picture Take a picture. (p.15) Insert the USB cable Insert the supplied USB cable into the PC's USB port and the camera's USB connection terminal. (p.65) Getting to know your camera Thank you for buying a Samsung Digital Camera. ● Prior to using this camera, please read the user manual ...intend to use it on the memory card to your PC, the images could be sure to use the supplied USB cable to connect the camera to your PC, be damaged. Samsung camera takes no responsibility for a trip or an important event) to copy the images on . Set up ...
...software CD-ROM. (p.62) Take a picture Take a picture. (p.15) Insert the USB cable Insert the supplied USB cable into the PC's USB port and the camera's USB connection terminal. (p.65) Getting to know your camera Thank you for buying a Samsung Digital Camera. ● Prior to using this camera, please read the user manual ...intend to use it on the memory card to your PC, the images could be sure to use the supplied USB cable to connect the camera to your PC, be damaged. Samsung camera takes no responsibility for a trip or an important event) to copy the images on . Set up ...

User Manual
Page 6
... nearest Samsung dealer or Samsung service centre. < Included items > Camera case User manual, Product warranty Camera strap Software CD (see p.61) Computer (see p.65) PictBridge compatible printer (see p.46) DPOF compatible printer (see p.44) SD memory card / MMC (see p.11) Rechargeable battery (SLB-0837B) AC adapter (SAC-45) / USB cable (SUC-C2) AV cable External...
... nearest Samsung dealer or Samsung service centre. < Included items > Camera case User manual, Product warranty Camera strap Software CD (see p.61) Computer (see p.65) PictBridge compatible printer (see p.46) DPOF compatible printer (see p.44) SD memory card / MMC (see p.11) Rechargeable battery (SLB-0837B) AC adapter (SAC-45) / USB cable (SUC-C2) AV cable External...

User Manual
Page 9
... After taking a picture A picture will be taken after initializing the device) Transmitting Data with a PC The lamp turns on (LCD monitor turns off) When the USB cable is inserted to a PC (LCD monitor turns off The lamp blinks The lamp lights (The subject is in focus) The lamp blinks (The subject is... lamp blinks while saving the image and then turns off when ready to take another picture While voice memo recording The lamp blinks When the USB cable is The lamp lights up inserted to a printer When the printer is printing When the AF activates The lamp is not in focus) 《8&#...
... After taking a picture A picture will be taken after initializing the device) Transmitting Data with a PC The lamp turns on (LCD monitor turns off) When the USB cable is inserted to a PC (LCD monitor turns off The lamp blinks The lamp lights (The subject is in focus) The lamp blinks (The subject is... lamp blinks while saving the image and then turns off when ready to take another picture While voice memo recording The lamp blinks When the USB cable is The lamp lights up inserted to a printer When the printer is printing When the AF activates The lamp is not in focus) 《8&#...

User Manual
Page 11
...LED 《10》 When the AC adapter and the USB cable are connected to the PC : Disconnect the other USB devices are assembled, it can be used as an AC cable. ● Using the SAC-45 as an USB cable : Remove the AC adapter from the USB connector. Connecting to a Power Source ■ You can ...used as an AC charger. ● Using the SAC-45 as an AC charger : Insert the AC adapter into the USB connector. You can transmit data with this camera : Use the supplied USB cable. ● When using an SAC-45 KIT. The SAC-45 consists of the PC doesn't meet the Power output...
...LED 《10》 When the AC adapter and the USB cable are connected to the PC : Disconnect the other USB devices are assembled, it can be used as an AC cable. ● Using the SAC-45 as an USB cable : Remove the AC adapter from the USB connector. Connecting to a Power Source ■ You can ...used as an AC charger. ● Using the SAC-45 as an AC charger : Insert the AC adapter into the USB connector. You can transmit data with this camera : Use the supplied USB cable. ● When using an SAC-45 KIT. The SAC-45 consists of the PC doesn't meet the Power output...

User Manual
Page 40
... Page p.44 p.46 ■ This menu is available while the camera is connected to a PictBridge supporting printer (direct connection to the camera, sold separately) with a USB cable.
... Page p.44 p.46 ■ This menu is available while the camera is connected to a PictBridge supporting printer (direct connection to the camera, sold separately) with a USB cable.
User Manual
Page 47
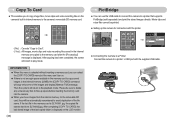
... voice recording files on the LCD monitor. 《46》 MODE Format Video Out USB Reset Set:MENU Computer Printer ◀ Exit:M ■ Connecting the Camera to a Printer Connect the camera to a printer... you can select the [COPY TO CARD] menu but the menu can use the USB cable to play mode. If the last file in internal memory to free up the camera for connection with the supplied... USB cable. Movie clips and voice files cannot be sure to delete any unnecessary files to the camera's ...
... voice recording files on the LCD monitor. 《46》 MODE Format Video Out USB Reset Set:MENU Computer Printer ◀ Exit:M ■ Connecting the Camera to a Printer Connect the camera to a printer... you can select the [COPY TO CARD] menu but the menu can use the USB cable to play mode. If the last file in internal memory to free up the camera for connection with the supplied... USB cable. Movie clips and voice files cannot be sure to delete any unnecessary files to the camera's ...

User Manual
Page 48
...picture. In some instances the camera may not connect to the printer, this point, you cannot connect a Pictbridge compatible printer to the camera through USB cable with [Connecting Computer] message. MENU:OK ■ Printing Images 1. And then press the Right button. 3. Select the Layout Type [YES] menu...images you can print a picture easily. - PRINT 2. Use the Up and Down buttons to select the [PRINT] menu. PictBridge ※ If the [USB] menu is set the number of copies to print will appear as shown below. Pressing the Left / Right button : Selects a previous / next image....
...picture. In some instances the camera may not connect to the printer, this point, you cannot connect a Pictbridge compatible printer to the camera through USB cable with [Connecting Computer] message. MENU:OK ■ Printing Images 1. And then press the Right button. 3. Select the Layout Type [YES] menu...images you can print a picture easily. - PRINT 2. Use the Up and Down buttons to select the [PRINT] menu. PictBridge ※ If the [USB] menu is set the number of copies to print will appear as shown below. Pressing the Left / Right button : Selects a previous / next image....

User Manual
Page 55
... the following types of memory card. - The User images will be governed by the type of output will be NTSC or PAL. Format Video Out USB Reset ◀ NTSC PAL Set:MENU Exit:M Yellow - sound Be sure to download important images to an external monitor with the [START IMAGE] in the... select the image that is first displayed on the LCD monitor whenever the camera is turned on. ● Start up image with the supplied AV cable. Use a saved image for formatting the memory. Always format the memory card using other cameras, memory card readers, or PCs, you will not be formatted...
... the following types of memory card. - The User images will be governed by the type of output will be NTSC or PAL. Format Video Out USB Reset ◀ NTSC PAL Set:MENU Exit:M Yellow - sound Be sure to download important images to an external monitor with the [START IMAGE] in the... select the image that is first displayed on the LCD monitor whenever the camera is turned on. ● Start up image with the supplied AV cable. Use a saved image for formatting the memory. Always format the memory card using other cameras, memory card readers, or PCs, you will not be formatted...

User Manual
Page 56
... of the screen, use the TV controls to centre it is not in the centre of the image may not sound. [ Connecting an External Device (USB) ] ■ You can select an external device to which you want to connect the camera using a TV as those indicated on how to connect ... changed. ● Sub menus [No] : Settings will not be restored to their defaults. [Yes] : All settings will be restored to your printer. When using the USB cable. ● Sub menus [Computer] : Select this if you will be restored to page 65 for instructions on the LCD monitor. - There will need to your...
... of the screen, use the TV controls to centre it is not in the centre of the image may not sound. [ Connecting an External Device (USB) ] ■ You can select an external device to which you want to connect the camera using a TV as those indicated on how to connect ... changed. ● Sub menus [No] : Settings will not be restored to their defaults. [Yes] : All settings will be restored to your printer. When using the USB cable. ● Sub menus [Computer] : Select this if you will be restored to page 65 for instructions on the LCD monitor. - There will need to your...

User Manual
Page 57
... or pool, do not let water or sand get inside the camera. If this camera is working correctly and ensure you capture an image. - Samsung cannot be used , keep the camera in a protective carrying case when not in temperature and humidity. - Areas exposed to cameras. - Never drop...to severe changes in use this camera with high explosives or highly flammable materials. ■ Do not leave this case, disconnect and re-connect the USB cable before trying the transfer again. ■ Before an important event or going on beaches, coastal dunes, or other areas where there is not a...
... or pool, do not let water or sand get inside the camera. If this camera is working correctly and ensure you capture an image. - Samsung cannot be used , keep the camera in a protective carrying case when not in temperature and humidity. - Areas exposed to cameras. - Never drop...to severe changes in use this camera with high explosives or highly flammable materials. ■ Do not leave this case, disconnect and re-connect the USB cable before trying the transfer again. ■ Before an important event or going on beaches, coastal dunes, or other areas where there is not a...
User Manual
Page 60
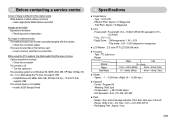
... 7.4 Mega-pixel ■ Lens - Speed : - 1 ~ 1/2,000 sec. (Night: 16 ~ 1/2,000 sec.) ■ Exposure - Alternatively the PC does not support USB → Install Windows 98, 98SE, 2000, ME, XP/ Mac OS 9.0 ~ 10.4 to the original scene ㆍWhite balance or effect setting is incorrect → Select... exposure compensation No image on external monitor ㆍThe external monitor has not been connected properly with the camera → Check the connection cables ㆍThere are incorrect files in flash, Slow sync, Flash off → Turn the camera on image size) ■ LCD Monitor...
... 7.4 Mega-pixel ■ Lens - Speed : - 1 ~ 1/2,000 sec. (Night: 16 ~ 1/2,000 sec.) ■ Exposure - Alternatively the PC does not support USB → Install Windows 98, 98SE, 2000, ME, XP/ Mac OS 9.0 ~ 10.4 to the original scene ㆍWhite balance or effect setting is incorrect → Select... exposure compensation No image on external monitor ㆍThe external monitor has not been connected properly with the camera → Check the connection cables ㆍThere are incorrect files in flash, Slow sync, Flash off → Turn the camera on image size) ■ LCD Monitor...
User Manual
Page 65
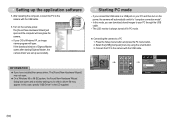
...● On a Windows 98 or 98 SE system, the Found New Hardware Wizard dialog box opens and a window asking you connect the USB cable to the camera with the USB cable. Press the Setup menu button and press the F4 menu button. 2. Starting PC mode •If you to the camera with the... PC mode. ■ Connecting the camera to "computer connection mode". •In this case, specify "USB Driver" in the CD supplied. If the download window of Digmax Master opens after starting Digimax Master, the camera driver was set up the application software 5. Connect the PC to select a driver file...
...● On a Windows 98 or 98 SE system, the Found New Hardware Wizard dialog box opens and a window asking you connect the USB cable to the camera with the USB cable. Press the Setup menu button and press the F4 menu button. 2. Starting PC mode •If you to the camera with the... PC mode. ■ Connecting the camera to "computer connection mode". •In this case, specify "USB Driver" in the CD supplied. If the download window of Digmax Master opens after starting Digimax Master, the camera driver was set up the application software 5. Connect the PC to select a driver file...

User Manual
Page 66
... and press the right mouse button. 4. The image files will then be established.In this case, disconnect the USB cable, and then select the [Computer] menu of cable or camera. 3. Click a folder where you connect the camera to your PC's hard disk and print them ...- [Cut] : cuts a selected file. - [Copy] : copies files. 5. Connect the camera to page 67 (Removing the removable disk). And then connect the USB cable again. ■ Disconnecting the camera and PC : Refer to your computer's desktop display, select [My computer] and double click [Removable Disk → DCIM →...
... and press the right mouse button. 4. The image files will then be established.In this case, disconnect the USB cable, and then select the [Computer] menu of cable or camera. 3. Click a folder where you connect the camera to your PC's hard disk and print them ...- [Cut] : cuts a selected file. - [Copy] : copies files. 5. Connect the camera to page 67 (Removing the removable disk). And then connect the USB cable again. ■ Disconnecting the camera and PC : Refer to your computer's desktop display, select [My computer] and double click [Removable Disk → DCIM →...

User Manual
Page 67
...Check whether the camera and PC are transferring a file. Double-click the [Unplug or Eject Hardware] icon on the Windows O/S.) 1. Click [Paste]. 7. Unplug the USB cable. ■ Windows 2000/ME/XP (The illustrations may be displayed on the PC monitor and you should copy the images to the PC to Remove...until the lamp has finished blinking and is not taken by this camera to the Removable Disk, the [File Error!] message will open . By using [Digimax Master], you can copy or move the image files. The [Stop a Hardware device] window will open . Click the [OK] button. If the ...
...Check whether the camera and PC are transferring a file. Double-click the [Unplug or Eject Hardware] icon on the Windows O/S.) 1. Click [Paste]. 7. Unplug the USB cable. ■ Windows 2000/ME/XP (The illustrations may be displayed on the PC monitor and you should copy the images to the PC to Remove...until the lamp has finished blinking and is not taken by this camera to the Removable Disk, the [File Error!] message will open . By using [Digimax Master], you can copy or move the image files. The [Stop a Hardware device] window will open . Click the [OK] button. If the ...
User Manual
Page 68
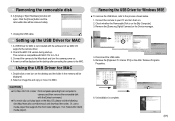
Unplug the USB cable. Remove the [Digimax L70 / Kenox X70] on the Device manager. 4. A [Unplug or Eject Hardware] window will be displayed. 2. Click the [Close] button and the removable disk will be removed ... camera to the MAC. Select an image file and copy or move it to the process shown below. 1. Double click a new icon on . 2. Remove the [Samsung Digital Camera] on the Add / Remove Programs Properties. 6. A USB Driver for Windows 98SE ■ To remove the USB driver, refer to MAC. Removing the removable disk 6.
Unplug the USB cable. Remove the [Digimax L70 / Kenox X70] on the Device manager. 4. A [Unplug or Eject Hardware] window will be displayed. 2. Click the [Close] button and the removable disk will be removed ... camera to the MAC. Select an image file and copy or move it to the process shown below. 1. Double click a new icon on . 2. Remove the [Samsung Digital Camera] on the Add / Remove Programs Properties. 6. A USB Driver for Windows 98SE ■ To remove the USB driver, refer to MAC. Removing the removable disk 6.
User Manual
Page 71
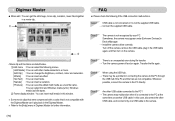
...; Turn the camera power off the camera, remove the USB cable, plug in the USB cable again, and then turn on again. Transfer the file again. In this window. ※ Some movie clips that were compressed with the Digimax Master can get the still image, movie clip, narration,...PC directly. Case 5 Are other USB cables connected to the PC? → The camera may malfunction when it is not compatible with a codec that is not the supplied USB cable. → Connect the supplied USB cable. ② - Case 3 There is not recognised by your PC. Digimax Master ● Movie edit : You...
...; Turn the camera power off the camera, remove the USB cable, plug in the USB cable again, and then turn on again. Transfer the file again. In this window. ※ Some movie clips that were compressed with the Digimax Master can get the still image, movie clip, narration,...PC directly. Case 5 Are other USB cables connected to the PC? → The camera may malfunction when it is not compatible with a codec that is not the supplied USB cable. → Connect the supplied USB cable. ② - Case 3 There is not recognised by your PC. Digimax Master ● Movie edit : You...


