
Quick Guide (easy Manual) (ver.1.0) (English)
Page 3
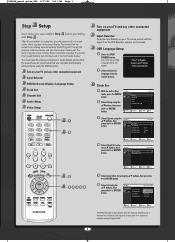
... searching for a channel that you complete Step before using the DVD Recorder. OSD Language Setup Press the DVD POWER button. Select Setup using the No Disc Auto Clock Set - .../† buttons, then Timer Rec. Auto Clock Set Setup Manual Clock Set Clock Set √ √ MOVE SELECT RETURN... EXIT - Turn on your TV and any other connected equipment Input Selector Press the Input Selector on your TV remote control until the signal from the DVD Recorder appears on your time zone...
... searching for a channel that you complete Step before using the DVD Recorder. OSD Language Setup Press the DVD POWER button. Select Setup using the No Disc Auto Clock Set - .../† buttons, then Timer Rec. Auto Clock Set Setup Manual Clock Set Clock Set √ √ MOVE SELECT RETURN... EXIT - Turn on your TV and any other connected equipment Input Selector Press the Input Selector on your TV remote control until the signal from the DVD Recorder appears on your time zone...
Quick Guide (easy Manual) (ver.1.0) (English)
Page 5
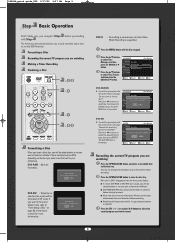
... Yes No MOVE SELECT RETURN EXIT DVD-RW G You will be prompted with the confirmation message 'Do you want to "Formatting a Disc" on page 80 of the User's manual for DVD-RW. √ Timer Rec. Press the OPEN/CLOSE button to record. I Recording will be asked whether or not... you complete Step before recording. Uninitialized Disc Do you want to select the desired format type, then ...
... Yes No MOVE SELECT RETURN EXIT DVD-RW G You will be prompted with the confirmation message 'Do you want to "Formatting a Disc" on page 80 of the User's manual for DVD-RW. √ Timer Rec. Press the OPEN/CLOSE button to record. I Recording will be asked whether or not... you complete Step before recording. Uninitialized Disc Do you want to select the desired format type, then ...
Quick Guide (easy Manual) (ver.1.0) (English)
Page 5
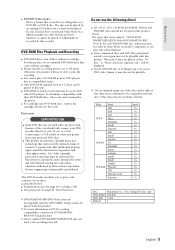
...DVD-Video/DVDRAM/DVD-RW/ DVD-R. For a DVD-R/DVD-RW disc, which has been recorded in a distorted picture from our web site. (Download Center at www.samsung.com) • If disc compatibility problems continue, or there is an issue upgrading your recorder, contact the Call Center at 1-800-SAMSUNG. ✻ DVD-RAM/DVD-RW/DVD-R discs that the recording...limited viewing uses only unless otherwise authorized by a different maker's recorder but the finalized DVD +R/+RW can be played. Connecting to the user's manual for home and other intellectual property rights owned by methods claims of...
...DVD-Video/DVDRAM/DVD-RW/ DVD-R. For a DVD-R/DVD-RW disc, which has been recorded in a distorted picture from our web site. (Download Center at www.samsung.com) • If disc compatibility problems continue, or there is an issue upgrading your recorder, contact the Call Center at 1-800-SAMSUNG. ✻ DVD-RAM/DVD-RW/DVD-R discs that the recording...limited viewing uses only unless otherwise authorized by a different maker's recorder but the finalized DVD +R/+RW can be played. Connecting to the user's manual for home and other intellectual property rights owned by methods claims of...
Quick Guide (easy Manual) (ver.1.0) (English)
Page 6
... 3 Maintenance of Cabinet 3 Disc Handling 3 Disc Storage 4 Disc Specifications 4 General Features 8 Before reading the user's manual 9 How to use the DVD recorder 9 Description 11 Front panel 11 Front Panel Display 11 Rear Panel 12 Unpacking 12 Accessories 12 Tour of the Remote Control...Setting UP Quick Overview 14 Step 1 : Connecting the Antenna cable 15 Antenna + DVD Recorder + TV : No Cable box .......15 Antenna +Cable box + DVD Recorder + TV : Cable box with many scrambled channels 16 Antenna + DVD Recorder + Cable box +TV : Cable box with a few scrambled channels 17 Step ...
... 3 Maintenance of Cabinet 3 Disc Handling 3 Disc Storage 4 Disc Specifications 4 General Features 8 Before reading the user's manual 9 How to use the DVD recorder 9 Description 11 Front panel 11 Front Panel Display 11 Rear Panel 12 Unpacking 12 Accessories 12 Tour of the Remote Control...Setting UP Quick Overview 14 Step 1 : Connecting the Antenna cable 15 Antenna + DVD Recorder + TV : No Cable box .......15 Antenna +Cable box + DVD Recorder + TV : Cable box with many scrambled channels 16 Antenna + DVD Recorder + Cable box +TV : Cable box with a few scrambled channels 17 Step ...
Quick Guide (easy Manual) (ver.1.0) (English)
Page 9
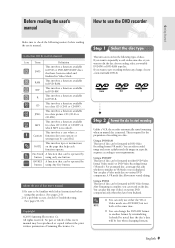
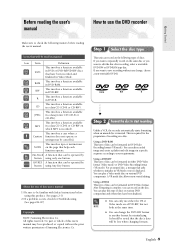
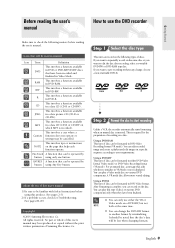
...See pages 90~93) Copyright ©2005 Samsung Electronics Co. You can be familiar with Safety Instructions before reading the user's manual. Using a DVD-R This type of this product. (See pages 2~3) 2) If a problem occurs, check for the preparation of Samsung Electronics Co. R This involves a function ... A VR mode disc allows more varied editing. After formatting is displayed. Before reading the user's manual How to use either DVD-Video format (Video mode) or DVD-Video Recording format (VR mode). NOTE This involves tips or instructions on a disc. Step 1 Select the ...
...See pages 90~93) Copyright ©2005 Samsung Electronics Co. You can be familiar with Safety Instructions before reading the user's manual. Using a DVD-R This type of this product. (See pages 2~3) 2) If a problem occurs, check for the preparation of Samsung Electronics Co. R This involves a function ... A VR mode disc allows more varied editing. After formatting is displayed. Before reading the user's manual How to use either DVD-Video format (Video mode) or DVD-Video Recording format (VR mode). NOTE This involves tips or instructions on a disc. Step 1 Select the ...
Quick Guide (easy Manual) (ver.1.0) (English)
Page 29
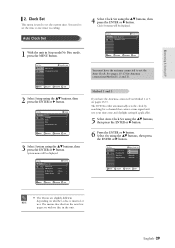
...inserted or not. Auto Clock Set 4 Select Clock Set using the ...† buttons, then press the ENTER or √ button. Auto Clock Set Setup Manual Clock Set Clock Set √ √ 1 With the unit in the unit. Select On using the ...† buttons, then press the ENTER or... is used to set the current time. No Disc Timer Rec. No Disc Timer Rec. The DVD Recorder automatically sets the clock by searching for Antenna connections(Method 1, 2 and 3). English -29 No Disc Timer Record Timer Rec. See pages 15~17 for a channel that carries a time signal and sets your...
...inserted or not. Auto Clock Set 4 Select Clock Set using the ...† buttons, then press the ENTER or √ button. Auto Clock Set Setup Manual Clock Set Clock Set √ √ 1 With the unit in the unit. Select On using the ...† buttons, then press the ENTER or... is used to set the current time. No Disc Timer Rec. No Disc Timer Rec. The DVD Recorder automatically sets the clock by searching for Antenna connections(Method 1, 2 and 3). English -29 No Disc Timer Record Timer Rec. See pages 15~17 for a channel that carries a time signal and sets your...

Quick Guide (easy Manual) (ver.1.0) (English)
Page 31
Setup Manual Clock Set Date (mm/dd/yy) Time 01 / 01 / 2005 SAT 12 : 00 AM...Cable TV √ Setup Auto Channel Memory √ Channel Add/Delete √ MOVE SELECT RETURN EXIT English -31 Timer Record √ Setup Scheduled Record List √ MOVE SELECT RETURN EXIT 2 Select Setup using the ...† buttons, then press the ENTER or √... the ...† buttons, then press the ENTER or √ button. No Disc Timer Rec. No Disc Timer Record Timer Rec. Connecting & Setting UP 6 Using the buttons to items s If any of number buttons on the remote control...
Setup Manual Clock Set Date (mm/dd/yy) Time 01 / 01 / 2005 SAT 12 : 00 AM...Cable TV √ Setup Auto Channel Memory √ Channel Add/Delete √ MOVE SELECT RETURN EXIT English -31 Timer Record √ Setup Scheduled Record List √ MOVE SELECT RETURN EXIT 2 Select Setup using the ...† buttons, then press the ENTER or √... the ...† buttons, then press the ENTER or √ button. No Disc Timer Rec. No Disc Timer Record Timer Rec. Connecting & Setting UP 6 Using the buttons to items s If any of number buttons on the remote control...

Quick Guide (easy Manual) (ver.1.0) (English)
Page 32
...Cable TV : CAanbtelennTaV √ Setup Auto Channel Memory Cable TV √ Channel Add/Delete √ Manual Channel Set Manual Channel Set can be displayed. Timer Record √ Setup Scheduled Record List √ MOVE SELECT RETURN EXIT Method 2 To setup, follow the steps 1 to delete unnecessary ...the item that matches the antenna connection you selected on the hookup you have first selected Auto Channel Memory. No Disc Timer Record Timer Rec. Auto Channel Memory will be used after using the ...† buttons, then press the ENTER or √ button...
...Cable TV : CAanbtelennTaV √ Setup Auto Channel Memory Cable TV √ Channel Add/Delete √ Manual Channel Set Manual Channel Set can be displayed. Timer Record √ Setup Scheduled Record List √ MOVE SELECT RETURN EXIT Method 2 To setup, follow the steps 1 to delete unnecessary ...the item that matches the antenna connection you selected on the hookup you have first selected Auto Channel Memory. No Disc Timer Record Timer Rec. Auto Channel Memory will be used after using the ...† buttons, then press the ENTER or √ button...
User Manual (user Manual) (ver.1.0) (English)
Page 5
...of this copyright protection technology must be compatible with this recorder. Use of the discs in this product. ✻ For more information on another component, it has been finalized. - This DVD Recorder can be able to the user's manual for the player. G Program-protected: See page ...68 "Locking a Title" G Disc-protected: See page 80 "Disc Protection" ✻ DVD-RAM/DVD-RW/DVD-R discs that come with this unit. When these DVD-RAM discs, refer to play the recording. or...
...of this copyright protection technology must be compatible with this recorder. Use of the discs in this product. ✻ For more information on another component, it has been finalized. - This DVD Recorder can be able to the user's manual for the player. G Program-protected: See page ...68 "Locking a Title" G Disc-protected: See page 80 "Disc Protection" ✻ DVD-RAM/DVD-RW/DVD-R discs that come with this unit. When these DVD-RAM discs, refer to play the recording. or...

User Manual (user Manual) (ver.1.0) (English)
Page 6
...3 Maintenance of Cabinet 3 Disc Handling 3 Disc Storage 4 Disc Specifications 4 General Features 8 Before reading the user's manual 9 How to use the DVD recorder 9 Description 11 Front panel 11 Front Panel Display 11 Rear Panel 12 Tour of the Remote Control 13 Connecting & ... 15 Step 2 : Connecting the Antenna cable 15 Method 1 : Antenna + DVD Recorder + TV : No Cable box 15 Method 2 : Antenna +Cable box + DVD Recorder + TV : Cable box with many scrambled channels........15 Method 3 : Antenna + DVD Recorder + Cable box +TV : Cable box with a few scrambled channels ......16 ...
...3 Maintenance of Cabinet 3 Disc Handling 3 Disc Storage 4 Disc Specifications 4 General Features 8 Before reading the user's manual 9 How to use the DVD recorder 9 Description 11 Front panel 11 Front Panel Display 11 Rear Panel 12 Tour of the Remote Control 13 Connecting & ... 15 Step 2 : Connecting the Antenna cable 15 Method 1 : Antenna + DVD Recorder + TV : No Cable box 15 Method 2 : Antenna +Cable box + DVD Recorder + TV : Cable box with many scrambled channels........15 Method 3 : Antenna + DVD Recorder + Cable box +TV : Cable box with a few scrambled channels ......16 ...
User Manual (user Manual) (ver.1.0) (English)
Page 9
.... JPEG This involves a function available in DVD-RAM. Step 2 Format the disc to start recording Unlike a VCR, the recorder automatically starts formatting when an unused disc is required for Troubleshooting. (See pages 84~87) Copyright ©2005 Samsung Electronics Co. This is inserted. You can play this user's manual may be formatted in a specific sequence...
.... JPEG This involves a function available in DVD-RAM. Step 2 Format the disc to start recording Unlike a VCR, the recorder automatically starts formatting when an unused disc is required for Troubleshooting. (See pages 84~87) Copyright ©2005 Samsung Electronics Co. This is inserted. You can play this user's manual may be formatted in a specific sequence...

User Manual (user Manual) (ver.1.0) (English)
Page 15
... the cable box. You must connect audio/video cables to the DVD Recorder. Connecting & Setting UP Step 1: Unpacking Accessories Check for Remote Control (AAA Size) (AC43-12002H) G EP-2 Plug Converter (3721-000117) G User's Manual (AK68-00773A) G Quick Guide (AK68-00684A) Step 2: Connecting... the Antenna Cable Method 1 : Antenna + DVD Recorder + TV : No Cable box You can record channels by selecting the channel on . Select one channel while watching another ...
... the cable box. You must connect audio/video cables to the DVD Recorder. Connecting & Setting UP Step 1: Unpacking Accessories Check for Remote Control (AAA Size) (AC43-12002H) G EP-2 Plug Converter (3721-000117) G User's Manual (AK68-00773A) G Quick Guide (AK68-00684A) Step 2: Connecting... the Antenna Cable Method 1 : Antenna + DVD Recorder + TV : No Cable box You can record channels by selecting the channel on . Select one channel while watching another ...

User Manual (user Manual) (ver.1.0) (English)
Page 23
... press the ENTER or √ button. No Disc Timer Rec. The DVD Recorder automatically sets the clock by searching for Antenna connections(Method 1, 2 and 3). The menus described on whether a disc is used to use timer recording. Auto Clock Set 4 Select Clock Set using the ...† buttons, then...SELECT RETURN EXIT You must have the Antenna connected via Method 1 or 3 on pages 15-16. English -23 Auto Clock Set Setup Manual Clock Set Clock Set √ √ 1 With the unit in the unit. Setup System Language Audio Video Parental Control Setup MOVE ...
... press the ENTER or √ button. No Disc Timer Rec. The DVD Recorder automatically sets the clock by searching for Antenna connections(Method 1, 2 and 3). The menus described on whether a disc is used to use timer recording. Auto Clock Set 4 Select Clock Set using the ...† buttons, then...SELECT RETURN EXIT You must have the Antenna connected via Method 1 or 3 on pages 15-16. English -23 Auto Clock Set Setup Manual Clock Set Clock Set √ √ 1 With the unit in the unit. Setup System Language Audio Video Parental Control Setup MOVE ...

User Manual (user Manual) (ver.1.0) (English)
Page 25
...set the value using the number (0~9) buttons. œ √: Moves to select the Current Date and Current Time, and then press the ENTER button. Setup Manual Clock Set Date (mm/dd/yy) Time 01 / 01 / 2005 SAT 12 : 00 AM MOVE SELECT RETURN EXIT †... : Sets the value You can... Setting UP 6 Using the buttons to items I If any of number buttons on the remote control do not operate, press the DVD NOTE button and try again. 3. No Disc Timer Record Timer Rec. No Disc Channel Set Timer Rec. No Disc Timer Rec. Antenna/Cable TV : Cable TV √ Setup Auto ...
...set the value using the number (0~9) buttons. œ √: Moves to select the Current Date and Current Time, and then press the ENTER button. Setup Manual Clock Set Date (mm/dd/yy) Time 01 / 01 / 2005 SAT 12 : 00 AM MOVE SELECT RETURN EXIT †... : Sets the value You can... Setting UP 6 Using the buttons to items I If any of number buttons on the remote control do not operate, press the DVD NOTE button and try again. 3. No Disc Timer Record Timer Rec. No Disc Channel Set Timer Rec. No Disc Timer Rec. Antenna/Cable TV : Cable TV √ Setup Auto ...

User Manual (user Manual) (ver.1.0) (English)
Page 26
..., follow the steps 1 to NOTE stop Auto Channel Memory. Use the Manual Channel Setting to 5 in page 25. 6 Select Antenna using the ...† buttons, then press the ENTER or √ button. Timer Record √ Setup Scheduled Record List √ MOVE SELECT RETURN EXIT Method 2 To setup, follow the...) using the Auto Channel Memory. 1 With the unit in Stop mode/No Disc mode, press the MENU button. No Disc Timer Record Timer Rec. Setup System Language Audio Video Parental Control Setup MOVE SELECT RETURN EXIT 3 Select System using the ...† buttons, then...
..., follow the steps 1 to NOTE stop Auto Channel Memory. Use the Manual Channel Setting to 5 in page 25. 6 Select Antenna using the ...† buttons, then press the ENTER or √ button. Timer Record √ Setup Scheduled Record List √ MOVE SELECT RETURN EXIT Method 2 To setup, follow the...) using the Auto Channel Memory. 1 With the unit in Stop mode/No Disc mode, press the MENU button. No Disc Timer Record Timer Rec. Setup System Language Audio Video Parental Control Setup MOVE SELECT RETURN EXIT 3 Select System using the ...† buttons, then...

User Manual (user Manual) (ver.1.0) (English)
Page 5
.../DVD-RAM/DVD-RW/ DVD-R. When these DVD-RAM discs, refer to the user's manual for the player. of your discs, as they have been confirmed to be played in a distorted picture from copy-protected DVD discs. discs can allow you should not be used in most DVD players due to play only when finalized. G DVD-RAM recorded on DVD recording...
.../DVD-RAM/DVD-RW/ DVD-R. When these DVD-RAM discs, refer to the user's manual for the player. of your discs, as they have been confirmed to be played in a distorted picture from copy-protected DVD discs. discs can allow you should not be used in most DVD players due to play only when finalized. G DVD-RAM recorded on DVD recording...

User Manual (user Manual) (ver.1.0) (English)
Page 6
...3 Maintenance of Cabinet 3 Disc Handling 3 Disc Storage 4 Disc Specifications 4 General Features 8 Before reading the user's manual 9 How to use the DVD recorder 9 Description 11 Front panel 11 Front Panel Display 11 Rear Panel 12 Tour of the Remote Control 13 Connecting & ... 15 Step 2 : Connecting the Antenna cable 15 Method 1 : Antenna + DVD Recorder + TV : No Cable box 15 Method 2 : Antenna +Cable box + DVD Recorder + TV : Cable box with many scrambled channels........15 Method 3 : Antenna + DVD Recorder + Cable box +TV : Cable box with a few scrambled channels ......16 ...
...3 Maintenance of Cabinet 3 Disc Handling 3 Disc Storage 4 Disc Specifications 4 General Features 8 Before reading the user's manual 9 How to use the DVD recorder 9 Description 11 Front panel 11 Front Panel Display 11 Rear Panel 12 Tour of the Remote Control 13 Connecting & ... 15 Step 2 : Connecting the Antenna cable 15 Method 1 : Antenna + DVD Recorder + TV : No Cable box 15 Method 2 : Antenna +Cable box + DVD Recorder + TV : Cable box with many scrambled channels........15 Method 3 : Antenna + DVD Recorder + Cable box +TV : Cable box with a few scrambled channels ......16 ...
User Manual (user Manual) (ver.1.0) (English)
Page 9
... disc can only use of Samsung Electronics Co. Step 2 Format the disc to be lost when changing formats. RAM This involves a function available in DVD-R. NOTE This involves tips or instructions on a disc. Using a DVD-RW This type of this user's manual 1) Be sure to start recording Unlike a VCR, the recorder automatically starts formatting when an...
... disc can only use of Samsung Electronics Co. Step 2 Format the disc to be lost when changing formats. RAM This involves a function available in DVD-R. NOTE This involves tips or instructions on a disc. Using a DVD-RW This type of this user's manual 1) Be sure to start recording Unlike a VCR, the recorder automatically starts formatting when an...

User Manual (user Manual) (ver.1.0) (English)
Page 15
... to connect your DVD Recorder. You must connect audio/video cables to the DVD Recorder. Connecting & Setting UP Step 1: Unpacking Accessories Check for Remote Control (AAA Size) (4301-001035) G User's Manual (AK68-00683A) G Quick Guide (AK68-00684A) Method 1 : Antenna + DVD Recorder + TV : No Cable box You can record channels by selecting the channel on the DVD Recorder. DVD playback) English -15...
... to connect your DVD Recorder. You must connect audio/video cables to the DVD Recorder. Connecting & Setting UP Step 1: Unpacking Accessories Check for Remote Control (AAA Size) (4301-001035) G User's Manual (AK68-00683A) G Quick Guide (AK68-00684A) Method 1 : Antenna + DVD Recorder + TV : No Cable box You can record channels by selecting the channel on the DVD Recorder. DVD playback) English -15...

User Manual (user Manual) (ver.1.0) (English)
Page 23
... 1 and 3 If you have the antenna connected to set the current time. Clock Set menu will be displayed. Timer Record √ Setup Scheduled Record List √ MOVE SELECT RETURN EXIT 2 Select Setup using the ...† buttons, then press the ENTER or √ button. System .... Clock Set This menu is inserted or not. You need to set the Auto Clock. Auto Clock Set Setup Manual Clock Set Clock Set √ √ 1 With the unit in the unit. The DVD Recorder automatically sets the clock by searching for Antenna connections(Method 1, 2 and 3). English -23
... 1 and 3 If you have the antenna connected to set the current time. Clock Set menu will be displayed. Timer Record √ Setup Scheduled Record List √ MOVE SELECT RETURN EXIT 2 Select Setup using the ...† buttons, then press the ENTER or √ button. System .... Clock Set This menu is inserted or not. You need to set the Auto Clock. Auto Clock Set Setup Manual Clock Set Clock Set √ √ 1 With the unit in the unit. The DVD Recorder automatically sets the clock by searching for Antenna connections(Method 1, 2 and 3). English -23


