User Manual (ENGLISH)
Page 2
... all warnings. 4) Follow all instructions. 5) Do not use this apparatus near water. 6) Clean only with dry cloth. 7) Do not block any ventilation openings, Install in accordance with the manufacturer's instructions. 8) Do not install near any way, such as radiators, heat registers, or other equipment. type plug. ...INSTRUCTED. This product satisfies FCC regulations when shielded cables and connectors are designed to wide slot, fully insert. CAUTION : DVD PLAYERS USE AN INVISIBLE LASER BEAM WHICH CAN CAUSE HAZARDOUS RADIATION EXPOSURE IF DIRECTED. These limits are used in accordance with ...
... all warnings. 4) Follow all instructions. 5) Do not use this apparatus near water. 6) Clean only with dry cloth. 7) Do not block any ventilation openings, Install in accordance with the manufacturer's instructions. 8) Do not install near any way, such as radiators, heat registers, or other equipment. type plug. ...INSTRUCTED. This product satisfies FCC regulations when shielded cables and connectors are designed to wide slot, fully insert. CAUTION : DVD PLAYERS USE AN INVISIBLE LASER BEAM WHICH CAN CAUSE HAZARDOUS RADIATION EXPOSURE IF DIRECTED. These limits are used in accordance with ...
User Manual (ENGLISH)
Page 3
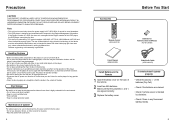
.... • Do not keep under direct sunlight. • Keep in a cool ventilated area. • Store vertically. • Keep in the Remote 1 Open the battery cover on these discs is AC 120V, 60Hz. Maintenance of Cabinet For safety reasons, be used only where the power supply is highly... cord from the AC outlet when you don't intend to put a flower vase filled with water or any fluorescent lighting nearby. 5 If this DVD player, the DVD player cannot play the disc. • This device is any small metal objects on again with a soft cloth. 4 Accessories Before You Start Remote ...
.... • Do not keep under direct sunlight. • Keep in a cool ventilated area. • Store vertically. • Keep in the Remote 1 Open the battery cover on these discs is AC 120V, 60Hz. Maintenance of Cabinet For safety reasons, be used only where the power supply is highly... cord from the AC outlet when you don't intend to put a flower vase filled with water or any fluorescent lighting nearby. 5 If this DVD player, the DVD player cannot play the disc. • This device is any small metal objects on again with a soft cloth. 4 Accessories Before You Start Remote ...
User Manual (ENGLISH)
Page 6
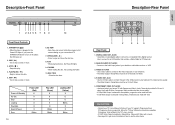
... LED (Red) O X X X X X Blinks 10 6. S-VIDEO OUT JACK • Use the S-Video cable to connect this jack to turn on how to open and close the disc tray. 8. PLAY/PAUSE ( ) • Begin or pause disc play . 4. Description-Front Panel STANDBY/ON EZ VIEW PLAY LOADING 1 2 34...( ) • When the player is selected in Setup Menu, interlaced scan mode will not work . DISC TRAY • Place the disc here. These jacks provide Pr, Pb and Y video. If Progressive Scan is supported, follow the TV User's Manual's instructions regarding Progressive Scan settings in the TV's menu ...
... LED (Red) O X X X X X Blinks 10 6. S-VIDEO OUT JACK • Use the S-Video cable to connect this jack to turn on how to open and close the disc tray. 8. PLAY/PAUSE ( ) • Begin or pause disc play . 4. Description-Front Panel STANDBY/ON EZ VIEW PLAY LOADING 1 2 34...( ) • When the player is selected in Setup Menu, interlaced scan mode will not work . DISC TRAY • Place the disc here. These jacks provide Pr, Pb and Y video. If Progressive Scan is supported, follow the TV User's Manual's instructions regarding Progressive Scan settings in the TV's menu ...
User Manual (ENGLISH)
Page 7
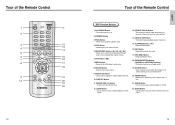
... Button • Allows you to program a specific order. 4. NUMBER Buttons 3. Use to remove menus or status displays from the current position. 14. SUBTITLE Button 11. OPEN/CLOSE ( ) button • To open and close the disc tray. 12. ANGLE Button • Use to replay the previous 10 seconds of the Remote Control... search forward/backward through a disc. SEARCH/SKIP buttons Allows you to full screen viewing on a disc. 13 SETUP DISC MENU Button • Brings up the DVD player's setup menu. 8.
... Button • Allows you to program a specific order. 4. NUMBER Buttons 3. Use to remove menus or status displays from the current position. 14. SUBTITLE Button 11. OPEN/CLOSE ( ) button • To open and close the disc tray. 12. ANGLE Button • Use to replay the previous 10 seconds of the Remote Control... search forward/backward through a disc. SEARCH/SKIP buttons Allows you to full screen viewing on a disc. 13 SETUP DISC MENU Button • Brings up the DVD player's setup menu. 8.
User Manual (ENGLISH)
Page 9
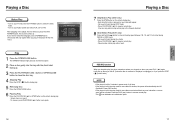
... TV and press the TV/VIDEO button to resume normal play . - After plugging in the player, the first time you press the DVD POWER button, this screen comes up . 3 Press the PLAY/PAUSE ( ) button or OPEN/CLOSE button to select the language, press a NUMBER button. (This screen will only appear when... you press the STOP ( ) button twice.) NOTE • If the player is left for more than 30 ...
... TV and press the TV/VIDEO button to resume normal play . - After plugging in the player, the first time you press the DVD POWER button, this screen comes up . 3 Press the PLAY/PAUSE ( ) button or OPEN/CLOSE button to select the language, press a NUMBER button. (This screen will only appear when... you press the STOP ( ) button twice.) NOTE • If the player is left for more than 30 ...
User Manual (ENGLISH)
Page 17
.... 5 Press the ENTER button. - Off : Normal Playback - Using the Zoom Function Using the Zoom Function (DVD) 1 During play , press ENTER to zoom in 2X/4X/2X/Normal in order. 32 Clips Menu for MP3/JPEG 1 Open the disc tray. 2 Place the disc on the tray. - Place the disc with the labeled side... up. 3 Close the tray. - During DVD play or pause mode, press the MENU button on the remote. 2 Use the UP...
.... 5 Press the ENTER button. - Off : Normal Playback - Using the Zoom Function Using the Zoom Function (DVD) 1 During play , press ENTER to zoom in 2X/4X/2X/Normal in order. 32 Clips Menu for MP3/JPEG 1 Open the disc tray. 2 Place the disc on the tray. - Place the disc with the labeled side... up. 3 Close the tray. - During DVD play or pause mode, press the MENU button on the remote. 2 Use the UP...

User Manual (ENGLISH)
Page 18
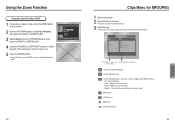
Root JPEG MP3 Parent Folder MUSIC Current Folder 1st Sub-Folders 2nd SONG FILE 1 SONG FILE 2 SONG FILE 3 Peer Folders MP3 Play 1 Open the disc tray. 2 Place the disc on the tray. - Place the disc with the labeled side up. 3 Close the tray. - ADVANCED FUNCTIONS 34 35 and ...
Root JPEG MP3 Parent Folder MUSIC Current Folder 1st Sub-Folders 2nd SONG FILE 1 SONG FILE 2 SONG FILE 3 Peer Folders MP3 Play 1 Open the disc tray. 2 Place the disc on the tray. - Place the disc with the labeled side up. 3 Close the tray. - ADVANCED FUNCTIONS 34 35 and ...


