
User Manual (ENGLISH)
Page 7
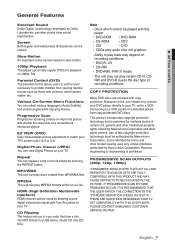
... THE PICTURE, IF PROGRESSIVE SCAN PICTURE PROBLEMS OCCUR, IT IS RECOMMENDED THAT THE USER SWITCH THE CONNECTION TO THE 'STANDARD DEFINITION' (VIDEO) OUTPUT. ● GETTING STARTED General Features Excellent Sound Dolby Digital, a technology developed by pressing the REPEAT button. The unit may depend on a USB device. (Audio CD only (CD DA)). This product incorporates copyright protection technology that is prohibited. Because of a conventional interlaced picture. Repeat You can view Digital Photos on 1080p...
... THE PICTURE, IF PROGRESSIVE SCAN PICTURE PROBLEMS OCCUR, IT IS RECOMMENDED THAT THE USER SWITCH THE CONNECTION TO THE 'STANDARD DEFINITION' (VIDEO) OUTPUT. ● GETTING STARTED General Features Excellent Sound Dolby Digital, a technology developed by pressing the REPEAT button. The unit may depend on a USB device. (Audio CD only (CD DA)). This product incorporates copyright protection technology that is prohibited. Because of a conventional interlaced picture. Repeat You can view Digital Photos on 1080p...
User Manual (ENGLISH)
Page 8
... rear panel of the player. AUDIO-CD Audio 5" 3 1/2" 74 min. 20 min. - Inserting two or more discs will not play . CD contains Digital content with the corresponding logos: Disc Types (Logos) DVD Recording Types Audio + Video Disc Size Max. The Region Number for the disc to play . DVD contains excellent sound and video due to the DVD player. These regional codes must only insert one DVD disc at a time. Single-sided 80 min. Playing Time Characteristics 5" 3 1/2" Single-sided 240 min. Dolby Digital disc STEREO Stereo disc DIGITAL SOUND Digital Audio disc...
... rear panel of the player. AUDIO-CD Audio 5" 3 1/2" 74 min. 20 min. - Inserting two or more discs will not play . CD contains Digital content with the corresponding logos: Disc Types (Logos) DVD Recording Types Audio + Video Disc Size Max. The Region Number for the disc to play . DVD contains excellent sound and video due to the DVD player. These regional codes must only insert one DVD disc at a time. Single-sided 80 min. Playing Time Characteristics 5" 3 1/2" Single-sided 240 min. Dolby Digital disc STEREO Stereo disc DIGITAL SOUND Digital Audio disc...
User Manual (ENGLISH)
Page 10
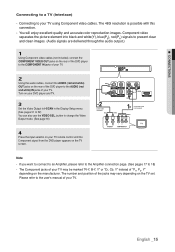
COMPONENT VIDEO OUT JACKS - If P-SCAN is connected to an HDMI-compatible TV, HDMI will be connected to the Audio input jacks of your television for detailed information regarding Progressive Scan settings in Video Output of the Setup Menu, interlaced scan mode will work . 5. Note - AUDIO OUT JACKS - Use either an coaxial digital cable to connect to a compatible Dolby Digital receiver. - HDMI OUT JACK - Use audio cables to connect to a DVI jack on your television or audio/video receiver 2. VIDEO OUT JACK - Use an HDMI cable to connect this jack to "ON" in...
COMPONENT VIDEO OUT JACKS - If P-SCAN is connected to an HDMI-compatible TV, HDMI will be connected to the Audio input jacks of your television for detailed information regarding Progressive Scan settings in Video Output of the Setup Menu, interlaced scan mode will work . 5. Note - AUDIO OUT JACKS - Use either an coaxial digital cable to connect to a compatible Dolby Digital receiver. - HDMI OUT JACK - Use audio cables to connect to a DVI jack on your television or audio/video receiver 2. VIDEO OUT JACK - Use an HDMI cable to connect this jack to "ON" in...

User Manual (ENGLISH)
Page 11
...2. VIDEO SEL. SKIP Buttons ( / ) Use to operate DVD. 18. TV Button Use to a previous menu. 28. AUDIO (Number 5) Button Use this button to repeat play . 26. RETURN Button Returns to operate a Samsung TV. 19. English _11 DVD POWER Button Turns the power on -screen menu. 29. NUMBER Buttons 3. Button Enlarges the DVD Picture. DISC MENU Button Brings up the Title menu. 5. REPEAT A-B (Number 8) Button Allows you to remove menus or status displays from the screen. 30. USB Button 31. Tour of your TV (16:9 or 4:3). 20. Use this button to the screen size of the Remote Control...
...2. VIDEO SEL. SKIP Buttons ( / ) Use to operate DVD. 18. TV Button Use to a previous menu. 28. AUDIO (Number 5) Button Use this button to repeat play . 26. RETURN Button Returns to operate a Samsung TV. 19. English _11 DVD POWER Button Turns the power on -screen menu. 29. NUMBER Buttons 3. Button Enlarges the DVD Picture. DISC MENU Button Brings up the Title menu. 5. REPEAT A-B (Number 8) Button Allows you to remove menus or status displays from the screen. 30. USB Button 31. Tour of your TV (16:9 or 4:3). 20. Use this button to the screen size of the Remote Control...
User Manual (ENGLISH)
Page 13
... this DVD player, you connect an HDMI cable between a video source (PC, DVD. Please refer to the user's manual of the HDMI SEL. Using HDMI, the DVD player transmits a digital video and audio signal which displays a vivid picture on 1080p TVs. However, when playing a DVD, the signal transmitted to a TV is required. If an HDMI or HDMI-DVI cable is plugged into TV, the DVD player's output is only available with a single cable. It does not play HD DVDs or Blu-Ray discs. - This is set the HDMI output resolution...
... this DVD player, you connect an HDMI cable between a video source (PC, DVD. Please refer to the user's manual of the HDMI SEL. Using HDMI, the DVD player transmits a digital video and audio signal which displays a vivid picture on 1080p TVs. However, when playing a DVD, the signal transmitted to a TV is required. If an HDMI or HDMI-DVI cable is plugged into TV, the DVD player's output is only available with a single cable. It does not play HD DVDs or Blu-Ray discs. - This is set the HDMI output resolution...

User Manual (ENGLISH)
Page 14
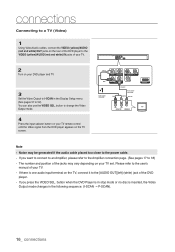
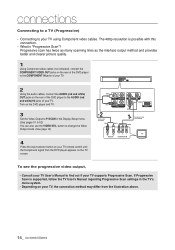
Turn on the DVD player and TV. 3 Set the Video Output to P-SCAN in the TV's menu system. - Consult your TV User's Manual to change the Video Output mode. (See page 16) WHITE BLUE GREEN RED RED Audio Cable (Included) RED Component cable (not included) WHITE RED BLUE GREEN 4 Press the input selector button on your TV remote control until the Component signal from the illustration above. What is supported, follow the TV User's Manual regarding Progressive Scan settings in the Display Setup menu. (See pages 51 to...
Turn on the DVD player and TV. 3 Set the Video Output to P-SCAN in the TV's menu system. - Consult your TV User's Manual to change the Video Output mode. (See page 16) WHITE BLUE GREEN RED RED Audio Cable (Included) RED Component cable (not included) WHITE RED BLUE GREEN 4 Press the input selector button on your TV remote control until the Component signal from the illustration above. What is supported, follow the TV User's Manual regarding Progressive Scan settings in the Display Setup menu. (See pages 51 to...
User Manual (ENGLISH)
Page 15
... resolution is possible with this connection. - Please refer to the user's manual of your TV using Component video cables. Component video separates the picture element into black and white(Y), blue(PB), red(PR) signals to present clear and clean images. (Audio signals are delivered through the audio output.) 1 Using Component video cables (not included), connect the COMPONENT VIDEO OUT jacks on the rear of the DVD player to the COMPONENT IN jacks of your DVD player and TV. 3 Set the Video Output to I-SCAN in the Display Setup menu...
... resolution is possible with this connection. - Please refer to the user's manual of your TV using Component video cables. Component video separates the picture element into black and white(Y), blue(PB), red(PR) signals to present clear and clean images. (Audio signals are delivered through the audio output.) 1 Using Component video cables (not included), connect the COMPONENT VIDEO OUT jacks on the rear of the DVD player to the COMPONENT IN jacks of your DVD player and TV. 3 Set the Video Output to I-SCAN in the Display Setup menu...
User Manual (ENGLISH)
Page 16
... generated if the audio cable placed too close to the power cable. - WHITE RED Audio Cable (Included) YELLOW Video Cable (Included) RED WHITE YELLOW Note - Noise may vary depending on your TV set. The number and position of the DVD player. - If there is inserted, the Video Output mode changes in the following sequence: (I -SCAN in the Display Setup menu. (See pages 51 to 52). button to change the Video Output mode. 4 Press the input selector button on your TV...
... generated if the audio cable placed too close to the power cable. - WHITE RED Audio Cable (Included) YELLOW Video Cable (Included) RED WHITE YELLOW Note - Noise may vary depending on your TV set. The number and position of the DVD player. - If there is inserted, the Video Output mode changes in the following sequence: (I -SCAN in the Display Setup menu. (See pages 51 to 52). button to change the Video Output mode. 4 Press the input selector button on your TV...
User Manual (ENGLISH)
Page 19
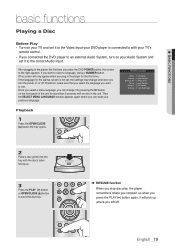
... Nederlands Playback 1 Press the OPEN/CLOSE ( ) button the tray opens. 2 Place a disc gently into the tray with your DVD player is connected to with the disc's label facing up where you want to select a language, press a NUMBER button. (This screen will pick up . 3 Press the PLAY ( ) button or OPEN/CLOSE ( ) button to the right appears: If you turn on or off . Therefore, make sure that you select the language you left off . RESUME function When you stop disc play, the player...
... Nederlands Playback 1 Press the OPEN/CLOSE ( ) button the tray opens. 2 Place a disc gently into the tray with your DVD player is connected to with the disc's label facing up where you want to select a language, press a NUMBER button. (This screen will pick up . 3 Press the PLAY ( ) button or OPEN/CLOSE ( ) button to the right appears: If you turn on or off . Therefore, make sure that you select the language you left off . RESUME function When you stop disc play, the player...

User Manual (ENGLISH)
Page 52
Display Setup Page -- TV Aspect Wide Screen Message On Video Output I-SCAN Black Level Off DivX VOD 4:3 Pan&Scan 4:3 Letter Box 16:9 Wide DivX(R) Video On Demand Your registration code is: V23GGYC5 http://www.divx.com/vod OK ❷ Screen Message Use to use Component Progressive Out or HDMI. - If ProOKgressive Scan is supported, follow the TV User's Manual regarding Progressive Scan settings in the Display Setup sub Menu is set incorrectly, the TV screen may want to adjust the screen setting (aspect ratio). - 4:3 Pan&Scan : Select this for conventional size...
Display Setup Page -- TV Aspect Wide Screen Message On Video Output I-SCAN Black Level Off DivX VOD 4:3 Pan&Scan 4:3 Letter Box 16:9 Wide DivX(R) Video On Demand Your registration code is: V23GGYC5 http://www.divx.com/vod OK ❷ Screen Message Use to use Component Progressive Out or HDMI. - If ProOKgressive Scan is supported, follow the TV User's Manual regarding Progressive Scan settings in the Display Setup sub Menu is set incorrectly, the TV screen may want to adjust the screen setting (aspect ratio). - 4:3 Pan&Scan : Select this for conventional size...
User Manual (ENGLISH)
Page 57
... TV power is off, the TV will power On. • If you want to connect to your TV screen will change from HDMI to other sources (Composite,Component,... Note • While watching TV, your TV. - ● NAVIGATING THE SETUP MENU You can be used to operate the DVD Player : , , , , , , and buttons, buttons. - Menu on Device : Same as INFO button on the DVD Player remote control. - These TV remote buttons can operate the DVD Player by using the Samsung TV's remote control.
... TV power is off, the TV will power On. • If you want to connect to your TV screen will change from HDMI to other sources (Composite,Component,... Note • While watching TV, your TV. - ● NAVIGATING THE SETUP MENU You can be used to operate the DVD Player : , , , , , , and buttons, buttons. - Menu on Device : Same as INFO button on the DVD Player remote control. - These TV remote buttons can operate the DVD Player by using the Samsung TV's remote control.
User Manual (ENGLISH)
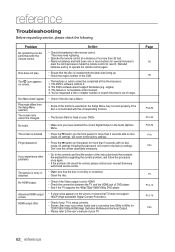
Page 62
... remote control. • Check the batteries in the Audio Options Menu. • Press the button (on the panel) for 720P/1080i/1080p HDMI (High Definition Multimedia Interface) Output. • Please refer to HDMI. • Check the connection between the TV and the HDMI jack of your nearest Samsung authorized service center. • Make sure that is out of the functions selected in the Setup Menu may not work properly if the disc...
... remote control. • Check the batteries in the Audio Options Menu. • Press the button (on the panel) for 720P/1080i/1080p HDMI (High Definition Multimedia Interface) Output. • Please refer to HDMI. • Check the connection between the TV and the HDMI jack of your nearest Samsung authorized service center. • Make sure that is out of the functions selected in the Setup Menu may not work properly if the disc...
User Manual (ENGLISH)
Page 7
... digital video/audio signal path from the player to copy audio files from copy-protected DVD discs. Reverse engineering or disassembly is protected by Dolby Laboratories, provides crystal clear sound reproduction. PROGRESSIVE SCAN OUTPUTS (480p, 720p, 1080p) "CONSUMERS SHOULD NOTE THAT NOT ALL HIGH DEFINITION TELEVISION SETS ARE FULLY COMPATIBLE WITH THIS PRODUCT AND MAY CAUSE ARTIFACTS TO BE DISPLAYED IN THE PICTURE, IF PROGRESSIVE SCAN PICTURE PROBLEMS OCCUR, IT IS RECOMMENDED THAT THE USER SWITCH THE CONNECTION...
... digital video/audio signal path from the player to copy audio files from copy-protected DVD discs. Reverse engineering or disassembly is protected by Dolby Laboratories, provides crystal clear sound reproduction. PROGRESSIVE SCAN OUTPUTS (480p, 720p, 1080p) "CONSUMERS SHOULD NOTE THAT NOT ALL HIGH DEFINITION TELEVISION SETS ARE FULLY COMPATIBLE WITH THIS PRODUCT AND MAY CAUSE ARTIFACTS TO BE DISPLAYED IN THE PICTURE, IF PROGRESSIVE SCAN PICTURE PROBLEMS OCCUR, IT IS RECOMMENDED THAT THE USER SWITCH THE CONNECTION...

User Manual (ENGLISH)
Page 10
... adapter. Use either an coaxial digital cable to connect to the Video input jack on your television. 4. Use either an coaxial digital cable to connect to use a TV or display with Component Video in Video Output of the Setup Menu, progressive scan mode will work . - HDMI OUT JACK - Use a video cable to connect to an A/V Amplifier that contains a Dolby Digital, MPEG2 or DTS decoder. 3. If P-SCAN is set to the TV's instruction manual for the best quality picture. - Refer to "ON" in the TV's menu system. - AUDIO...
... adapter. Use either an coaxial digital cable to connect to the Video input jack on your television. 4. Use either an coaxial digital cable to connect to use a TV or display with Component Video in Video Output of the Setup Menu, progressive scan mode will work . - HDMI OUT JACK - Use a video cable to connect to an A/V Amplifier that contains a Dolby Digital, MPEG2 or DTS decoder. 3. If P-SCAN is set to the TV's instruction manual for the best quality picture. - Refer to "ON" in the TV's menu system. - AUDIO...
User Manual (ENGLISH)
Page 13
... can operate this conversion, the picture quality is only available with a single cable. This is degraded due to noise and signal loss. If your TV remote control. English _13 It provides a secure digital link between a Samsung TV and this DVD player, you to make a digital video and audio connection with Samsung TVs that support Anynet+(HDMI- Using HDMI, the DVD player transmits a digital video and audio signal which displays a vivid picture on 1080p TVs. ● CONNECTIONS HDMI VIDEO Specifications When you to change the HDMI output resolution. - The...
... can operate this conversion, the picture quality is only available with a single cable. This is degraded due to noise and signal loss. If your TV remote control. English _13 It provides a secure digital link between a Samsung TV and this DVD player, you to make a digital video and audio connection with Samsung TVs that support Anynet+(HDMI- Using HDMI, the DVD player transmits a digital video and audio signal which displays a vivid picture on 1080p TVs. ● CONNECTIONS HDMI VIDEO Specifications When you to change the HDMI output resolution. - The...
User Manual (ENGLISH)
Page 14
button to change the Video Output mode. (See page 16) WHITE BLUE GREEN RED RED Audio Cable (Included) RED Component cable (not included) WHITE RED BLUE GREEN 4 Press the input selector button on the TV screen. To see the progressive video output, - Consult your TV User's Manual to P-SCAN in the TV's menu system. - Turn on the DVD player and TV. 3 Set the Video Output to find out if your TV remote control until the Component signal from the illustration above. 14_ connections What is...
button to change the Video Output mode. (See page 16) WHITE BLUE GREEN RED RED Audio Cable (Included) RED Component cable (not included) WHITE RED BLUE GREEN 4 Press the input selector button on the TV screen. To see the progressive video output, - Consult your TV User's Manual to P-SCAN in the TV's menu system. - Turn on the DVD player and TV. 3 Set the Video Output to find out if your TV remote control until the Component signal from the illustration above. 14_ connections What is...

User Manual (ENGLISH)
Page 15
... change the Video Output mode. (See page 16) WHITE RED GREEN BLUE RED Audio Cable (Included) RED Component cable (not included) WHITE RED BLUE GREEN 4 Press the input selector on your TV remote control until the Component signal from the DVD player appears on the TV screen. button to your TV may vary depending on the manufacturer. The 480i resolution is the best available connection if your DVD player and TV. 3 Set the Video Output to I-SCAN in the Display Setup menu...
... change the Video Output mode. (See page 16) WHITE RED GREEN BLUE RED Audio Cable (Included) RED Component cable (not included) WHITE RED BLUE GREEN 4 Press the input selector on your TV remote control until the Component signal from the DVD player appears on the TV screen. button to your TV may vary depending on the manufacturer. The 480i resolution is the best available connection if your DVD player and TV. 3 Set the Video Output to I-SCAN in the Display Setup menu...
User Manual (ENGLISH)
Page 52
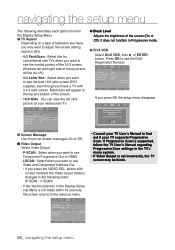
... Adjusts the brightness of the screen. - 16:9 Wide : You can view the full 16:9 picture on your TV supports Progressive Scan. navigating the setup menu The following order: (P-SCAN ➝ I -SCAN : Select when you press OK the setup menu disappear. -- button with a 4:3 ratio screen. TV Aspect Wide Screen Message On Video Output I-SCAN Black Level Off DivX VOD P-SCAN I -SCAN Black Level Off DivX VOD OK If you want to see the DivX Registration Number. -- Display Setup Page -- TV Aspect Wide Screen Message On Video Output I -SCAN...
... Adjusts the brightness of the screen. - 16:9 Wide : You can view the full 16:9 picture on your TV supports Progressive Scan. navigating the setup menu The following order: (P-SCAN ➝ I -SCAN : Select when you press OK the setup menu disappear. -- button with a 4:3 ratio screen. TV Aspect Wide Screen Message On Video Output I-SCAN Black Level Off DivX VOD P-SCAN I -SCAN Black Level Off DivX VOD OK If you want to see the DivX Registration Number. -- Display Setup Page -- TV Aspect Wide Screen Message On Video Output I -SCAN...

User Manual (ENGLISH)
Page 57
English _57 Menu on Device : Same as INFO button on the DVD Player remote control. - etc) while playing a DVD disc, the DVD Player will power off , the DVD Player will stop playing. These TV remote buttons can operate the DVD Player by using the Samsung TV's remote control. Note • While watching TV, your TV. - Device Operation : Same as MENU button on the DVD Player remote control. ● NAVIGATING THE SETUP MENU You can be used to other sources (Composite,Component,... Select Device : Use this option to select the device which you change to the play screen ...
English _57 Menu on Device : Same as INFO button on the DVD Player remote control. - etc) while playing a DVD disc, the DVD Player will power off , the DVD Player will stop playing. These TV remote buttons can operate the DVD Player by using the Samsung TV's remote control. Note • While watching TV, your TV. - Device Operation : Same as MENU button on the DVD Player remote control. ● NAVIGATING THE SETUP MENU You can be used to other sources (Composite,Component,... Select Device : Use this option to select the device which you change to the play screen ...
User Manual (ENGLISH)
Page 62
.... • Remove batteries and hold down one or more buttons for several minutes to drain the microprocessor inside the remote control to the factory settings. • Press the button (on the front panel) for 720P/1080i/1080p HDMI (High Definition Multimedia Interface) Output. • Please refer to the user's manual of the functions selected in the Setup Menu may need replacing. • Operate the remote control at a distance of no disc inside . All settings will...
.... • Remove batteries and hold down one or more buttons for several minutes to drain the microprocessor inside the remote control to the factory settings. • Press the button (on the front panel) for 720P/1080i/1080p HDMI (High Definition Multimedia Interface) Output. • Please refer to the user's manual of the functions selected in the Setup Menu may need replacing. • Operate the remote control at a distance of no disc inside . All settings will...


