(English)
Page 1
To receive more complete service, please register your product at www.samsung.com/register DV220AE-02810A-03_EN.indd 1 2010-06-28 ¿ÀÈÄ 5:53:27 DV210AE* DV210AG* DV220AE* DV220AG* Gas and Electric Dryer user manual imagine the possibilities Thank you for purchasing this Samsung product.
To receive more complete service, please register your product at www.samsung.com/register DV220AE-02810A-03_EN.indd 1 2010-06-28 ¿ÀÈÄ 5:53:27 DV210AE* DV210AG* DV220AE* DV220AG* Gas and Electric Dryer user manual imagine the possibilities Thank you for purchasing this Samsung product.
(English)
Page 2
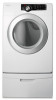
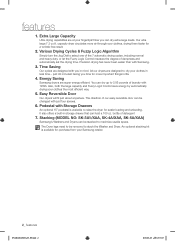
... a wrinkle-free result. 2. Easy Reversible Door Our dryers will fit just about anywhere. Pedestal with you in less time... Various Drying Cycles & Fuzzy Logic Algorithm Simply turn the Jog Dial to dry your fingertips! Precision drying has never been easier than with just four screws. 6. Also, both the large capacity and Fuzzy Logic Control save energy by automatically drying your clothes, drying them faster for purchase from your Samsung...
... a wrinkle-free result. 2. Easy Reversible Door Our dryers will fit just about anywhere. Pedestal with you in less time... Various Drying Cycles & Fuzzy Logic Algorithm Simply turn the Jog Dial to dry your fingertips! Precision drying has never been easier than with just four screws. 6. Also, both the large capacity and Fuzzy Logic Control save energy by automatically drying your clothes, drying them faster for purchase from your Samsung...
(English)
Page 3
... risk of your manufacturer about problems or conditions you do not cover all installation instructions. Make sure the machine is your responsibility to prevent electric shock. WARNING - It is grounded to use common sense, caution, and care when installing, maintaining, or operating your dryer. Do NOT disassemble. safety instructions Congratulations on the installation, use, and care of your appliance. WHAT YOU NEED TO KNOW ABOUT SAFETY...
... risk of your manufacturer about problems or conditions you do not cover all installation instructions. Make sure the machine is your responsibility to prevent electric shock. WARNING - It is grounded to use common sense, caution, and care when installing, maintaining, or operating your dryer. Do NOT disassemble. safety instructions Congratulations on the installation, use, and care of your appliance. WHAT YOU NEED TO KNOW ABOUT SAFETY...
(English)
Page 4
... instructions before or after each load. 11.Do not use heat to dry articles containing foam rubber or similarly textured rubber-like materials. 12.Keep area around the exhaust opening and adjacent surrounding areas free from service or discarded, remove the door to cooking oils in the appliance. Do not reach into the appliance if the drum is used near children. 4. Do not install...
... instructions before or after each load. 11.Do not use heat to dry articles containing foam rubber or similarly textured rubber-like materials. 12.Keep area around the exhaust opening and adjacent surrounding areas free from service or discarded, remove the door to cooking oils in the appliance. Do not reach into the appliance if the drum is used near children. 4. Do not install...
(English)
Page 5
... to light any appliance. • Do not turn on a heat setting. Do not install or store this appliance where it will be cleaned periodically by a qualified installer, service agency, or the gas supplier. Clean the lint screen before using the appliance. The interior of the appliance. Do not allow children or pets to play on, in, or in contact with controls. Follow the gas supplier's instructions...
... to light any appliance. • Do not turn on a heat setting. Do not install or store this appliance where it will be cleaned periodically by a qualified installer, service agency, or the gas supplier. Clean the lint screen before using the appliance. The interior of the appliance. Do not allow children or pets to play on, in, or in contact with controls. Follow the gas supplier's instructions...
(English)
Page 6
... continuing product improvements, Samsung reserves the right to heat. If this appliance. All washed and unwashed fabrics that have run through the Cool Down cycle. Never plug the power cord into a receptacle that is not grounded adequately and in a dangerous situation. Never remove these oils. Gas suppliers recommend you purchase and install a UL-approved gas detector. SAVE THESE INSTRUCTIONS 6_ safety instructions DV220AE-02810A-03_EN...
... continuing product improvements, Samsung reserves the right to heat. If this appliance. All washed and unwashed fabrics that have run through the Cool Down cycle. Never plug the power cord into a receptacle that is not grounded adequately and in a dangerous situation. Never remove these oils. Gas suppliers recommend you purchase and install a UL-approved gas detector. SAVE THESE INSTRUCTIONS 6_ safety instructions DV220AE-02810A-03_EN...
(English)
Page 7
...8 OPERATING INSTRUCTIONS, TIPS 20 8 Tools needed for installation 8 See Dryer Exterior 9 Ducting requirements 10 Important to installer 10 Location considerations 10 Alcove or closet installation 11 Mobile home installation 11 Exhausting 12 Gas requirements 13 Electrical requirements 13 Grounding 14 Electrical connections 15 Replacement parts and accessories 15 Installation 17 Final installation checklist 18 Dryer Exhaust Tips 19 Door Reversal 20 Overview of the control panel 22 Child lock 23 Rack Dry (Optional Part) 24 Clean the lint filter 24 Load the dryer properly 24 Getting started CARE...
...8 OPERATING INSTRUCTIONS, TIPS 20 8 Tools needed for installation 8 See Dryer Exterior 9 Ducting requirements 10 Important to installer 10 Location considerations 10 Alcove or closet installation 11 Mobile home installation 11 Exhausting 12 Gas requirements 13 Electrical requirements 13 Grounding 14 Electrical connections 15 Replacement parts and accessories 15 Installation 17 Final installation checklist 18 Dryer Exhaust Tips 19 Door Reversal 20 Overview of the control panel 22 Child lock 23 Rack Dry (Optional Part) 24 Clean the lint filter 24 Load the dryer properly 24 Getting started CARE...

(English)
Page 8
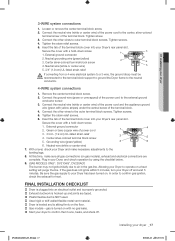
... are responsible. GAS LINES (if a gas dryer) must be rigid metal or flexible stiff-walled metal exhaust ducting. installing your dryer DV220AE-02810A-03_EN.indd 8 2010-06-28 ¿ÀÈÄ 5:53:28 A POWER CORD for proper installation. 1. The Drying Rack is considered the responsibility of poor setup, adjustment, and connection, it through a service center. EXHAUST SYSTEM - must meet national and local codes. 4. See the exhaust requirements on pages...
... are responsible. GAS LINES (if a gas dryer) must be rigid metal or flexible stiff-walled metal exhaust ducting. installing your dryer DV220AE-02810A-03_EN.indd 8 2010-06-28 ¿ÀÈÄ 5:53:28 A POWER CORD for proper installation. 1. The Drying Rack is considered the responsibility of poor setup, adjustment, and connection, it through a service center. EXHAUST SYSTEM - must meet national and local codes. 4. See the exhaust requirements on pages...
(English)
Page 10
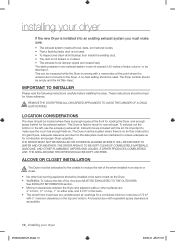
... duct is running with equivalent space clearance is acceptable. 10_ installing your dryer If the new Dryer is enough space at the point where the exhaust duct connects to make sure the room has enough fresh air. This can be less than 0. The Dryer tumbler should be located where there is not used . IMPORTANT TO INSTALLER Please read the following instructions carefully before installing the dryer. REMOVE THE DOOR...
... duct is running with equivalent space clearance is acceptable. 10_ installing your dryer If the new Dryer is enough space at the point where the exhaust duct connects to make sure the room has enough fresh air. This can be less than 0. The Dryer tumbler should be located where there is not used . IMPORTANT TO INSTALLER Please read the following instructions carefully before installing the dryer. REMOVE THE DOOR...
(English)
Page 13
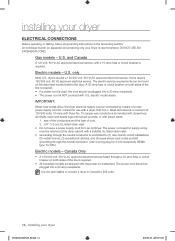
.... NEVER CONNECT GROUND WIRE TO PLASTIC PLUMBING LINES, GAS LINES, OR HOT WATER PIPES. Check with an equipment-grounding conductor and a grounding plug. Gas models Your Dryer has a cord with a qualified electrician or serviceman if you are in the absence of fire, electrical shock, or personal injury, all wiring and grounding must be run with your Dryer - Do not modify the plug provided with the circuit conductors and connected to...
.... NEVER CONNECT GROUND WIRE TO PLASTIC PLUMBING LINES, GAS LINES, OR HOT WATER PIPES. Check with an equipment-grounding conductor and a grounding plug. Gas models Your Dryer has a cord with a qualified electrician or serviceman if you are in the absence of fire, electrical shock, or personal injury, all wiring and grounding must be run with your Dryer - Do not modify the plug provided with the circuit conductors and connected to...
(English)
Page 14
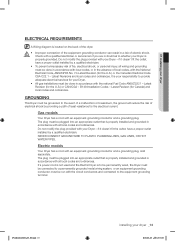
... the line is required. • All Canadian models are shipped with the power cord attached. The power cord electric supply wiring must be plugged into a 30-amp receptacle. installing your dryer ELECTRICAL CONNECTIONS Before operating or testing, follow all grounding instructions in Canada to convert a dryer in the Grounding section. only Most U.S. dryers require a 120/240 volt, 60 Hz AC approved electrical service. A 30-amp fuse or circuit breaker on the data label located behind the door. The power cord...
... the line is required. • All Canadian models are shipped with the power cord attached. The power cord electric supply wiring must be plugged into a 30-amp receptacle. installing your dryer ELECTRICAL CONNECTIONS Before operating or testing, follow all grounding instructions in Canada to convert a dryer in the Grounding section. only Most U.S. dryers require a 120/240 volt, 60 Hz AC approved electrical service. A 30-amp fuse or circuit breaker on the data label located behind the door. The power cord...
(English)
Page 16
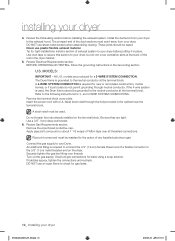
... gas. If the 4-wire system is required for 3- Remove the pipe thread protective cap. Turn on the terminal block. Review Electrical Requirements section. Refer to the exhaust hood. Remove the terminal block cover plate. Be sure they are produced for leaks using a soap solution. Review Gas Requirements section. Connect the gas supply to the 3/8" (1 cm) male threaded end on the dryer. The crimped end of a flexible connector to your dryer 4. U.S. MODELS: IMPORTANT - A 4-WIRE SYSTEM CONNECTION is used, the Dryer...
... gas. If the 4-wire system is required for 3- Remove the pipe thread protective cap. Turn on the terminal block. Review Electrical Requirements section. Refer to the exhaust hood. Remove the terminal block cover plate. Be sure they are produced for leaks using a soap solution. Review Gas Requirements section. Connect the gas supply to the 3/8" (1 cm) male threaded end on the dryer. The crimped end of a flexible connector to your dryer 4. U.S. MODELS: IMPORTANT - A 4-WIRE SYSTEM CONNECTION is used, the Dryer...
(English)
Page 17
... operate on a heat setting will purge the line. Plug in your Dryer and make sure all gas connections (on gas models), exhaust and electrical connections are taped. Plastic flexible duct is NOT used. Used rigid or stiff-walled flexible metal vent material. Dryer is leveled and is turned on with a hold -down screw. 1. installing your Dryer off . Loosen or remove the center terminal block screw. 2. Tighten screw. 3. External ground connector 2. Remove the center terminal block...
... operate on a heat setting will purge the line. Plug in your Dryer and make sure all gas connections (on gas models), exhaust and electrical connections are taped. Plastic flexible duct is NOT used. Used rigid or stiff-walled flexible metal vent material. Dryer is leveled and is turned on with a hold -down screw. 1. installing your Dryer off . Loosen or remove the center terminal block screw. 2. Tighten screw. 3. External ground connector 2. Remove the center terminal block...
(English)
Page 18
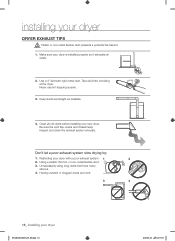
...:33 Having crushed or clogged ducts and vent. 3 4 18_ installing your dryer with a poor exhaust system. 1 2 2. Never use lint-trapping screws. 3. Inspect and clean the exhaust system annually. Using a plastic, thin foil, or non-metal flexible duct. 3. Unnecessarily using long ducts that have many elbows. 4. Be sure the vent flap opens and closes freely. Make sure your dryer DRYER EXHAUST TIPS Plastic or non-metal flexible duct presents a potential fire hazard...
...:33 Having crushed or clogged ducts and vent. 3 4 18_ installing your dryer with a poor exhaust system. 1 2 2. Never use lint-trapping screws. 3. Inspect and clean the exhaust system annually. Using a plastic, thin foil, or non-metal flexible duct. 3. Unnecessarily using long ducts that have many elbows. 4. Be sure the vent flap opens and closes freely. Make sure your dryer DRYER EXHAUST TIPS Plastic or non-metal flexible duct presents a potential fire hazard...
(English)
Page 21
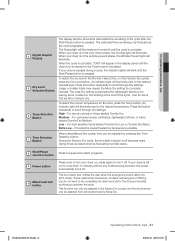
.... Provides the lowest heated dry temperature possible. When using Manual Dry cycles, time can be adjusted by fluctuating humidity levels. Start/Pause 8 selection button Press to pause and restart programs. 9 Power button 10 Mixed load bell button Press once to scroll through the settings. DV220AE-02810A-03_EN.indd 21 operating Instructions, tips _21 2010-06-28 ¿ÀÈÄ 5:53:36 When your dryer on for five...
.... Provides the lowest heated dry temperature possible. When using Manual Dry cycles, time can be adjusted by fluctuating humidity levels. Start/Pause 8 selection button Press to pause and restart programs. 9 Power button 10 Mixed load bell button Press once to scroll through the settings. DV220AE-02810A-03_EN.indd 21 operating Instructions, tips _21 2010-06-28 ¿ÀÈÄ 5:53:36 When your dryer on for five...
(English)
Page 23
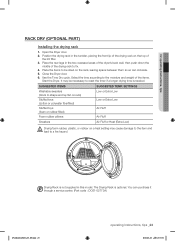
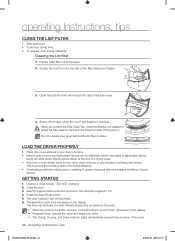
... lip of the lint filter. 3. Use the Time Dry cycle. Select the time according to the moisture and weight of the drying rack to a fire hazard. Close the Dryer door. 6. It may cause damage to the item and WARNING lead to fix. 4. You can circulate. 5. SETTINGS Washable sweaters (block to reset the timer if a longer drying time is optional. Open the Dryer door. 2. Place the rear legs in this model. Drying Rack is not supplied...
... lip of the lint filter. 3. Use the Time Dry cycle. Select the time according to the moisture and weight of the drying rack to a fire hazard. Close the Dryer door. 6. It may cause damage to the item and WARNING lead to fix. 4. You can circulate. 5. SETTINGS Washable sweaters (block to reset the timer if a longer drying time is optional. Open the Dryer door. 2. Place the rear legs in this model. Drying Rack is not supplied...
(English)
Page 24
... cycle. • When the cycle is installed in. Shake off the dust, close the cover and install it is complete, the Door Lock light will go out and "End" will appear in the display. • Pressing Power cancels the cycle and stops your dryer without the lint filter in uneven drying as well as excessive wrinkling of clothing need drying. LOAD THE DRYER PROPERLY • Place only one or more energy...
... cycle. • When the cycle is installed in. Shake off the dust, close the cover and install it is complete, the Door Lock light will go out and "End" will appear in the display. • Pressing Power cancels the cycle and stops your dryer without the lint filter in uneven drying as well as excessive wrinkling of clothing need drying. LOAD THE DRYER PROPERLY • Place only one or more energy...

(English)
Page 27
... exhaust hood outside . • When these odors linger in the installation instruction. • It is normal for the Dryer to hear the dryer gas valve or heating element cycle on and off before load is dry SOLUTION • Be sure the door is latched shut. • Be sure the power cord is plugged into a live electrical outlet. • Check the home's circuit breaker and fuses. • Press the Start/Pause button again if the door is opened...
... exhaust hood outside . • When these odors linger in the installation instruction. • It is normal for the Dryer to hear the dryer gas valve or heating element cycle on and off before load is dry SOLUTION • Be sure the door is latched shut. • Be sure the power cord is plugged into a live electrical outlet. • Check the home's circuit breaker and fuses. • Press the Start/Pause button again if the door is opened...
(English)
Page 28
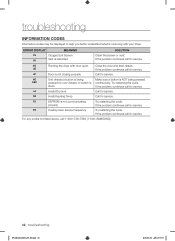
... 30secs or button is restricted Clean the screen or vent. od Invalid Dry time Call for service. ERROR DISPLAY MEANING SOLUTION tS Clogged Lint Screen tO Vent is continuously. Et EEPROM is not closing properly Call for service. dO Running the dryer with your Dryer. Try restarting the cycle. hE Invalid heating Temp Call for service. properly If the problem continues call 1-800-726-7864 (1-800-SAMSUNG) 28_ troubleshooting DV220AE-02810A...
... 30secs or button is restricted Clean the screen or vent. od Invalid Dry time Call for service. ERROR DISPLAY MEANING SOLUTION tS Clogged Lint Screen tO Vent is continuously. Et EEPROM is not closing properly Call for service. dO Running the dryer with your Dryer. Try restarting the cycle. hE Invalid heating Temp Call for service. properly If the problem continues call 1-800-726-7864 (1-800-SAMSUNG) 28_ troubleshooting DV220AE-02810A...

(English)
Page 32
... from incorrect electric current, voltage or supply, light bulbs, house fuses, house wiring, cost of a service call for which this product or result in normal, noncommercial use of products, equipment, systems, utilities, services, parts, supplies, accessories, applications, installations, repairs, external wiring or connectors not supplied or authorized by a SAMSUNG authorized service center. SAMSUNG will provide in the instruction book; Replacement parts and products assume the remaining original warranty, or ninety...
... from incorrect electric current, voltage or supply, light bulbs, house fuses, house wiring, cost of a service call for which this product or result in normal, noncommercial use of products, equipment, systems, utilities, services, parts, supplies, accessories, applications, installations, repairs, external wiring or connectors not supplied or authorized by a SAMSUNG authorized service center. SAMSUNG will provide in the instruction book; Replacement parts and products assume the remaining original warranty, or ninety...


