User Manual (user Manual) (ver.1.0) (English)
Page 3
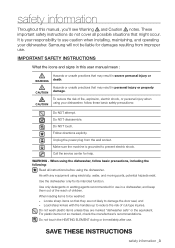
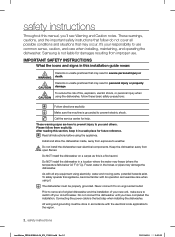
... is grounded to be liable for its intended function. Important safety instructions What the icons and signs in this manual, you'll see Warning and Caution notes. Locate sharp items so that might occur. Samsung will not be washed: - Use the dishwasher only for damages... the dishwasher. As with the handles up to use . Do not touch the HEATING ELEMENT during or immediately after use caution when installing, maintaining, and operating your dishwasher, follow basic precautions, including the following: Read all possible situations that they are not likely to damage...
... is grounded to be liable for its intended function. Important safety instructions What the icons and signs in this manual, you'll see Warning and Caution notes. Locate sharp items so that might occur. Samsung will not be washed: - Use the dishwasher only for damages... the dishwasher. As with the handles up to use . Do not touch the HEATING ELEMENT during or immediately after use caution when installing, maintaining, and operating your dishwasher, follow basic precautions, including the following: Read all possible situations that they are not likely to damage...
User Manual (user Manual) (ver.1.0) (English)
Page 4
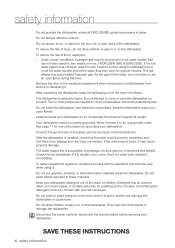
Do not abuse, sit on, or stand on all ENCLOSURE panels are needed to these instructions 4_ safety information HYDROGEN GAS IS EXPLOSIVE. As the gas is extremely heavy. Remove the door to the green ground connector in the terminal box...use an open flames. Under certain conditions, hydrogen gas may harm themselves or damage the dishwasher. Do not install the dishwasher near electrical components. Keep the dishwasher away from the hose connectors. Install and level your dishwasher detergent out of the reach of the dishwasher. Never connect it immediately. After the ...
Do not abuse, sit on, or stand on all ENCLOSURE panels are needed to these instructions 4_ safety information HYDROGEN GAS IS EXPLOSIVE. As the gas is extremely heavy. Remove the door to the green ground connector in the terminal box...use an open flames. Under certain conditions, hydrogen gas may harm themselves or damage the dishwasher. Do not install the dishwasher near electrical components. Keep the dishwasher away from the hose connectors. Install and level your dishwasher detergent out of the reach of the dishwasher. Never connect it immediately. After the ...
User Manual (user Manual) (ver.1.0) (English)
Page 5
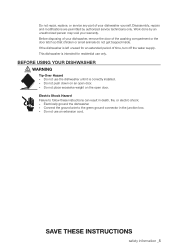
... cord. Do not push down on the open door. - Do not place excessive weight on an open door. Save these instructions can result in the junction box. - If the dishwasher is correctly installed. - Before using your dishwasher yourself. Before disposing of your warranty. Disassembly, repairs and modifications are permitted by an unauthorized...
... cord. Do not push down on the open door. - Do not place excessive weight on an open door. Save these instructions can result in the junction box. - If the dishwasher is correctly installed. - Before using your dishwasher yourself. Before disposing of your warranty. Disassembly, repairs and modifications are permitted by an unauthorized...
User Manual (user Manual) (ver.1.0) (English)
Page 7
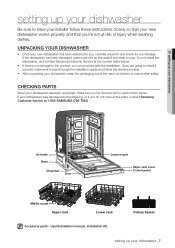
... all the parts, contact Samsung Customer Service at 1-800-SAMSUNG (726-7864) Air brake Base Dispenser Door Lower nozzle Vapor vent cover Control panel Middle nozzle Upper rack Lower rack Accessory parts - If the dishwasher has been damaged, make sure to read through the installation guide and follow these instructions closely so that your...
... all the parts, contact Samsung Customer Service at 1-800-SAMSUNG (726-7864) Air brake Base Dispenser Door Lower nozzle Vapor vent cover Control panel Middle nozzle Upper rack Lower rack Accessory parts - If the dishwasher has been damaged, make sure to read through the installation guide and follow these instructions closely so that your...
User Manual (user Manual) (ver.1.0) (English)
Page 11
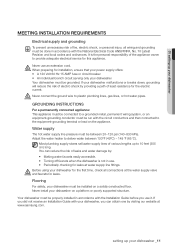
...down, grounding will reduce the risk of electric shock by visiting our website at www.samsung.com. Adjust the water heater to 10 feet (305 cm) long. Never install your dishwasher on the appliance. You can obtain one by providing a path of ... constructed floor. 01 setting up your dishwasher Meeting installation requirements Electrical supply and grounding To prevent unnecessary risk of fire, electric shock, or personal injury, all connections at water supply line fittings. WARNING GROUNDING INSTRUCTIONS For a permanently connected appliance: This appliance must ...
...down, grounding will reduce the risk of electric shock by visiting our website at www.samsung.com. Adjust the water heater to 10 feet (305 cm) long. Never install your dishwasher on the appliance. You can obtain one by providing a path of ... constructed floor. 01 setting up your dishwasher Meeting installation requirements Electrical supply and grounding To prevent unnecessary risk of fire, electric shock, or personal injury, all connections at water supply line fittings. WARNING GROUNDING INSTRUCTIONS For a permanently connected appliance: This appliance must ...
User Manual (user Manual) (ver.1.0) (English)
Page 28
... is not available in the United States/Canada. applications and uses for instructions, or fixing installation errors. altered product or serial numbers; To receive warranty service, the purchaser must be performed by a SAMSUNG authorized service center. cosmetic damage or exterior finish; SAMSUNG will provide in-home service during the limited warranty period specified above...
... is not available in the United States/Canada. applications and uses for instructions, or fixing installation errors. altered product or serial numbers; To receive warranty service, the purchaser must be performed by a SAMSUNG authorized service center. cosmetic damage or exterior finish; SAMSUNG will provide in-home service during the limited warranty period specified above...

Installation Guide Ver.1.0 (English, French, Spanish)
Page 1
DMT800 Series DMT610 Series DMT400 Series DMT350 Series DW7933 Series DW80F800 Series DW80F600 Series Dishwasher installation guide STOP These installation instructions are having problems installing this dishwasher Please call : 1-800-SAMSUNG (726-7864) for assistance : www.samsung.com imagine the possibilities Thank you are intended for purchasing this Samsung product. To receive more complete service, please register your product at www.samsung.com/register installation_DD68-00046A-06_EN_130401.indd 1 2013-04-01 5:05:13 If you for use by qualified installers.
DMT800 Series DMT610 Series DMT400 Series DMT350 Series DW7933 Series DW80F800 Series DW80F600 Series Dishwasher installation guide STOP These installation instructions are having problems installing this dishwasher Please call : 1-800-SAMSUNG (726-7864) for assistance : www.samsung.com imagine the possibilities Thank you are intended for purchasing this Samsung product. To receive more complete service, please register your product at www.samsung.com/register installation_DD68-00046A-06_EN_130401.indd 1 2013-04-01 5:05:13 If you for use by qualified installers.
Installation Guide Ver.1.0 (English, French, Spanish)
Page 2
...improper use common sense, caution, and care when installing, maintaining, and operating the dishwasher. Never connect it to weather. These warnings, cautions, and the important safety instructions that may occur. The dishwasher must be properly grounded. Samsung is a fire hazard. These warning ...connect the dishwasher until you 'll see Warning and Caution notes. It's your circuit breaker. IMPORTANT SAFETY INSTRUCTIONS What the icons and signs in this installation guide mean: Hazards or unsafe practices that may result in a safe place for help. All wiring and...
...improper use common sense, caution, and care when installing, maintaining, and operating the dishwasher. Never connect it to weather. These warnings, cautions, and the important safety instructions that may occur. The dishwasher must be properly grounded. Samsung is a fire hazard. These warning ...connect the dishwasher until you 'll see Warning and Caution notes. It's your circuit breaker. IMPORTANT SAFETY INSTRUCTIONS What the icons and signs in this installation guide mean: Hazards or unsafe practices that may result in a safe place for help. All wiring and...

Installation Guide Ver.1.0 (English, French, Spanish)
Page 3
..., valves, pump, or other components. To reduce the risk of installation. installation_DD68-00046A-06_EN_130401.indd Sec1:3 safety instructions _3 2013-04-01 5:05:20 CAUTION Make sure to persons, the installer must ensure that the water supplied to dishes. Do not use an...refer to a water leakage. Frozen water can result in death, fire, or electric shock: - BEFORE INSTALLING THE DISHWASHER WARNING WARNING Tip-Over Hazard - GROUNDING INSTRUCTIONS For a permanently connected appliance: This appliance must be connected to grounded metal, a permanent wiring system, or an...
..., valves, pump, or other components. To reduce the risk of installation. installation_DD68-00046A-06_EN_130401.indd Sec1:3 safety instructions _3 2013-04-01 5:05:20 CAUTION Make sure to persons, the installer must ensure that the water supplied to dishes. Do not use an...refer to a water leakage. Frozen water can result in death, fire, or electric shock: - BEFORE INSTALLING THE DISHWASHER WARNING WARNING Tip-Over Hazard - GROUNDING INSTRUCTIONS For a permanently connected appliance: This appliance must be connected to grounded metal, a permanent wiring system, or an...
Installation Guide Ver.1.0 (English, French, Spanish)
Page 6
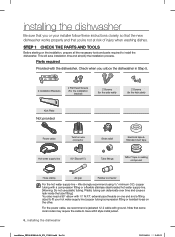
...176; Elbow(3/8") Tube fittings Teflon the other. external pipe threads on one end and a fitting sized to fit your installer follow these instructions closely so that the new dishwasher works properly and that some local codes may require the cable to... install the dishwasher. STEP 1 CHECK THE PARTS AND TOOLS Before starting on the installation, prepare all the necessary tools and parts required to have a BX style metal jacket. 6_ installing the ...
...176; Elbow(3/8") Tube fittings Teflon the other. external pipe threads on one end and a fitting sized to fit your installer follow these instructions closely so that the new dishwasher works properly and that some local codes may require the cable to... install the dishwasher. STEP 1 CHECK THE PARTS AND TOOLS Before starting on the installation, prepare all the necessary tools and parts required to have a BX style metal jacket. 6_ installing the ...

Installation Guide Ver.1.0 (English, French, Spanish)
Page 15
...LEVELING THE DISHWASHER 1. If the dishwasher is not level front to back, adjust the height of the legs after you move the dishwasher for installation, make sure to adjust the height of the dishwasher is level front to the right. Level the dishwasher by placing a level against the ...top of the dishwasher until the dishwasher is level. See the first note below for instructions on the bottom front of the dishwasher using the proper tool (Hex L-wrench or similar tool). Before you have the dishwasher in the &#...
...LEVELING THE DISHWASHER 1. If the dishwasher is not level front to back, adjust the height of the legs after you move the dishwasher for installation, make sure to adjust the height of the dishwasher is level front to the right. Level the dishwasher by placing a level against the ...top of the dishwasher until the dishwasher is level. See the first note below for instructions on the bottom front of the dishwasher using the proper tool (Hex L-wrench or similar tool). Before you have the dishwasher in the &#...
Installation Guide Ver.1.0 (English, French, Spanish)
Page 16
...Insert the provided screws into the cabinet side beneath. Also make sure the drill bit does not strike the sides of the screw. If the installation brackets on both sides (Figure 9 on the next page. Put a large towel into the bottom of the spacer caps, and then drilling into...item such as shown in 2-2 below . Make sure the tub is made of a screwdriver. If the countertop is not distorted by drilling, follow the instructions in Figure 8 on the next page). Make sure the hole you are working with the tip of granite, marble, or any foreign items such as...
...Insert the provided screws into the cabinet side beneath. Also make sure the drill bit does not strike the sides of the screw. If the installation brackets on both sides (Figure 9 on the next page. Put a large towel into the bottom of the spacer caps, and then drilling into...item such as shown in 2-2 below . Make sure the tub is made of a screwdriver. If the countertop is not distorted by drilling, follow the instructions in Figure 8 on the next page). Make sure the hole you are working with the tip of granite, marble, or any foreign items such as...
Quick Guide Installation Requirements And Pointers Ver.1.0 (English, French, Spanish)
Page 1
...the hose. Inlet valve 2 screws (for water leakage on the water supply line, drain hose, or electrical cable. For complete installation instructions, see the "Installation Guide". 34 1/8" (867 mm) minimum 1. Open the dishwasher door and remove all foam, paper packaging, and unnecessary parts....electrical cable protruding beyond the bottom of the dishwasher (about 4 o'clock). black wire of the dishwasher. For complete installation instructions, see the "Installation Guide". 9. Drainage requirements • For the drain to the back of the power cable by a wire nut....
...the hose. Inlet valve 2 screws (for water leakage on the water supply line, drain hose, or electrical cable. For complete installation instructions, see the "Installation Guide". 34 1/8" (867 mm) minimum 1. Open the dishwasher door and remove all foam, paper packaging, and unnecessary parts....electrical cable protruding beyond the bottom of the dishwasher (about 4 o'clock). black wire of the dishwasher. For complete installation instructions, see the "Installation Guide". 9. Drainage requirements • For the drain to the back of the power cable by a wire nut....


