User Manual (user Manual) (ver.1.0) (English)
Page 2
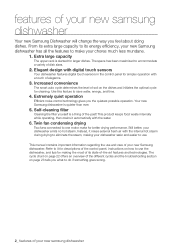
...dishes. Still better, your chores much less mundane. 1. This manual contains important information regarding the use and care of your new samsung dishwasher The space has been maximized to one motor make your dishwasher emits no hot steam. Extremely quiet operation Efficient noise control .... Self-cleaning filter Cleaning the filter yourself is a thing of elegance. 3. This product keeps food waste internally while operating, then drains it mixes external fresh air with the internal hot steam during drying to eliminate the steam, making your dishwasher safer and easier to...
...dishes. Still better, your chores much less mundane. 1. This manual contains important information regarding the use and care of your new samsung dishwasher The space has been maximized to one motor make your dishwasher emits no hot steam. Extremely quiet operation Efficient noise control .... Self-cleaning filter Cleaning the filter yourself is a thing of elegance. 3. This product keeps food waste internally while operating, then drains it mixes external fresh air with the internal hot steam during drying to eliminate the steam, making your dishwasher safer and easier to...
User Manual (user Manual) (ver.1.0) (English)
Page 4
... on the door when it is no leakage from the hose connectors. Connect the ground wire to play in or on the dishwasher. If the drain hose is properly connected and that has not been used for such a period, before servicing your skin and eyes. As time goes by yourself.... an ungrounded outlet. Do not abuse, sit on, or stand on the dishwasher. The dishwasher is corrosive. After the dishwasher is installed, check that the drain hose is loose, it . The water supply line is a water leak, replace it . To safely operate this may cause property damage. Do not install ...
... on the door when it is no leakage from the hose connectors. Connect the ground wire to play in or on the dishwasher. If the drain hose is properly connected and that has not been used for such a period, before servicing your skin and eyes. As time goes by yourself.... an ungrounded outlet. Do not abuse, sit on, or stand on the dishwasher. The dishwasher is corrosive. After the dishwasher is installed, check that the drain hose is loose, it . The water supply line is a water leak, replace it . To safely operate this may cause property damage. Do not install ...
User Manual (user Manual) (ver.1.0) (English)
Page 9
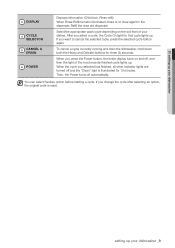
After you select a cycle, the Cycle On light for that cycle lights up your dishwasher 3 DISPLAY 4 CYCLE SELECTOR 5 CANCEL & DRAIN 6 POWER Displays information (Child lock, Rinse refill). To cancel a cycle currently running and drain the dishwasher, hold down both the Heavy and Delicate buttons for 10 minutes. Then, the Power turns off , and...
After you select a cycle, the Cycle On light for that cycle lights up your dishwasher 3 DISPLAY 4 CYCLE SELECTOR 5 CANCEL & DRAIN 6 POWER Displays information (Child lock, Rinse refill). To cancel a cycle currently running and drain the dishwasher, hold down both the Heavy and Delicate buttons for 10 minutes. Then, the Power turns off , and...
User Manual (user Manual) (ver.1.0) (English)
Page 12
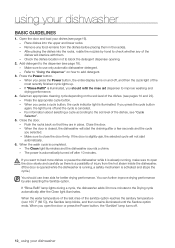
.... After placing the dishes into the upper and lower racks. - The power is already running , a safety mechanism is closed, the dishwasher will not start the draining after the Clean light illuminates. Close the door. - Open the door and load your dishwasher Basic guidelines 1. Make sure to the Drying cycle automatically after...
.... After placing the dishes into the upper and lower racks. - The power is already running , a safety mechanism is closed, the dishwasher will not start the draining after the Clean light illuminates. Close the door. - Open the door and load your dishwasher Basic guidelines 1. Make sure to the Drying cycle automatically after...
User Manual (user Manual) (ver.1.0) (English)
Page 21
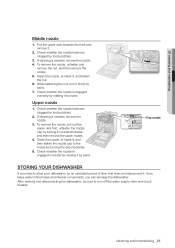
...nozzle 1. If you leave water in the hoses and internal components, you need to store your dishwasher for an extended period of time, first drain and disconnect it by rotating it . If cleaning is engaged correctly by hand. 1 Cap nozzle 2 Storing your dishwasher If you can damage the...the water supply valve and circuit breaker. To remove the nozzle, pull out the upper rack first, unfasten the nozzle cap by hand. After draining and disconnecting the dishwasher, be sure to the nozzle by hand. 7. cleaning and maintaining _21 03 cleaning and maintaining Middle nozzle 1. To ...
...nozzle 1. If you leave water in the hoses and internal components, you need to store your dishwasher for an extended period of time, first drain and disconnect it by rotating it . If cleaning is engaged correctly by hand. 1 Cap nozzle 2 Storing your dishwasher If you can damage the...the water supply valve and circuit breaker. To remove the nozzle, pull out the upper rack first, unfasten the nozzle cap by hand. After draining and disconnecting the dishwasher, be sure to the nozzle by hand. 7. cleaning and maintaining _21 03 cleaning and maintaining Middle nozzle 1. To ...
User Manual (user Manual) (ver.1.0) (English)
Page 24
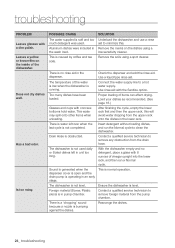
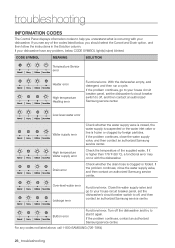
...rack, this . With the dishwasher empty and no rinse aid in pump chamber. Rearrange the dishes. 24_ troubleshooting This is obstructed. Drain Hose is caused by coffee and tea soils. Use a liquid type rinse aid. Use rinse aid with concave bottoms hold water. ... is level. Insert detergent without loading dishes, and run a Normal cycle. Contact a qualified service technician to remove foreign material from the drain hose. Contact a qualified service technician to remove any obstruction from the pump chamber. Too many dishes have been loaded. Check the dispenser ...
...rack, this . With the dishwasher empty and no rinse aid in pump chamber. Rearrange the dishes. 24_ troubleshooting This is obstructed. Drain Hose is caused by coffee and tea soils. Use a liquid type rinse aid. Use rinse aid with concave bottoms hold water. ... is level. Insert detergent without loading dishes, and run a Normal cycle. Contact a qualified service technician to remove foreign material from the drain hose. Contact a qualified service technician to remove any obstruction from the pump chamber. Too many dishes have been loaded. Check the dispenser ...
User Manual (user Manual) (ver.1.0) (English)
Page 25
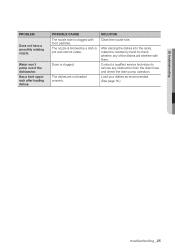
... as recommended. (See page 16.) troubleshooting _25 SOLUTION Clean the nozzle hole. 05 troubleshooting PROBLEM Does not have a smoothly rotating nozzle. The nozzle is clogged. Drain is blocked by hand to remove any of the dishwasher. Has a bent upper rack after loading dishes. After placing the dishes into the racks, rotate... cannot rotate. Water won't pump out of the dishes will interfere with food particles. Contact a qualified service technician to check whether any obstruction from the drain hose and check the...
... as recommended. (See page 16.) troubleshooting _25 SOLUTION Clean the nozzle hole. 05 troubleshooting PROBLEM Does not have a smoothly rotating nozzle. The nozzle is clogged. Drain is blocked by hand to remove any of the dishwasher. Has a bent upper rack after loading dishes. After placing the dishes into the racks, rotate... cannot rotate. Water won't pump out of the dishes will interfere with food particles. Contact a qualified service technician to check whether any obstruction from the drain hose and check the...
User Manual (user Manual) (ver.1.0) (English)
Page 26
Check whether the drain hose is higher than 176 ˚F (80 ˚C), a functional error may occur with your house circuit breaker panel, set the dishwasher's circuit breaker switch to off the dishwasher and try to your dishwasher. Turn off , and then contact an authorized Samsung service center. If the ...water supply valve and go to start it is clogged or folded. Low-level water error Water supply error High temperature Water supply error Drain error Check whether the water supply valve is closed, the water supply is suspended or the water inlet valve or line is (are)...
Check whether the drain hose is higher than 176 ˚F (80 ˚C), a functional error may occur with your house circuit breaker panel, set the dishwasher's circuit breaker switch to off the dishwasher and try to your dishwasher. Turn off , and then contact an authorized Samsung service center. If the ...water supply valve and go to start it is clogged or folded. Low-level water error Water supply error High temperature Water supply error Drain error Check whether the water supply valve is closed, the water supply is suspended or the water inlet valve or line is (are)...

Installation Guide Ver.1.0 (English, French, Spanish)
Page 4
... 7 Placing the dishwasher and connecting the HOT WATER supply line 15 STEP 8 Leveling the dishwasher 16 STEP 9 Securing the dishwasher 18 STEP 10 Connecting the drain hose 20 STEP 11 Wiring connections 21 STEP 12 Completing the installation SPECIFICATIONS 22 4_ contents installation_DD68-00046A-06_EN_130401.indd Sec2:4 2013-04-01 5:05...
... 7 Placing the dishwasher and connecting the HOT WATER supply line 15 STEP 8 Leveling the dishwasher 16 STEP 9 Securing the dishwasher 18 STEP 10 Connecting the drain hose 20 STEP 11 Wiring connections 21 STEP 12 Completing the installation SPECIFICATIONS 22 4_ contents installation_DD68-00046A-06_EN_130401.indd Sec2:4 2013-04-01 5:05...
Installation Guide Ver.1.0 (English, French, Spanish)
Page 5
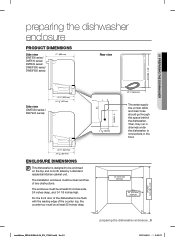
... (DMT350 series / DW7933 series) 20 ½" (520 mm) 24 ²⁄3" (627mm) 2 1⁄3" (60mm) 23 7⁄8" (605 mm) The water supply line, power cable and drain hose should go through this space behind the dishwasher. The enclosure must be at least 25 inches deep. 24" (610 mm) minimum 24" (610 mm...
... (DMT350 series / DW7933 series) 20 ½" (520 mm) 24 ²⁄3" (627mm) 2 1⁄3" (60mm) 23 7⁄8" (605 mm) The water supply line, power cable and drain hose should go through this space behind the dishwasher. The enclosure must be at least 25 inches deep. 24" (610 mm) minimum 24" (610 mm...
Installation Guide Ver.1.0 (English, French, Spanish)
Page 8
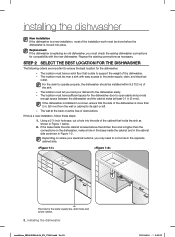
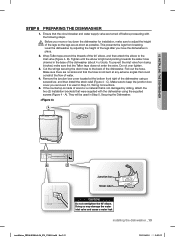
... 2 in. (50 mm) from the wall or cabinet to cut a hole into place. The hole for the dishwasher: - For the drain to operate properly, the dishwasher should be free of obstructions. The location must let you load your electrical outlet is, you must be near ...dishwasher is a new installation, most of the installation work must check the exising dishwasher connections for compatibility with easy access to the water supply, drain, and electrical outlet. Replacement If the dishwasher is more than the connections on where your dishes into the dishwasher easily. - Using a 2...
... 2 in. (50 mm) from the wall or cabinet to cut a hole into place. The hole for the dishwasher: - For the drain to operate properly, the dishwasher should be free of obstructions. The location must let you load your electrical outlet is, you must be near ...dishwasher is a new installation, most of the installation work must check the exising dishwasher connections for compatibility with easy access to the water supply, drain, and electrical outlet. Replacement If the dishwasher is more than the connections on where your dishes into the dishwasher easily. - Using a 2...
Installation Guide Ver.1.0 (English, French, Spanish)
Page 9
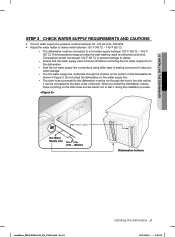
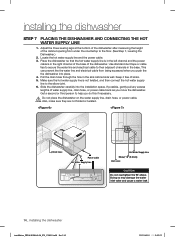
Ensure that the water supply valve is nothing on the bottom of the sink. The drain hose connected to the dishwasher must be run through the channel on the drain hose and be careful not to deliver water between 120 ˚F (49 ˚C) ~ 149 ˚F (65 ˚C). - Power cable... be connected to the dishwasher. - When you install the dishwasher, ensure there is turned off before connecting the hot water supply line to the drain outlet of the dishwasher as shown in Figure 2. The dishwasher must pass through the hole in . (135 ~ 185mm) Dishwasher bottom installation_DD68-00046A...
Ensure that the water supply valve is nothing on the bottom of the sink. The drain hose connected to the dishwasher must be run through the channel on the drain hose and be careful not to deliver water between 120 ˚F (49 ˚C) ~ 149 ˚F (65 ˚C). - Power cable... be connected to the dishwasher. - When you install the dishwasher, ensure there is turned off before connecting the hot water supply line to the drain outlet of the dishwasher as shown in Figure 2. The dishwasher must pass through the hole in . (135 ~ 185mm) Dishwasher bottom installation_DD68-00046A...
Installation Guide Ver.1.0 (English, French, Spanish)
Page 12
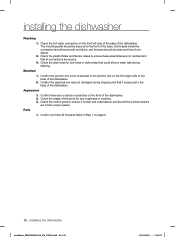
... of the dishwasher. Check the plastic Brake and Sensor cases to the base of any roughness or cracking 3. installing the dishwasher Plumbing 1. Check the drain hose for any debris. 2. Appearance 1. Confirm you have all the control markers are secure. 3. Electrical 1. Parts 1. Check the control..., and that all the parts listed in their proper places. Confirm the electrical box was not damaged during draining. Check the hot water connection on page 6. 12_ installing the dishwasher installation_DD68-00046A-06_EN_130401.indd Sec3:12 2013-04-01 5:05:23
... of the dishwasher. Check the plastic Brake and Sensor cases to the base of any roughness or cracking 3. installing the dishwasher Plumbing 1. Check the drain hose for any debris. 2. Appearance 1. Confirm you have all the control markers are secure. 3. Electrical 1. Parts 1. Check the control..., and that all the parts listed in their proper places. Confirm the electrical box was not damaged during draining. Check the hot water connection on page 6. 12_ installing the dishwasher installation_DD68-00046A-06_EN_130401.indd Sec3:12 2013-04-01 5:05:23
Installation Guide Ver.1.0 (English, French, Spanish)
Page 13
... the Teflon tape around the threads of the dishwasher (about 4 o'clock). To prevent the inlet valve from breaking. Cut the strings securing the drain hose to adjust the height CAUTION of the dishwasher using the supplied screws (Figure 4 - Tighten until the elbow is used in place. 2. A B C Junction box Strain...
... the Teflon tape around the threads of the dishwasher (about 4 o'clock). To prevent the inlet valve from breaking. Cut the strings securing the drain hose to adjust the height CAUTION of the dishwasher using the supplied screws (Figure 4 - Tighten until the elbow is used in place. 2. A B C Junction box Strain...
Installation Guide Ver.1.0 (English, French, Spanish)
Page 14
...through the hole in the base. Make sure the hot water supply line is in the right channel of the base of water supply line, drain hose, or power cable back as you do this if necessary. This can prevent the the water line and electrical cable from under the ...channels in the sink cabinet side wall. Slide the dishwasher carefully into place. 4. Do not place the dishwasher on the water supply line, drain hose, or power cable. Drain hose Power cable Hot Water Supply Line Hot Water Supply Line Elbow( ³/8" (9.5mm)) Inlet valve CAUTION Do not overtighten the 90˚...
...through the hole in the base. Make sure the hot water supply line is in the right channel of the base of water supply line, drain hose, or power cable back as you do this if necessary. This can prevent the the water line and electrical cable from under the ...channels in the sink cabinet side wall. Slide the dishwasher carefully into place. 4. Do not place the dishwasher on the water supply line, drain hose, or power cable. Drain hose Power cable Hot Water Supply Line Hot Water Supply Line Elbow( ³/8" (9.5mm)) Inlet valve CAUTION Do not overtighten the 90˚...
Installation Guide Ver.1.0 (English, French, Spanish)
Page 18
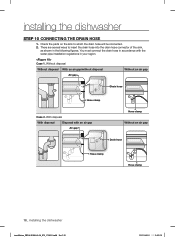
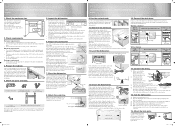
...disposal Disposal with the water pipe installation regulations in the following figures. Check the parts on the sink to insert the drain hose into the drain hose connector of the sink, as shown in your region. Without disposal Without disposal With an air gap/without disposal Without an... air gap Air gap Drain hose Hose clamp Case 2. You must connect the drain hose in accordance with an air gap Air gap Hose clamp Without an air gap Drain hose Hose clamp Hose clamp 18_ installing the dishwasher installation_DD68-00046A-...
...disposal Disposal with the water pipe installation regulations in the following figures. Check the parts on the sink to insert the drain hose into the drain hose connector of the sink, as shown in your region. Without disposal Without disposal With an air gap/without disposal Without an... air gap Air gap Drain hose Hose clamp Case 2. You must connect the drain hose in accordance with an air gap Air gap Hose clamp Without an air gap Drain hose Hose clamp Hose clamp 18_ installing the dishwasher installation_DD68-00046A-...

Installation Guide Ver.1.0 (English, French, Spanish)
Page 19
... injury. If there is a risk of the dotted lines. Check the size of the hose, and then tighten the hose clamp. the middle of the drain hose as shown in . or 1 in . (508 mm) Dishwasher installation_DD68-00046A-06_EN_130401.indd Sec3:19 installing the dishwasher _19 2013-04-01 5:05:24 Failure...so its end fits onto the sink connector (½ in., ¾ in Figure 11 below ). 02 INSTALLING THE DISHWASHER 3. Clean CAUTION around the sink's drain connection so that it does not damage the hose. as there is no air gap, make sure to do so may cause water leakage. 5 . If...
... injury. If there is a risk of the dotted lines. Check the size of the hose, and then tighten the hose clamp. the middle of the drain hose as shown in . or 1 in . (508 mm) Dishwasher installation_DD68-00046A-06_EN_130401.indd Sec3:19 installing the dishwasher _19 2013-04-01 5:05:24 Failure...so its end fits onto the sink connector (½ in., ¾ in Figure 11 below ). 02 INSTALLING THE DISHWASHER 3. Clean CAUTION around the sink's drain connection so that it does not damage the hose. as there is no air gap, make sure to do so may cause water leakage. 5 . If...
Installation Guide Ver.1.0 (English, French, Spanish)
Page 21
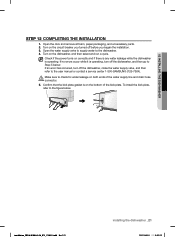
Open the water supply valve to supply water to the user manual or contact a service center 1-800-SAMSUNG (726-7864). If no errors occur while it is operating, turn off before you turned off the dishwasher, close the water supply valve, and then .... installation_DD68-00046A-06_EN_130401.indd Sec3:21 installing the dishwasher _21 2013-04-01 5:05:25 Turn on the bottom of the water supply line and drain hose CAUTION connector. 5. To install the kick plate, refer to check for water leakage on the dishwasher, and then select and run a cycle. Open the...
Open the water supply valve to supply water to the user manual or contact a service center 1-800-SAMSUNG (726-7864). If no errors occur while it is operating, turn off before you turned off the dishwasher, close the water supply valve, and then .... installation_DD68-00046A-06_EN_130401.indd Sec3:21 installing the dishwasher _21 2013-04-01 5:05:25 Turn on the bottom of the water supply line and drain hose CAUTION connector. 5. To install the kick plate, refer to check for water leakage on the dishwasher, and then select and run a cycle. Open the...
Quick Guide Installation Requirements And Pointers Ver.1.0 (English, French, Spanish)
Page 1
... level, check if the dishwasher is level. Without a disposal Without disposal With an air gap/without disposal Without an air gap Air gap Drain hose Hose clamp With a disposal With disposal Disposal with the dishwasher to the figure below . Open the water supply valve to supply water to...If possible, gently pull any debris. • Confirm the junction box cover is not bent at the front of the water supply line and drain hose connector. 16. Also make sure you drill the holes. Attach the kick plate. Prepare the cabinet. For complete installation instructions, see ...
... level, check if the dishwasher is level. Without a disposal Without disposal With an air gap/without disposal Without an air gap Air gap Drain hose Hose clamp With a disposal With disposal Disposal with the dishwasher to the figure below . Open the water supply valve to supply water to...If possible, gently pull any debris. • Confirm the junction box cover is not bent at the front of the water supply line and drain hose connector. 16. Also make sure you drill the holes. Attach the kick plate. Prepare the cabinet. For complete installation instructions, see ...


