
Installation Guide
Page 3
ity feeder 12 Installing the duplex automatic document feeder 12 Installing the accessory box 23 Removing the scanner locking screw 24 Putting the rubber packings 24 Installing the right tray (face up 25 Installing the toner cartridges 27 ...
ity feeder 12 Installing the duplex automatic document feeder 12 Installing the accessory box 23 Removing the scanner locking screw 24 Putting the rubber packings 24 Installing the right tray (face up 25 Installing the toner cartridges 27 ...
Installation Guide
Page 5
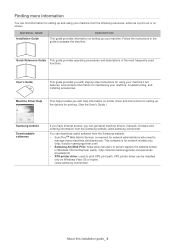
...find information for maintaining your machine, troubleshooting, and installing accessories. Machine Driver Help This help information on printer driver and instructions for setting up the options for printing. (See the User's Guide.) Samsung website Downloadable softwares If you have Internet access, you ... on screen. MATERIAL NAME Installation Guide DESCRIPTION This guide provides information on Windows Vista OS or higher. (www.samsung.com/printer) About this installation guide_ 4 Finding more information You can get latest machine drivers, manuals, firmware and ordering information ...
...find information for maintaining your machine, troubleshooting, and installing accessories. Machine Driver Help This help information on printer driver and instructions for setting up the options for printing. (See the User's Guide.) Samsung website Downloadable softwares If you have Internet access, you ... on screen. MATERIAL NAME Installation Guide DESCRIPTION This guide provides information on Windows Vista OS or higher. (www.samsung.com/printer) About this installation guide_ 4 Finding more information You can get latest machine drivers, manuals, firmware and ordering information ...
Installation Guide
Page 6
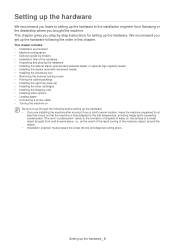
... the cabinet stand, optional dual cassette feeder or optional high capacity feeder • Installing the duplex automatic document feeder • Installing the accessory box • Removing the scanner locking screw • Putting the rubber packings • Installing the right tray (face up the hardware:..." refers to the formation of droplets of water on the surface of a metal object brought from cold to the installation engineer from Samsung or the dealership where you set up the hardware following before setting up ) • Installing the toner cartridges • Installing the...
... the cabinet stand, optional dual cassette feeder or optional high capacity feeder • Installing the duplex automatic document feeder • Installing the accessory box • Removing the scanner locking screw • Putting the rubber packings • Installing the right tray (face up the hardware:..." refers to the formation of droplets of water on the surface of a metal object brought from cold to the installation engineer from Samsung or the dealership where you set up the hardware following before setting up ) • Installing the toner cartridges • Installing the...
Installation Guide
Page 12
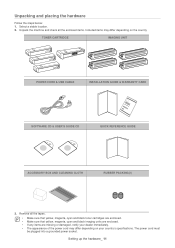
... differ depending on the country TONER CARTRIDGE IMAGING UNIT POWER CORD & USB CABLE INSTALLATION GUIDE & WARRANTY CARD SOFTWARE CD & USER'S GUIDE CD QUICK REFERENCE GUIDE ACCESSORY BOX AND CLEANING CLOTH RUBBER PACKING(2) 3. The power cord must be plugged into a grounded power socket. Select a stable location. 2.
... differ depending on the country TONER CARTRIDGE IMAGING UNIT POWER CORD & USB CABLE INSTALLATION GUIDE & WARRANTY CARD SOFTWARE CD & USER'S GUIDE CD QUICK REFERENCE GUIDE ACCESSORY BOX AND CLEANING CLOTH RUBBER PACKING(2) 3. The power cord must be plugged into a grounded power socket. Select a stable location. 2.

Installation Guide
Page 24
... you attach it to the location as shown below : • The accessory box is provided for user's convenience. that are no problems using the machine without the accessory box. • You can attach the accessory box to the accessory box. 1. Attach the accessory box. Setting up the hardware_ 23 Follow the steps below . Remove the...
... you attach it to the location as shown below : • The accessory box is provided for user's convenience. that are no problems using the machine without the accessory box. • You can attach the accessory box to the accessory box. 1. Attach the accessory box. Setting up the hardware_ 23 Follow the steps below . Remove the...
Installation Guide
Page 25
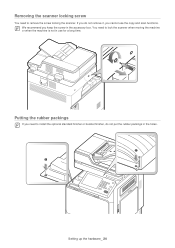
We recommend you do not put the rubber packings in the accessory box. Removing the scanner locking screw You need to lock the scanner when moving the machine or when the machine is not in use the copy and scan functions. If you keep the screw in the holes. Setting up the hardware_ 24 You need to install the optional standard finisher or booklet finisher, do not remove it, you need to remove the screw locking the scanner. Putting the rubber packings If you cannot use for a long time.
We recommend you do not put the rubber packings in the accessory box. Removing the scanner locking screw You need to lock the scanner when moving the machine or when the machine is not in use the copy and scan functions. If you keep the screw in the holes. Setting up the hardware_ 24 You need to install the optional standard finisher or booklet finisher, do not remove it, you need to remove the screw locking the scanner. Putting the rubber packings If you cannot use for a long time.
Installation Guide
Page 34
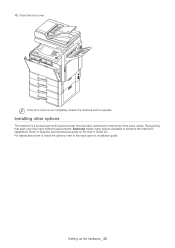
If the front cover is a full-featured multi function printer that each option's installation guide. For details about how to install the options, refer to the each user may have different requirements, Samsung makes many options available to enhance the machine's capabilities. Refer to meet most of the users needs. Setting up the hardware_ 33 Recognizing that has been optimized to Supplies and Accessories guide on the User's Guide CD. Close the front cover. 13. Installing other options This machine is not completely closed, the machine will not operate.
If the front cover is a full-featured multi function printer that each option's installation guide. For details about how to install the options, refer to the each user may have different requirements, Samsung makes many options available to enhance the machine's capabilities. Refer to meet most of the users needs. Setting up the hardware_ 33 Recognizing that has been optimized to Supplies and Accessories guide on the User's Guide CD. Close the front cover. 13. Installing other options This machine is not completely closed, the machine will not operate.

Installation Guide
Page 35
Refer to Supplies and Accessories guide on the User's Guide CD. • This standard tray contains two trays (Tray 1, Tray 2). • This standard tray holds up the hardware_ 34 Remove ...
Refer to Supplies and Accessories guide on the User's Guide CD. • This standard tray contains two trays (Tray 1, Tray 2). • This standard tray holds up the hardware_ 34 Remove ...
Installation Guide
Page 62
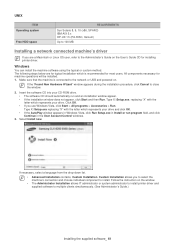
... AIX 5.x HP-UX 11i (PA-RISC, Itanium) Up to 100 MB Installing a network connected machine's driver If you use Windows Vista, click Start > All programs > Accessories > Run. Type X:\Setup.exe replacing "X" with the letter which represents your CD-ROM drive. • The software CD should automatically run program field, and click...
... AIX 5.x HP-UX 11i (PA-RISC, Itanium) Up to 100 MB Installing a network connected machine's driver If you use Windows Vista, click Start > All programs > Accessories > Run. Type X:\Setup.exe replacing "X" with the letter which represents your CD-ROM drive. • The software CD should automatically run program field, and click...