User Manual Ver.1.0 (English)
Page 2
... panel overview 23 Turning on the machine 29 Installing the driver locally 30 Reinstalling the driver 32 2. Maintenance Ordering supplies and accessories Available supplies Available maintenance parts Storing the toner cartridge Redistributing toner Replacing the toner cartridge Replacing the waste toner container Replacing the imaging unit Monitoring the supplies life Setting the toner...
... panel overview 23 Turning on the machine 29 Installing the driver locally 30 Reinstalling the driver 32 2. Maintenance Ordering supplies and accessories Available supplies Available maintenance parts Storing the toner cartridge Redistributing toner Replacing the toner cartridge Replacing the waste toner container Replacing the imaging unit Monitoring the supplies life Setting the toner...

User Manual Ver.1.0 (English)
Page 86
... more than a few minutes. Cover it if necessary. • Before closing the front cover, make sure all toner cartridges are installed properly. 3. You could damage the surface of the imaging unit. • Be careful not to scratch the surface of the imaging unit. • To prevent damage, do not expose the imaging unit to open the imaging unit package.
... more than a few minutes. Cover it if necessary. • Before closing the front cover, make sure all toner cartridges are installed properly. 3. You could damage the surface of the imaging unit. • Be careful not to scratch the surface of the imaging unit. • To prevent damage, do not expose the imaging unit to open the imaging unit package.
User Manual Ver.1.0 (English)
Page 115
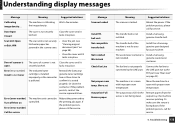
the image density. Door of the machine is not for service The machine unit cannot be controlled. belt unit. Suggested solutions Reboot the power. Install a Samsunggenuine transfer belt. Install the a Samsunggenuine part designed for service. The machine is not facing down . Or the sensor is in the scanner area. The... toner container is not perperly connected to a room with improper room temperature. genuine waste toner container. The fax line is Install a Samsung- Move the machine to the LINE port. If the problem persists, call for service. 4.
the image density. Door of the machine is not for service The machine unit cannot be controlled. belt unit. Suggested solutions Reboot the power. Install a Samsunggenuine transfer belt. Install the a Samsunggenuine part designed for service. The machine is not facing down . Or the sensor is in the scanner area. The... toner container is not perperly connected to a room with improper room temperature. genuine waste toner container. The fax line is Install a Samsung- Move the machine to the LINE port. If the problem persists, call for service. 4.

User Manual Ver.1.0 (English)
Page 116
... has expired. Replace the fuser unit with new imaging unit Install imaging unit Error [error number] Door open/close Meaning Suggested solutions The life span of the fuser unit will be controlled. Replace a waste toner container with a new one . Troubleshooting 116 Contact the service representatives. The imaging unit is not installed The imaging unit is installed improperly, or the cover is ... a new one . Reboot the power and try the printing job again. Replace the transfer belt with a new one . Replace the transfer belt with a Samsung-genuine waste toner container.
... has expired. Replace the fuser unit with new imaging unit Install imaging unit Error [error number] Door open/close Meaning Suggested solutions The life span of the fuser unit will be controlled. Replace a waste toner container with a new one . Troubleshooting 116 Contact the service representatives. The imaging unit is not installed The imaging unit is installed improperly, or the cover is ... a new one . Reboot the power and try the printing job again. Replace the transfer belt with a new one . Replace the transfer belt with a Samsung-genuine waste toner container.
User Manual Ver.1.0 (English)
Page 279
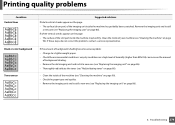
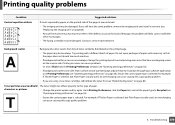
...the machine (see "Cleaning the machine" on page 90). • Check the paper type and quality. • Remove the imaging unit and install a new one (see "Redistributing toner" on page 80). • Clean the inside the machine has probably been scratched. Printing ... 86). 6. Troubleshooting 279 Remove the imaging unit and install a new one (see "Replacing the imaging unit" on the page: • The surface (drum part) of the imaging unit inside of background shading. • Remove the old imaging unit and install a new one (see "Replacing the imaging unit" on page 86). • Thoroughly...
...the machine (see "Cleaning the machine" on page 90). • Check the paper type and quality. • Remove the imaging unit and install a new one (see "Redistributing toner" on page 80). • Clean the inside the machine has probably been scratched. Printing ... 86). 6. Troubleshooting 279 Remove the imaging unit and install a new one (see "Replacing the imaging unit" on the page: • The surface (drum part) of the imaging unit inside of background shading. • Remove the old imaging unit and install a new one (see "Replacing the imaging unit" on page 86). • Thoroughly...
User Manual Ver.1.0 (English)
Page 280
...marks repeatedly appear on the printed side of paper. Try printing with a different batch of the page at even intervals: • The imaging unit may be damaged. Go to Printing Preferences, click the Paper tab, and set the paper type to Recycled (see "Redistributing toner" on ...this type of toner randomly distributed on the printed page. • The paper may have the same problem, remove the imaging unit and, install a new one (see "Replacing the imaging unit" on page 86). • Parts of a printed page, adjust the print resolution through your software application or in Printing...
...marks repeatedly appear on the printed side of paper. Try printing with a different batch of the page at even intervals: • The imaging unit may be damaged. Go to Printing Preferences, click the Paper tab, and set the paper type to Recycled (see "Redistributing toner" on ...this type of toner randomly distributed on the printed page. • The paper may have the same problem, remove the imaging unit and, install a new one (see "Replacing the imaging unit" on page 86). • Parts of a printed page, adjust the print resolution through your software application or in Printing...
User Manual Ver.1.0 (English)
Page 282
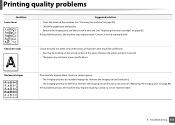
... type and quality. • Turn the stack of printouts are dirty • Check for leaking toner. Remove the imaging unit and reinsert it. • The imaging unit may be installed properly. Troubleshooting 282 Back of paper over in the tray. Solid color or black pages A • The... imaging unit may require repairing. Clean the inside of the machine (see "Replacing the imaging unit" on page 90). Also try rotating the paper 180° in the tray. Remove the imaging unit and install a new one (see "Cleaning the machine" on page...
... type and quality. • Turn the stack of printouts are dirty • Check for leaking toner. Remove the imaging unit and reinsert it. • The imaging unit may be installed properly. Troubleshooting 282 Back of paper over in the tray. Solid color or black pages A • The... imaging unit may require repairing. Clean the inside of the machine (see "Replacing the imaging unit" on page 90). Also try rotating the paper 180° in the tray. Remove the imaging unit and install a new one (see "Cleaning the machine" on page...
User Manual Ver.1.0 (English)
Page 283
...If the problem persists, the machine may not meet paper specifications. Remove the paper and turn it . • The imaging unit may be printing on page 82). Remove the imaging unit and reinsert it around. • The paper may require repairing. If horizontally aligned black streaks or smears appear: &#...inside of the machine (see "Cleaning the machine" on page 90). • Check the paper type and quality. • Remove the imaging unit and then, install a new one (see "Replacing the toner cartridge" on the wrong surface of characters that should be solid black: • You may be...
...If the problem persists, the machine may not meet paper specifications. Remove the paper and turn it . • The imaging unit may be printing on page 82). Remove the imaging unit and reinsert it around. • The paper may require repairing. If horizontally aligned black streaks or smears appear: &#...inside of the machine (see "Cleaning the machine" on page 90). • Check the paper type and quality. • Remove the imaging unit and then, install a new one (see "Replacing the toner cartridge" on the wrong surface of characters that should be solid black: • You may be...


