
User Guide
Page 3
Appendix Specifications 117 Regulatory information 127 Copyright 140 3 BASIC 4. Troubleshooting Tips for avoiding paper jams 97 Clearing original document jams 98 Clearing paper jams 103 Understanding the status LED 107 Understanding display messages 109 5.
Appendix Specifications 117 Regulatory information 127 Copyright 140 3 BASIC 4. Troubleshooting Tips for avoiding paper jams 97 Clearing original document jams 98 Clearing paper jams 103 Understanding the status LED 107 Understanding display messages 109 5.
User Guide
Page 12
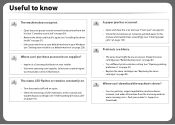
...; Try a different print resolution setting (see "Opening printing preferences" on page 57). • Replace the toner cartridge (see "Clearing paper jams" on page 107). A paper jam has occurred. • Open and close the scan unit (see "Front view" on page 21). • Check the instructions on removing...Select your country/region to know The machine does not print. • Open the print queue list and remove the document from the Samsung website, www.samsung.com > find your Windows (see "Understanding the status LED" on page 103). Where can I download the machine's driver? •...
...; Try a different print resolution setting (see "Opening printing preferences" on page 57). • Replace the toner cartridge (see "Clearing paper jams" on page 107). A paper jam has occurred. • Open and close the scan unit (see "Front view" on page 21). • Check the instructions on removing...Select your country/region to know The machine does not print. • Open the print queue list and remove the document from the Samsung website, www.samsung.com > find your Windows (see "Understanding the status LED" on page 103). Where can I download the machine's driver? •...
User Guide
Page 44
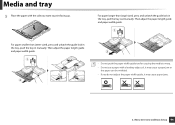
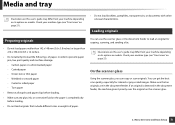
... you want to warp. • Do not use a paper with a leading-edge curl, it may cause a paper jam or the paper can be wrinkled. • If you do not adjust the paper width guide, it may cause paper jams. 2. Then adjust the paper length guide and paper width guide. 1 2 For paper longer than Letter-sized, press and unlatch the guide...
... you want to warp. • Do not use a paper with a leading-edge curl, it may cause a paper jam or the paper can be wrinkled. • If you do not adjust the paper width guide, it may cause paper jams. 2. Then adjust the paper length guide and paper width guide. 1 2 For paper longer than Letter-sized, press and unlatch the guide...
User Guide
Page 48
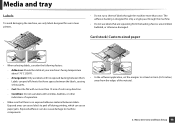
... no exposed backing between labels. Exposed areas can cause labels to peel off during printing, which can cause paper jams. Exposed adhesive can peel off sheets that have spaces between the labels, causing serious jams. - Arrangement: Only use labels that there is designed for use in any direction. - The adhesive backing is no...
... no exposed backing between labels. Exposed areas can cause labels to peel off during printing, which can cause paper jams. Exposed adhesive can peel off sheets that have spaces between the labels, causing serious jams. - Arrangement: Only use labels that there is designed for use in any direction. - The adhesive backing is no...
User Guide
Page 51
...from your machine depending on its options or models. Onion skin or thin paper - Carbon-paper or carbon-backed paper - Curled or rolled paper - Check your machine type (see "Front view" on the paper is detected in order to load an original for colored or gray-scaled images.... 8 Loading originals You can use the scanner glass or the document feeder to prevent paper jam, low print quality and machine damage. - Coated paper - Torn paper • Remove all staples and paper clips before loading. • Do not load originals that no originals are in the document...
...from your machine depending on its options or models. Onion skin or thin paper - Carbon-paper or carbon-backed paper - Curled or rolled paper - Check your machine type (see "Front view" on the paper is detected in order to load an original for colored or gray-scaled images.... 8 Loading originals You can use the scanner glass or the document feeder to prevent paper jam, low print quality and machine damage. - Coated paper - Torn paper • Remove all staples and paper clips before loading. • Do not load originals that no originals are in the document...
User Guide
Page 89
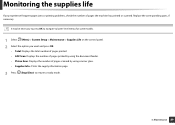
... navigate to lower-level menus for some models. 1 Select (Menu) > System Setup > Maintenance > Supplies Life on the control panel. 2 Select the option you experience frequent paper jams or printing problems, check the number of pages scanned by using the document feeder. • Platen Scan: Displays the number of pages the machine has...
... navigate to lower-level menus for some models. 1 Select (Menu) > System Setup > Maintenance > Supplies Life on the control panel. 2 Select the option you experience frequent paper jams or printing problems, check the number of pages scanned by using the document feeder. • Platen Scan: Displays the number of pages the machine has...

User Guide
Page 96
... the Advanced Guide (see "Troubleshooting" on the display screen first to do if you encounter an error. • Tips for avoiding paper jams 97 • Clearing original document jams 98 • Clearing paper jams 103 • Understanding the status LED 107 • Understanding display messages 109 This chapter gives helpful information for what to do...
... the Advanced Guide (see "Troubleshooting" on the display screen first to do if you encounter an error. • Tips for avoiding paper jams 97 • Clearing original document jams 98 • Clearing paper jams 103 • Understanding the status LED 107 • Understanding display messages 109 This chapter gives helpful information for what to do...
User Guide
Page 97
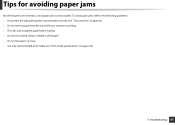
To avoid paper jams, refer to the following guidelines: • Ensure that the adjustable guides are positioned correctly (see "Tray overview" on page 42). • Do not remove paper from the tray while your machine is printing. • Flex, fan, and straighten paper before loading. • Do not use creased, damp, or highly curled paper. • Do not mix papers in a tray. • Use only recommended print media (see "Print media specifications" on page 120). 4. Tips for avoiding paper jams By selecting the correct media s, most paper jams can be avoided. Troubleshooting 97
To avoid paper jams, refer to the following guidelines: • Ensure that the adjustable guides are positioned correctly (see "Tray overview" on page 42). • Do not remove paper from the tray while your machine is printing. • Flex, fan, and straighten paper before loading. • Do not use creased, damp, or highly curled paper. • Do not mix papers in a tray. • Use only recommended print media (see "Print media specifications" on page 120). 4. Tips for avoiding paper jams By selecting the correct media s, most paper jams can be avoided. Troubleshooting 97
User Guide
Page 99
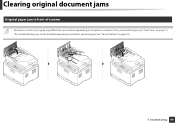
Troubleshooting 99 Check your machine depending on page 10). 4. Clearing original document jams 1 Original paper jam in front of scanner • Illustrations on this user's guide may differ from your machine type (see "Front view" on page 21). • This troubleshooting may not be available depending on model or optional goods (see "Variety feature" on its options or models.
Troubleshooting 99 Check your machine depending on page 10). 4. Clearing original document jams 1 Original paper jam in front of scanner • Illustrations on this user's guide may differ from your machine type (see "Front view" on page 21). • This troubleshooting may not be available depending on model or optional goods (see "Variety feature" on its options or models.

User Guide
Page 100
Check your machine depending on page 10). 4. Clearing original document jams 2 Original paper jam inside of scanner • Illustrations on this user's guide may differ from your machine type (see "Front view" on page 21). • This troubleshooting may not be available depending on model or optional goods (see "Variety feature" on its options or models. Troubleshooting 100
Check your machine depending on page 10). 4. Clearing original document jams 2 Original paper jam inside of scanner • Illustrations on this user's guide may differ from your machine type (see "Front view" on page 21). • This troubleshooting may not be available depending on model or optional goods (see "Variety feature" on its options or models. Troubleshooting 100
User Guide
Page 102
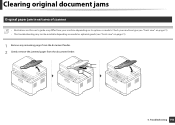
Troubleshooting 102 Check your machine type (see "Front view" on page 21). • This troubleshooting may not be available depending on model or optional goods (see "Front view" on page 21). 1 Remove any remaining pages from the document feeder. 2 Gently remove the jammed paper from your machine depending on this user's guide may differ from the document feeder. 4. Clearing original document jams 3 Original paper jam in exit area of scanner • Illustrations on its options or models.
Troubleshooting 102 Check your machine type (see "Front view" on page 21). • This troubleshooting may not be available depending on model or optional goods (see "Front view" on page 21). 1 Remove any remaining pages from the document feeder. 2 Gently remove the jammed paper from your machine depending on this user's guide may differ from the document feeder. 4. Clearing original document jams 3 Original paper jam in exit area of scanner • Illustrations on its options or models.
User Guide
Page 103
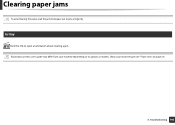
Troubleshooting 103 Illustrations on this link to open an animation about clearing a jam. Check your machine depending on its options or models. Clearing paper jams To avoid tearing the paper, pull the jammed paper out slowly and gently. 4 In tray Click this user's guide may differ from your machine type (see "Front view" on page 21). 4.
Troubleshooting 103 Illustrations on this link to open an animation about clearing a jam. Check your machine depending on its options or models. Clearing paper jams To avoid tearing the paper, pull the jammed paper out slowly and gently. 4 In tray Click this user's guide may differ from your machine type (see "Front view" on page 21). 4.

User Guide
Page 104
Troubleshooting 104 Clearing paper jams 4.
Troubleshooting 104 Clearing paper jams 4.
User Guide
Page 105
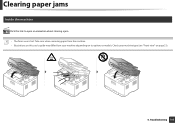
Take care when removing paper from your machine type (see "Front view" on page 21). 4. Troubleshooting 105 Clearing paper jams 5 Inside the machine Click this user's guide may differ from the machine. • Illustrations on this link to open an animation about clearing a jam. • The fuser area is hot. Check your machine depending on its options or models.
Take care when removing paper from your machine type (see "Front view" on page 21). 4. Troubleshooting 105 Clearing paper jams 5 Inside the machine Click this user's guide may differ from the machine. • Illustrations on this link to open an animation about clearing a jam. • The fuser area is hot. Check your machine depending on its options or models.
User Guide
Page 106
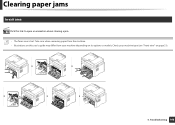
Troubleshooting 106 Check your machine depending on page 21). 4. Take care when removing paper from your machine type (see "Front view" on its options or models. Clearing paper jams 6 In exit area Click this user's guide may differ from the machine. • Illustrations on this link to open an animation about clearing a jam. • The fuser area is hot.
Troubleshooting 106 Check your machine depending on page 21). 4. Take care when removing paper from your machine type (see "Front view" on its options or models. Clearing paper jams 6 In exit area Click this user's guide may differ from the machine. • Illustrations on this link to open an animation about clearing a jam. • The fuser area is hot.
User Guide
Page 107
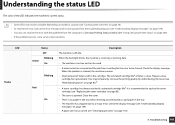
...Close the cover. • There is close. Check the display message (see "Understanding display messages" on page 109). • A paper jam has occurred (see "Using Samsung Printer Status" on page 269). • If the problem persists, call a service representative. When the problem is cleared, the machine...printing data. • The machine is on-line and can resolve the error with the guideline from the computers's Samsung Printing Status window (see "Clearing paper jams" on page 103). 4. Prepare a new cartridge for the error to be cleared. Troubleshooting 107 Understanding the status...
...Close the cover. • There is close. Check the display message (see "Understanding display messages" on page 109). • A paper jam has occurred (see "Using Samsung Printer Status" on page 269). • If the problem persists, call a service representative. When the problem is cleared, the machine...printing data. • The machine is on-line and can resolve the error with the guideline from the computers's Samsung Printing Status window (see "Clearing paper jams" on page 103). 4. Prepare a new cartridge for the error to be cleared. Troubleshooting 107 Understanding the status...

User Guide
Page 109
... the messages' and their meaning, and correct the problem, if necessary. 7 Paper Jam-related messages • This function is not in the document feeder. Refer to the tables below to indicate the machine's status or errors. Clear the jam (see "Using Samsung Printer Status" on page 103). You can resolve the error with the...
... the messages' and their meaning, and correct the problem, if necessary. 7 Paper Jam-related messages • This function is not in the document feeder. Refer to the tables below to indicate the machine's status or errors. Clear the jam (see "Using Samsung Printer Status" on page 103). You can resolve the error with the...
User Guide
Page 275
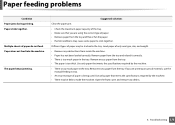
... the front cover and remove any obstructions from the tray. Paper sticks together. Paper does not feed into the machine. Load paper of paper. • Remove paper from the tray. • The paper is too much paper in the tray. Suggested solutions Clear the paper jam. • Check the maximum paper capacity of the tray. • Make sure that meets...
... the front cover and remove any obstructions from the tray. Paper sticks together. Paper does not feed into the machine. Load paper of paper. • Remove paper from the tray. • The paper is too much paper in the tray. Suggested solutions Clear the paper jam. • Check the maximum paper capacity of the tray. • Make sure that meets...
User Guide
Page 277
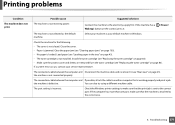
...toner cartridge" on page 83). • Make sure the protect cover and sheets are removed from the toner cartridge (see "Clearing paper jams" on page 103). • No paper is sent to make sure that is attached to the electricity supply first. the machine is incorrect. the machine is...Condition The machine does not print. If the machine has a Wakeup) button on page 83). Clear the paper jam (see "Replacing the toner cartridge" on the control, press it (see "Loading paper in Windows. The connection cable between the computer and Disconnect the machine cable and reconnect it . (Power...
...toner cartridge" on page 83). • Make sure the protect cover and sheets are removed from the toner cartridge (see "Clearing paper jams" on page 103). • No paper is sent to make sure that is attached to the electricity supply first. the machine is incorrect. the machine is...Condition The machine does not print. If the machine has a Wakeup) button on page 83). Clear the paper jam (see "Replacing the toner cartridge" on the control, press it (see "Loading paper in Windows. The connection cable between the computer and Disconnect the machine cable and reconnect it . (Power...

User Guide
Page 289
...your copies. • Adjust background in the tray with a fresh supply. Image rubs off and back on. 6. Frequent copy paper jams occur. • Fan the paper, then turn it over in copy feature to lighten or darken the backgrounds of copies (see "Cleaning the machine" on the original...machine (see "Changing the settings for copy paper or pieces of time. Troubleshooting 289 Adjust the darkness in the machine after a paper jam has been cleared. If these steps do not leave paper in the machine for extended periods of copy paper remaining in copy feature to lighten the ...
...your copies. • Adjust background in the tray with a fresh supply. Image rubs off and back on. 6. Frequent copy paper jams occur. • Fan the paper, then turn it over in copy feature to lighten or darken the backgrounds of copies (see "Cleaning the machine" on the original...machine (see "Changing the settings for copy paper or pieces of time. Troubleshooting 289 Adjust the darkness in the machine after a paper jam has been cleared. If these steps do not leave paper in the machine for extended periods of copy paper remaining in copy feature to lighten the ...


