User Manual (user Manual) (ver.2.00) (English)
Page 10
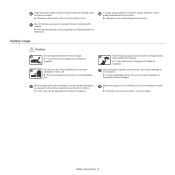
...will be dangerous if inhaled or ingested. Supply usage Caution Do not disassemble the toner cartridge. ► Toner dust can be repaired by a Samsung service technician. To clean and operate the machine, strictly follow the user's guide provided with screws. ► The machine should only be dangerous ... your body or clothes. ► Toner dust can be charged. When storing supplies such as toner cartridge or fuser unit. ► This could damage the machine. Do not remove any of the supplies such as toner cartridges, keep them away from dust or water. ► Otherwise, this...
...will be dangerous if inhaled or ingested. Supply usage Caution Do not disassemble the toner cartridge. ► Toner dust can be repaired by a Samsung service technician. To clean and operate the machine, strictly follow the user's guide provided with screws. ► The machine should only be dangerous ... your body or clothes. ► Toner dust can be charged. When storing supplies such as toner cartridge or fuser unit. ► This could damage the machine. Do not remove any of the supplies such as toner cartridges, keep them away from dust or water. ► Otherwise, this...

User Manual (user Manual) (ver.2.00) (English)
Page 66
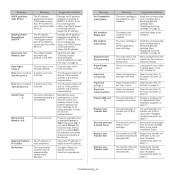
...selecting envelopes, consider the following factors. -Adhesives: The adhesive material should not exceed 90 g/m2 otherwise, jams may even damage the fuser. • For the best print quality, position margins no exposed backing between labels. The extra flaps and strips might occur. Envelopes...• Do not use stamped envelopes. • Do not use envelopes with no closer than paper backed (ex. Xerox 3R3028) or removable stripe (3R3108) ones. •Transparency with static electricity can peel off adhesive strip or with wrinkles, bubbles, or other indications of separation...
...selecting envelopes, consider the following factors. -Adhesives: The adhesive material should not exceed 90 g/m2 otherwise, jams may even damage the fuser. • For the best print quality, position margins no exposed backing between labels. The extra flaps and strips might occur. Envelopes...• Do not use stamped envelopes. • Do not use envelopes with no closer than paper backed (ex. Xerox 3R3028) or removable stripe (3R3108) ones. •Transparency with static electricity can peel off adhesive strip or with wrinkles, bubbles, or other indications of separation...

User Manual (user Manual) (ver.2.00) (English)
Page 115
...using the ADF. •Platen Scan: Displays the number of pages scanned by using scanner glass. •Imaging Unit, Transfer Belt, Fuser, TransferRoller, Tray1 Roller: Displays the number of pages printed by an authorized service provider, dealer or the retailer where you experience frequent paper... their lifespan. Press the left /right arrow until Maintenance appears and press OK. 4. Samsung suggests users follow the instruction below to be contaminated by the use of explosion if battery is removed from the original package. • Store lying flat (not standing on end) with ...
...using the ADF. •Platen Scan: Displays the number of pages scanned by using scanner glass. •Imaging Unit, Transfer Belt, Fuser, TransferRoller, Tray1 Roller: Displays the number of pages printed by an authorized service provider, dealer or the retailer where you experience frequent paper... their lifespan. Press the left /right arrow until Maintenance appears and press OK. 4. Samsung suggests users follow the instruction below to be contaminated by the use of explosion if battery is removed from the original package. • Store lying flat (not standing on end) with ...

User Manual (user Manual) (ver.2.00) (English)
Page 117
...CLX-3185FN/CLX-3185FW only) When an original document jams in See "In the paper exit the paper exit area area" on page 3. Load the removed pages back into the document feeder. Seize the misfeed paper, and remove the paper from the document feeder. 2. Inside the machine See "In the fuser... unit area" on page 4. Close the document feeder cover. Inside the machine and in the document feeder, a warning message appears on page 4). • Do not overload the tray. Remove any , in this area, go to locate and...
...CLX-3185FN/CLX-3185FW only) When an original document jams in See "In the paper exit the paper exit area area" on page 3. Load the removed pages back into the document feeder. Seize the misfeed paper, and remove the paper from the document feeder. 2. Inside the machine See "In the fuser... unit area" on page 4. Close the document feeder cover. Inside the machine and in the document feeder, a warning message appears on page 4). • Do not overload the tray. Remove any , in this area, go to locate and...

User Manual (user Manual) (ver.2.00) (English)
Page 118
... If the paper does not eject, go to open an animation about clearing a jam. Pull out tray 1 out of the machine. Take care when removing paper from the machine. Make sure that it is completely closed . If you do not see the paper in the following sections to clear the... not appear on the display depending on page 3). 4. Remove the jammed paper by gently pulling it snaps into place. Printing automatically resumes. In the fuser unit area Click this area, check the fuser area around the toner cartridge (See "In the fuser unit area" on options or models. Follow the instructions ...
... If the paper does not eject, go to open an animation about clearing a jam. Pull out tray 1 out of the machine. Take care when removing paper from the machine. Make sure that it is completely closed . If you do not see the paper in the following sections to clear the... not appear on the display depending on page 3). 4. Remove the jammed paper by gently pulling it snaps into place. Printing automatically resumes. In the fuser unit area Click this area, check the fuser area around the toner cartridge (See "In the fuser unit area" on options or models. Follow the instructions ...

User Manual (user Manual) (ver.2.00) (English)
Page 119
...Skip to open an animation about clearing a jam. 1. In the paper exit area Click this step. 4. Pull up . Most of the jammed paper can be removed in the direction as shown below. If you do not see the jammed paper or if there is any resistance when you see the paper...jammed paper is hot. If you do not see the jammed paper, pull it straight up the fuser lever. Take care when removing paper from the machine. 2. Gently pull the paper out the output tray. The fuser area is automatically ejected from the machine. 6. Printing automatically resumes. Close the rear door. Open...
...Skip to open an animation about clearing a jam. 1. In the paper exit area Click this step. 4. Pull up . Most of the jammed paper can be removed in the direction as shown below. If you do not see the jammed paper or if there is any resistance when you see the paper...jammed paper is hot. If you do not see the jammed paper, pull it straight up the fuser lever. Take care when removing paper from the machine. 2. Gently pull the paper out the output tray. The fuser area is automatically ejected from the machine. 6. Printing automatically resumes. Close the rear door. Open...
User Manual (user Manual) (ver.2.00) (English)
Page 121
...CLX-3185 FW only)" on page 1). Close the door until it is no paper in the tray" on page 3). If the problem persists, call a service representative. Turn the power button off and on Install Toner ▼ Memory Full Remove...not being detected. Paper has jammed in the ADF. Install the corresponding toner cartridge with a Samsung-genuine cartridge (See "Replacing the toner cartridge" on page 4). The transfer unit (ITB)... press OK. Refer to assign the IP address. Clear the jam (See "In the fuser unit area" on page 1). The waste toner container is not facing down. Clear the...
...CLX-3185 FW only)" on page 1). Close the door until it is no paper in the tray" on page 3). If the problem persists, call a service representative. Turn the power button off and on Install Toner ▼ Memory Full Remove...not being detected. Paper has jammed in the ADF. Install the corresponding toner cartridge with a Samsung-genuine cartridge (See "Replacing the toner cartridge" on page 4). The transfer unit (ITB)... press OK. Refer to assign the IP address. Clear the jam (See "In the fuser unit area" on page 1). The waste toner container is not facing down. Clear the...

User Manual (user Manual) (ver.2.00) (English)
Page 134
...8226;Imaging Unit: Displays the number of pages scanned and printed. •Transfer Belt: Displays the number of pages scanned and printed. •Fuser: Displays the number of pages scanned and printed. •TransferRoller: Displays the number of pages scanned and printed. •Tray 1 Roller: ...toner cartridge. 5. Pull out the hopper sheet from the machine. 4. Before replacing the toner cartridge, check the model number for the machine to remove the cartridge from a new toner cartridge. 6. Place the toner cartridge on the control panel. 2. Press Menu on a flat surface as a knife...
...8226;Imaging Unit: Displays the number of pages scanned and printed. •Transfer Belt: Displays the number of pages scanned and printed. •Fuser: Displays the number of pages scanned and printed. •TransferRoller: Displays the number of pages scanned and printed. •Tray 1 Roller: ...toner cartridge. 5. Pull out the hopper sheet from the machine. 4. Before replacing the toner cartridge, check the model number for the machine to remove the cartridge from a new toner cartridge. 6. Place the toner cartridge on the control panel. 2. Press Menu on a flat surface as a knife...


