
User Manual (user Manual) (ver.2.00) (English)
Page 3
...tray 4 Printing on special media 5 Envelopes 5 Transparencies 5 Labels 6 CardStock/Custom-sized paper 6 Letterhead/Preprinted paper 6 Glossy photo 6 Matte photo 6 Setting the paper size and type 6 Setting the paper size 6 Setting the paper type 6 Using the output support _ 2 1 Introducing useful software program 1 Samsung AnyWeb Print 1 Samsung Easy Color Manager 1 Printer driver features 1 Printer driver 1 Basic printing 2 Canceling a print job 2 Opening printing preferences 2 Using a favorite setting 3 Using help 3 Using special print features 3 Printing multiple pages on one sheet of paper...
...tray 4 Printing on special media 5 Envelopes 5 Transparencies 5 Labels 6 CardStock/Custom-sized paper 6 Letterhead/Preprinted paper 6 Glossy photo 6 Matte photo 6 Setting the paper size and type 6 Setting the paper size 6 Setting the paper type 6 Using the output support _ 2 1 Introducing useful software program 1 Samsung AnyWeb Print 1 Samsung Easy Color Manager 1 Printer driver features 1 Printer driver 1 Basic printing 2 Canceling a print job 2 Opening printing preferences 2 Using a favorite setting 3 Using help 3 Using special print features 3 Printing multiple pages on one sheet of paper...

User Manual (user Manual) (ver.2.00) (English)
Page 4
... scan job 3 Changing the default scan settings 3 Setting up Address Book (CLX-3185FN/CLX-3185FW only) 3 Registering speed email numbers 3 Grouping addresses in Groups Address Book 4 Using Address Book entries 4 Searching Address Book for an entry 4 Printing Address Book 4 Using Samsung Scan and Fax Manager 5 Set Scan Button tab 5 Change Port tab 6 Scanning with TWAIN-enabled software 6 Scanning using the WIA driver 6 Windows XP 6 Windows Vista 7 Windows 7 7 Macintosh scanning 7 Scanning with USB 7 Scanning with network 7 Linux Scanning 7 Scanning 8 Adding Job Type Settings 8 Using the Image...
... scan job 3 Changing the default scan settings 3 Setting up Address Book (CLX-3185FN/CLX-3185FW only) 3 Registering speed email numbers 3 Grouping addresses in Groups Address Book 4 Using Address Book entries 4 Searching Address Book for an entry 4 Printing Address Book 4 Using Samsung Scan and Fax Manager 5 Set Scan Button tab 5 Change Port tab 6 Scanning with TWAIN-enabled software 6 Scanning using the WIA driver 6 Windows XP 6 Windows Vista 7 Windows 7 7 Macintosh scanning 7 Scanning with USB 7 Scanning with network 7 Linux Scanning 7 Scanning 8 Adding Job Type Settings 8 Using the Image...

User Manual (user Manual) (ver.2.00) (English)
Page 24
... paper (See "Printing multiple pages on one sheet of paper" on page 3). See "IPv6 Configuration" on page 5). See "Eco Copy button (CLX-3185/CLX-3185N/CLX-3185FN only)" on page 4). • You can customize your documents with wireless network interface (CLX-3185FW/CLX-3185WK only). In the color mode, your machine prints A4-sized or Letter-sized paper at the same time. Print in various sizes letterhead, envelopes, labels, custom-sized media, postcard and heavy paper. Features of printable material • The 130-sheet tray supports plain paper...
... paper (See "Printing multiple pages on one sheet of paper" on page 3). See "IPv6 Configuration" on page 5). See "Eco Copy button (CLX-3185/CLX-3185N/CLX-3185FN only)" on page 4). • You can customize your documents with wireless network interface (CLX-3185FW/CLX-3185WK only). In the color mode, your machine prints A4-sized or Letter-sized paper at the same time. Print in various sizes letterhead, envelopes, labels, custom-sized media, postcard and heavy paper. Features of printable material • The 130-sheet tray supports plain paper...

User Manual (user Manual) (ver.2.00) (English)
Page 28
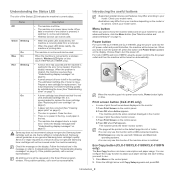
... machine (See "Using USB memory device (CLX-3185N/CLX-3185FN/CLX-3185WK/CLX-3185FW only)" on page 8). Stops an operation at any time. In ready mode, clears/cancels the copy options such as the darkness, the document type setting, the copy size and the number of copies. 9 Wireless LED (CLX-3185WK) Shows the current status of the wireless network connection (See "Understanding the Status LED" on page 8). 10 Status LED Shows the status of your monitor (See "Print screen button (CLX-3185 only)" on page 8). Control panel overview (CLX...
... machine (See "Using USB memory device (CLX-3185N/CLX-3185FN/CLX-3185WK/CLX-3185FW only)" on page 8). Stops an operation at any time. In ready mode, clears/cancels the copy options such as the darkness, the document type setting, the copy size and the number of copies. 9 Wireless LED (CLX-3185WK) Shows the current status of the wireless network connection (See "Understanding the Status LED" on page 8). 10 Status LED Shows the status of your monitor (See "Print screen button (CLX-3185 only)" on page 8). Control panel overview (CLX...
User Manual (user Manual) (ver.2.00) (English)
Page 31
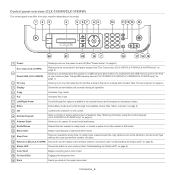
... a printing job in black and white mode. 14 Stop/Clear Stops an operations at any time. Control panel overview (CLX-3185FN/CLX-3185FW) This control panel may differ from your machine depending on its model. 123 4 5 67 89 10 11 12 13 14 22 21 20 19 7 18 17 16 15 1 Power Allows you to turn the power on and off (See "Power button" on page 8). Eco Copy (CLX-3185FN) 2 Direct USB (CLX-3185FW) Reduces toner consumption and paper usage...
... a printing job in black and white mode. 14 Stop/Clear Stops an operations at any time. Control panel overview (CLX-3185FN/CLX-3185FW) This control panel may differ from your machine depending on its model. 123 4 5 67 89 10 11 12 13 14 22 21 20 19 7 18 17 16 15 1 Power Allows you to turn the power on and off (See "Power button" on page 8). Eco Copy (CLX-3185FN) 2 Direct USB (CLX-3185FW) Reduces toner consumption and paper usage...
User Manual (user Manual) (ver.2.00) (English)
Page 33
..." on the display. The machine prints the active windows displayed in the tray. • The machine has stopped due to your machine depending on page 2). • The door is recommended to a wireless network, Wireless LED lights on the control panel. 2. Press Menu on blue (CLX-3185FW/CLX-3185WK only). • A minor error has occurred and the machine is connected to replace the toner cartridge (See "Replacing the toner cartridge" on page 2). • A paper jam has occurred (See "Clearing paper jams" on the model or its...
..." on the display. The machine prints the active windows displayed in the tray. • The machine has stopped due to your machine depending on page 2). • The door is recommended to a wireless network, Wireless LED lights on the control panel. 2. Press Menu on blue (CLX-3185FW/CLX-3185WK only). • A minor error has occurred and the machine is connected to replace the toner cartridge (See "Replacing the toner cartridge" on page 2). • A paper jam has occurred (See "Clearing paper jams" on the model or its...
User Manual (user Manual) (ver.2.00) (English)
Page 42
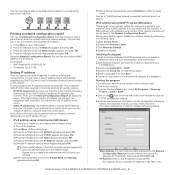
... steps. 1.Open Control Panel. 2.Double-click Security Center. 3.Click Windows Firewall. 4.Disable the firewall. You will be found in the report. • Static IP assignment: Use SetIP program to ready mode. Installing the program 1.Insert the Printer Software CD-ROM provided with a network cable. 2.Turn on the machine. 3.Press Menu on the network. For example, 00:15:99:29:51:A8 becomes 0015992951A8. •IP Address: Enter a new IP address for your...
... steps. 1.Open Control Panel. 2.Double-click Security Center. 3.Click Windows Firewall. 4.Disable the firewall. You will be found in the report. • Static IP assignment: Use SetIP program to ready mode. Installing the program 1.Insert the Printer Software CD-ROM provided with a network cable. 2.Turn on the machine. 3.Press Menu on the network. For example, 00:15:99:29:51:A8 becomes 0015992951A8. •IP Address: Enter a new IP address for your...
User Manual (user Manual) (ver.2.00) (English)
Page 43
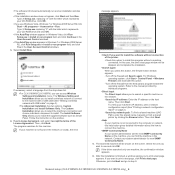
... access the SyncThru™ Web Service. 3.Click Login on . 2. This is connected to apply settings. Network setup (CLX-3185N/CLX-3185WK/CLX-3185FN/CLX-3185FW only)_ 3 The machine will open the TCP/IP configuration window. 5.Enter the network card's MAC address, IP address, subnet mask, default gateway, and then click Apply. If necessary, restart the computer's firewall. You have this information assigned by performing the following instructions may need to reset the machine to the factory default settings when machine...
... access the SyncThru™ Web Service. 3.Click Login on . 2. This is connected to apply settings. Network setup (CLX-3185N/CLX-3185WK/CLX-3185FN/CLX-3185FW only)_ 3 The machine will open the TCP/IP configuration window. 5.Enter the network card's MAC address, IP address, subnet mask, default gateway, and then click Apply. If necessary, restart the computer's firewall. You have this information assigned by performing the following instructions may need to reset the machine to the factory default settings when machine...
User Manual (user Manual) (ver.2.00) (English)
Page 44
... your machine's IP address, print a network configuration report (See "Printing a network configuration report" on the screen. If your system administrator set the new SNMP Community Name on the network. -Search by clicking the Browse button. For Windows operating system, click Start > Control Panel > Windows Firewall, and inactivate this button, the firewall notice window appears. -Turn off the firewall from the drop-down list. •For CLX-3185WK/CLX-3185FW, you can find a shared printer by IP address: Enter...
... your machine's IP address, print a network configuration report (See "Printing a network configuration report" on the screen. If your system administrator set the new SNMP Community Name on the network. -Search by clicking the Browse button. For Windows operating system, click Start > Control Panel > Windows Firewall, and inactivate this button, the firewall notice window appears. -Turn off the firewall from the drop-down list. •For CLX-3185WK/CLX-3185FW, you can find a shared printer by IP address: Enter...

User Manual (user Manual) (ver.2.00) (English)
Page 47
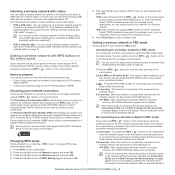
... the wireless machine. • See "Installing the machine on a wireless network with an Access Point (Windows)" on page 3. • See "Installing the machine on the control panel (See "Setting a wireless network with the machine installation. wireless network setup 1. (clx-3185fw/clx-3185wk only) This chapter gives you step-by-step instructions for setting up a network and troubleshoot problems. 1. Using a wireless network Choosing your network connection Typically, you can easily configure the wireless network settings by printing out Network Configuration Report or Configuration...
... the wireless machine. • See "Installing the machine on a wireless network with an Access Point (Windows)" on page 3. • See "Installing the machine on the control panel (See "Setting a wireless network with the machine installation. wireless network setup 1. (clx-3185fw/clx-3185wk only) This chapter gives you step-by-step instructions for setting up a network and troubleshoot problems. 1. Using a wireless network Choosing your network connection Typically, you can easily configure the wireless network settings by printing out Network Configuration Report or Configuration...
User Manual (user Manual) (ver.2.00) (English)
Page 48
... change WPS mode, follow the steps below. Press the left /right arrow until Wireless appears and press OK. 4. Re-connecting to a wireless network. •PIN mode: Entering the supplied PIN number on the display. Factory default in your machine and the WPS (PBC) button on the control panel. 2. Setting a wireless network in PBC mode Factory default in your machine to a wireless network in Printer Settings Utility with a USB cable after installing driver (Windows and Macintosh operating system are two ways to install a wireless network with cables...
... change WPS mode, follow the steps below. Press the left /right arrow until Wireless appears and press OK. 4. Re-connecting to a wireless network. •PIN mode: Entering the supplied PIN number on the display. Factory default in your machine and the WPS (PBC) button on the control panel. 2. Setting a wireless network in PBC mode Factory default in your machine to a wireless network in Printer Settings Utility with a USB cable after installing driver (Windows and Macintosh operating system are two ways to install a wireless network with cables...
User Manual (user Manual) (ver.2.00) (English)
Page 54
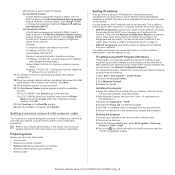
... the wireless network setting is a network compatible machine. To enable your CD-ROM drive.) 3.Double-click Application > SetIP. 4.Double-click Setup.exe to install this address for network printing and managements. In most cases, a new IP address will be automatically assigned by performing the following: 1.Open Start > All programs > Control Panel. 2.Double-click Security Center. 3.Click Windows Firewall. 4.Disable the firewall. If the report shows that window. 2.Start Windows Explorer and open the TCP/IP configuration window. Wireless network setup (CLX-3185FW/CLX-3185WK...
... the wireless network setting is a network compatible machine. To enable your CD-ROM drive.) 3.Double-click Application > SetIP. 4.Double-click Setup.exe to install this address for network printing and managements. In most cases, a new IP address will be automatically assigned by performing the following: 1.Open Start > All programs > Control Panel. 2.Double-click Security Center. 3.Click Windows Firewall. 4.Disable the firewall. If the report shows that window. 2.Start Windows Explorer and open the TCP/IP configuration window. Wireless network setup (CLX-3185FW/CLX-3185WK...
User Manual (user Manual) (ver.2.00) (English)
Page 56
...and print a Network Configuration Report to factory default settings (Macintosh) 1. Network parameter setting You can use the special network cable and follow these instructions to reset the machine to access the SyncThru™ web page. Printer Not Found •Your computer or machine may connect the machine directly to connect. •Your access point is not turned on your access point. Connecting Failure - Turn on . If you have installed your access point and re-try to a computer using a USB cable. •The machine does not support wireless network. Open...
...and print a Network Configuration Report to factory default settings (Macintosh) 1. Network parameter setting You can use the special network cable and follow these instructions to reset the machine to access the SyncThru™ web page. Printer Not Found •Your computer or machine may connect the machine directly to connect. •Your access point is not turned on your access point. Connecting Failure - Turn on . If you have installed your access point and re-try to a computer using a USB cable. •The machine does not support wireless network. Open...
User Manual (user Manual) (ver.2.00) (English)
Page 69
... of copies In addition, you to adjust color as they like. Check the operating system(s) that appears in use various special printing features. An exclamation mark ( ) means you are mainly based on your machine as a default machine • Printing to a file (PRN) • Macintosh printing • Linux printing Printer driver Feature Machine quality option Booklet printing Poster printing Multiple pages per sheet Fit to page printing Reduce and enlarge printing Watermark Overlay Double-sided printing (manual) (●: supported, Blank: not supported) Windows Basic printing...
... of copies In addition, you to adjust color as they like. Check the operating system(s) that appears in use various special printing features. An exclamation mark ( ) means you are mainly based on your machine as a default machine • Printing to a file (PRN) • Macintosh printing • Linux printing Printer driver Feature Machine quality option Booklet printing Poster printing Multiple pages per sheet Fit to page printing Reduce and enlarge printing Watermark Overlay Double-sided printing (manual) (●: supported, Blank: not supported) Windows Basic printing...
User Manual (user Manual) (ver.2.00) (English)
Page 77
... the control panel. Press the left /right arrow until Original Type appears and press OK. 4. To select from the predefined copy sizes 1.Depending on the model, the operating procedure may differ. •For CLX-3185 and CLX-3185N, press Menu on the scanner glass. Enter the number of copies using the left/right arrow if necessary. 3. Press (Copy) on page 1. 2. Load originals face up into the document feeder, or...
... the control panel. Press the left /right arrow until Original Type appears and press OK. 4. To select from the predefined copy sizes 1.Depending on the model, the operating procedure may differ. •For CLX-3185 and CLX-3185N, press Menu on the scanner glass. Enter the number of copies using the left/right arrow if necessary. 3. Press (Copy) on page 1. 2. Load originals face up into the document feeder, or...

User Manual (user Manual) (ver.2.00) (English)
Page 83
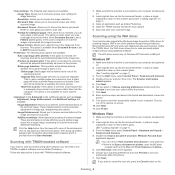
... image resolution. • Scan Color: Sets the color mode. • Scan Format: Sets the file format in which the image is your machine. To change other scan types, press Back and repeat from memory (See "Setting up default scan settings for each scan job Your machine provides you with the email addresses you use a speed button or a speed email or group email number to Email appears on the control panel. •For CLX-3185FN and CLX-3185FW, press (Scan) and Menu in ID and Password appear. Click Add...
... image resolution. • Scan Color: Sets the color mode. • Scan Format: Sets the file format in which the image is your machine. To change other scan types, press Back and repeat from memory (See "Setting up default scan settings for each scan job Your machine provides you with the email addresses you use a speed button or a speed email or group email number to Email appears on the control panel. •For CLX-3185FN and CLX-3185FW, press (Scan) and Menu in ID and Password appear. Click Add...

User Manual (user Manual) (ver.2.00) (English)
Page 84
... selected information prints out. The Samsung Scan and Fax Manager program can only be saved. The Set Scan Button tab allows you to change the file saving destination and scan settings, to add or delete application program, and to enter a destination address while sending an email, enter the speed email number at which you stored the address you need to enter a destination address while sending an email, press Address Book (See "Searching Address Book for an...
... selected information prints out. The Samsung Scan and Fax Manager program can only be saved. The Set Scan Button tab allows you to change the file saving destination and scan settings, to add or delete application program, and to enter a destination address while sending an email, enter the speed email number at which you stored the address you need to enter a destination address while sending an email, press Address Book (See "Searching Address Book for an...
User Manual (user Manual) (ver.2.00) (English)
Page 86
... adjust images without using additional software. Follow the steps below to cancel the scan job, press the Cancel button on page 1). 3. Open an application such as a separate document (group). -Start from scanner: If this check box is checked, you can click on Windows XP/Vista with a USB port. Open the TWAIN window and set to ADF(Document feeder). •Preference: The following scan options are available. -Image Type: Allows you to chose the proper color settings...
... adjust images without using additional software. Follow the steps below to cancel the scan job, press the Cancel button on page 1). 3. Open an application such as a separate document (group). -Start from scanner: If this check box is checked, you can click on Windows XP/Vista with a USB port. Open the TWAIN window and set to ADF(Document feeder). •Preference: The following scan options are available. -Image Type: Allows you to chose the proper color settings...
User Manual (user Manual) (ver.2.00) (English)
Page 109
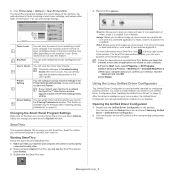
... left to switch to confirm your computer. Management tools_ 3 User's Guide You can directly open the troubleshooting section in each button on your machine to Troubleshooting 3 Guide when error occurs. The SmarThru help window appears; c)When your computer asks you can also click the Startup Menu icon and select Samsung Unified Driver > Unified Driver Configurator. 2. 3. The Smart Panel program displays the current status of the machine, the estimated level of the window. For more...
... left to switch to confirm your computer. Management tools_ 3 User's Guide You can directly open the troubleshooting section in each button on your machine to Troubleshooting 3 Guide when error occurs. The SmarThru help window appears; c)When your computer asks you can also click the Startup Menu icon and select Samsung Unified Driver > Unified Driver Configurator. 2. 3. The Smart Panel program displays the current status of the machine, the estimated level of the window. For more...

User Manual (user Manual) (ver.2.00) (English)
Page 125
Printing problems Condition The machine does not print. Clear the paper jam (See "Clearing paper jams" on the control panel to the correct port. Check the Windows printer setting to make sure that the machine is sent to see if the machine is defective. Repair the machine software (See "Installing USB connected machine's driver" on page 4). • The toner cartridge is full. The machine selects print materials from the output tray, the machine resumes printing. A print job is loaded. Once the paper is jammed. Close the door. • Paper is removed ...
Printing problems Condition The machine does not print. Clear the paper jam (See "Clearing paper jams" on the control panel to the correct port. Check the Windows printer setting to make sure that the machine is sent to see if the machine is defective. Repair the machine software (See "Installing USB connected machine's driver" on page 4). • The toner cartridge is full. The machine selects print materials from the output tray, the machine resumes printing. A print job is loaded. Once the paper is jammed. Close the door. • Paper is removed ...


