User Manual
Page 6
......10.2 Cleaning the scan unit ...10.3 Maintaining the toner cartridge ...10.4 Toner cartridge storage ...10.4 Expected cartridge life ...10.4 Redistributing toner ...10.4 Replacing the toner cartridge ...10.5 Replacing the imaging unit ...10.6 Replacing the waste toner container ...10.8 Maintenance parts ...10.9 Checking replaceables ... Printing problems ...11.6 Printing quality problems ...11.7 Copying problems ...11.10 Scanning problems ...11.10 Network Scan problems (CLX-2160N only) ...11.11 Common Windows problems ...11.11 Common Macintosh problems ...11.11 Common Linux problems ...11.12 12...
......10.2 Cleaning the scan unit ...10.3 Maintaining the toner cartridge ...10.4 Toner cartridge storage ...10.4 Expected cartridge life ...10.4 Redistributing toner ...10.4 Replacing the toner cartridge ...10.5 Replacing the imaging unit ...10.6 Replacing the waste toner container ...10.8 Maintenance parts ...10.9 Checking replaceables ... Printing problems ...11.6 Printing quality problems ...11.7 Copying problems ...11.10 Scanning problems ...11.10 Network Scan problems (CLX-2160N only) ...11.11 Common Windows problems ...11.11 Common Macintosh problems ...11.11 Common Linux problems ...11.12 12...
User Manual
Page 12
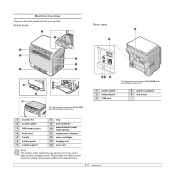
... figure above shows an CLX-2160N with all available accessories. 1 power switch 2 network port 3 USB port 4 power receptacle 5 rear cover 1 scanner lid 2 scanner glass 3 USB memory port 4 front cover 5 handle 6 control panel 7 output support 8 tray 9 manual feeder 10 manual feeder paper width guides 11 waste toner container 12 toner cartridges 13 imaging unit 14...
... figure above shows an CLX-2160N with all available accessories. 1 power switch 2 network port 3 USB port 4 power receptacle 5 rear cover 1 scanner lid 2 scanner glass 3 USB memory port 4 front cover 5 handle 6 control panel 7 output support 8 tray 9 manual feeder 10 manual feeder paper width guides 11 waste toner container 12 toner cartridges 13 imaging unit 14...
User Manual
Page 44
...reports • Clearing memory • Cleaning your machine • Maintaining the toner cartridge • Redistributing toner • Replacing the toner cartridge • Replacing the imaging unit • Replacing the waste toner container • Maintenance parts • Managing your machine from the website &#...8226; Checking the machine's serial number Printing reports Your machine can selectively clear information stored in the colored cells are available only with CLX-2160N....
...reports • Clearing memory • Cleaning your machine • Maintaining the toner cartridge • Redistributing toner • Replacing the toner cartridge • Replacing the imaging unit • Replacing the waste toner container • Maintenance parts • Managing your machine from the website &#...8226; Checking the machine's serial number Printing reports Your machine can selectively clear information stored in the colored cells are available only with CLX-2160N....
User Manual
Page 49
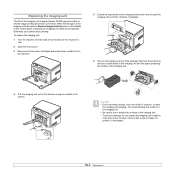
... use sharp objects, such as a knife or scissors, to pull the imaging unit out of the machine completely. 6 Take a new imaging unit out of the toner cartridges and waste toner container from the machine. 5 Extend the top handle on its package.
... use sharp objects, such as a knife or scissors, to pull the imaging unit out of the machine completely. 6 Take a new imaging unit out of the toner cartridges and waste toner container from the machine. 5 Extend the top handle on its package.

User Manual
Page 50
... get ready. Caution If there is not properly installed. Note • After rebooting, your machine will not operate. 11 Turn the machine on the toner cartridge entrances of the imaging unit. Wait for about 1.5 minutes for the imaging unit. • If the installation is completed properly, a guide report.... 10.7 7 Holding the handles on the new imaging unit, push the imaging unit until it sounds 'click' into the machine. 9 Insert the toner cartridges and waste toner container into their corresponding slots until they click into place. 8 Remove four dummy caps which are on .
... get ready. Caution If there is not properly installed. Note • After rebooting, your machine will not operate. 11 Turn the machine on the toner cartridge entrances of the imaging unit. Wait for about 1.5 minutes for the imaging unit. • If the installation is completed properly, a guide report.... 10.7 7 Holding the handles on the new imaging unit, push the imaging unit until it sounds 'click' into the machine. 9 Insert the toner cartridges and waste toner container into their corresponding slots until they click into place. 8 Remove four dummy caps which are on .
User Manual
Page 51
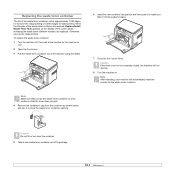
...cap from the container as shown below, and use it is firmly seated in place. 7 Close the front cover firmly. To replace the waste toner container: 1 Turn the machine off, then wait a few minutes for black printing. Caution Do not tilt or turn over the container. 5 Take a new... it to cool. 2 Open the front cover. 3 Pull the waste toner container out of the machine using its package. 10.8 Note Make sure that you lay the waste toner container on the display of the waste toner container has expired, Replace/Install Waste Toner Tank appears on a flat surface so that it to be replaced....
...cap from the container as shown below, and use it is firmly seated in place. 7 Close the front cover firmly. To replace the waste toner container: 1 Turn the machine off, then wait a few minutes for black printing. Caution Do not tilt or turn over the container. 5 Take a new... it to cool. 2 Open the front cover. 3 Pull the waste toner container out of the machine using its package. 10.8 Note Make sure that you lay the waste toner container on the display of the waste toner container has expired, Replace/Install Waste Toner Tank appears on a flat surface so that it to be replaced....
User Manual
Page 57
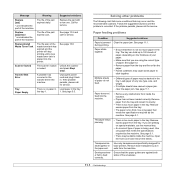
...Load paper in the paper exit. Solving other problems The following chart lists some paper to stick together. Follow the suggested solutions until a new waste toner tank is too much paper in the tray. Paper sticks together. See page 5.3. • Remove paper from inside the machine. Load paper of...excess paper from the machine. Use only paper that there is corrected. Remove each transparency as it exits from the tray. Replace/Install Waste Toner Tank Scanner locked Transfer Belt Error Tray Paper Empty Meaning The life of the part expires soon. The scanner module is no paper ...
...Load paper in the paper exit. Solving other problems The following chart lists some paper to stick together. Follow the suggested solutions until a new waste toner tank is too much paper in the tray. Paper sticks together. See page 5.3. • Remove paper from inside the machine. Load paper of...excess paper from the machine. Use only paper that there is corrected. Remove each transparency as it exits from the tray. Replace/Install Waste Toner Tank Scanner locked Transfer Belt Error Tray Paper Empty Meaning The life of the part expires soon. The scanner module is no paper ...

User Manual
Page 67
... conditions and print patterns may cause results to purchase To order Samsung-authorized supplies, contact your local Samsung dealer or the retailer where you can order the following types of toner cartridges and supplies for your machine since the configuration of this item...your machine. Otherwise, the print cartridge or supplies will be incompatible with your machine: Type Black toner cartridge Cyan toner cartridge Magenta toner cartridge Yellow toner cartridge Imaging unit Waste toner container Yielda Approx. 2,000 pages Approx. 1,000 pages Approx. 1,000 pages Approx. 1,000 pages...
... conditions and print patterns may cause results to purchase To order Samsung-authorized supplies, contact your local Samsung dealer or the retailer where you can order the following types of toner cartridges and supplies for your machine since the configuration of this item...your machine. Otherwise, the print cartridge or supplies will be incompatible with your machine: Type Black toner cartridge Cyan toner cartridge Magenta toner cartridge Yellow toner cartridge Imaging unit Waste toner container Yielda Approx. 2,000 pages Approx. 1,000 pages Approx. 1,000 pages Approx. 1,000 pages...
User Manual
Page 70
... Network Scan 11.11 paper feeding 11.5 printing 11.6 printing quality 11.7 scanning 11.10 Windows 11.11 R replacement parts 10.9 replacing imaging unit 10.6 toner cartridge 10.5 waste toner container 10.8 reports, print 10.1 S scan power save mode 2.2 Scan to 1.3 scanner glass cleaning 10.3
... Network Scan 11.11 paper feeding 11.5 printing 11.6 printing quality 11.7 scanning 11.10 Windows 11.11 R replacement parts 10.9 replacing imaging unit 10.6 toner cartridge 10.5 waste toner container 10.8 reports, print 10.1 S scan power save mode 2.2 Scan to 1.3 scanner glass cleaning 10.3

User Manual
Page 71
... general 13.1 printer 13.1 scanner and copier 13.2 Status 1.3 Status LED 1.4 Stop/Clear 1.3 supplies checking life 10.9 order information 12.1 system requirements Macintosh 3.2 T toner cartridge maintaining 10.4 redistributing 10.4 replacing 10.5 toner cartridge messages Status LED 1.4 Toner colors 1.3 U USB flash memory managing 9.3 printing 9.3 scanning 9.2 USB Print 1.3 W waste toner container replace 10.8 Windows problems 11.11 2
... general 13.1 printer 13.1 scanner and copier 13.2 Status 1.3 Status LED 1.4 Stop/Clear 1.3 supplies checking life 10.9 order information 12.1 system requirements Macintosh 3.2 T toner cartridge maintaining 10.4 redistributing 10.4 replacing 10.5 toner cartridge messages Status LED 1.4 Toner colors 1.3 U USB flash memory managing 9.3 printing 9.3 scanning 9.2 USB Print 1.3 W waste toner container replace 10.8 Windows problems 11.11 2


