
User Manual (ENGLISH)
Page 4
...remove all of the packing tape from the printer. 3 Pull the paper tray out of dust CAUTION: You must place your printer on a level surface. If you do not, print quality problems can occur. 4 SETUP GUIDE Clean, dry, and free of the printer and remove the packing tape from direct ...airflow of temperature, sunlight, and humidity extremes or fluctuations - Away from the tray. 4 Select a location for the printer: •Leave enough room to open the printer trays, covers, and to allow...
...remove all of the packing tape from the printer. 3 Pull the paper tray out of dust CAUTION: You must place your printer on a level surface. If you do not, print quality problems can occur. 4 SETUP GUIDE Clean, dry, and free of the printer and remove the packing tape from direct ...airflow of temperature, sunlight, and humidity extremes or fluctuations - Away from the tray. 4 Select a location for the printer: •Leave enough room to open the printer trays, covers, and to allow...
User Manual (ENGLISH)
Page 37
... Waste Toner Container 6.11 Replacing the Imaging Unit 6.14 Replacing the Transfer Belt 6.22 Cleaning the Printer 6.29 Cleaning the Outside of the Printer 6.29 Cleaning the LSU Inside the Printer 6.29 Cleaning the Inside of the Printer 6.30 Replacement Parts 6.38 Managing the Printer from the Website 6.38 Setting Up E-mail Notification 6.39 Setting the Contact Information tab...
... Waste Toner Container 6.11 Replacing the Imaging Unit 6.14 Replacing the Transfer Belt 6.22 Cleaning the Printer 6.29 Cleaning the Outside of the Printer 6.29 Cleaning the LSU Inside the Printer 6.29 Cleaning the Inside of the Printer 6.30 Replacement Parts 6.38 Managing the Printer from the Website 6.38 Setting Up E-mail Notification 6.39 Setting the Contact Information tab...
User Manual (ENGLISH)
Page 126
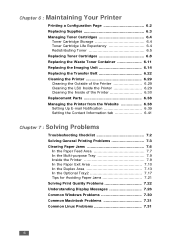
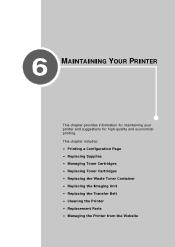
This chapter includes: • Printing a Configuration Page • Replacing Supplies • Managing Toner Cartridges • Replacing Toner Cartridges • Replacing the Waste Toner Container • Replacing the Imaging Unit • Replacing the Transfer Belt • Cleaning the Printer • Replacement Parts • Managing the Printer from the Website 6 MAINTAINING YOUR PRINTER This chapter provides information for maintaining your printer and suggestions for high-quality and economical printing.
This chapter includes: • Printing a Configuration Page • Replacing Supplies • Managing Toner Cartridges • Replacing Toner Cartridges • Replacing the Waste Toner Container • Replacing the Imaging Unit • Replacing the Transfer Belt • Cleaning the Printer • Replacement Parts • Managing the Printer from the Website 6 MAINTAINING YOUR PRINTER This chapter provides information for maintaining your printer and suggestions for high-quality and economical printing.
User Manual (ENGLISH)
Page 141
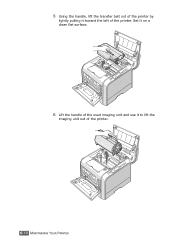
Set it on a clean flat surface. 6 Lift the handle of the used imaging unit and use it toward the left of the printer. 6.16 MAINTAINING YOUR PRINTER 5 Using the handle, lift the transfer belt out of the printer by lightly pulling it to lift the imaging unit out of the printer.
Set it on a clean flat surface. 6 Lift the handle of the used imaging unit and use it toward the left of the printer. 6.16 MAINTAINING YOUR PRINTER 5 Using the handle, lift the transfer belt out of the printer by lightly pulling it to lift the imaging unit out of the printer.
User Manual (ENGLISH)
Page 154
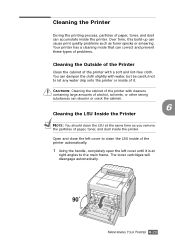
...toner specks or smearing. Over time, this build-up can correct and prevent these types of problems. Cleaning the Outside of the Printer Clean the cabinet of the printer with cleaners containing large amounts of alcohol, solvents, or other strong substances can discolor or crack the cabinet.... 6 Cleaning the LSU Inside the Printer NOTE: You should clean the LSU at right angles to clean the LSU inside the printer. Open and close the left cover until it . Your printer has a cleaning mode that can cause print quality problems such as...
...toner specks or smearing. Over time, this build-up can correct and prevent these types of problems. Cleaning the Outside of the Printer Clean the cabinet of the printer with cleaners containing large amounts of alcohol, solvents, or other strong substances can discolor or crack the cabinet.... 6 Cleaning the LSU Inside the Printer NOTE: You should clean the LSU at right angles to clean the LSU inside the printer. Open and close the left cover until it . Your printer has a cleaning mode that can cause print quality problems such as...
User Manual (ENGLISH)
Page 155
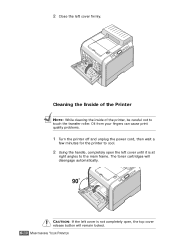
... locked. 6.30 MAINTAINING YOUR PRINTER Cleaning the Inside of the Printer NOTE: While cleaning the inside of the printer, be careful not to the main frame. CAUTION: If the left cover is not completely open the left cover firmly. Oil from your fingers can cause print quality problems. 1 Turn the printer off and unplug the power...
... locked. 6.30 MAINTAINING YOUR PRINTER Cleaning the Inside of the Printer NOTE: While cleaning the inside of the printer, be careful not to the main frame. CAUTION: If the left cover is not completely open the left cover firmly. Oil from your fingers can cause print quality problems. 1 Turn the printer off and unplug the power...

User Manual (ENGLISH)
Page 156
This will cause damage to the imaging unit. Set them on a clean flat surface. 4 Press the top cover release button to unlatch the top cover and open for more than a few minutes, the imaging unit can be ... for any reason. Close the top and left cover open it all the way. 6 CAUTION: If you are ready to lift them out of the printer, transfer your grip to the body of the cartridges, and lift them out of their slot, but when you leave the left covers should the...
This will cause damage to the imaging unit. Set them on a clean flat surface. 4 Press the top cover release button to unlatch the top cover and open for more than a few minutes, the imaging unit can be ... for any reason. Close the top and left cover open it all the way. 6 CAUTION: If you are ready to lift them out of the printer, transfer your grip to the body of the cartridges, and lift them out of their slot, but when you leave the left covers should the...

User Manual (ENGLISH)
Page 157
5 Pull the lock levers on a clean flat surface. 6.32 MAINTAINING YOUR PRINTER Set it on each side toward you, as shown below, to release the transfer belt. 6 Using the handle, lift the transfer belt out of the printer by lightly pulling it toward the left of the printer.
5 Pull the lock levers on a clean flat surface. 6.32 MAINTAINING YOUR PRINTER Set it on each side toward you, as shown below, to release the transfer belt. 6 Using the handle, lift the transfer belt out of the printer by lightly pulling it toward the left of the printer.
User Manual (ENGLISH)
Page 158
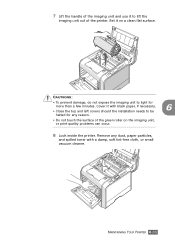
... printer. MAINTAINING YOUR PRINTER 6.33 7 Lift the handle of the imaging unit and use it with a damp, soft lint-free cloth, or small vacuum cleaner. CAUTIONS: • To prevent damage, do not expose the imaging unit to light for any reason. • Do not touch the surface of the green roller on a clean...
... printer. MAINTAINING YOUR PRINTER 6.33 7 Lift the handle of the imaging unit and use it with a damp, soft lint-free cloth, or small vacuum cleaner. CAUTIONS: • To prevent damage, do not expose the imaging unit to light for any reason. • Do not touch the surface of the green roller on a clean...
User Manual (ENGLISH)
Page 189
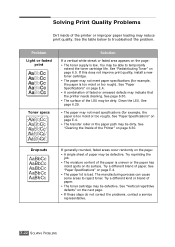
Solving Print Quality Problems Dirt inside of faded or smeared defects may indicate that the printer needs cleaning. See the table below to reject toner. You may not meet specifications (for example, the paper is uneven or the paper has moist spots..." on the page: • A single sheet of paper. • The toner cartridge may reduce print quality. Clean the LSU. If generally rounded, faded areas occur randomly on page E.4. • A combination of the printer or improper paper loading may be defective. The manufacturing process can cause some areas to troubleshoot the problem...
Solving Print Quality Problems Dirt inside of faded or smeared defects may indicate that the printer needs cleaning. See the table below to reject toner. You may not meet specifications (for example, the paper is uneven or the paper has moist spots..." on the page: • A single sheet of paper. • The toner cartridge may reduce print quality. Clean the LSU. If generally rounded, faded areas occur randomly on page E.4. • A combination of the printer or improper paper loading may be defective. The manufacturing process can cause some areas to troubleshoot the problem...
User Manual (ENGLISH)
Page 190
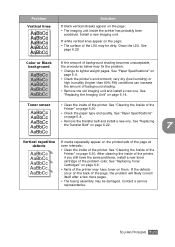
... inside of the printer. See "Cleaning the Inside of the Printer" on page 6.30. See "Cleaning the Inside of the Printer" on page 6.30 • Check the paper type and quality. See "Replacing Toner Cartridges" on page 6.8. • Parts of the printer may be damaged. Color or Black background AaBbCc AaBbCc AaBbCc AaBbCc AaBbCc If the amount...
... inside of the printer. See "Cleaning the Inside of the Printer" on page 6.30. See "Cleaning the Inside of the Printer" on page 6.30 • Check the paper type and quality. See "Replacing Toner Cartridges" on page 6.8. • Parts of the printer may be damaged. Color or Black background AaBbCc AaBbCc AaBbCc AaBbCc AaBbCc If the amount...
User Manual (ENGLISH)
Page 192
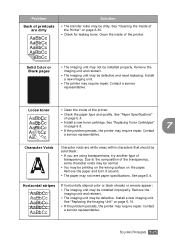
... AaBbCc AaBbCc AaBbCc If horizontally aligned color or black streaks or smears appear: • The imaging unit may be defective. Contact a service representative. See page E.4. Remove the imaging unit and reinsert. • The imaging unit may be dirty. Loose toner • Clean the inside of the printer. Contact a service representative. Install a new imaging...
... AaBbCc AaBbCc AaBbCc If horizontally aligned color or black streaks or smears appear: • The imaging unit may be defective. Contact a service representative. See page E.4. Remove the imaging unit and reinsert. • The imaging unit may be dirty. Loose toner • Clean the inside of the printer. Contact a service representative. Install a new imaging...

User Manual (ENGLISH)
Page 263
INDEX B booklet printing 5.9 C cancel, print jobs 4.4 card stock, print 3.21 clean inside the printer 6.30 LSU 6.29 outside of the printer 6.29 color mode 4.9, 4.10 components 1.4 configuration page, print 6.2 connect Ethernet D.11 control panel 2.2 buttons 2.3 display 2.2 menus 2.5 custom-sized materials, print 3.21 D double-sided printing 5.2 E envelopes, print 3.14 ...
INDEX B booklet printing 5.9 C cancel, print jobs 4.4 card stock, print 3.21 clean inside the printer 6.30 LSU 6.29 outside of the printer 6.29 color mode 4.9, 4.10 components 1.4 configuration page, print 6.2 connect Ethernet D.11 control panel 2.2 buttons 2.3 display 2.2 menus 2.5 custom-sized materials, print 3.21 D double-sided printing 5.2 E envelopes, print 3.14 ...


