User Manual (ENGLISH)
Page 8
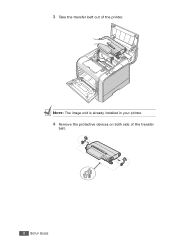
NOTE: The image unit is already installed in your printer. 4 Remove the protective devices on both side of the printer. 3 Take the transfer belt out of the transfer belt. 8 SETUP GUIDE
NOTE: The image unit is already installed in your printer. 4 Remove the protective devices on both side of the printer. 3 Take the transfer belt out of the transfer belt. 8 SETUP GUIDE
User Manual (ENGLISH)
Page 9
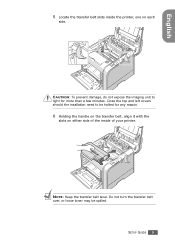
Close the top and left covers should the insallation need to light for any reason. 6 Holding the handle on the transfer belt, align it with the slots on each side. SETUP GUIDE 9 CAUTION: To prevent damage, do not expose the imaging unit to be spilled. NOTE: Keep the transfer belt level. Do not turn the transfer belt over, or loose toner may be halted for more than a few minutes. English 5 Locate the transfer belt slots inside the printer, one on either side of the inside of your printer.
Close the top and left covers should the insallation need to light for any reason. 6 Holding the handle on the transfer belt, align it with the slots on each side. SETUP GUIDE 9 CAUTION: To prevent damage, do not expose the imaging unit to be spilled. NOTE: Keep the transfer belt level. Do not turn the transfer belt over, or loose toner may be halted for more than a few minutes. English 5 Locate the transfer belt slots inside the printer, one on either side of the inside of your printer.
User Manual (ENGLISH)
Page 10
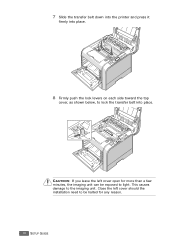
Close the left cover open for more than a few minutes, the imaging unit can be halted for any reason. 10 SETUP GUIDE 7 Slide the transfer belt down into the printer and press it firmly into place. 8 Firmly push the lock levers on each side toward the top cover, as shown below, to the imaging unit. This causes damage to lock the transfer belt into place. CAUTION: If you leave the left cover should the installation need to be exposed to light.
Close the left cover open for more than a few minutes, the imaging unit can be halted for any reason. 10 SETUP GUIDE 7 Slide the transfer belt down into the printer and press it firmly into place. 8 Firmly push the lock levers on each side toward the top cover, as shown below, to the imaging unit. This causes damage to lock the transfer belt into place. CAUTION: If you leave the left cover should the installation need to be exposed to light.
User Manual (ENGLISH)
Page 37
...Waste Toner Container 6.11 Replacing the Imaging Unit 6.14 Replacing the Transfer Belt 6.22 Cleaning the Printer 6.29 Cleaning the Outside of the Printer 6.29 Cleaning the LSU Inside the Printer 6.29 Cleaning the Inside of the Printer 6.30 Replacement Parts 6.38 Managing the Printer from the Website 6.38 Setting ... 7.2 Solving General Printing Problems 7.3 Clearing Paper Jams 7.6 In the Paper Feed Area 7.7 In the Multi-purpose Tray 7.9 Inside the Printer 7.9 In the Paper Exit Area 7.10 In the Duplex Area 7.13 In the Optional Tray2 7.17 Tips for Avoiding Paper Jams 7.21...
...Waste Toner Container 6.11 Replacing the Imaging Unit 6.14 Replacing the Transfer Belt 6.22 Cleaning the Printer 6.29 Cleaning the Outside of the Printer 6.29 Cleaning the LSU Inside the Printer 6.29 Cleaning the Inside of the Printer 6.30 Replacement Parts 6.38 Managing the Printer from the Website 6.38 Setting ... 7.2 Solving General Printing Problems 7.3 Clearing Paper Jams 7.6 In the Paper Feed Area 7.7 In the Multi-purpose Tray 7.9 Inside the Printer 7.9 In the Paper Exit Area 7.10 In the Duplex Area 7.13 In the Optional Tray2 7.17 Tips for Avoiding Paper Jams 7.21...
User Manual (ENGLISH)
Page 64
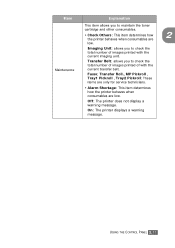
... Pickroll: These items are only for service technicians. • Alarm Shortage: This item determines how the printer behaves when consumables are low. Maintenance Transfer Belt: allows you to check the total number of with the current imaging unit. Item Explanation This item allows you to maintain the toner cartridge and other consumables. • Check Others...
... Pickroll: These items are only for service technicians. • Alarm Shortage: This item determines how the printer behaves when consumables are low. Maintenance Transfer Belt: allows you to check the total number of with the current imaging unit. Item Explanation This item allows you to maintain the toner cartridge and other consumables. • Check Others...
User Manual (ENGLISH)
Page 126
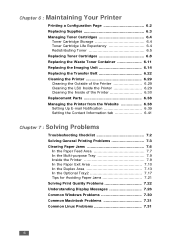
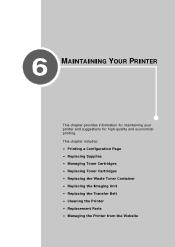
This chapter includes: • Printing a Configuration Page • Replacing Supplies • Managing Toner Cartridges • Replacing Toner Cartridges • Replacing the Waste Toner Container • Replacing the Imaging Unit • Replacing the Transfer Belt • Cleaning the Printer • Replacement Parts • Managing the Printer from the Website 6 MAINTAINING YOUR PRINTER This chapter provides information for maintaining your printer and suggestions for high-quality and economical printing.
This chapter includes: • Printing a Configuration Page • Replacing Supplies • Managing Toner Cartridges • Replacing Toner Cartridges • Replacing the Waste Toner Container • Replacing the Imaging Unit • Replacing the Transfer Belt • Cleaning the Printer • Replacement Parts • Managing the Printer from the Website 6 MAINTAINING YOUR PRINTER This chapter provides information for maintaining your printer and suggestions for high-quality and economical printing.

User Manual (ENGLISH)
Page 128
... for black and 3,000 pages for 6.11 color** 50,000 pages 6 Imaging Unit Replace Imaging Unit for black and 12,500 pages 6.14 for color** Transfer Belt Replace Transfer Belt 50,000 pages for black and 12,500 pages for color** 6.22 *Average A4-/letter-sized page count based on each page. MAINTAINING YOUR PRINTER 6.3 black printing. Replacing Supplies From time to...
... for black and 3,000 pages for 6.11 color** 50,000 pages 6 Imaging Unit Replace Imaging Unit for black and 12,500 pages 6.14 for color** Transfer Belt Replace Transfer Belt 50,000 pages for black and 12,500 pages for color** 6.22 *Average A4-/letter-sized page count based on each page. MAINTAINING YOUR PRINTER 6.3 black printing. Replacing Supplies From time to...
User Manual (ENGLISH)
Page 141
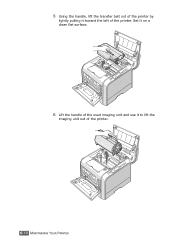
Set it on a clean flat surface. 6 Lift the handle of the used imaging unit and use it toward the left of the printer. 6.16 MAINTAINING YOUR PRINTER 5 Using the handle, lift the transfer belt out of the printer by lightly pulling it to lift the imaging unit out of the printer.
Set it on a clean flat surface. 6 Lift the handle of the used imaging unit and use it toward the left of the printer. 6.16 MAINTAINING YOUR PRINTER 5 Using the handle, lift the transfer belt out of the printer by lightly pulling it to lift the imaging unit out of the printer.
User Manual (ENGLISH)
Page 150
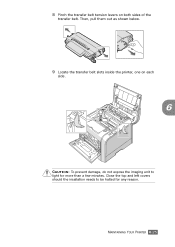
8 Pinch the transfer belt tension levers on each side. 6 CAUTION: To prevent damage, do not expose the imaging unit to be halted for more than a few minutes. MAINTAINING YOUR PRINTER 6.25 Then, pull them out as shown below. 9 Locate the transfer belt slots inside the printer, one on both sides of the transfer belt. Close the top and left covers should the insallation needs to light for any reason.
8 Pinch the transfer belt tension levers on each side. 6 CAUTION: To prevent damage, do not expose the imaging unit to be halted for more than a few minutes. MAINTAINING YOUR PRINTER 6.25 Then, pull them out as shown below. 9 Locate the transfer belt slots inside the printer, one on both sides of the transfer belt. Close the top and left covers should the insallation needs to light for any reason.
User Manual (ENGLISH)
Page 159
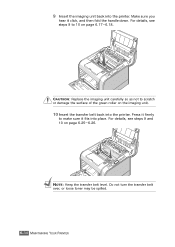
Press it firmly to make sure it click, and then fold the handle down. CAUTION: Replace the imaging unit carefully so as not to 10 on page 6.17~6.18. NOTE: Keep the transfer belt level. Do not turn the transfer belt over, or loose toner may be spilled. 6.34 MAINTAINING YOUR PRINTER For details, see steps 9 to scratch or damage the surface of the green roller on page 6.25~6.26. For details, see steps 9 and 10 on the imaging unit. 10 Insert the transfer belt back into the printer. 9 Insert the imaging unit back into place. Make sure you hear it fits into the printer.
Press it firmly to make sure it click, and then fold the handle down. CAUTION: Replace the imaging unit carefully so as not to 10 on page 6.17~6.18. NOTE: Keep the transfer belt level. Do not turn the transfer belt over, or loose toner may be spilled. 6.34 MAINTAINING YOUR PRINTER For details, see steps 9 to scratch or damage the surface of the green roller on page 6.25~6.26. For details, see steps 9 and 10 on the imaging unit. 10 Insert the transfer belt back into the printer. 9 Insert the imaging unit back into place. Make sure you hear it fits into the printer.
User Manual (ENGLISH)
Page 190
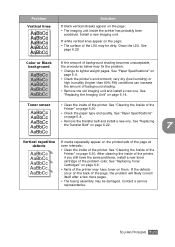
... . See "Paper Specifications" on page E.4. • Remove the transfer belt and install a new one . See "Replacing Toner Cartridges" on page 6.8. • Parts of the printer may be dirty. See "Paper Specifications" on page 6.14. After cleaning the inside the printer has probably been scratched. Install a new imaging unit. Color or Black background AaBbCc AaBbCc AaBbCc AaBbCc AaBbCc...
... . See "Paper Specifications" on page E.4. • Remove the transfer belt and install a new one . See "Replacing Toner Cartridges" on page 6.8. • Parts of the printer may be dirty. See "Paper Specifications" on page 6.14. After cleaning the inside the printer has probably been scratched. Install a new imaging unit. Color or Black background AaBbCc AaBbCc AaBbCc AaBbCc AaBbCc...
User Manual (ENGLISH)
Page 194
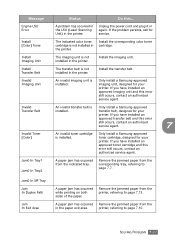
... both sides of the paper. printer, referring to page 7.7. Install Imaging Unit The imaging unit is not installed in the printer. Only install a Samsung-approved imaging unit, designed for your printer. transfer belt, designed for service. If you have installed an approved imaging unit and this ... Install Transfer Belt The transfer belt is not installed in the printer. Invalid Transfer Belt Invalid Toner [Color] An invalid transfer belt is not installed in the paper...
... both sides of the paper. printer, referring to page 7.7. Install Imaging Unit The imaging unit is not installed in the printer. Only install a Samsung-approved imaging unit, designed for your printer. transfer belt, designed for service. If you have installed an approved imaging unit and this ... Install Transfer Belt The transfer belt is not installed in the printer. Invalid Transfer Belt Invalid Toner [Color] An invalid transfer belt is not installed in the paper...
User Manual (ENGLISH)
Page 196
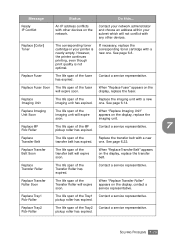
...printer is not optimal. When "Replace Fuser" appears on the display, replace the imaging unit. When "Replace Imaging Unit" appears on the display, replace the fuser. See page 6.22. Replace Transfer Roller The life span of the Tray1 Contact a service representative. Replace Tray1 Pick-Roller The life span of the Transfer Roller has expired. Replace [Color... has expired. Replace Imaging Unit The life span of the Transfer Roller will expire soon. Replace Transfer Belt Soon The life span of the imaging unit will expire soon. Replace Transfer Belt The life span of...
...printer is not optimal. When "Replace Fuser" appears on the display, replace the imaging unit. When "Replace Imaging Unit" appears on the display, replace the fuser. See page 6.22. Replace Transfer Roller The life span of the Tray1 Contact a service representative. Replace Tray1 Pick-Roller The life span of the Transfer Roller has expired. Replace [Color... has expired. Replace Imaging Unit The life span of the Transfer Roller will expire soon. Replace Transfer Belt Soon The life span of the imaging unit will expire soon. Replace Transfer Belt The life span of...
User Manual (ENGLISH)
Page 253
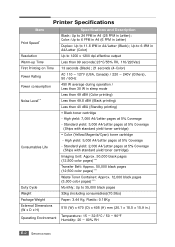
... with standard yield toner cartridge) Imaging Unit: Approx. 50,000 black pages (12,500 color pages)*** Transfer Belt: Approx. 50,000 black pages (12,500 color pages)*** Waste Toner Container: Approx. 12,000 black pages (3,000 color pages)*** Monthly: Up to 35...,000 black pages 32kg (including consumables)(70.5lbs) Paper: 3.44 Kg, Plastic: 0.18Kg 510 (W) x 470 (D) x 405 (H) mm (20.1 x 18.5 x 15.9 in A4/Letter (Black); Printer...
... with standard yield toner cartridge) Imaging Unit: Approx. 50,000 black pages (12,500 color pages)*** Transfer Belt: Approx. 50,000 black pages (12,500 color pages)*** Waste Toner Container: Approx. 12,000 black pages (3,000 color pages)*** Monthly: Up to 35...,000 black pages 32kg (including consumables)(70.5lbs) Paper: 3.44 Kg, Plastic: 0.18Kg 510 (W) x 470 (D) x 405 (H) mm (20.1 x 18.5 x 15.9 in A4/Letter (Black); Printer...
User Manual (ENGLISH)
Page 264
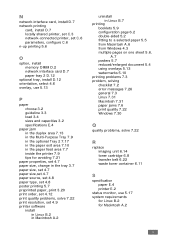
... set 4.8 poster printing 5.7 preprinted paper, print 3.20 print order, set 4.12 print quality problems, solve 7.22 print resolution, set 4.9 printer software install in Linux B.2 in Macintosh A.2 uninstall in Linux B.7 printing booklets 5.9 configuration page 6.2 double-sided 5.2 fitting to a selected paper... paper jams 7.6 print quality 7.22 Windows 7.30 Q quality problems, solve 7.22 R replace imaging unit 6.14 toner cartridge 6.8 transfer belt 6.22 waste toner container 6.11 S specification paper E.4 printer E.2 status monitor, use 5.17 system requirements for Linux B.2 for Macintosh A.2 ii
... set 4.8 poster printing 5.7 preprinted paper, print 3.20 print order, set 4.12 print quality problems, solve 7.22 print resolution, set 4.9 printer software install in Linux B.2 in Macintosh A.2 uninstall in Linux B.7 printing booklets 5.9 configuration page 6.2 double-sided 5.2 fitting to a selected paper... paper jams 7.6 print quality 7.22 Windows 7.30 Q quality problems, solve 7.22 R replace imaging unit 6.14 toner cartridge 6.8 transfer belt 6.22 waste toner container 6.11 S specification paper E.4 printer E.2 status monitor, use 5.17 system requirements for Linux B.2 for Macintosh A.2 ii


