

User Guide
Page 3
If you prefer, you can chat online, send us an e-mail, or call for : ■■ answers to questions ■■ software upgrades ■■ and more! Go to provide high-quality pictures and documents. EN i Resources Support is available! SAMSUNG CJX-1000 All-in-One Printer Your SAMSUNG All-in-One Printer combines ease-of-use and affordable inks to www.samsung.com/printer. Go to www.samsung.com/printer for technical support.
If you prefer, you can chat online, send us an e-mail, or call for : ■■ answers to questions ■■ software upgrades ■■ and more! Go to provide high-quality pictures and documents. EN i Resources Support is available! SAMSUNG CJX-1000 All-in-One Printer Your SAMSUNG All-in-One Printer combines ease-of-use and affordable inks to www.samsung.com/printer. Go to www.samsung.com/printer for technical support.

User Guide
Page 6
ENGLISH Contents 1 Printer Overview 1 Components 1 Control panel 4 Print Manager Software 6 Configuring printer settings 6 Paper...7 Paper types...8 Paper sizes...8 Loading paper...9 2 Basic Functions 13 Printing 13 Printing documents 13 Printing pictures 16 Copying 27 Copying a document 27 Copying a photograph 32 Scanning 38 Before you begin scanning 38 Scanning from the computer 43 Scanning from the control panel 45 Ordering supplies 47 iv EN
ENGLISH Contents 1 Printer Overview 1 Components 1 Control panel 4 Print Manager Software 6 Configuring printer settings 6 Paper...7 Paper types...8 Paper sizes...8 Loading paper...9 2 Basic Functions 13 Printing 13 Printing documents 13 Printing pictures 16 Copying 27 Copying a document 27 Copying a photograph 32 Scanning 38 Before you begin scanning 38 Scanning from the computer 43 Scanning from the control panel 45 Ordering supplies 47 iv EN

User Guide
Page 7
ENGLISH Contents 3 Maintaining Your Printer 49 General care and cleaning 50 Cleaning the scanner glass and document backing 50 Replacing ink cartridges 53 Updating the software and printer firmware 58 Updating if your printer is connected to a computer with WINDOWS OS 58 Updating if your printer is connected to a computer with MAC OS 60 Monitoring and adjusting printer performance 61 Checking ink levels 61 Resetting factory defaults 61 Replacing the printhead 62 4 Troubleshooting 69 Basic troubleshooting 69 Power light 72 EN v
ENGLISH Contents 3 Maintaining Your Printer 49 General care and cleaning 50 Cleaning the scanner glass and document backing 50 Replacing ink cartridges 53 Updating the software and printer firmware 58 Updating if your printer is connected to a computer with WINDOWS OS 58 Updating if your printer is connected to a computer with MAC OS 60 Monitoring and adjusting printer performance 61 Checking ink levels 61 Resetting factory defaults 61 Replacing the printhead 62 4 Troubleshooting 69 Basic troubleshooting 69 Power light 72 EN v

User Guide
Page 8
ENGLISH Contents 5 Product and Safety Specifications 73 Specifications and features 73 Print performance 73 Photo printing features 73 Copy document features 74 Copy photo features 75 Scanning features 76 Paper input tray features 76 Ink cartridges...77 Connectivity...79 Software support 79 Physical specifications 80 System requirements 81 Computer with WINDOWS OS 81 Computer with MAC OS 81 Paper types supported 82 Paper sizes supported 83 vi EN
ENGLISH Contents 5 Product and Safety Specifications 73 Specifications and features 73 Print performance 73 Photo printing features 73 Copy document features 74 Copy photo features 75 Scanning features 76 Paper input tray features 76 Ink cartridges...77 Connectivity...79 Software support 79 Physical specifications 80 System requirements 81 Computer with WINDOWS OS 81 Computer with MAC OS 81 Paper types supported 82 Paper sizes supported 83 vi EN

User Guide
Page 11
Components 1 2 3 4 6 1 Left paper-edge guide 2 Paper guard 3 Paper input tray 5 4 Right paper-edge guide 5 Paper output tray 6 Output tray extender EN 1 1 Printer Overview This printer lets you print, copy, and scan pictures and documents.
Components 1 2 3 4 6 1 Left paper-edge guide 2 Paper guard 3 Paper input tray 5 4 Right paper-edge guide 5 Paper output tray 6 Output tray extender EN 1 1 Printer Overview This printer lets you print, copy, and scan pictures and documents.

User Guide
Page 15
Printer Overview Feature 1 LCD 2 Cancel button 3 Menu button 4 Navigation buttons 5 Start button 6 OK button 7 Back button 8 Power button Description Displays pictures, messages, and menus Stops the current operation and returns to the menu Displays the main menu Used to navigate menus, scroll through pictures Begins copying, scanning, printing, maintenance tasks, and file transfer Selects a menu item or allows you to continue with the current operation Displays the higher level screen in the menu structure Turns the printer on or off EN 5
Printer Overview Feature 1 LCD 2 Cancel button 3 Menu button 4 Navigation buttons 5 Start button 6 OK button 7 Back button 8 Power button Description Displays pictures, messages, and menus Stops the current operation and returns to the menu Displays the main menu Used to navigate menus, scroll through pictures Begins copying, scanning, printing, maintenance tasks, and file transfer Selects a menu item or allows you to continue with the current operation Displays the higher level screen in the menu structure Turns the printer on or off EN 5

User Guide
Page 16
... Printer Settings menu. ■■ Time to browse and edit pictures, print, copy, scan, order supplies, and configure your all-in -One Printer Software unless you chose otherwise during installation. The Print Manager icon will enter a low power (sleep) mode after being idle for a default delay time of the following settings: ■■ Date and Time -- On a computer with your desktop. On a computer with MAC OS, you are done making changes. -- You can use Print...
... Printer Settings menu. ■■ Time to browse and edit pictures, print, copy, scan, order supplies, and configure your all-in -One Printer Software unless you chose otherwise during installation. The Print Manager icon will enter a low power (sleep) mode after being idle for a default delay time of the following settings: ■■ Date and Time -- On a computer with your desktop. On a computer with MAC OS, you are done making changes. -- You can use Print...

User Guide
Page 17
... 7 Press to view the Firmware Version number; Press OK, press to the Main Menu. Printer Overview power (in 0.5 hour increments). ■■ Tagged Images Printing (see Resetting factory defaults, page 61) NOTE: Resetting factory defaults does not change the time to energy-saving sleep mode (select from 1 to 4 hours in 0.5 hour increments) up to 4 hours. press OK when you are optimized to work with the COLORLOK Technology logo on...
... 7 Press to view the Firmware Version number; Press OK, press to the Main Menu. Printer Overview power (in 0.5 hour increments). ■■ Tagged Images Printing (see Resetting factory defaults, page 61) NOTE: Resetting factory defaults does not change the time to energy-saving sleep mode (select from 1 to 4 hours in 0.5 hour increments) up to 4 hours. press OK when you are optimized to work with the COLORLOK Technology logo on...
User Guide
Page 24
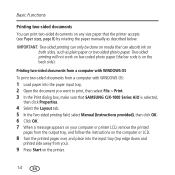
...-sided documents You can print two-sided documents on the back side). Printing two-sided documents from a computer with WINDOWS OS To print two-sided documents from you want to print, then select File > Print. 3 In the Print dialog box, make sure that can only be done on media that SAMSUNG CJX-1000 Series AiO is on any size paper that the printer accepts (see Paper sizes, page 8) by rotating the paper manually as plain paper or two-sided photo paper. IMPORTANT: Two-sided printing can absorb ink...
...-sided documents You can print two-sided documents on the back side). Printing two-sided documents from a computer with WINDOWS OS To print two-sided documents from you want to print, then select File > Print. 3 In the Print dialog box, make sure that can only be done on media that SAMSUNG CJX-1000 Series AiO is on any size paper that the printer accepts (see Paper sizes, page 8) by rotating the paper manually as plain paper or two-sided photo paper. IMPORTANT: Two-sided printing can absorb ink...
User Guide
Page 33
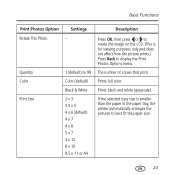
Prints black and white (grayscale). Basic Functions Print Photos Option Rotate This Photo Quantity Color Print Size Settings -- 1 (default) to 99 Color (default) Black & White 2 x 3 3.5 x 5 4 x 6 (default) 4 x 7 4 x 8 5 x 7 4 x 12 8 x 10 8.5 x 11 or A4 Description Press OK, then press or to rotate the image on the LCD. (This is smaller than the paper in the paper tray, the printer automatically arranges the pictures to display the Print Photos Options menu. If the selected copy size is for viewing purposes...
Prints black and white (grayscale). Basic Functions Print Photos Option Rotate This Photo Quantity Color Print Size Settings -- 1 (default) to 99 Color (default) Black & White 2 x 3 3.5 x 5 4 x 6 (default) 4 x 7 4 x 8 5 x 7 4 x 12 8 x 10 8.5 x 11 or A4 Description Press OK, then press or to rotate the image on the LCD. (This is smaller than the paper in the paper tray, the printer automatically arranges the pictures to display the Print Photos Options menu. If the selected copy size is for viewing purposes...
User Guide
Page 34
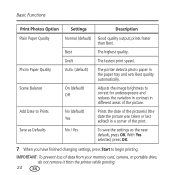
Basic Functions Print Photos Option Settings Description Plain Paper Quality Normal (default) Good quality output; Photo Paper Quality Auto. (default) The printer detects photo paper in different areas of data from your memory card, camera, or portable drive, do not remove it from the printer while printing. 24 EN Scene Balance On (default) Off Adjusts the image brightness to Prints No (default) Yes Prints the date of the picture(s) (the date the picture was taken or last...
Basic Functions Print Photos Option Settings Description Plain Paper Quality Normal (default) Good quality output; Photo Paper Quality Auto. (default) The printer detects photo paper in different areas of data from your memory card, camera, or portable drive, do not remove it from the printer while printing. 24 EN Scene Balance On (default) Off Adjusts the image brightness to Prints No (default) Yes Prints the date of the picture(s) (the date the picture was taken or last...
User Guide
Page 37
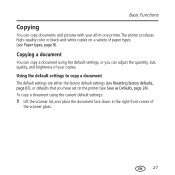
... adjust the quantity, size, quality, and brightness of your all-in the right-front corner of paper types (see Paper types, page 8). The printer produces high-quality color or black-and-white copies on the printer (see Resetting factory defaults, page 61), or defaults that you can copy documents and pictures with your copies. Using the default settings to copy a document The default settings are either the factory default settings (see Save as Defaults, page 24). Copying a document You can copy a document using the current default settings: 1 Lift the scanner...
... adjust the quantity, size, quality, and brightness of your all-in the right-front corner of paper types (see Paper types, page 8). The printer produces high-quality color or black-and-white copies on the printer (see Resetting factory defaults, page 61), or defaults that you can copy documents and pictures with your copies. Using the default settings to copy a document The default settings are either the factory default settings (see Save as Defaults, page 24). Copying a document You can copy a document using the current default settings: 1 Lift the scanner...

User Guide
Page 48
Basic Functions Scanning Scanning digitizes documents and pictures, and sends the digital files to scan: From the control panel on the printer, or from a software program on the computer. When you scan, the digital file can: ■■ Open in Print Manager Software (when connected to a computer using a USB cable. Before you more options. If you plan to scan directly from the printer control panel, change the scan settings as Print Manager Software) is connected to a computer with WINDOWS OS) ■■...
Basic Functions Scanning Scanning digitizes documents and pictures, and sends the digital files to scan: From the control panel on the printer, or from a software program on the computer. When you scan, the digital file can: ■■ Open in Print Manager Software (when connected to a computer using a USB cable. Before you more options. If you plan to scan directly from the printer control panel, change the scan settings as Print Manager Software) is connected to a computer with WINDOWS OS) ■■...

User Guide
Page 52
... bottom right of the Printer Scan Settings window. 5 Close the Printer Tools window. 42 EN On a computer with WINDOWS OS, see the Print Manager Software Help (? icon) for File Name and Location Automatically Save - specify: ■■Base name; Basic Functions Setting File Save Options Prompt for instructions. 4 When you will be able to preview it in Print Manager Software, crop and sharpen the image, and adjust color, if desired.
... bottom right of the Printer Scan Settings window. 5 Close the Printer Tools window. 42 EN On a computer with WINDOWS OS, see the Print Manager Software Help (? icon) for File Name and Location Automatically Save - specify: ■■Base name; Basic Functions Setting File Save Options Prompt for instructions. 4 When you will be able to preview it in Print Manager Software, crop and sharpen the image, and adjust color, if desired.

User Guide
Page 59
... Keep the printhead and ink cartridges in .) For optimal performance, keep the printer connected to a computer that is powered on and has the SAMSUNG Print Manager Software installed, or keep the printer plugged into an AC power outlet. In the US, go to the Electronics Industry Alliance at all times to help prevent damage to the printhead. 3 Maintaining Your Printer Your printer requires little maintenance. If you use a power strip, don't turn off the power...
... Keep the printhead and ink cartridges in .) For optimal performance, keep the printer connected to a computer that is powered on and has the SAMSUNG Print Manager Software installed, or keep the printer plugged into an AC power outlet. In the US, go to the Electronics Industry Alliance at all times to help prevent damage to the printhead. 3 Maintaining Your Printer Your printer requires little maintenance. If you use a power strip, don't turn off the power...
User Guide
Page 63
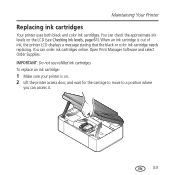
... of ink, the printer LCD displays a message stating that the black or color ink cartridge needs replacing. Open Print Manager Software and select Order Supplies. IMPORTANT: Do not use refilled ink cartridges. You can check the approximate ink levels on . 2 Lift the printer access door, and wait for the carriage to move to a position where you can order ink cartridges online. When an ink cartridge is on the LCD (see Checking ink levels, page 61). Maintaining Your Printer Replacing ink cartridges Your printer uses both black and color ink cartridges.
... of ink, the printer LCD displays a message stating that the black or color ink cartridge needs replacing. Open Print Manager Software and select Order Supplies. IMPORTANT: Do not use refilled ink cartridges. You can check the approximate ink levels on . 2 Lift the printer access door, and wait for the carriage to move to a position where you can order ink cartridges online. When an ink cartridge is on the LCD (see Checking ink levels, page 61). Maintaining Your Printer Replacing ink cartridges Your printer uses both black and color ink cartridges.
User Guide
Page 71
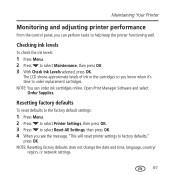
... the cartridges so you see the message, "This will reset printer settings to order replacement cartridges. Maintaining Your Printer Monitoring and adjusting printer performance From the control panel, you can order ink cartridges online. NOTE: You can perform tasks to select Maintenance, then press OK. 3 With Check Ink Levels selected, press OK. Checking ink levels To check the ink levels: 1 Press Menu. 2 Press to help keep the printer functioning well. NOTE: Resetting factory defaults does not change the date and time, language, country/ region, or network settings.
... the cartridges so you see the message, "This will reset printer settings to order replacement cartridges. Maintaining Your Printer Monitoring and adjusting printer performance From the control panel, you can order ink cartridges online. NOTE: You can perform tasks to select Maintenance, then press OK. 3 With Check Ink Levels selected, press OK. Checking ink levels To check the ink levels: 1 Press Menu. 2 Press to help keep the printer functioning well. NOTE: Resetting factory defaults does not change the date and time, language, country/ region, or network settings.

User Guide
Page 80
... jam Print quality Possible Solutions ■■Open the printer access door and clear any obstructions. ■■Check that the printhead and ink cartridges are installed correctly. (The printhead and ink cartridges are installed correctly when you hear them click into place.) ■■For best results, use KODAK Paper or a paper with the COLORLOK Technology logo on the package. ■■Make sure the paper is loaded correctly. See Loading paper, page...
... jam Print quality Possible Solutions ■■Open the printer access door and clear any obstructions. ■■Check that the printhead and ink cartridges are installed correctly. (The printhead and ink cartridges are installed correctly when you hear them click into place.) ■■For best results, use KODAK Paper or a paper with the COLORLOK Technology logo on the package. ■■Make sure the paper is loaded correctly. See Loading paper, page...

User Guide
Page 81
... access the paper from the front, gently pull the jammed paper up from the paper input tray. Make sure the cartridges click into place. ■■Open the printer access door and gently remove any paper from inside the printer. ■■Make sure the paper in the tray is free of tears or creases. ■■Make sure you do EN 71 Problem Ink cartridge errors Paper jam Error codes/ messages Troubleshooting Possible Solutions ■■Check that Ink Cartridge(s) are installed...
... access the paper from the front, gently pull the jammed paper up from the paper input tray. Make sure the cartridges click into place. ■■Open the printer access door and gently remove any paper from inside the printer. ■■Make sure the paper in the tray is free of tears or creases. ■■Make sure you do EN 71 Problem Ink cartridge errors Paper jam Error codes/ messages Troubleshooting Possible Solutions ■■Check that Ink Cartridge(s) are installed...

User Guide
Page 89
... Specifications Connectivity Protocols supported USB 2.0 High Speed; DPOF Devices supported WINDOWS OS-based and MACINTOSH Computers, memory cards (SD, MS/Duo, MMC, SDHC) Image Formats supported Image printing supports JPEG (EXIF v2.2); does not support progressive JPEG format Number of USB ports One rear device port (high speed) Protocols supported USB 2.0 High Speed (for documents Media support Plain paper, photo paper, envelopes, greeting cards, and labels Scanner support TWAIN and WIA, WIA2 (VISTA OS and WINDOWS 7), ICA (MAC OS), including segmentation scanning Update support Software...
... Specifications Connectivity Protocols supported USB 2.0 High Speed; DPOF Devices supported WINDOWS OS-based and MACINTOSH Computers, memory cards (SD, MS/Duo, MMC, SDHC) Image Formats supported Image printing supports JPEG (EXIF v2.2); does not support progressive JPEG format Number of USB ports One rear device port (high speed) Protocols supported USB 2.0 High Speed (for documents Media support Plain paper, photo paper, envelopes, greeting cards, and labels Scanner support TWAIN and WIA, WIA2 (VISTA OS and WINDOWS 7), ICA (MAC OS), including segmentation scanning Update support Software...


