
User Manual
Page 6
contents using basic functions 23 Turn your phone on and off 23 Use the touch screen 24 Access menus 25 Switch applications 26 Use widgets 26 Access help information 27 Use shortcuts in Quick access mode ........ 28 Customise your phone 28 Use basic ...44 Use advanced phonebook functions ......... 47 Use advanced messaging functions .......... 48 Use advanced camera functions 50 Use advanced music functions 53 using tools and applications 57 Use the Bluetooth wireless feature 57 Activate and connect to a wireless LAN (WLAN 59 Activate and send an SOS message ......... 61 Activate...
contents using basic functions 23 Turn your phone on and off 23 Use the touch screen 24 Access menus 25 Switch applications 26 Use widgets 26 Access help information 27 Use shortcuts in Quick access mode ........ 28 Customise your phone 28 Use basic ...44 Use advanced phonebook functions ......... 47 Use advanced messaging functions .......... 48 Use advanced camera functions 50 Use advanced music functions 53 using tools and applications 57 Use the Bluetooth wireless feature 57 Activate and connect to a wireless LAN (WLAN 59 Activate and send an SOS message ......... 61 Activate...

User Manual
Page 7
contents Upload photos and videos to the web ....... 67 Use Java-powered games and applications 68 Synchronise data 69 Use RSS feeds 71 View your current position 72 Update the GPS functionality 72 Create and view world clocks 72 Set and use alarms 73 Use the calculator 74 Convert currencies or measurements ........ 74 Set a countdown timer 75 Use the stopwatch 75 Create new tasks 75 Create new memos 75 Manage your calendar 76 troubleshooting a index d vi
contents Upload photos and videos to the web ....... 67 Use Java-powered games and applications 68 Synchronise data 69 Use RSS feeds 71 View your current position 72 Update the GPS functionality 72 Create and view world clocks 72 Set and use alarms 73 Use the calculator 74 Convert currencies or measurements ........ 74 Set a countdown timer 75 Use the stopwatch 75 Create new tasks 75 Create new memos 75 Manage your calendar 76 troubleshooting a index d vi

User Manual
Page 15
... base station. safety and usage information During testing, the maximum SAR recorded for this product (Waste Electrical & Electronic Equipment) (Applicable in the European Union and other European countries with separate collection systems) This marking on the product, accessories or literature indicates that... the product and its electronic accessories (e.g. For more information about the SAR and related EU standards, visit the Samsung mobile phone website. The Declaration of Conformity at the back of this manual demonstrates your overall exposure to be disposed of ...
... base station. safety and usage information During testing, the maximum SAR recorded for this product (Waste Electrical & Electronic Equipment) (Applicable in the European Union and other European countries with separate collection systems) This marking on the product, accessories or literature indicates that... the product and its electronic accessories (e.g. For more information about the SAR and related EU standards, visit the Samsung mobile phone website. The Declaration of Conformity at the back of this manual demonstrates your overall exposure to be disposed of ...

User Manual
Page 16
Correct disposal of batteries in this product (Applicable in EC Directive 2006/66. Where marked, the chemical symbols Hg, Cd or Pb indicate that the batteries in this product should not be mixed ...
Correct disposal of batteries in this product (Applicable in EC Directive 2006/66. Where marked, the chemical symbols Hg, Cd or Pb indicate that the batteries in this product should not be mixed ...

User Manual
Page 17
... GUARANTEE THE ACCURACY, VALIDITY, TIMELINESS, LEGALITY, OR COMPLETENESS OF ANY CONTENT OR SERVICE MADE AVAILABLE THROUGH THIS DEVICE AND UNDER NO CIRCUMSTANCES, INCLUDING NEGLIGENCE, SHALL SAMSUNG BE LIABLE, WHETHER IN CONTRACT OR TORT, FOR ANY DIRECT, INDIRECT, INCIDENTAL, SPECIAL OR CONSEQUENTIAL DAMAGES, ATTORNEY FEES, EXPENSES, OR ANY OTHER DAMAGES ARISING ...content or services in any manner or medium any content or services displayed through this device. Without limiting the foregoing, unless expressly authorised by the applicable content owner or service provider, you may not use .
... GUARANTEE THE ACCURACY, VALIDITY, TIMELINESS, LEGALITY, OR COMPLETENESS OF ANY CONTENT OR SERVICE MADE AVAILABLE THROUGH THIS DEVICE AND UNDER NO CIRCUMSTANCES, INCLUDING NEGLIGENCE, SHALL SAMSUNG BE LIABLE, WHETHER IN CONTRACT OR TORT, FOR ANY DIRECT, INDIRECT, INCIDENTAL, SPECIAL OR CONSEQUENTIAL DAMAGES, ATTORNEY FEES, EXPENSES, OR ANY OTHER DAMAGES ARISING ...content or services in any manner or medium any content or services displayed through this device. Without limiting the foregoing, unless expressly authorised by the applicable content owner or service provider, you may not use .

User Manual
Page 21
... phone Keys Key Dial Menu Power/ Menu exit Function Make or answer a call ; Unlock the touch screen and keys (press and hold ); Shows all active applications (press and hold) Turn the phone on and off (press and hold ) In Idle mode, turn on the camera; Return to Idle mode Volume Adjust...
... phone Keys Key Dial Menu Power/ Menu exit Function Make or answer a call ; Unlock the touch screen and keys (press and hold ); Shows all active applications (press and hold) Turn the phone on and off (press and hold ) In Idle mode, turn on the camera; Return to Idle mode Volume Adjust...

User Manual
Page 31
Use the touch screen Your phone's touch screen lets you easily select items or perform functions. Learn basic actions to scroll through vertical lists. • Drag your finger up or down to scroll through horizontal lists. For the optimal use of the touch screen, remove the screen protection film before using basic functions 24 using your phone. • Touch an icon to open a menu or launch an application. • Drag your finger left or right to use the touch screen.
Use the touch screen Your phone's touch screen lets you easily select items or perform functions. Learn basic actions to scroll through vertical lists. • Drag your finger up or down to scroll through horizontal lists. For the optimal use of the touch screen, remove the screen protection film before using basic functions 24 using your phone. • Touch an icon to open a menu or launch an application. • Drag your finger left or right to use the touch screen.

User Manual
Page 32
... mode. Select Reset to restore the default order of the screen. • To rearrange applications, select and drag an application icon to a Menu mode screen. 3. You can organise applications in the text input field at the top of applications. 25 Select Save. In Menu mode, scroll left or right to the location you want...
... mode. Select Reset to restore the default order of the screen. • To rearrange applications, select and drag an application icon to a Menu mode screen. 3. You can organise applications in the text input field at the top of applications. 25 Select Save. In Menu mode, scroll left or right to the location you want...

User Manual
Page 33
...Learn to use widgets on your widgets connect to web services. Switch from one active application to an application and select . Scroll to an application and select it. To close the current application, press [ ]. Selecting a web-based widget may incur additional charges. •...depending on the widget toolbar. • Some of applications. 2. To change the view mode, select Grid view. Close applications To close an application that is running multiple applications at the same time. using basic functions Switch applications Your phone allows you to multi-task by running ...
...Learn to use widgets on your widgets connect to web services. Switch from one active application to an application and select . Scroll to an application and select it. To close the current application, press [ ]. Selecting a web-based widget may incur additional charges. •...depending on the widget toolbar. • Some of applications. 2. To change the view mode, select Grid view. Close applications To close an application that is running multiple applications at the same time. using basic functions Switch applications Your phone allows you to multi-task by running ...

User Manual
Page 34
... landscape view. 4. Move the widgets to the widget toolbar and select Save. Open the widget toolbar. 3. To move them to access helpful information about an application or feature. 5. Select the widgets you want to include to the idle screen 1. Open the widget toolbar. 2. Drag a widget from the widget toolbar to the...
... landscape view. 4. Move the widgets to the widget toolbar and select Save. Open the widget toolbar. 3. To move them to access helpful information about an application or feature. 5. Select the widgets you want to include to the idle screen 1. Open the widget toolbar. 2. Drag a widget from the widget toolbar to the...
User Manual
Page 38
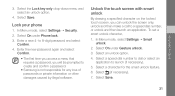
...screen only, unlock and then make a call to create and confirm a password. • Samsung is not responsible for the smart unlock feature. 6. Select a speed dial number to dial or select an application to 8-digit password and select Confirm. 4. Select Save. 31 Select the Lock key only drop...drawing a specified character on the locked touch screen, you will be prompted to a speed dial number, or unlock and then launch an application. In Menu mode, select Settings → Security. 2. To set a smart unlock character, 1. Select On under Gesture unlock. 3. using basic functions ...
...screen only, unlock and then make a call to create and confirm a password. • Samsung is not responsible for the smart unlock feature. 6. Select a speed dial number to dial or select an application to 8-digit password and select Confirm. 4. Select Save. 31 Select the Lock key only drop...drawing a specified character on the locked touch screen, you will be prompted to a speed dial number, or unlock and then launch an application. In Menu mode, select Settings → Security. 2. To set a smart unlock character, 1. Select On under Gesture unlock. 3. using basic functions ...

User Manual
Page 43
... depending on your service provider. View an email 1. The memory location to memory. 36 To change the memory location, in Menu mode, select Settings → Application settings → Phonebook → Memory in use → Save new contacts to Phonebook → New. 3. Select → Add to → a memory location. Add and find...
... depending on your service provider. View an email 1. The memory location to memory. 36 To change the memory location, in Menu mode, select Settings → Application settings → Phonebook → Memory in use → Save new contacts to Phonebook → New. 3. Select → Add to → a memory location. Add and find...

User Manual
Page 53
The caller will hear a busy tone. In Menu mode, select Settings → Application settings → Call → All calls → Auto reject. 2. Select On under Activation. 3. Select the number input field. 5. Enter a number to add more parties (if ...
The caller will hear a busy tone. In Menu mode, select Settings → Application settings → Call → All calls → Auto reject. 2. Select On under Activation. 3. Select the number input field. 5. Enter a number to add more parties (if ...

User Manual
Page 64
... how to work with your phone is visible. 4. If you selected Custom, set duration that your mobile phone's tools and additional applications. Select Save. 57 Select the circle in the centre to locate your phone, select More → Settings → On under My phone's visibility → a visibility ...
... how to work with your phone is visible. 4. If you selected Custom, set duration that your mobile phone's tools and additional applications. Select Save. 57 Select the circle in the centre to locate your phone, select More → Settings → On under My phone's visibility → a visibility ...

User Manual
Page 65
Select and drag a device icon into the centre. 3. When the owner of your phone's applications that you want to enter a PIN depending on the device. Send data using the Bluetooth wireless feature 1. Enter the PIN for the Bluetooth wireless feature ... Yes to confirm that you are willing to receive data from the device (if necessary). 58 You may not need to send. 2. using tools and applications Find and pair with other device enters the same PIN or accepts the connection, pairing is complete.
Select and drag a device icon into the centre. 3. When the owner of your phone's applications that you want to enter a PIN depending on the device. Send data using the Bluetooth wireless feature 1. Enter the PIN for the Bluetooth wireless feature ... Yes to confirm that you are willing to receive data from the device (if necessary). 58 You may not need to send. 2. using tools and applications Find and pair with other device enters the same PIN or accepts the connection, pairing is complete.

User Manual
Page 66
... France. Select the circle in the background will consume battery power. To preserve battery power, activate the WLAN only when needed. 59 using tools and applications Use Remote SIM mode In Remote SIM mode, you can be operated in the EU without restriction indoors, but cannot be operated outdoors in all...
... France. Select the circle in the background will consume battery power. To preserve battery power, activate the WLAN only when needed. 59 using tools and applications Use Remote SIM mode In Remote SIM mode, you can be operated in the EU without restriction indoors, but cannot be operated outdoors in all...

User Manual
Page 67
... Menu mode, select Wi-Fi → Search. 2. In Menu mode, select Internet or Communities, or in Idle mode, select a web-based widget. 4. using tools and applications Search for and connect to the network using a WPS (Wi-Fi Protected Setup) access point, 1. Select a network icon → Add and add a connection profile. •...
... Menu mode, select Wi-Fi → Search. 2. In Menu mode, select Internet or Communities, or in Idle mode, select a web-based widget. 4. using tools and applications Search for and connect to the network using a WPS (Wi-Fi Protected Setup) access point, 1. Select a network icon → Add and add a connection profile. •...

User Manual
Page 68
... on your contact list. 5. Select the recipient field to open your region or service provider. 1. When you press and hold [ ] or press [ ]. using tools and applications Activate and send an SOS message In case of times to repeat the SOS message. 9. In Menu mode, select Messages → SOS messages → Sending...
... on your contact list. 5. Select the recipient field to open your region or service provider. 1. When you press and hold [ ] or press [ ]. using tools and applications Activate and send an SOS message In case of times to repeat the SOS message. 9. In Menu mode, select Messages → SOS messages → Sending...

User Manual
Page 69
... back a recorded voice. When you are finished selecting contacts, select Save to open the recipient list. 5. Select Save → Accept. using tools and applications Activate the mobile tracker When someone inserts a new SIM or USIM card in your phone, the mobile tracker feature will automatically send the contact number... and select Add. 7. Select the sender input field. 10. Enter the sender's name and select Done. 11. In Menu mode, select Settings → Application settings → Call → Fake call when you locate and recover your password and select Confirm. 3.
... back a recorded voice. When you are finished selecting contacts, select Save to open the recipient list. 5. Select Save → Accept. using tools and applications Activate the mobile tracker When someone inserts a new SIM or USIM card in your phone, the mobile tracker feature will automatically send the contact number... and select Add. 7. Select the sender input field. 10. Enter the sender's name and select Done. 11. In Menu mode, select Settings → Application settings → Call → Fake call when you locate and recover your password and select Confirm. 3.

User Manual
Page 70
... Change the time delay before fake calls 1. In Menu mode, select Voice recorder. 2. Speak your phone's voice recorder. using tools and applications Record a voice 1. Select Voice recording. 4. Select to operate your memo into the microphone. 6. Select an option → Save. Play...the fake call timer. 2. When you are finished speaking, select . Your memo is saved automatically. In Menu mode, select Settings → Application settings → Call → Fake call → Fake call voice. 3. Speak into the microphone. 4. When you are finished speaking, ...
... Change the time delay before fake calls 1. In Menu mode, select Voice recorder. 2. Speak your phone's voice recorder. using tools and applications Record a voice 1. Select Voice recording. 4. Select to operate your memo into the microphone. 6. Select an option → Save. Play...the fake call timer. 2. When you are finished speaking, select . Your memo is saved automatically. In Menu mode, select Settings → Application settings → Call → Fake call → Fake call voice. 3. Speak into the microphone. 4. When you are finished speaking, ...


