User Manual (ENGLISH)
Page 6
... explosion or fire. Adjusts the resolution and frequency to the level appropriate for the model. • An inappropriate resolution may cause a malfunction, electric shock or fire. • If a foreign substance enters the monitor, unplug the power cord and contact the Service Center. Do not place water containers...for an extended period of time, residual image or blurriness may result in damage to the cable. Do not cover the vents on the monitor. • This may cause undesirable picture quality. Never insert anything metallic into the vent, headphone port or AV ports or etc. &#...
... explosion or fire. Adjusts the resolution and frequency to the level appropriate for the model. • An inappropriate resolution may cause a malfunction, electric shock or fire. • If a foreign substance enters the monitor, unplug the power cord and contact the Service Center. Do not place water containers...for an extended period of time, residual image or blurriness may result in damage to the cable. Do not cover the vents on the monitor. • This may cause undesirable picture quality. Never insert anything metallic into the vent, headphone port or AV ports or etc. &#...
User Manual (ENGLISH)
Page 17
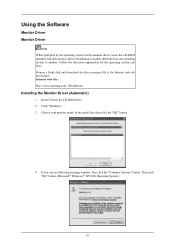
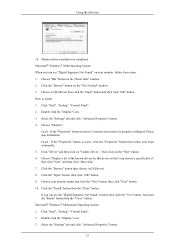
... CD-ROM drive. 2. Click "Windows". 3. Follow the directions appropriate for the monitor driver, insert the CD-ROM included with this monitor. Choose your monitor model in the model list, then click the "OK" button. 4. Internet web site : http://www.samsung.com/ (Worldwide) Installing the Monitor Driver (Automatic) 1. Driver installation is slightly different from one operating system to...
... CD-ROM drive. 2. Click "Windows". 3. Follow the directions appropriate for the monitor driver, insert the CD-ROM included with this monitor. Choose your monitor model in the model list, then click the "OK" button. 4. Internet web site : http://www.samsung.com/ (Worldwide) Installing the Monitor Driver (Automatic) 1. Driver installation is slightly different from one operating system to...

User Manual (ENGLISH)
Page 20
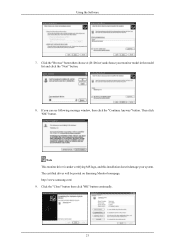
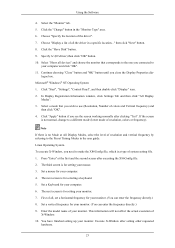
Click "Close" → "Close" → "OK" → "OK" on the screen, and click "Next". 10. Select the model that matches your monitor from the list of monitor models on the following screens displayed in sequence. Microsoft® Windows® XP Operating System 19 Using the Software 9.
Click "Close" → "Close" → "OK" → "OK" on the screen, and click "Next". 10. Select the model that matches your monitor from the list of monitor models on the following screens displayed in sequence. Microsoft® Windows® XP Operating System 19 Using the Software 9.
User Manual (ENGLISH)
Page 22
The certified driver will be posted on Samsung Monitor homepage. http://www.samsung.com/ 9. If you can see following message window, then click the "Continue Anyway" button. Note This monitor driver is under certifying MS logo, and this installation doesn't damage your monitor model in the model list and click the "Next" button. 8. Click the "Browse" button then choose A:(D:\Driver) and choose your system. Then click "OK" button. Using the Software 7. Click the "Close" button then click "OK" button continually. 21
The certified driver will be posted on Samsung Monitor homepage. http://www.samsung.com/ 9. If you can see following message window, then click the "Continue Anyway" button. Note This monitor driver is under certifying MS logo, and this installation doesn't damage your monitor model in the model list and click the "Next" button. 8. Click the "Browse" button then choose A:(D:\Driver) and choose your system. Then click "OK" button. Using the Software 7. Click the "Close" button then click "OK" button continually. 21
User Manual (ENGLISH)
Page 23
... the "Settings" tab and click "Advanced Properties" button. 22 Please stop installation Case2 : If the "Properties" button is properly configured. Choose your monitor, follow next steps continually. 5. Click the "Finish" button then the "Close" button. Select the "Settings" tab and click "Advanced Properties" button... installation is completed. Microsoft® Windows® 2000 Operating System When you can see "Digital Signature Not Found" on your monitor model and click the "Next" button then click "Next" button. 10. Click the "Browse" button on the "Next" button. 6. ...
... the "Settings" tab and click "Advanced Properties" button. 22 Please stop installation Case2 : If the "Properties" button is properly configured. Choose your monitor, follow next steps continually. 5. Click the "Finish" button then the "Close" button. Select the "Settings" tab and click "Advanced Properties" button... installation is completed. Microsoft® Windows® 2000 Operating System When you can see "Digital Signature Not Found" on your monitor model and click the "Next" button then click "Next" button. 10. Click the "Browse" button on the "Next" button. 6. ...
User Manual (ENGLISH)
Page 24
...Apply" button if you need to make the X86Config file, which is for selecting a keyboard. 5. Note If there is for your monitor. Set a mouse for setting your monitor. 7. Enter the model name of system setting file. 1. Click the "Have Disk" button. 9. Select "Show all the driver in a specific location..." ...click "All Display Modes". 3. Press "Enter" at All Display Modes, select the level of all, set a horizontal frequency for your monitor. The third screen is no Mode at the first and the second screen after executing the X86Config file. 2. Set a Keyboard for your...
...Apply" button if you need to make the X86Config file, which is for selecting a keyboard. 5. Note If there is for your monitor. Set a mouse for setting your monitor. 7. Enter the model name of system setting file. 1. Click the "Have Disk" button. 9. Select "Show all the driver in a specific location..." ...click "All Display Modes". 3. Press "Enter" at All Display Modes, select the level of all, set a horizontal frequency for your monitor. The third screen is no Mode at the first and the second screen after executing the X86Config file. 2. Set a Keyboard for your...

User Manual (ENGLISH)
Page 57
... (With Stand), 3.9 kg / 8.6 lbs Dimensions (W x H x D) / Weight (HAS Stand) 439 x 290 x 65.5 mm / 17.3 x 11.4 x 2.6 inch (Without Stand) 56 Specifications General General Model Name SyncMaster 943BW LCD Panel Size Display area Pixel Pitch 19 inch (48 cm) 408.24 mm (H) x 255.15 mm (V) 0.2835 mm (H) x 0.2835 mm (V) Synchronization Horizontal Vertical 30 ~ 81 kHz 56 ~ 75...
... (With Stand), 3.9 kg / 8.6 lbs Dimensions (W x H x D) / Weight (HAS Stand) 439 x 290 x 65.5 mm / 17.3 x 11.4 x 2.6 inch (Without Stand) 56 Specifications General General Model Name SyncMaster 943BW LCD Panel Size Display area Pixel Pitch 19 inch (48 cm) 408.24 mm (H) x 255.15 mm (V) 0.2835 mm (H) x 0.2835 mm (V) Synchronization Horizontal Vertical 30 ~ 81 kHz 56 ~ 75...

User Manual (ENGLISH)
Page 60
... (With Stand), 3.9 kg / 8.6 lbs Dimensions (W x H x D) / Weight (HAS Stand) 439 x 290 x 65.5 mm / 17.3 x 11.4 x 2.6 inch (Without Stand) 59 Unit: Hz General Model Name SyncMaster 943BWX LCD Panel Size Display area Pixel Pitch 19 inch (48 cm) 408.24 mm (H) x 255.15 mm (V) 0.2835 mm (H) x 0.2835 mm (V) Synchronization Horizontal Vertical 30 ~ 81 kHz 56 ~ 75 Hz...
... (With Stand), 3.9 kg / 8.6 lbs Dimensions (W x H x D) / Weight (HAS Stand) 439 x 290 x 65.5 mm / 17.3 x 11.4 x 2.6 inch (Without Stand) 59 Unit: Hz General Model Name SyncMaster 943BWX LCD Panel Size Display area Pixel Pitch 19 inch (48 cm) 408.24 mm (H) x 255.15 mm (V) 0.2835 mm (H) x 0.2835 mm (V) Synchronization Horizontal Vertical 30 ~ 81 kHz 56 ~ 75 Hz...

