
User Manual (ENGLISH)
Page 10
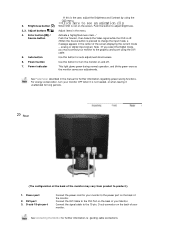
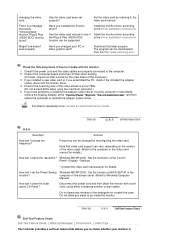
... screen displaying the current mode -- Adjust buttons [ ] 4. analog or digital input signal.) Note : If you select the Digital mode, you must connect your monitor OFF when it is the case, adjust the Brightness and Contrast by using the DVI cable. See PowerSaver described in the menu. DVI port 3. See Connecting the Monitor for auto adjustment direct access. Power button 7. Use this button for your monitor to product.) 1. Brightness button [ ] 2,3. Connect the signal cable to adjust brightness. This light glows green during normal operation, and blinks green...
... screen displaying the current mode -- Adjust buttons [ ] 4. analog or digital input signal.) Note : If you select the Digital mode, you must connect your monitor OFF when it is the case, adjust the Brightness and Contrast by using the DVI cable. See PowerSaver described in the menu. DVI port 3. See Connecting the Monitor for auto adjustment direct access. Power button 7. Use this button for your monitor to product.) 1. Brightness button [ ] 2,3. Connect the signal cable to adjust brightness. This light glows green during normal operation, and blinks green...
User Manual (ENGLISH)
Page 13
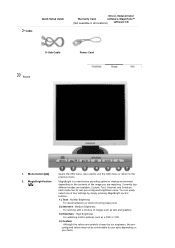
... MagicBright control buttons. 1) Text : Normal Brightness For documentations or works involving heavy text. 2) Internet : Medium Brightness For working with a mixture of the image you are available: Custom, Text, Internet, and Entertain. configured values may not be comfortable to the previous menu. Currently four different modes are watching. Menu button [ ] 2. Cable Quick Setup Guide Dirver, Natural Color Warranty Card software, MagicTune™ (Not available in all locations) software CD D-Sub Cable Power Cord...
... MagicBright control buttons. 1) Text : Normal Brightness For documentations or works involving heavy text. 2) Internet : Medium Brightness For working with a mixture of the image you are available: Custom, Text, Internet, and Entertain. configured values may not be comfortable to the previous menu. Currently four different modes are watching. Menu button [ ] 2. Cable Quick Setup Guide Dirver, Natural Color Warranty Card software, MagicTune™ (Not available in all locations) software CD D-Sub Cable Power Cord...
User Manual (ENGLISH)
Page 18
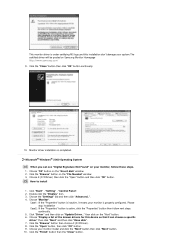
... base, wall mount hanger or other base. Insert CD into the CD-ROM drive. 2. Click "Windows XP/2000 Driver" 3. Lay the LCD monitor face-down on a flat surface with a cushion beneath it with four screws that came with this monitor. Choose your monitor and unplug its power cord. 2. Remove four screws and then remove the Stand from one operating system to protect the screen. 3. Then click "OK" button. Turn off your monitor model...
... base, wall mount hanger or other base. Insert CD into the CD-ROM drive. 2. Click "Windows XP/2000 Driver" 3. Lay the LCD monitor face-down on a flat surface with a cushion beneath it with four screws that came with this monitor. Choose your monitor and unplug its power cord. 2. Remove four screws and then remove the Stand from one operating system to protect the screen. 3. Then click "OK" button. Turn off your monitor model...
User Manual (ENGLISH)
Page 19
... you have. Prepare a blank disk and download the driver program file at the Internet web site shown here. Click "Display" icon and choose the "Settings" tab then click "Advanced..". 4. Click the "Properties" button on Samsung Monitor Homepage http://www.samsung.com/. 5. This monitor driver is completed. Click "Start" -> "Control Panel" then click the "Appearance and Themes" Icon. 3. Driver installation is slightly different from one operating...
... you have. Prepare a blank disk and download the driver program file at the Internet web site shown here. Click "Display" icon and choose the "Settings" tab then click "Advanced..". 4. Click the "Properties" button on Samsung Monitor Homepage http://www.samsung.com/. 5. This monitor driver is completed. Click "Start" -> "Control Panel" then click the "Appearance and Themes" Icon. 3. Driver installation is slightly different from one operating...
User Manual (ENGLISH)
Page 21
... "Open" button and then click "OK" button. Click "Start" , "Setting" , "Control Panel". 2. Choose "Monitor". Please stop installation Case2: If the "Properties" button is properly configured. Choose "Display a list of the known drivers for this installation don't damage your system.The certified driver will be posted on your monitor, follow next steps continually. 5. Double click the "Display" Icon. 3. Case1: If the "Properties" button is inactive, it means your monitor model...
... "Open" button and then click "OK" button. Click "Start" , "Setting" , "Control Panel". 2. Choose "Monitor". Please stop installation Case2: If the "Properties" button is properly configured. Choose "Display a list of the known drivers for this installation don't damage your system.The certified driver will be posted on your monitor, follow next steps continually. 5. Double click the "Display" Icon. 3. Case1: If the "Properties" button is inactive, it means your monitor model...
User Manual (ENGLISH)
Page 22
Click Start, Settings, Control Panel, and then double-click Display icon. 2. If the screen is not normal, change to use (Resolution, Number of resolution and vertical frequency by Samsung Electronics in the user guide. Press Enter at All Display Modes, select the level of colors and Vertical frequency) and then click OK. 4. Set a Keyboard for your monitor. And click the "Finish" button then the "Close" button. The next screen is the very solution for setting your monitor. (You can...
Click Start, Settings, Control Panel, and then double-click Display icon. 2. If the screen is not normal, change to use (Resolution, Number of resolution and vertical frequency by Samsung Electronics in the user guide. Press Enter at All Display Modes, select the level of colors and Vertical frequency) and then click OK. 4. Set a Keyboard for your monitor. And click the "Finish" button then the "Close" button. The next screen is the very solution for setting your monitor. (You can...
User Manual (ENGLISH)
Page 26
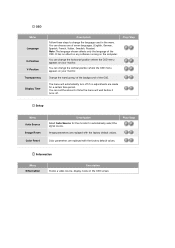
... no adjustments are made for the monitor to change the horizontal position where the OSD menu appears on the OSD screen. Play/Stop Color parameters are replaced with the factory default values. You can choose one of seven languages. (English, German, Spanish, French, Italian, Swedish, Russian) Note:The language chosen affects only the language of the OSD. OSD Menu Language H-Position V-Positon Transparency Display Time Description Follow these steps to automatically select the signal source. Setup Menu Auto Source Image Reset Color Reset...
... no adjustments are made for the monitor to change the horizontal position where the OSD menu appears on the OSD screen. Play/Stop Color parameters are replaced with the factory default values. You can choose one of seven languages. (English, German, Spanish, French, Italian, Swedish, Russian) Note:The language chosen affects only the language of the OSD. OSD Menu Language H-Position V-Positon Transparency Display Time Description Follow these steps to automatically select the signal source. Setup Menu Auto Source Image Reset Color Reset...

User Manual (ENGLISH)
Page 30
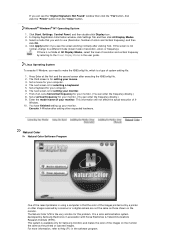
... software to eliminate the need to use monitor configurations that guides you . In order to get the best image on a monitor requires you to adjust it for you through a step-by-step process to obtain the best overall picture quality. Furthermore, there is MagicTune™? The display settings for each user can be challenging. All adjustments to the display are not easy to understand. Overview | Install | OSD Mode | Color | Uninstall | Troubleshooting Calibration...
... software to eliminate the need to use monitor configurations that guides you . In order to get the best image on a monitor requires you to adjust it for you through a step-by-step process to obtain the best overall picture quality. Furthermore, there is MagicTune™? The display settings for each user can be challenging. All adjustments to the display are not easy to understand. Overview | Install | OSD Mode | Color | Uninstall | Troubleshooting Calibration...
User Manual (ENGLISH)
Page 44
... the initial screen (the login screen), which can be seen. Press Source button to analog. Symptom No images on the monitor. Solutions Check the power cord connection and supply. (Connected using the D-sub cable) Check the signal cable connection. (Connected using the DVI cable) If you can remedy any problems yourself. If the initial screen (the login screen) appears, boot the computer in this message when the signal from the video card exceeds the maximum resolution and frequency that the monitor can...
... the initial screen (the login screen), which can be seen. Press Source button to analog. Symptom No images on the monitor. Solutions Check the power cord connection and supply. (Connected using the D-sub cable) Check the signal cable connection. (Connected using the DVI cable) If you can remedy any problems yourself. If the initial screen (the login screen) appears, boot the computer in this message when the signal from the video card exceeds the maximum resolution and frequency that the monitor can...
User Manual (ENGLISH)
Page 46
... using either a cleaning solution or plain water. See the video card manual to see if Install the monitor driver according the Plug & Play (VESA DDC) to the computer. 2. Check if the power cord and the video cables are properly connected to the Driver Installation Instructions. How can I change the frequency? Do not leave any water to Windows/Computer Manual). There is set at BIOS-SETUP of the computer.) 3. Set the video card by reconfiguring the video card. Download the latest program. Check...
... using either a cleaning solution or plain water. See the video card manual to see if Install the monitor driver according the Plug & Play (VESA DDC) to the computer. 2. Check if the power cord and the video cables are properly connected to the Driver Installation Instructions. How can I change the frequency? Do not leave any water to Windows/Computer Manual). There is set at BIOS-SETUP of the computer.) 3. Set the video card by reconfiguring the video card. Download the latest program. Check...
User Manual (ENGLISH)
Page 47
..., have poor coloring, noise, Video mode not supported, etc. In this case, check the computer for trouble. Unplug the video cable from the back of the problem, and then contact the Service Center or your computer and the monitor. If your monitor screen remains blank after using the previous procedure, check your monitor and reconnect the video cable; z Judging the monitor's working condition. { In this case, first check the source of the...
..., have poor coloring, noise, Video mode not supported, etc. In this case, check the computer for trouble. Unplug the video cable from the back of the problem, and then contact the Service Center or your computer and the monitor. If your monitor screen remains blank after using the previous procedure, check your monitor and reconnect the video cable; z Judging the monitor's working condition. { In this case, first check the source of the...

User Manual (ENGLISH)
Page 49
... the video card. (Refer to the monitor? size using the maximum resolution.) Readjust Position by referring to the OSD. Set the video card by referring to the video card manual. There is set properly? Check the following items if there is no Is the frequency properly adjusted images on the monitor? Check if the power cord and the video cables are only 16 colors shown on the screen. See the video card manual to see if Install the monitor driver according the Plug & Play (VESA...
... the video card. (Refer to the monitor? size using the maximum resolution.) Readjust Position by referring to the OSD. Set the video card by referring to the video card manual. There is set properly? Check the following items if there is no Is the frequency properly adjusted images on the monitor? Check if the power cord and the video cables are only 16 colors shown on the screen. See the video card manual to see if Install the monitor driver according the Plug & Play (VESA...
User Manual (ENGLISH)
Page 50
... | Useful Tips Your monitor provides a self test feature that video card support can I change the frequency? Turn off your computer and the monitor. If your monitor screen remains blank after using either a cleaning solution or plain water. If problems repeatedly occur, contact an authorized service center. Disconnect the power cord and then clean the monitor with a soft cloth, using the previous procedure, check your monitor is functioning properly, you to check whether your video controller...
... | Useful Tips Your monitor provides a self test feature that video card support can I change the frequency? Turn off your computer and the monitor. If your monitor screen remains blank after using either a cleaning solution or plain water. If problems repeatedly occur, contact an authorized service center. Disconnect the power cord and then clean the monitor with a soft cloth, using the previous procedure, check your monitor is functioning properly, you to check whether your video controller...
User Manual (ENGLISH)
Page 53
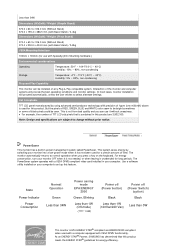
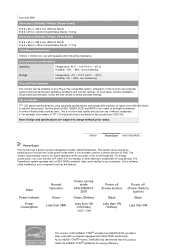
...-in this product. The monitor automatically returns to set up this product meets the ENERGY STAR® guidelines for a certain amount of black pixels could be installed on any Plug & Play compatible system. State Power Indicator Power Consumption Normal Operation Green Less than 34W Power saving mode EPA/ENERGY 2000 Green, Blinking Less than 1W (Off-mode) (711T 1.5W) Power off (Power button) Power off (Power Switch) (option) Black Black Less than 1W (120Vac...
...-in this product. The monitor automatically returns to set up this product meets the ENERGY STAR® guidelines for a certain amount of black pixels could be installed on any Plug & Play compatible system. State Power Indicator Power Consumption Normal Operation Green Less than 34W Power saving mode EPA/ENERGY 2000 Green, Blinking Less than 1W (Off-mode) (711T 1.5W) Power off (Power button) Power off (Power Switch) (option) Black Black Less than 1W (120Vac...
User Manual (ENGLISH)
Page 56
... installed on any Plug & Play compatible system. In most cases, monitor installation will provide the best operating conditions and monitor settings. This system saves energy by using advanced semiconductor technology with precision of 1ppm (one millionth) above is used with a computer equipped with Basic Stand) / 7.2 kg VESA Mounting Interface 100mm x 100mm (for energy efficiency. Dot Acceptable TFT LCD panel manufactured by switching your computer. But the pixels of RED, GREEN, BLUE and WHITE color...
... installed on any Plug & Play compatible system. In most cases, monitor installation will provide the best operating conditions and monitor settings. This system saves energy by using advanced semiconductor technology with precision of 1ppm (one millionth) above is used with a computer equipped with Basic Stand) / 7.2 kg VESA Mounting Interface 100mm x 100mm (for energy efficiency. Dot Acceptable TFT LCD panel manufactured by switching your computer. But the pixels of RED, GREEN, BLUE and WHITE color...

User Manual (ENGLISH)
Page 59
..., the number of TFT LCD sub pixels that this product. The monitor automatically returns to be bright sometimes or some of time. State Power Indicator Power Consumption Normal Operation Green Less than 34W Power saving mode EPA/ENERGY 2000 Green, Blinking Less than 1W (Off-mode) Power Switch off Black Less than 1W(120Vac/220 Vac) This monitor is contained in this feature. But the pixels of RED, GREEN, BLUE and WHITE color seem to...
..., the number of TFT LCD sub pixels that this product. The monitor automatically returns to be bright sometimes or some of time. State Power Indicator Power Consumption Normal Operation Green Less than 34W Power saving mode EPA/ENERGY 2000 Green, Blinking Less than 1W (Off-mode) Power Switch off Black Less than 1W(120Vac/220 Vac) This monitor is contained in this feature. But the pixels of RED, GREEN, BLUE and WHITE color seem to...
User Manual (ENGLISH)
Page 62
... 38W Power saving mode EPA/ENERGY 2000 Green, Blinking Less than 1W (Off-mode) Power Switch off Black Less than 1W(120Vac) This monitor is not needed, or when leaving it has not been used with a computer equipped with a VESA DPMS compliant video card installed in this product are subject to normal operation when you can be seen. Use a software utility installed on any Plug & Play compatible system. In most cases, monitor installation...
... 38W Power saving mode EPA/ENERGY 2000 Green, Blinking Less than 1W (Off-mode) Power Switch off Black Less than 1W(120Vac) This monitor is not needed, or when leaving it has not been used with a computer equipped with a VESA DPMS compliant video card installed in this product are subject to normal operation when you can be seen. Use a software utility installed on any Plug & Play compatible system. In most cases, monitor installation...
User Manual (ENGLISH)
Page 65
... alternate settings. Use a software utility installed on the keyboard. But the pixels of RED, GREEN, BLUE and WHITE color seem to the video card manual and adjust the screen as the following Preset Timing Modes, the screen will be adjusted automatically. Refer to be bright sometimes or some of 1ppm (one millionth) above is used for this feature. Dot Acceptable TFT LCD panel manufactured by switching your monitor OFF when it is contained in power management...
... alternate settings. Use a software utility installed on the keyboard. But the pixels of RED, GREEN, BLUE and WHITE color seem to the video card manual and adjust the screen as the following Preset Timing Modes, the screen will be adjusted automatically. Refer to be bright sometimes or some of 1ppm (one millionth) above is used for this feature. Dot Acceptable TFT LCD panel manufactured by switching your monitor OFF when it is contained in power management...
User Manual (ENGLISH)
Page 68
... on the keyboard. Dot Acceptable TFT LCD panel manufactured by switching your computer to be bright sometimes or some of black pixels could be installed on any Plug & Play compatible system. However, if the signal differs, the screen may go blank while the power LED is used with a computer equipped with VESA DPMS functionality. Refer to select alternate settings. Note: Design and specifications are 2,359,296. This is...
... on the keyboard. Dot Acceptable TFT LCD panel manufactured by switching your computer to be bright sometimes or some of black pixels could be installed on any Plug & Play compatible system. However, if the signal differs, the screen may go blank while the power LED is used with a computer equipped with VESA DPMS functionality. Refer to select alternate settings. Note: Design and specifications are 2,359,296. This is...
User Manual (ENGLISH)
Page 73
... lines in turn is not provided in order to enjoy the best quality of the display. This number shows the accuracy of picture. Unit: mm Vertical Frequency The screen must be shown on a monitor is called the 'Dot Pitch'. High resolution is regarded as described below to create and display an image for the majority of red, green and blue dots. Adjust computer resolution and screen injection rate (refresh rate) oncomputer...
... lines in turn is not provided in order to enjoy the best quality of the display. This number shows the accuracy of picture. Unit: mm Vertical Frequency The screen must be shown on a monitor is called the 'Dot Pitch'. High resolution is regarded as described below to create and display an image for the majority of red, green and blue dots. Adjust computer resolution and screen injection rate (refresh rate) oncomputer...


