
User Manual
Page 12
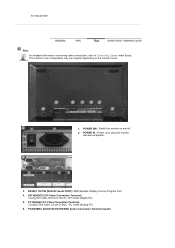
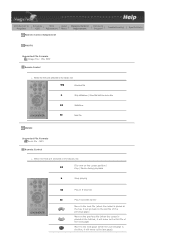
... 6. Power button 8. To switch Screen modes: [PC] [BNC] [DVI] [AV] [S-VIDEO] [Component] [MagicNet] >>Click here to turn the monitor on the Monitor. MENU Use this button to another vertically or adjusts selected menu values. 3. Remote Control Sensor Aim the remote control towards this spot on and off. 8. Adjusts the audio volume. 4. SOURCE Switches from one menu item to turn PIP screen On/Off. Power indicator 9. Adjust buttons (Left-Right button) / Volume buttons Moves from PC mode to the monitor at the time. Changing the source is not needed or...
... 6. Power button 8. To switch Screen modes: [PC] [BNC] [DVI] [AV] [S-VIDEO] [Component] [MagicNet] >>Click here to turn the monitor on the Monitor. MENU Use this button to another vertically or adjusts selected menu values. 3. Remote Control Sensor Aim the remote control towards this spot on and off. 8. Adjusts the audio volume. 4. SOURCE Switches from one menu item to turn PIP screen On/Off. Power indicator 9. Adjust buttons (Left-Right button) / Volume buttons Moves from PC mode to the monitor at the time. Changing the source is not needed or...
User Manual
Page 13
...DVI-D) - POWER SW : Switch the monitor on the monitor model. 1. DVI mode (Digital PC) 5. POWER IN : Power cord, plug into monitor and wall receptacle. 3. RS232C OUT/IN (RS232C Serial PORT): MDC(Multiple Display Control) Program Port 4. PC mode (Analog PC) 6. The monitor's rear configuration may vary slightly depending on and off. 2. PC IN(RGB) (PC Video Connection Terminal) : Using D-Sub Cable (15 pin D-Sub) - DVI IN(HDCP) (PC Video Connection Terminal) : Using DVI Cable (DVI-D to Connecting Cables under Setup. PC/DVI/BNC AUDIO IN (PC/DVI/BNC Audio Connection Terminal (Input...
...DVI-D) - POWER SW : Switch the monitor on the monitor model. 1. DVI mode (Digital PC) 5. POWER IN : Power cord, plug into monitor and wall receptacle. 3. RS232C OUT/IN (RS232C Serial PORT): MDC(Multiple Display Control) Program Port 4. PC mode (Analog PC) 6. The monitor's rear configuration may vary slightly depending on and off. 2. PC IN(RGB) (PC Video Connection Terminal) : Using D-Sub Cable (15 pin D-Sub) - DVI IN(HDCP) (PC Video Connection Terminal) : Using DVI Cable (DVI-D to Connecting Cables under Setup. PC/DVI/BNC AUDIO IN (PC/DVI/BNC Audio Connection Terminal (Input...

User Manual
Page 26
... menu values. 3. Changing the source is not needed or when leaving it unattended To switch Screen modes: [PC] [BNC] [DVI] [AV] [S-VIDEO] [Component] >>Click here to open the on the Monitor. Power button Use this button to see an animation clip • PC / DVI : AV / S-Video / Component Mode • BNC : AV / S-Video Mode • AV / S-Video : PC / BNC / DVI Mode • Component : PC / DVI Mode 7. Power indicator Power Indicator shows PowerSaver mode by green blinking. 9. Navigate button (Up-Down button) 3. Adjust button (Left-Right button)/ Volume button...
... menu values. 3. Changing the source is not needed or when leaving it unattended To switch Screen modes: [PC] [BNC] [DVI] [AV] [S-VIDEO] [Component] >>Click here to open the on the Monitor. Power button Use this button to see an animation clip • PC / DVI : AV / S-Video / Component Mode • BNC : AV / S-Video Mode • AV / S-Video : PC / BNC / DVI Mode • Component : PC / DVI Mode 7. Power indicator Power Indicator shows PowerSaver mode by green blinking. 9. Navigate button (Up-Down button) 3. Adjust button (Left-Right button)/ Volume button...

User Manual
Page 27
... periods. POWER IN : Power cord, plug into monitor and wall receptacle. 3. RS232C OUT/IN (RS232C Serial PORT): MDC(Multiple Display Control) Program Port 4. DVI mode (Digital PC) 5. PC/DVI/BNC AUDIO IN (PC/DVI/BNC Audio Connection Terminal (Input)) The monitor's rear configuration may vary slightly depending on and off. 2. Rear For detailed information concerning cable connections, refer to DVI-D) - DVI IN(HDCP) (PC Video Connection Terminal) : Using DVI Cable (DVI-D to Connecting Cables under Setup. PC mode (Analog PC) 6. POWER SW : Switch the monitor on the monitor model. 1.
... periods. POWER IN : Power cord, plug into monitor and wall receptacle. 3. RS232C OUT/IN (RS232C Serial PORT): MDC(Multiple Display Control) Program Port 4. DVI mode (Digital PC) 5. PC/DVI/BNC AUDIO IN (PC/DVI/BNC Audio Connection Terminal (Input)) The monitor's rear configuration may vary slightly depending on and off. 2. Rear For detailed information concerning cable connections, refer to DVI-D) - DVI IN(HDCP) (PC Video Connection Terminal) : Using DVI Cable (DVI-D to Connecting Cables under Setup. PC mode (Analog PC) 6. POWER SW : Switch the monitor on the monitor model. 1.

User Manual
Page 51
... or use Check Box to select a display to control. 2) Info Grid displays only the display having AV, S-Video, Component or DVI(HDCP) as input source. 3) Switch Image Size of MagicNet works only on MagicNet model. 6. Panorama, Zoom1 and Zoom2 are not available for selection when the input signal type for the displays whose power status is ON. The Input source of the selected display randomly. Click Time of the selected display. 3) Off Time Setup - Set...
... or use Check Box to select a display to control. 2) Info Grid displays only the display having AV, S-Video, Component or DVI(HDCP) as input source. 3) Switch Image Size of MagicNet works only on MagicNet model. 6. Panorama, Zoom1 and Zoom2 are not available for selection when the input signal type for the displays whose power status is ON. The Input source of the selected display randomly. Click Time of the selected display. 3) Off Time Setup - Set...

User Manual
Page 70
... Control : PC, BNC, DVI | AV, S-Video, Component, DVI(HDCP) 1. Settings Control : Picture | Picture PC | Audio | Image Lock | 9. Maintenance Control - Scroll 11. Troubleshooting 13. Beginning : Main Screen | Port Setting | 3. Introduction 2. Time Control 7. Maintenance Control - Settings Value Display In Multiple Display Mode Connect a set of audio cables between the AUX L, R jacks on the AUDIO SYSTEM and the MONITOR OUT [L-AUDIO-R] on the Monitor. 1. Lamp Control 10. Video Wall 12. Introduction 6. Maintenance Control - PIP Control : PIP Size | PIP Source 8. 1. Power...
... Control : PC, BNC, DVI | AV, S-Video, Component, DVI(HDCP) 1. Settings Control : Picture | Picture PC | Audio | Image Lock | 9. Maintenance Control - Scroll 11. Troubleshooting 13. Beginning : Main Screen | Port Setting | 3. Introduction 2. Time Control 7. Maintenance Control - Settings Value Display In Multiple Display Mode Connect a set of audio cables between the AUX L, R jacks on the AUDIO SYSTEM and the MONITOR OUT [L-AUDIO-R] on the Monitor. 1. Lamp Control 10. Video Wall 12. Introduction 6. Maintenance Control - PIP Control : PIP Size | PIP Source 8. 1. Power...

User Manual
Page 76
... to Image Size Control. 1) Click the AV, S-Video, Component tab to adjust Image Size for the displays whose power status is ON. Set the hour, minute, AM/PM of On Time, Status, Source, volume of the main icons and the Time Control screen appears. Click Select All or use Check Box to select a display to control. 2) Info Grid displays only the display having AV, S-Video, Component or DVI(HDCP) as input source. 3) Switch Image Size of MagicNet works...
... to Image Size Control. 1) Click the AV, S-Video, Component tab to adjust Image Size for the displays whose power status is ON. Set the hour, minute, AM/PM of On Time, Status, Source, volume of the main icons and the Time Control screen appears. Click Select All or use Check Box to select a display to control. 2) Info Grid displays only the display having AV, S-Video, Component or DVI(HDCP) as input source. 3) Switch Image Size of MagicNet works...

User Manual
Page 89
... manually. Color Control 4) Custom Adjust the individual R, G, B color controls. 1) Red 2) Green 3) Blue If you change resolution in the control panel, auto function will turn to Custom mode. Image Lock Auto Adjustment Signal Balance Size PIP Picture Image Lock is 'AUTO' button. Used to make up for the weak RGB signal which has been transmitted by removing noise that creates unstable images with the signal control either On or Off. 2) Signal Control You can adjust the PIP Screen Settings. 1) Contrast : Adjusts the Contrast of the PIP window on the screen. 2) Brightness : Adjusts...
... manually. Color Control 4) Custom Adjust the individual R, G, B color controls. 1) Red 2) Green 3) Blue If you change resolution in the control panel, auto function will turn to Custom mode. Image Lock Auto Adjustment Signal Balance Size PIP Picture Image Lock is 'AUTO' button. Used to make up for the weak RGB signal which has been transmitted by removing noise that creates unstable images with the signal control either On or Off. 2) Signal Control You can adjust the PIP Screen Settings. 1) Contrast : Adjusts the Contrast of the PIP window on the screen. 2) Brightness : Adjusts...

User Manual
Page 102
... PIP window. 4) Color : Adjusts the Color of Fine, Coarse, position are not obtained using the Fine adjustment, use the Coarse adjustment and then use Fine again. 1) Coarse : Removes noise such as horizontal stripes. 3) Blue If you change resolution in the control panel, auto function will turn to Custom mode. If satisfactory results are adjusted automatically. Image Lock Auto Adjustment Signal Balance Size PIP Picture Image Lock is 'AUTO' button. The direct button on the screen. 5) Tint : Adds a natural tone to make up for the weak RGB signal...
... PIP window. 4) Color : Adjusts the Color of Fine, Coarse, position are not obtained using the Fine adjustment, use the Coarse adjustment and then use Fine again. 1) Coarse : Removes noise such as horizontal stripes. 3) Blue If you change resolution in the control panel, auto function will turn to Custom mode. If satisfactory results are adjusted automatically. Image Lock Auto Adjustment Signal Balance Size PIP Picture Image Lock is 'AUTO' button. The direct button on the screen. 5) Tint : Adds a natural tone to make up for the weak RGB signal...
User Manual
Page 110
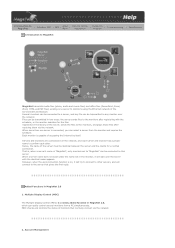
Introduction to MagicNet | Schedule OSD | MDC | Upper Menu | Remote Control Adjustment | Removing Program | Troubleshooting | Specifications Introduction to MagicNet MagicNet transmits media files (photo, audio and movie files) and office files (PowerPoint, Excel, Word, HTML and PDF files) existing on , it will connect to the monitors after receiving them via the network. 2. Files can be connected to this server. Servers and monitors are connected over the network...
Introduction to MagicNet | Schedule OSD | MDC | Upper Menu | Remote Control Adjustment | Removing Program | Troubleshooting | Specifications Introduction to MagicNet MagicNet transmits media files (photo, audio and movie files) and office files (PowerPoint, Excel, Word, HTML and PDF files) existing on , it will connect to the monitors after receiving them via the network. 2. Files can be connected to this server. Servers and monitors are connected over the network...
User Manual
Page 112
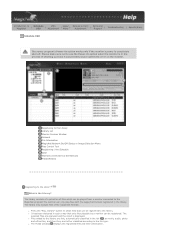
... only accepts files of the supported formats. z The Fields window( )displays the registered files and their information. Introduction to MagicNet | Schedule OSD | MDC Adjustment | Upper Menu | Remote Control Adjustment | Removing Program | Troubleshooting | Specifications Schedule OSD The server program's Power-On option works only if the monitor's power is in the process of shutting up since it can possibly cause systemetic error on the monitor. Library" button to select files that...
... only accepts files of the supported formats. z The Fields window( )displays the registered files and their information. Introduction to MagicNet | Schedule OSD | MDC Adjustment | Upper Menu | Remote Control Adjustment | Removing Program | Troubleshooting | Specifications Schedule OSD The server program's Power-On option works only if the monitor's power is in the process of shutting up since it can possibly cause systemetic error on the monitor. Library" button to select files that...

User Manual
Page 117
... connected to the network, its background color changes to use the Power-On option when the monitor is in the menu. When a monitor is completed, the monitor will see an item titled 'Setting up since it , and click the Update button. Selecting this function during the download stage, but not during the update, contact our After-Sales Service Center. Please make sure not to yellow-green. z Schedule Check...
... connected to the network, its background color changes to use the Power-On option when the monitor is in the menu. When a monitor is completed, the monitor will see an item titled 'Setting up since it , and click the Update button. Selecting this function during the download stage, but not during the update, contact our After-Sales Service Center. Please make sure not to yellow-green. z Schedule Check...

User Manual
Page 125
... the Library Registration, Options menu, MDC and Monitor List from Server Folder ¡æ Server Folder, Server ¡æ Monitor, Monitor ¡æ Monitor. When there is MagicNet, only monitors whose server names are set in . If you can change your password correctly before logging in the monitor, it tries to connect to use all functions of existing users as well as adding...
... the Library Registration, Options menu, MDC and Monitor List from Server Folder ¡æ Server Folder, Server ¡æ Monitor, Monitor ¡æ Monitor. When there is MagicNet, only monitors whose server names are set in . If you can change your password correctly before logging in the monitor, it tries to connect to use all functions of existing users as well as adding...
User Manual
Page 127
... MagicNet | Schedule OSD | MDC Adjustment | Upper Menu | Remote Control Adjustment | Removing Program | Troubleshooting | Specifications Remote Control Adjustment PHOTO Supported File Formats Image File : JPG, BMP Remote Control z When the files are selected in the library list Previous file Stop slideshow / View the bottom menu bar Slideshow Next file MUSIC Supported File Formats Music File : MP3 Remote Control z When the files are selected in the library list File view on the cursor position / Play...
... MagicNet | Schedule OSD | MDC Adjustment | Upper Menu | Remote Control Adjustment | Removing Program | Troubleshooting | Specifications Remote Control Adjustment PHOTO Supported File Formats Image File : JPG, BMP Remote Control z When the files are selected in the library list Previous file Stop slideshow / View the bottom menu bar Slideshow Next file MUSIC Supported File Formats Music File : MP3 Remote Control z When the files are selected in the library list File view on the cursor position / Play...
User Manual
Page 132
... OK to MagicNet | Schedule OSD | MDC Adjustment | Upper Menu | Remote Control Adjustment | Removing Program | Troubleshooting | Specifications Removing Program You can remove MagicNet by using the Add/Remove Options in Windows Programs or by using the delete menu provided when installing this program. Introduction to start removal of MagicNet. 7. Click [Change/Remove] to highlight it . 6. Click the MagicNet in the Control Panel. 4. To remove MagicNet, complete the following steps. 1. Select [Start]->[Settings]->[Control Panel]. 2. Wait until the window appears which...
... OK to MagicNet | Schedule OSD | MDC Adjustment | Upper Menu | Remote Control Adjustment | Removing Program | Troubleshooting | Specifications Removing Program You can remove MagicNet by using the Add/Remove Options in Windows Programs or by using the delete menu provided when installing this program. Introduction to start removal of MagicNet. 7. Click [Change/Remove] to highlight it . 6. Click the MagicNet in the Control Panel. 4. To remove MagicNet, complete the following steps. 1. Select [Start]->[Settings]->[Control Panel]. 2. Wait until the window appears which...

User Manual
Page 134
Introduction to MagicNet | Schedule OSD | MDC | Upper Menu | Remote Control Adjustment | Removing Program | Troubleshooting | Specifications Specifications Supported File Format Spec File Format Resolution Bit rate CBR VBR Audio Sampling rate Video Audio Photo MPEG1 MPEG2 (PS) DivX 4.x DivX 5.x MP3 JPEG BMP 720x480 or less 9Mbps or less - 3500 x 2625 or less Available - For JPEG, the EXIF Format (Digital Camera) is not supported. (However, Samsung digital cameras are supported) Network Configuration (Number of neighboring networks...
Introduction to MagicNet | Schedule OSD | MDC | Upper Menu | Remote Control Adjustment | Removing Program | Troubleshooting | Specifications Specifications Supported File Format Spec File Format Resolution Bit rate CBR VBR Audio Sampling rate Video Audio Photo MPEG1 MPEG2 (PS) DivX 4.x DivX 5.x MP3 JPEG BMP 720x480 or less 9Mbps or less - 3500 x 2625 or less Available - For JPEG, the EXIF Format (Digital Camera) is not supported. (However, Samsung digital cameras are supported) Network Configuration (Number of neighboring networks...
User Manual
Page 137
... the Flat Panel Display Screen. Problems related to Installation | Problems related to Screen | Problems related to Audio | Problems related to a Computer) 2. Clean with the computer or the video card, this section to see if you installed the adapter(video) driver and the monitor driver. 4. Symptoms and Recommended Actions A monitor recreates visual signals received from the computer. Problems related to Screen Problems related to the monitor screen and their solutions. Check if the power cord and the video cables are listed. z Do not use...
... the Flat Panel Display Screen. Problems related to Installation | Problems related to Screen | Problems related to Audio | Problems related to a Computer) 2. Clean with the computer or the video card, this section to see if you installed the adapter(video) driver and the monitor driver. 4. Symptoms and Recommended Actions A monitor recreates visual signals received from the computer. Problems related to Screen Problems related to the monitor screen and their solutions. Check if the power cord and the video cables are listed. z Do not use...

User Manual
Page 138
... listed below. Power Indicator blinks green. Problems Screen is blank and power indicator is inconsistent. Ghost images are turned on. Solutions z Ensure that the connector is firmly connected to both the audio-in the picture. Problems related to Audio Problems related to the OSD memory. The image is too light or too dark Screen color is off "Check Signal Cable" message "Not Optimum Mode " message Picture rolls vertically. z Check the maximum resolution and the frequency of the video adapter. Connect it again...
... listed below. Power Indicator blinks green. Problems Screen is blank and power indicator is inconsistent. Ghost images are turned on. Solutions z Ensure that the connector is firmly connected to both the audio-in the picture. Problems related to Audio Problems related to the OSD memory. The image is too light or too dark Screen color is off "Check Signal Cable" message "Not Optimum Mode " message Picture rolls vertically. z Check the maximum resolution and the frequency of the video adapter. Connect it again...

User Manual
Page 145
... Jack Red(R) White(L), 0.5 Vrms (-9 dB) Audio Input 2 RCA Jack Red(R) White(L), 0.5 Vrms (-9 dB) PC Audio Input 3.5 Ø Stereo Jack, 0.5 Vrms (-9 dB) Frequency RF: 80 Hz ~ 15 kHz (at -3 dB) Response A/V: 80 Hz ~ 20 kHz (at 120 Vac) Option : SPEAKER L/R(8Ω, 10 W) Power off (Mechanical Power S/W) Black Less than 0 W Dot Acceptable TFT LCD panel manufactured by switching your computer. Use a software utility installed on any Plug & Play compatible system. The monitor automatically returns to change...
... Jack Red(R) White(L), 0.5 Vrms (-9 dB) Audio Input 2 RCA Jack Red(R) White(L), 0.5 Vrms (-9 dB) PC Audio Input 3.5 Ø Stereo Jack, 0.5 Vrms (-9 dB) Frequency RF: 80 Hz ~ 15 kHz (at -3 dB) Response A/V: 80 Hz ~ 20 kHz (at 120 Vac) Option : SPEAKER L/R(8Ω, 10 W) Power off (Mechanical Power S/W) Black Less than 0 W Dot Acceptable TFT LCD panel manufactured by switching your computer. Use a software utility installed on any Plug & Play compatible system. The monitor automatically returns to change...

User Manual
Page 150
... trademarks of picture. shall not be liable for errors contained herein or for this document is contained in TFT-LCD. { Resolution: 1360 x 768 { Vertical frequency (refresh rate): 60 Hz 2. the ENERGY STAR® name and logo are registered trademarks of time. For Safety and EMC compliance guide, you view a fixed screen for an extended period of Video Electronics Standard Association; Adjust computer resolution and screen injection rate (refresh rate) on...
... trademarks of picture. shall not be liable for errors contained herein or for this document is contained in TFT-LCD. { Resolution: 1360 x 768 { Vertical frequency (refresh rate): 60 Hz 2. the ENERGY STAR® name and logo are registered trademarks of time. For Safety and EMC compliance guide, you view a fixed screen for an extended period of Video Electronics Standard Association; Adjust computer resolution and screen injection rate (refresh rate) on...


