
User Manual
Page 3
... power cord of another product. • Otherwise, this may result in damage to the product due to contact an authorized Service Center when installing your monitor. Use only the power cord provided by our company. Be sure to electric shock. Ensure that the front end of the bottom of a size appropriate... lift and move the product. • Otherwise, it may result in a location with heavy dust, high or low temperatures, high humidity, and exposed to your monitor in fire.
... power cord of another product. • Otherwise, this may result in damage to the product due to contact an authorized Service Center when installing your monitor. Use only the power cord provided by our company. Be sure to electric shock. Ensure that the front end of the bottom of a size appropriate... lift and move the product. • Otherwise, it may result in a location with heavy dust, high or low temperatures, high humidity, and exposed to your monitor in fire.

User Manual
Page 4
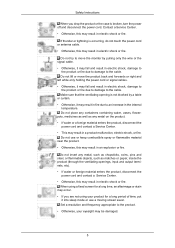
...; If the antenna touches or falls onto a high voltage cable, it down , make sure to an increase in the in- If the height of your monitor is a clearance of the TFT-LCD screen, wipe with it may fall and cause personal injury. • Make sure to the screen display. When cleaning the... monitor case or the surface of more than 4 inches (10 cm) from the power cord or the product as possible. • Otherwise, this may result in ...
...; If the antenna touches or falls onto a high voltage cable, it down , make sure to an increase in the in- If the height of your monitor is a clearance of the TFT-LCD screen, wipe with it may fall and cause personal injury. • Make sure to the screen display. When cleaning the... monitor case or the surface of more than 4 inches (10 cm) from the power cord or the product as possible. • Otherwise, this may result in ...
User Manual
Page 6
Do not lift or move the monitor by a table or curtain. • Otherwise, it into sleep mode or use or keep combustible spray or flammable material near the product. • Otherwise, this ...
Do not lift or move the monitor by a table or curtain. • Otherwise, it into sleep mode or use or keep combustible spray or flammable material near the product. • Otherwise, this ...

User Manual
Page 7
... may result in overheating or fire due to dust, and may result in fire due to electric shock or leakage. Safety Instructions When using the monitor for a long period of the internal liquid. 6 Take a rest for at least five (5) minutes after using headphones or earphones, do not turn the power off...
... may result in overheating or fire due to dust, and may result in fire due to electric shock or leakage. Safety Instructions When using the monitor for a long period of the internal liquid. 6 Take a rest for at least five (5) minutes after using headphones or earphones, do not turn the power off...
User Manual
Page 14
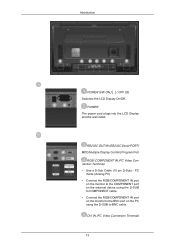
... the COMPONENT port on the external device using the D-SUB to COMPONENT cable. • Connect the RGB/COMPONENT IN port on the monitor to the BNC port on the PC using the D-SUB to BNC cable. DVI IN (PC Video Connection Terminal) 13 RS232C OUT/IN (RS232C Serial ... Display Control) Program Port RGB/ COMPONENT IN (PC Video Connection Terminal) • Use a D-Sub Cable (15 pin D-Sub) - POWER The power cord plugs into the LCD Display and the wall outlet. Introduction POWER S/W ON [ │ ] / OFF [O] Switches the...
... the COMPONENT port on the external device using the D-SUB to COMPONENT cable. • Connect the RGB/COMPONENT IN port on the monitor to the BNC port on the PC using the D-SUB to BNC cable. DVI IN (PC Video Connection Terminal) 13 RS232C OUT/IN (RS232C Serial ... Display Control) Program Port RGB/ COMPONENT IN (PC Video Connection Terminal) • Use a D-Sub Cable (15 pin D-Sub) - POWER The power cord plugs into the LCD Display and the wall outlet. Introduction POWER S/W ON [ │ ] / OFF [O] Switches the...
User Manual
Page 15
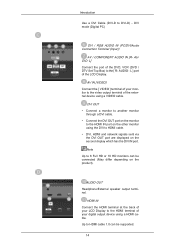
.... AUDIO- AV IN [VIDEO] Connect the [ VIDEO ] terminal of your monitor to the video output terminal of your LCD Display to the [ R- Introduction Use a DVI Cable (DVI-D to HDMI cable. • DVI, HDMI and network signals sent via the DVI OUT port are displayed ... / COMPONENT AUDIO IN [R- Up to 6 Full HD or 10 HD monitors can be connected (May differ depending on the other monitor using the DVI to DVI-D) - DVI OUT • Connect a monitor to another monitor through a DVI cable. • Connect the DVI OUT port on the monitor to the HDMI IN port on the product). AUDIO -
.... AUDIO- AV IN [VIDEO] Connect the [ VIDEO ] terminal of your monitor to the video output terminal of your LCD Display to the [ R- Introduction Use a DVI Cable (DVI-D to HDMI cable. • DVI, HDMI and network signals sent via the DVI OUT port are displayed ... / COMPONENT AUDIO IN [R- Up to 6 Full HD or 10 HD monitors can be connected (May differ depending on the other monitor using the DVI to DVI-D) - DVI OUT • Connect a monitor to another monitor through a DVI cable. • Connect the DVI OUT port on the monitor to the HDMI IN port on the product). AUDIO -
User Manual
Page 30
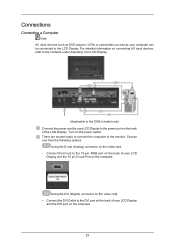
... the DVI (Digital) connector on the video card. • Connect the DVI Cable to the 15-pin, RGB port on the back of your LCD Display and the 15 pin D-sub Port on the computer. 29 For detailed information on connecting AV input devices, refer to the contents under Adjusting... Your LCD Display. (Applicable to the CXN-2 model only) Connect the power cord for your computer can be connected to the monitor. There are several ways to connect the computer to the...
... the DVI (Digital) connector on the video card. • Connect the DVI Cable to the 15-pin, RGB port on the back of your LCD Display and the 15 pin D-sub Port on the computer. 29 For detailed information on connecting AV input devices, refer to the contents under Adjusting... Your LCD Display. (Applicable to the CXN-2 model only) Connect the power cord for your computer can be connected to the monitor. There are several ways to connect the computer to the...

User Manual
Page 31
...8226; Connect the HDMI IN port on the monitor to the HDMI port on the back of the LCD Display. Connect the audio cable for your LCD Display to an antenna or CATV cable without installing any separate TV reception hardware or software on the LCD Display model. For detailed information on connecting ... the HDMI cable to the PC, ensure that you select HDMI from both your computer and the LCD Display. • Contact a local SAMSUNG Electronics Service Center to buy optional items. Connecting to the LCD Display. Note • Turn on both the Source List and Edit Name before selecting PC or ...
...8226; Connect the HDMI IN port on the monitor to the HDMI port on the back of the LCD Display. Connect the audio cable for your LCD Display to an antenna or CATV cable without installing any separate TV reception hardware or software on the LCD Display model. For detailed information on connecting ... the HDMI cable to the PC, ensure that you select HDMI from both your computer and the LCD Display. • Contact a local SAMSUNG Electronics Service Center to buy optional items. Connecting to the LCD Display. Note • Turn on both the Source List and Edit Name before selecting PC or ...

User Manual
Page 35
...to D-sub cable(sold separately) to the product's RGB/COMPONENT IN port and the COMPONENT - Connect between the AUDIO OUT port on the LCD monitor and the audio input port on another monitor using the SOURCE button on the front of audio cables between the AV COMPONENT AUDIO IN [R-AUDIO-L] on the... Box. Connecting a DTV Set Top (Cable/Satellite) Box 1. Note • Select Component using a stereo cable. 3. Connect between the DVI OUT port on the LCD monitor and the input port on another monitor using the SOURCE button on the front of the LCD Display or on the Set-Top Box. 2.
...to D-sub cable(sold separately) to the product's RGB/COMPONENT IN port and the COMPONENT - Connect between the AUDIO OUT port on the LCD monitor and the audio input port on another monitor using the SOURCE button on the front of audio cables between the AV COMPONENT AUDIO IN [R-AUDIO-L] on the... Box. Connecting a DTV Set Top (Cable/Satellite) Box 1. Note • Select Component using a stereo cable. 3. Connect between the DVI OUT port on the LCD monitor and the input port on another monitor using the SOURCE button on the front of the LCD Display or on the Set-Top Box. 2.

User Manual
Page 36
... can be connected to an Audio System 1. Connect a set of audio cables between the AUX L, R jacks on the AUDIO SYSTEM and AUDIO OUT on the LCD Display model. 35 For detailed information on connecting AV input devices, refer to BNC cable. Connect the RGB/COMPONENT IN port on the... monitor to the BNC port on the PC using the D-SUB to the contents under Adjusting Your LCD Display. • The LCD Display 's configuration at the back may vary slightly depending on...
... can be connected to an Audio System 1. Connect a set of audio cables between the AUX L, R jacks on the AUDIO SYSTEM and AUDIO OUT on the LCD Display model. 35 For detailed information on connecting AV input devices, refer to BNC cable. Connect the RGB/COMPONENT IN port on the... monitor to the BNC port on the PC using the D-SUB to the contents under Adjusting Your LCD Display. • The LCD Display 's configuration at the back may vary slightly depending on...
User Manual
Page 38
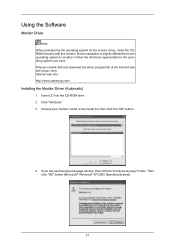
... "OK" button (Microsoft® Windows® XP/2000 Operating System). 37 Internet web site : http://www.samsung.com/ Installing the Monitor Driver (Automatic) 1. Insert CD into the CD-ROM drive. 2. If you have. Using the Software Monitor Driver Note When prompted by the operating system for the operating system you can see following...
... "OK" button (Microsoft® Windows® XP/2000 Operating System). 37 Internet web site : http://www.samsung.com/ Installing the Monitor Driver (Automatic) 1. Insert CD into the CD-ROM drive. 2. If you have. Using the Software Monitor Driver Note When prompted by the operating system for the operating system you can see following...
User Manual
Page 39
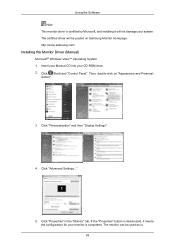
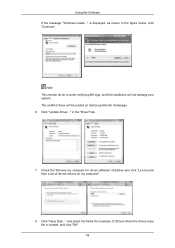
...it means the configuration for your monitor is . 38 The certified driver will not damage your CD-ROM drive. 2. Insert your Manual CD into your system. If the "Properties" button is deactivated, it will be used as is completed. Then, double-click on Samsung Monitor homepage. Click "Personalization" and ...then "Display Settings". 4. The monitor can be posted on "Appearance and Personal-
...it means the configuration for your monitor is . 38 The certified driver will not damage your CD-ROM drive. 2. Insert your Manual CD into your system. If the "Properties" button is deactivated, it will be used as is completed. Then, double-click on Samsung Monitor homepage. Click "Personalization" and ...then "Display Settings". 4. The monitor can be posted on "Appearance and Personal-
User Manual
Page 40
... 39 Click "Have Disk..." Click "Update Driver..." The certified driver will not damage your system. in the figure below, click "Continue". Note This monitor driver is displayed, as shown in the "Driver" tab. 7. and select the folder (for driver software" checkbox and click "Let me pick from... a list of device drivers on Samsung Monitor homepage. 6. Using the Software If the message "Windows needs..." is under certifying MS logo, and this installation will be posted on my computer". 8....
... 39 Click "Have Disk..." Click "Update Driver..." The certified driver will not damage your system. in the figure below, click "Continue". Note This monitor driver is displayed, as shown in the "Driver" tab. 7. and select the folder (for driver software" checkbox and click "Let me pick from... a list of device drivers on Samsung Monitor homepage. 6. Using the Software If the message "Windows needs..." is under certifying MS logo, and this installation will be posted on my computer". 8....

User Manual
Page 41
Using the Software 9. Select the model that matches your monitor from the list of monitor models on the following screens displayed in sequence. Click "Close" → "Close" → "OK" → "OK" on the screen, and click "Next". 10. Microsoft® Windows® XP Operating System 40
Using the Software 9. Select the model that matches your monitor from the list of monitor models on the following screens displayed in sequence. Click "Close" → "Close" → "OK" → "OK" on the screen, and click "Next". 10. Microsoft® Windows® XP Operating System 40
User Manual
Page 42
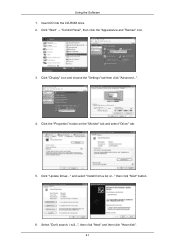
Click "Start" → "Control Panel", then click the "Appearance and Themes" icon. 3. Click the "Properties" button on the "Monitor" tab and select "Driver" tab. 5. then click "Next" button. 6. and select "Install from a list or..." Select "Don't search, I will...", then click "Next" and then click "Have disk". 41 Using the Software 1. Click "Display" icon and choose the "Settings" tab then click "Advanced...". 4. Insert CD into the CD-ROM drive. 2. Click "Update Driver..."
Click "Start" → "Control Panel", then click the "Appearance and Themes" icon. 3. Click the "Properties" button on the "Monitor" tab and select "Driver" tab. 5. then click "Next" button. 6. and select "Install from a list or..." Select "Don't search, I will...", then click "Next" and then click "Have disk". 41 Using the Software 1. Click "Display" icon and choose the "Settings" tab then click "Advanced...". 4. Insert CD into the CD-ROM drive. 2. Click "Update Driver..."

User Manual
Page 43
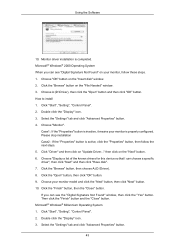
If you can see the following message window, click the "Continue Anyway" button. Then click "OK" button. Click the "Close" button, then click the "OK" button continually. 42 Note This monitor driver is certified by Microsoft, and this installation will be posted on Samsung Monitor homepage. The certified driver will not damage your monitor model in the model list and click the "Next" button. 8. Using the Software 7. Click the "Browse" button then choose A:(D:\Driver) and choose your system. http://www.samsung.com/ 9.
If you can see the following message window, click the "Continue Anyway" button. Then click "OK" button. Click the "Close" button, then click the "OK" button continually. 42 Note This monitor driver is certified by Microsoft, and this installation will be posted on Samsung Monitor homepage. The certified driver will not damage your monitor model in the model list and click the "Next" button. 8. Using the Software 7. Click the "Browse" button then choose A:(D:\Driver) and choose your system. http://www.samsung.com/ 9.
User Manual
Page 44
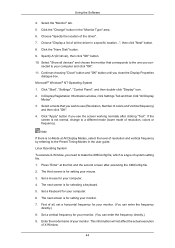
..."Browse" button on "Update Driver..." Microsoft® Windows® Millennium Operating System 1. Click the "Finish" button, then the "Close" button. Monitor driver installation is active, click the "Properties" button, then follow these steps. 1. Choose "Display a list of the known drivers for this device ...so that I can see "Digital Signature Not Found" on your monitor, follow the next steps. 5. Click "Driver" and then click on the "File Needed" window. 3. Click the "Open" button, then click...
..."Browse" button on "Update Driver..." Microsoft® Windows® Millennium Operating System 1. Click the "Finish" button, then the "Close" button. Monitor driver installation is active, click the "Properties" button, then follow these steps. 1. Choose "Display a list of the known drivers for this device ...so that I can see "Digital Signature Not Found" on your monitor, follow the next steps. 5. Click "Driver" and then click on the "File Needed" window. 3. Click the "Open" button, then click...
User Manual
Page 45
... normal, change to a different mode (lower mode of resolution and vertical frequency by referring to make the X86Config file, which is for setting your monitor. (You can enter the frequency directly.) 8. Click the "Change" button in a specific location...", then click "Next" button. 8. Click the ...", and then double-click "Display" icon. 2. Continue choosing "Close" button and "OK" button until you con- Note If there is for your monitor. 7. Press "Enter" at All Display Modes, select the level of resolution, colors or frequency). Set a Keyboard for your computer and click "OK"....
... normal, change to a different mode (lower mode of resolution and vertical frequency by referring to make the X86Config file, which is for setting your monitor. (You can enter the frequency directly.) 8. Click the "Change" button in a specific location...", then click "Next" button. 8. Click the ...", and then double-click "Display" icon. 2. Continue choosing "Close" button and "OK" button until you con- Note If there is for your monitor. 7. Press "Enter" at All Display Modes, select the level of resolution, colors or frequency). Set a Keyboard for your computer and click "OK"....

User Manual
Page 46
...press F5 Key. Installation Problems The installation of the license agreement" to start the program. MDC execution icon may not appear depending on your monitor. Click "Finish". 8. Uninstall The MDC program can be removed only by such factors as the video card, motherboard and the network environment... menu and then double-click "Add/Delete a program". Double-click the icon to accept the terms of computer system or monitor. The "Installation Status" window appears. 7. You have finished setting up your desktop. Click "Install". 6. Perform the following steps remove MDC.
...press F5 Key. Installation Problems The installation of the license agreement" to start the program. MDC execution icon may not appear depending on your monitor. Click "Finish". 8. Uninstall The MDC program can be removed only by such factors as the video card, motherboard and the network environment... menu and then double-click "Add/Delete a program". Double-click the icon to accept the terms of computer system or monitor. The "Installation Status" window appears. 7. You have finished setting up your desktop. Click "Install". 6. Perform the following steps remove MDC.

User Manual
Page 66
The Type item can be set to 10, 20, 30, 40 or 50. For the All White and Pattern type, it can be set to 1, 2,...is ON. This function is used to be performed. The Input source of MagicInfo works only on TV model. The Input source of TV works only on MagicInfo model. This allows the screen to prevent afterimages from occurring. There are ...five (5) types that occur when a still screen is displayed on the monitor for a long time. 2) Pixel Shift -...
The Type item can be set to 10, 20, 30, 40 or 50. For the All White and Pattern type, it can be set to 1, 2,...is ON. This function is used to be performed. The Input source of MagicInfo works only on TV model. The Input source of TV works only on MagicInfo model. This allows the screen to prevent afterimages from occurring. There are ...five (5) types that occur when a still screen is displayed on the monitor for a long time. 2) Pixel Shift -...

