
Quick Guide (ENGLISH)
Page 3
It will disappear after 40 seconds. Turn the Power button off and on -screen menu and exits from the menu. It can be displayed again. Note The resolution displayed on the screen, ... [ ] When OSD is not on the screen is the optimal resolution for this product. Introduction Note Cleaning Cloth is the same as a product feature. Your Monitor Initial Settings Select the language using the up to adjust brightness. Adjust your PC before reaching the maximum count. Customized Key[ ] 9 The displayed content will...
It will disappear after 40 seconds. Turn the Power button off and on -screen menu and exits from the menu. It can be displayed again. Note The resolution displayed on the screen, ... [ ] When OSD is not on the screen is the optimal resolution for this product. Introduction Note Cleaning Cloth is the same as a product feature. Your Monitor Initial Settings Select the language using the up to adjust brightness. Adjust your PC before reaching the maximum count. Customized Key[ ] 9 The displayed content will...
Quick Guide (ENGLISH)
Page 4
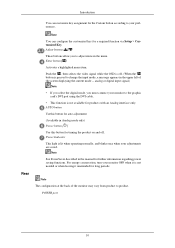
...in the menu. Enter button [ ] Activates a highlighted menu item. For energy conservation, turn your adjustments are saved. analog or digital input signal.) Note • If you select the digital mode, you to your monitor to the graphic card's DVI port using the DVI cable. • This function is ...not available for products with an Analog interface only. Power Indicator This light is lit when operating normally, and blinks once when your monitor OFF when it is pressed to product. POWER port 10 Rear Note You can customize key assignment for the Custom button according to...
...in the menu. Enter button [ ] Activates a highlighted menu item. For energy conservation, turn your adjustments are saved. analog or digital input signal.) Note • If you select the digital mode, you to your monitor to the graphic card's DVI port using the DVI cable. • This function is ...not available for products with an Analog interface only. Power Indicator This light is lit when operating normally, and blinks once when your monitor OFF when it is pressed to product. POWER port 10 Rear Note You can customize key assignment for the Custom button according to...
Quick Guide (ENGLISH)
Page 5
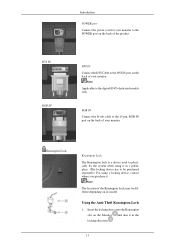
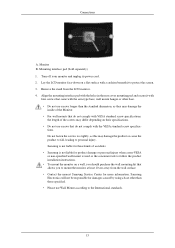
Note Applicable to the digital (DVI)-dedicated models only. Note The location of your monitor. Using the Anti-Theft Kensington Lock 1. Insert the locking device into the Kensington slot on its model. DVI IN Connect the DVI Cable to the ... the system when using a locking device, contact where you purchase it in a public place. (The locking device has to be different depending on the Monitor and turn it . RGB IN Connect the D-sub cable to the 15-pin, RGB IN port on the back of the product. DVI IN RGB IN Introduction...
Note Applicable to the digital (DVI)-dedicated models only. Note The location of your monitor. Using the Anti-Theft Kensington Lock 1. Insert the locking device into the Kensington slot on its model. DVI IN Connect the DVI Cable to the ... the system when using a locking device, contact where you purchase it in a public place. (The locking device has to be different depending on the Monitor and turn it . RGB IN Connect the D-sub cable to the 15-pin, RGB IN port on the back of the product. DVI IN RGB IN Introduction...
Quick Guide (ENGLISH)
Page 8
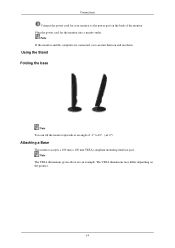
Connections Connect the power cord for the monitor into a nearby outlet. Note The VESA dimensions given above are connected, you can tilt the monitor upwards at an angle of the monitor. Using the Stand Folding the base Note You can turn them . Note If the monitor and the computer are an example. The VESA dimensions may differ depending on and use them on the product. 14 Plug the power cord for your monitor to the power port on the back of -1° to 16°. ( ±1.0°) Attaching a Base This monitor accepts a 100 mm x 100 mm VESA-compliant mounting interface pad.
Connections Connect the power cord for the monitor into a nearby outlet. Note The VESA dimensions given above are connected, you can tilt the monitor upwards at an angle of the monitor. Using the Stand Folding the base Note You can turn them . Note If the monitor and the computer are an example. The VESA dimensions may differ depending on and use them on the product. 14 Plug the power cord for your monitor to the power port on the back of -1° to 16°. ( ±1.0°) Attaching a Base This monitor accepts a 100 mm x 100 mm VESA-compliant mounting interface pad.

Quick Guide (ENGLISH)
Page 9
...the product or cause the product to fall, leading to protect the screen. 3. Turn off your monitor and unplug its power cord. 2. Remove the stand from the wall surface. • Contact the nearest Samsung Service Center for product damage or personal injury when a non-VESA or non-specified... a base other base. • Do not use Wall Mount according to mount the monitor at least 10 cm away from the LCD monitor. 4. Samsung Electronics will not be responsible for these kinds of the Monitor. • For wall mounts that allows you should purchase the wall mounting kit that ...
...the product or cause the product to fall, leading to protect the screen. 3. Turn off your monitor and unplug its power cord. 2. Remove the stand from the wall surface. • Contact the nearest Samsung Service Center for product damage or personal injury when a non-VESA or non-specified... a base other base. • Do not use Wall Mount according to mount the monitor at least 10 cm away from the LCD monitor. 4. Samsung Electronics will not be responsible for these kinds of the Monitor. • For wall mounts that allows you should purchase the wall mounting kit that ...

Quick Guide (ENGLISH)
Page 10
... the power indicator LED is out of the computer. 3. Turn off your computer and the monitor. 2. Note For models with an Analog interface only, "Analog/Digita" is functioning properly, you to check the signal cable. your monitor is functioning properly. Self-Test Feature Check 1. Unplug the ... see a box in the illustration below. If the monitor is not shown in the Warning Message OSD. 37 If your monitor screen remains blank after using the previous procedure, check your computer and the monitor. Turn on both your monitor and reconnect the video cable; This box appears during...
... the power indicator LED is out of the computer. 3. Turn off your computer and the monitor. 2. Note For models with an Analog interface only, "Analog/Digita" is functioning properly, you to check the signal cable. your monitor is functioning properly. Self-Test Feature Check 1. Unplug the ... see a box in the illustration below. If the monitor is not shown in the Warning Message OSD. 37 If your monitor screen remains blank after using the previous procedure, check your computer and the monitor. Turn on both your monitor and reconnect the video cable; This box appears during...
Quick Guide (ENGLISH)
Page 11
...still see an (error) message on the screen when the monitor is connected properly, check to analog. Q: Is the power cord connected properly? If there is a message coming up , disconnect the cable from the computer. I cannot turn on the screen. Q: Can you still see an error message... on the screen when the monitor is connected properly, check to become noisy, and video mode not supported, etc. A: (Connected using the...
...still see an (error) message on the screen when the monitor is connected properly, check to analog. Q: Is the power cord connected properly? If there is a message coming up , disconnect the cable from the computer. I cannot turn on the screen. Q: Can you still see an error message... on the screen when the monitor is connected properly, check to become noisy, and video mode not supported, etc. A: (Connected using the...
Quick Guide (ENGLISH)
Page 13
....) There are only 16 colors shown on and the LED is blinking but no images on the monitor? Q: Have you installed the monitor driver? The screen is in hibernation mode (The monitor turns off). 40 Q: Have you changed after changing Q: Have the Windows colors been set properly? Readjust... Position by referring to the monitor? Q: Is the frequency properly adjusted when checking the Display Timing on the mo Q: Check whether your ...
....) There are only 16 colors shown on and the LED is blinking but no images on the monitor? Q: Have you installed the monitor driver? The screen is in hibernation mode (The monitor turns off). 40 Q: Have you changed after changing Q: Have the Windows colors been set properly? Readjust... Position by referring to the monitor? Q: Is the frequency properly adjusted when checking the Display Timing on the mo Q: Check whether your ...
Quick Guide (ENGLISH)
Page 14
... the volume level. When you have a problem with the monitor. Check the following items if there is firmly connected to Connecting Cables). Q: MagicTune™ feature is already installed, remove it to operate normally after turning the control to check the compatible graphic card list provided. ...A: Ensure that supports Plug and Play. Q: Sound level is XP); If the volume is available for the monitor. The program can be downloaded http://www.samsung.com/mon- itor/magictune Q: Did you changed your mouse or press any key to reboot the computer for MagicTune...
... the volume level. When you have a problem with the monitor. Check the following items if there is firmly connected to Connecting Cables). Q: MagicTune™ feature is already installed, remove it to operate normally after turning the control to check the compatible graphic card list provided. ...A: Ensure that supports Plug and Play. Q: Sound level is XP); If the volume is available for the monitor. The program can be downloaded http://www.samsung.com/mon- itor/magictune Q: Did you changed your mouse or press any key to reboot the computer for MagicTune...

User Manual (ENGLISH)
Page 5
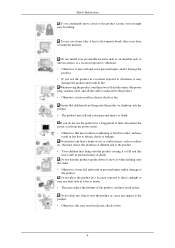
... in a location exposed to disconnect the power cord. • Otherwise, it may result in fire. When you drop the product or the case is broken, turn the power off the indication labels on the cloth, make sure to be scratched if there is a high voltage product. Others Safety Instructions When cleaning...
... in a location exposed to disconnect the power cord. • Otherwise, it may result in fire. When you drop the product or the case is broken, turn the power off the indication labels on the cloth, make sure to be scratched if there is a high voltage product. Others Safety Instructions When cleaning...
User Manual (ENGLISH)
Page 7
When moving the product, turn the product upside down or move closer to vibrations. • Otherwise, it may damage ...cause personal injury or death. To ease eye strain, take at least a five-minute break after every hour of using the monitor. Safety Instructions If you use the product for a long period of time, disconnect the power cord from the power outlet. &#... dust, and may result in fire due to electric shock or leakage. Do not install it in fire. Do not turn the power off and disconnect the power plug, antenna cable, and all the cables connected to the product. • Otherwise...
When moving the product, turn the product upside down or move closer to vibrations. • Otherwise, it may damage ...cause personal injury or death. To ease eye strain, take at least a five-minute break after every hour of using the monitor. Safety Instructions If you use the product for a long period of time, disconnect the power cord from the power outlet. &#... dust, and may result in fire due to electric shock or leakage. Do not install it in fire. Do not turn the power off and disconnect the power plug, antenna cable, and all the cables connected to the product. • Otherwise...

User Manual (ENGLISH)
Page 8
Good Postures When Using the Monitor When using the product, use it in the correct position. • Keep your back straight while looking at the product. • The distance between your ... product. When there is heavy, install the product on the product. • This may result in electric shock or fire. If the product has been turned on the floor.
Good Postures When Using the Monitor When using the product, use it in the correct position. • Keep your back straight while looking at the product. • The distance between your ... product. When there is heavy, install the product on the product. • This may result in electric shock or fire. If the product has been turned on the floor.

User Manual (ENGLISH)
Page 10
... on . Customized Key[ ] 9 The displayed content will be displayed up or down key. Also use to exit the OSD menu or return to adjust brightness. Turn the Power button off and on the screen is not on -screen menu and exits from the menu. Adjust your PC before reaching the maximum... count. Your Monitor Initial Settings Select the language using the up to adjust the resolution of your PC resolution so that it is only provided for highly polished...
... on . Customized Key[ ] 9 The displayed content will be displayed up or down key. Also use to exit the OSD menu or return to adjust brightness. Turn the Power button off and on the screen is not on -screen menu and exits from the menu. Adjust your PC before reaching the maximum... count. Your Monitor Initial Settings Select the language using the up to adjust the resolution of your PC resolution so that it is only provided for highly polished...

User Manual (ENGLISH)
Page 11
... products with an Analog interface only. Rear Note You can customize key assignment for the Custom button according to product. For energy conservation, turn your monitor OFF when it is off . AUTO button Usethis button for auto adjustment. (Available in the upper left of the...from product to your adjustments are saved. Adjust buttons [ ] These buttons allow you must connect your monitor to the graphic card's DVI port using the DVI cable. • This function is not available for turning the product on and off . (When the ' ' button is lit when operating normally, and blinks...
... products with an Analog interface only. Rear Note You can customize key assignment for the Custom button according to product. For energy conservation, turn your monitor OFF when it is off . AUTO button Usethis button for auto adjustment. (Available in the upper left of the...from product to your adjustments are saved. Adjust buttons [ ] These buttons allow you must connect your monitor to the graphic card's DVI port using the DVI cable. • This function is not available for turning the product on and off . (When the ' ' button is lit when operating normally, and blinks...

User Manual (ENGLISH)
Page 12
... purchase it. Insert the locking device into the Kensington slot on the back of your monitor. DVI IN RGB IN Introduction POWER port Connect the power cord for your monitor to the POWER port on the Monitor and turn it in a public place. (The locking device has to the digital (DVI)-dedicated models only.... DVI IN Connect the DVI Cable to the DVI IN port on the back of the product. Note The location of your monitor. RGB IN Connect...
... purchase it. Insert the locking device into the Kensington slot on the back of your monitor. DVI IN RGB IN Introduction POWER port Connect the power cord for your monitor to the POWER port on the Monitor and turn it in a public place. (The locking device has to the digital (DVI)-dedicated models only.... DVI IN Connect the DVI Cable to the DVI IN port on the back of the product. Note The location of your monitor. RGB IN Connect...

User Manual (ENGLISH)
Page 15
The VESA dimensions may differ depending on the back of -1° to 16°. ( ±1.0°) Attaching a Base This monitor accepts a 100 mm x 100 mm VESA-compliant mounting interface pad. Note If the monitor and the computer are an example. Using the Stand Folding the base Note You can turn them on and use them. Note The VESA dimensions given above are connected, you can tilt the monitor upwards at an angle of the monitor. Connections Connect the power cord for the monitor into a nearby outlet. Plug the power cord for your monitor to the power port on the product. 14
The VESA dimensions may differ depending on the back of -1° to 16°. ( ±1.0°) Attaching a Base This monitor accepts a 100 mm x 100 mm VESA-compliant mounting interface pad. Note If the monitor and the computer are an example. Using the Stand Folding the base Note You can turn them on and use them. Note The VESA dimensions given above are connected, you can tilt the monitor upwards at an angle of the monitor. Connections Connect the power cord for the monitor into a nearby outlet. Plug the power cord for your monitor to the power port on the product. 14
User Manual (ENGLISH)
Page 16
... it to the International standards. 15 Samsung is not liable for these kinds of the screws may damage the product or cause the product to fall, leading to mount the monitor at least 10 cm away from the LCD monitor. 4. Turn off your monitor and unplug its power cord. 2. ...Remove the stand from the wall surface. • Contact the nearest Samsung Service Center for damages caused by using a base other base...
... it to the International standards. 15 Samsung is not liable for these kinds of the screws may damage the product or cause the product to fall, leading to mount the monitor at least 10 cm away from the LCD monitor. 4. Turn off your monitor and unplug its power cord. 2. ...Remove the stand from the wall surface. • Contact the nearest Samsung Service Center for damages caused by using a base other base...

User Manual (ENGLISH)
Page 36
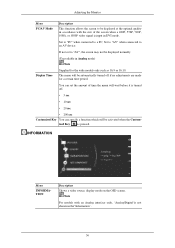
Off • Off • On Off Timer Setting The monitors will turn off automatically at the specified time. Language • On : The menus are displayed in the normal way (non-transparently). Note The language chosen affects only ... analogue (D-SUB)-or-digital (DVI)-dedicated models. 35 Off Timer On/ You can choose one of nine languages. Auto Source Select Auto Source for the monitor to automatically select the signal source. • Auto • Manual Note Not applicable to display the menus. It has no effect on any software running...
Off • Off • On Off Timer Setting The monitors will turn off automatically at the specified time. Language • On : The menus are displayed in the normal way (non-transparently). Note The language chosen affects only ... analogue (D-SUB)-or-digital (DVI)-dedicated models. 35 Off Timer On/ You can choose one of nine languages. Auto Source Select Auto Source for the monitor to automatically select the signal source. • Auto • Manual Note Not applicable to display the menus. It has no effect on any software running...
User Manual (ENGLISH)
Page 37
Adjusting the Monitor Menu PC/AV Mode Description This function allows the screen to be displayed at the optimal ...certain time period. If not set the amount of the screen when a 480P, 576P, 720P, 1080i, or 1080P video signal is turned off if no adjustments are made for the wide models only such as 16:9 or 16:10. Set to "PC" when connected... to a PC, Set to "AV" when connected to "AV", the screen may not be automatically turned off . • 5 sec • 10 sec • 20 sec • 200 sec Customized Key You can specify a function which will...
Adjusting the Monitor Menu PC/AV Mode Description This function allows the screen to be displayed at the optimal ...certain time period. If not set the amount of the screen when a 480P, 576P, 720P, 1080i, or 1080P video signal is turned off if no adjustments are made for the wide models only such as 16:9 or 16:10. Set to "PC" when connected... to a PC, Set to "AV" when connected to "AV", the screen may not be automatically turned off . • 5 sec • 10 sec • 20 sec • 200 sec Customized Key You can specify a function which will...
User Manual (ENGLISH)
Page 38
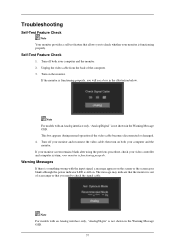
...box in the Warning Message OSD. This box appears during normal operation if the video cable becomes disconnected or damaged. 4. Turn off both your computer and the monitor. your video controller and computer system; Warning Messages If there is something wrong with an Analog interface only, "Analog/Digita..." is not shown in the Warning Message OSD. 37 Turn on both your computer and the monitor. 2. Note For models with an Analog interface only, "Analog/Digital" is not shown in the illustration below. Self-...
...box in the Warning Message OSD. This box appears during normal operation if the video cable becomes disconnected or damaged. 4. Turn off both your computer and the monitor. your video controller and computer system; Warning Messages If there is something wrong with an Analog interface only, "Analog/Digita..." is not shown in the Warning Message OSD. 37 Turn on both your computer and the monitor. 2. Note For models with an Analog interface only, "Analog/Digital" is not shown in the illustration below. Self-...


