User Manual (ENGLISH)
Page 11
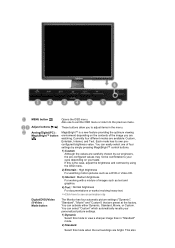
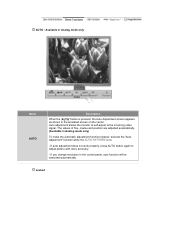
... Select this is a new feature providing the optimum viewing environment depending on your taste. MENU button [ ] Opens the OSD menu. Also use to exit the OSD menu or return to see an animation clip Digital(DVD)/Video /S-Video : Mode button The Monitor has four automatic picture settings ("Dynamic", "Standard", "Movie" and "Custom") that are preset at...
... Select this is a new feature providing the optimum viewing environment depending on your taste. MENU button [ ] Opens the OSD menu. Also use to exit the OSD menu or return to see an animation clip Digital(DVD)/Video /S-Video : Mode button The Monitor has four automatic picture settings ("Dynamic", "Standard", "Movie" and "Custom") that are preset at...
User Manual (ENGLISH)
Page 12
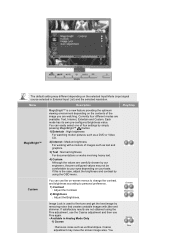
... fatigue. 4) Custom Select this mode when the surroundings are dark. For energy conservation, turn the monitor on Video screens in PIP Mode. For more information, see an animation clip PIP button ( Available in Analog/Digital(PC) Mode Only ) In Analog or Digital Mode, turns on and...Analog mode only) When the 'AUTO' button is pressed, the Auto Adjustment screen appears as shown in the animated screen on the screen, push the button to adjust brightness. >>Click here to see an animation clip Enter button [ ] / SOURCE button Activates a highlighted menu item. / Push the 'SOURCE', then...
... fatigue. 4) Custom Select this mode when the surroundings are dark. For energy conservation, turn the monitor on Video screens in PIP Mode. For more information, see an animation clip PIP button ( Available in Analog/Digital(PC) Mode Only ) In Analog or Digital Mode, turns on and...Analog mode only) When the 'AUTO' button is pressed, the Auto Adjustment screen appears as shown in the animated screen on the screen, push the button to adjust brightness. >>Click here to see an animation clip Enter button [ ] / SOURCE button Activates a highlighted menu item. / Push the 'SOURCE', then...

User Manual (ENGLISH)
Page 25
... select [Execute]. Click Natural Color on the initial screen to delete the Natural Color software program Select "Setting/Control Panel" on the "Start" menu and then double-click "Add/Delete a program". Enter D:\color\eng\setup.exe and then press the key. (If the drive where the CD...Color software. Select Natural Color from the list and then click the "Add/Delete" button. To install the program manually, insert the CD included with the Samsung monitor into the CDROM Drive, click the [Start] button of the program Natural Color will be executed. How to install the Natural Color software...
... select [Execute]. Click Natural Color on the initial screen to delete the Natural Color software program Select "Setting/Control Panel" on the "Start" menu and then double-click "Add/Delete a program". Enter D:\color\eng\setup.exe and then press the key. (If the drive where the CD...Color software. Select Natural Color from the list and then click the "Add/Delete" button. To install the program manually, insert the CD included with the Samsung monitor into the CDROM Drive, click the [Start] button of the program Natural Color will be executed. How to install the Natural Color software...
User Manual (ENGLISH)
Page 26
... the OSD is not on -screen menu and exits from the menu screen or closes screen adjustment menu. PIP Push the PIP button to activate a highlighted menu item. AUTO Press to self-adjust to adjust items in the menu. The values of the image you are...button allows you to the incoming Analog signal. Then push button again to circle through available preconfigured modes. ( Custom → Entertain → Internet → Text ) Digital(DVD)/Video/S-Video: Mode The Monitor has four automatic picture settings that are watching. Then push button again to adjust items in the menu...
... the OSD is not on -screen menu and exits from the menu screen or closes screen adjustment menu. PIP Push the PIP button to activate a highlighted menu item. AUTO Press to self-adjust to adjust items in the menu. The values of the image you are...button allows you to the incoming Analog signal. Then push button again to circle through available preconfigured modes. ( Custom → Entertain → Internet → Text ) Digital(DVD)/Video/S-Video: Mode The Monitor has four automatic picture settings that are watching. Then push button again to adjust items in the menu...
User Manual (ENGLISH)
Page 27
... AUTO PATTERN is pressed, the Auto Adjustment screen appears as shown in the animated screen on . - If auto adjustment does not work properly, press AUTO button again to the incoming video signal. If you change resolution in the control panel, auto function will be executed automatically. Locked AUTO : Available in Analog...
... AUTO PATTERN is pressed, the Auto Adjustment screen appears as shown in the animated screen on . - If auto adjustment does not work properly, press AUTO button again to the incoming video signal. If you change resolution in the control panel, auto function will be executed automatically. Locked AUTO : Available in Analog...

User Manual (ENGLISH)
Page 28
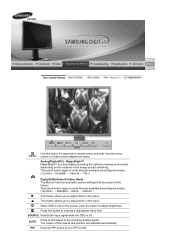
Play/Stop MagicBright™ Menu Locked Description After pushing the "MENU" button more than 5 seconds, OSD function is a new feature providing the optimum viewing environment depending on the contents of the image you can still adjust MagicBright™ and Brightness and Contrast of the monitor. Play/Stop MENU AUTO/PIP Menu Description Analog/Digital(PC) : MagicBright™ MagicBright™ is locked (unlocked). Even if you use the OSD adjustment lock function, you are watching.
Play/Stop MagicBright™ Menu Locked Description After pushing the "MENU" button more than 5 seconds, OSD function is a new feature providing the optimum viewing environment depending on the contents of the image you can still adjust MagicBright™ and Brightness and Contrast of the monitor. Play/Stop MENU AUTO/PIP Menu Description Analog/Digital(PC) : MagicBright™ MagicBright™ is locked (unlocked). Even if you use the OSD adjustment lock function, you are watching.

User Manual (ENGLISH)
Page 29
Then push button again to circle through available preconfigured modes. ( Dynamic → Standard → Movie → Custom ) Brightness : Available in Analog/Digital Mode Only Menu Brightness Description When OSD is not on the screen, push the button to circle through available preconfigured modes. ( Custom → Entertain → Internet → Text ) Mode MagicBright™ / Mode Digital(DVD)/Video/S-Video : Mode The Monitor has four automatic picture settings that are preset at the factory. Then push button again to adjust brightness. SOURCE
Then push button again to circle through available preconfigured modes. ( Dynamic → Standard → Movie → Custom ) Brightness : Available in Analog/Digital Mode Only Menu Brightness Description When OSD is not on the screen, push the button to circle through available preconfigured modes. ( Custom → Entertain → Internet → Text ) Mode MagicBright™ / Mode Digital(DVD)/Video/S-Video : Mode The Monitor has four automatic picture settings that are preset at the factory. Then push button again to adjust brightness. SOURCE

User Manual (ENGLISH)
Page 30
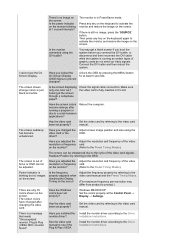
Menu SOURCE Description Selects the input signal while the OSD is off. (When the source button is pressed to change the input mode, a message appears in the upper left of the screen displaying the current mode -Analog, Digital, Video and S-Video input signal.) Note : Changing the source is allowed only in Analog/Digital(PC) Mode Only ) Menu PIP Description Push the PIP button to the monitor at the time. Source : Video, S-Video PIP ( Available in external devices that are connected to turn PIP screen On/Off.
Menu SOURCE Description Selects the input signal while the OSD is off. (When the source button is pressed to change the input mode, a message appears in the upper left of the screen displaying the current mode -Analog, Digital, Video and S-Video input signal.) Note : Changing the source is allowed only in Analog/Digital(PC) Mode Only ) Menu PIP Description Push the PIP button to the monitor at the time. Source : Video, S-Video PIP ( Available in external devices that are connected to turn PIP screen On/Off.
User Manual (ENGLISH)
Page 32
... 2) Internet : Medium brightness For working with jitter and shimmer. Currently four different modes are not obtained using the OSD menu. You can use Fine again. - If satisfactory results are available: Text, Internet, Entertain and Custom. Coarse adjustment may...1) Contrast : Adjust the Contrast. 2) Brightness : Adjust the Brightness. Menu MagicBright™ Description MagicBright™ is the case, adjust the brightness and contrast by simply pressing MagicBright™ [ ] button. 1) Entertain : High brightness For watching motion pictures such as vertical ...
... 2) Internet : Medium brightness For working with jitter and shimmer. Currently four different modes are not obtained using the OSD menu. You can use Fine again. - If satisfactory results are available: Text, Internet, Entertain and Custom. Coarse adjustment may...1) Contrast : Adjust the Contrast. 2) Brightness : Adjust the Brightness. Menu MagicBright™ Description MagicBright™ is the case, adjust the brightness and contrast by simply pressing MagicBright™ [ ] button. 1) Entertain : High brightness For watching motion pictures such as vertical ...
User Manual (ENGLISH)
Page 45
...on all display resolutions supported by simply pressing MagicBright control buttons. 1. For quick adjustment of the monitor settings, the OSD mode allows easy and convenient access to all tabs and sub-menu items. Button Tab Definition OK Applies any changes in the dark areas...VCD. Each mode has its own pre-configured brightness value. Internet: For working with a mixture of the images. When selected , each monitor. Color Overview | Installation | OSD Mode | | Uninstall | Troubleshooting Calibration MagicTune allows for quick accurate tuning of the display with the ...
...on all display resolutions supported by simply pressing MagicBright control buttons. 1. For quick adjustment of the monitor settings, the OSD mode allows easy and convenient access to all tabs and sub-menu items. Button Tab Definition OK Applies any changes in the dark areas...VCD. Each mode has its own pre-configured brightness value. Internet: For working with a mixture of the images. When selected , each monitor. Color Overview | Installation | OSD Mode | | Uninstall | Troubleshooting Calibration MagicTune allows for quick accurate tuning of the display with the ...

User Manual (ENGLISH)
Page 51
Perform the following steps remove MagicTune™. 1. Click the "Add or Remove Programs" icon in the menu. Go to remove the program. 5. Click "Yes" to [Control Panel] in the [Start] menu. 2. If the program runs on it . 4. Wait until the "Uninstall Complete" dialog box appears. Color Overview | Installation | OSD Mode | | ...uninstall process. 6. In the "Add or Remove Programs" screen, scroll down to highlight it to find "MagicTune™." Click the "Change/Remove" button to [Task Tray] ' [Start] ' [Settings] and select [Control Panel] in Control Panel. 3.
Perform the following steps remove MagicTune™. 1. Click the "Add or Remove Programs" icon in the menu. Go to remove the program. 5. Click "Yes" to [Control Panel] in the [Start] menu. 2. If the program runs on it . 4. Wait until the "Uninstall Complete" dialog box appears. Color Overview | Installation | OSD Mode | | ...uninstall process. 6. In the "Add or Remove Programs" screen, scroll down to highlight it to find "MagicTune™." Click the "Change/Remove" button to [Task Tray] ' [Start] ' [Settings] and select [Control Panel] in Control Panel. 3.
User Manual (ENGLISH)
Page 59
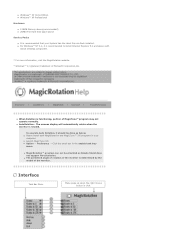
... install both MagicRotation and MagicTune™ 3.6 programs in the enable task tray menu. z The permitted angle of rotation of the monitor is rotated. Interface Task Bar Menu Menu pops up when the right mouse button is registered trademark of Microsoft Corporation,Inc. z For Windows™ NT 4.0, it should be provided as below. Overview | Installation | Interface...
... install both MagicRotation and MagicTune™ 3.6 programs in the enable task tray menu. z The permitted angle of rotation of the monitor is rotated. Interface Task Bar Menu Menu pops up when the right mouse button is registered trademark of Microsoft Corporation,Inc. z For Windows™ NT 4.0, it should be provided as below. Overview | Installation | Interface...

User Manual (ENGLISH)
Page 62
... program runs on it to [Task Tray] ' [Start] ' [Settings] and select [Control Panel] in the [Start] menu. 2. Click "Yes" to [Control Panel] in the menu. In order to remove the program. 5. Click the "Change/Remove" button to verify if a problem exists in it . 4. If the installed "Display Driver" is installed. Go to highlight...
... program runs on it to [Task Tray] ' [Start] ' [Settings] and select [Control Panel] in the [Start] menu. 2. Click "Yes" to [Control Panel] in the menu. In order to remove the program. 5. Click the "Change/Remove" button to verify if a problem exists in it . 4. If the installed "Display Driver" is installed. Go to highlight...
User Manual (ENGLISH)
Page 65
...frequency per resolution may get a blank screen if you boot the system before you locked the On Screen Display (OSD) Menu to activate the monitor and restore the image on the screen. Has the video card been set properly? Have you adjusted the Adjust the ...monitor? (Refer to the Preset Timing Modes). Have the screen colors become unbalanced. Readjust Position by referring to the cycle of the video card signals. Has the video card been set properly? Have you changed after running as if looking at least 5 seconds. Set the video card by pressing the MENU button...
...frequency per resolution may get a blank screen if you boot the system before you locked the On Screen Display (OSD) Menu to activate the monitor and restore the image on the screen. Has the video card been set properly? Have you adjusted the Adjust the ...monitor? (Refer to the Preset Timing Modes). Have the screen colors become unbalanced. Readjust Position by referring to the cycle of the video card signals. Has the video card been set properly? Have you changed after running as if looking at least 5 seconds. Set the video card by pressing the MENU button...


