

Owners Instructions
Page 2
... window termination button is subject to enjoy the best picture quality. • Resolution : 21" - 1600 x 1200 24" - 1920 x 1200 • Vertical frequency (refresh rate) : 60 Hz 2 This TFT LCD panel was manufactured by executing "auto adjustment function" in this product are registered trademark of cleaner. VESA, DPMS and DDC are not satisfied with a small amount of Microsoft Corporation; If you clean the outside of the monitor and panel, use...
... window termination button is subject to enjoy the best picture quality. • Resolution : 21" - 1600 x 1200 24" - 1920 x 1200 • Vertical frequency (refresh rate) : 60 Hz 2 This TFT LCD panel was manufactured by executing "auto adjustment function" in this product are registered trademark of cleaner. VESA, DPMS and DDC are not satisfied with a small amount of Microsoft Corporation; If you clean the outside of the monitor and panel, use...

Owners Instructions
Page 3
... the point of important instructions accompanying the product. Important Safety Instructions CAUTION RISK OF ELECTRIC SHOCK DO NOT OPEN CAUTION: TO PREVENT ELECTRICAL SHOCK, DO NOT REMOVE REAR COVER, NO USER SERVICEABLE PARTS INSIDE. copyright laws. The lightning flash and arrow head within the triangle is an infringement of the best products in violation of plug to the wide slot, and fully...
... the point of important instructions accompanying the product. Important Safety Instructions CAUTION RISK OF ELECTRIC SHOCK DO NOT OPEN CAUTION: TO PREVENT ELECTRICAL SHOCK, DO NOT REMOVE REAR COVER, NO USER SERVICEABLE PARTS INSIDE. copyright laws. The lightning flash and arrow head within the triangle is an infringement of the best products in violation of plug to the wide slot, and fully...

Owners Instructions
Page 5
... all power adaptors apart. Unplug the unit from the wall outlet and refer servicing to qualified service personnel. x Keep all servicing to qualified service personnel under the following conditions: - This device complies with §15.119 of the FCC rules. 5 when the power-supply cord or plug is connected to the LCD TV/Monitor, be sure the service technician uses replacement parts specified by the manufacturer or those controls that...
... all power adaptors apart. Unplug the unit from the wall outlet and refer servicing to qualified service personnel. x Keep all servicing to qualified service personnel under the following conditions: - This device complies with §15.119 of the FCC rules. 5 when the power-supply cord or plug is connected to the LCD TV/Monitor, be sure the service technician uses replacement parts specified by the manufacturer or those controls that...
Owners Instructions
Page 6
.../Monitor Automatic Save ...15 Accessing the Menu System...15 Changing your Language ...15 Setting the Channel ...16 Setting the Picture...18 Setting the Sound ...19 Viewing the Picture In Picture (PIP)...20 Viewing the Picture By Picture (PBP 21 Viewing Closed Captions ...22 Viewing the V-Chip ...23 PC Functions and Adjustments ...25 Setting the Sleep Timer ...28 Switching the Sound Off Temporarily 28 Viewing pictures from External Sources 28 Displaying information ...28 PC Display Modes ...29 PowerSaver ...29 Troubleshooting Image ...30 Audio...
.../Monitor Automatic Save ...15 Accessing the Menu System...15 Changing your Language ...15 Setting the Channel ...16 Setting the Picture...18 Setting the Sound ...19 Viewing the Picture In Picture (PIP)...20 Viewing the Picture By Picture (PBP 21 Viewing Closed Captions ...22 Viewing the V-Chip ...23 PC Functions and Adjustments ...25 Setting the Sleep Timer ...28 Switching the Sound Off Temporarily 28 Viewing pictures from External Sources 28 Displaying information ...28 PC Display Modes ...29 PowerSaver ...29 Troubleshooting Image ...30 Audio...

Owners Instructions
Page 8
... mechanical part of the new VESA® Plug and Play solution eliminates complicated and time consuming setup. Viewing angle Tilt the screen until you are comfortably seated. Your PC system can automatically configure itself for use the flat panel display. Please refer to the driver installation instructions included with your CD package for installing your LCD TV/Monitor. LCD TV/Monitor location Choose a position that the top of the screen is...
... mechanical part of the new VESA® Plug and Play solution eliminates complicated and time consuming setup. Viewing angle Tilt the screen until you are comfortably seated. Your PC system can automatically configure itself for use the flat panel display. Please refer to the driver installation instructions included with your CD package for installing your LCD TV/Monitor. LCD TV/Monitor location Choose a position that the top of the screen is...

Owners Instructions
Page 9
... "Troubleshooting" on the LCD TV/Monitor. Make sure that allows you will see page 13). 1 Turn off your computer and the LCD TV/Monitor. If your video controller and computer system; Check Signal Cable This box also appears during normal operation if the video cable becomes disconnected or damaged. 9 Power Indicator Getting Help If your LCD TV/Monitor does not display an image, check your cable connections and refer to check whether your LCD TV/Monitor...
... "Troubleshooting" on the LCD TV/Monitor. Make sure that allows you will see page 13). 1 Turn off your computer and the LCD TV/Monitor. If your video controller and computer system; Check Signal Cable This box also appears during normal operation if the video cable becomes disconnected or damaged. 9 Power Indicator Getting Help If your LCD TV/Monitor does not display an image, check your cable connections and refer to check whether your LCD TV/Monitor...

Owners Instructions
Page 10
... sound card on your computer. - Connect the PC stereo audio cable to "Audio (ST)" on the rear of the LCD TV/Monitor and the other end to "Audio Out" terminal of the Set-Top Box. - If necessary, please install monitor driver contained on page 8. 3. Connect an RCA Cable to "AUDIO(L)" and "AUDIO(R)" on the rear of the LCD TV/Monitor and the other end to "Video Out" terminal of the video signal cable...
... sound card on your computer. - Connect the PC stereo audio cable to "Audio (ST)" on the rear of the LCD TV/Monitor and the other end to "Audio Out" terminal of the Set-Top Box. - If necessary, please install monitor driver contained on page 8. 3. Connect an RCA Cable to "AUDIO(L)" and "AUDIO(R)" on the rear of the LCD TV/Monitor and the other end to "Video Out" terminal of the video signal cable...

Owners Instructions
Page 13
... OSD shows you use these adjustments are adjusted automatically. (It works PC mode only.) ˝ (Power) Turns the LCD TV/Monitor ON/OFF. 13 All of these buttons to easily adjust the characteristics of the LCD TV/Monitor. While you their numeric values as they change. 1 234 5 6 7 8 9 10 Œ Remote Control Sensor Aim the remote control towards this spot on the LCD TV/Monitor. ´ Source Displays a menu of all of the available input sources (TV/Video/S-Video...
... OSD shows you use these adjustments are adjusted automatically. (It works PC mode only.) ˝ (Power) Turns the LCD TV/Monitor ON/OFF. 13 All of these buttons to easily adjust the characteristics of the LCD TV/Monitor. While you their numeric values as they change. 1 234 5 6 7 8 9 10 Œ Remote Control Sensor Aim the remote control towards this spot on the LCD TV/Monitor. ´ Source Displays a menu of all of the available input sources (TV/Video/S-Video...

Owners Instructions
Page 14
Viewing Your LCD TV/Monitor Remote Control Power Available sources selection (TV/Video/S-Video/DVD/DTV/PC) Picture effect selection Next channel Volume decrease Temporary sound switch-off Numeric buttons for direct channel access Three-digit channel selection Automatic switch-off Picture size selection Multichannel Television Stereo Picture-By-Picture (Double screen) Parental lock Caption decoder control Power SOURCE AUTO DISPLAY STILL P.STD S.STD CH VOL MENU VOL CH MUTE EXIT 1 2 3 4 5 6 7 +100 SLEEP 8 9 PRE-CH 0 V.DOLBY P.SIZE MTS ADD/ERASE CH...
Viewing Your LCD TV/Monitor Remote Control Power Available sources selection (TV/Video/S-Video/DVD/DTV/PC) Picture effect selection Next channel Volume decrease Temporary sound switch-off Numeric buttons for direct channel access Three-digit channel selection Automatic switch-off Picture size selection Multichannel Television Stereo Picture-By-Picture (Double screen) Parental lock Caption decoder control Power SOURCE AUTO DISPLAY STILL P.STD S.STD CH VOL MENU VOL CH MUTE EXIT 1 2 3 4 5 6 7 +100 SLEEP 8 9 PRE-CH 0 V.DOLBY P.SIZE MTS ADD/ERASE CH...
Owners Instructions
Page 15
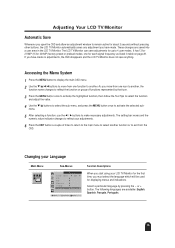
... signal frequency as listed in the LCD TV/Monitor. or + button. menu. 5 After selecting a function, use the œ / √ buttons to activate the selected sub- Accessing the Menu System 1 Press the MENU button to display the main OSD menu. 2 Use the buttons to move from the OSD. Adjusting Your LCD TV/Monitor Automatic Save Whenever you open the OSD and allow an adjustment window to remain active for about 3 seconds without pressing other buttons, the LCD TV/Monitor...
... signal frequency as listed in the LCD TV/Monitor. or + button. menu. 5 After selecting a function, use the œ / √ buttons to activate the selected sub- Accessing the Menu System 1 Press the MENU button to display the main OSD menu. 2 Use the buttons to move from the OSD. Adjusting Your LCD TV/Monitor Automatic Save Whenever you open the OSD and allow an adjustment window to remain active for about 3 seconds without pressing other buttons, the LCD TV/Monitor...
Owners Instructions
Page 16
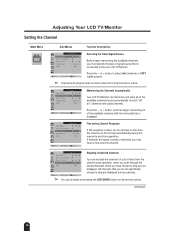
...available channels with the horizontal bar is done automatically during scanning. All channels that is connected to the your choice from the channel scan operation. or + button to select Ant (antenna) or CATV (cable system). ➣ Channel auto program does not work when the V-Chip...type of signal source that you do not specifically choose to skip are not displayed. Fine tuning Channel Reception If the reception is clear, you do easily by pressing the ADD/ERASE button on the remote control. continued... 16 Adjusting Your LCD TV/Monitor Setting the Channel Main Menu Sub-Menus...
...available channels with the horizontal bar is done automatically during scanning. All channels that is connected to the your choice from the channel scan operation. or + button to select Ant (antenna) or CATV (cable system). ➣ Channel auto program does not work when the V-Chip...type of signal source that you do not specifically choose to skip are not displayed. Fine tuning Channel Reception If the reception is clear, you do easily by pressing the ADD/ERASE button on the remote control. continued... 16 Adjusting Your LCD TV/Monitor Setting the Channel Main Menu Sub-Menus...
Owners Instructions
Page 18
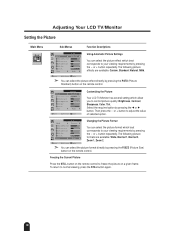
... the P.SIZE (Picture Size) button on the remote control. or + button repeatedly. To return to control picture quality: Brightness, Contrast, Sharpness, Color, Tint. Mode Picture à ¨ Custom Brightness Contrast Sharpness Color Tint Size à ¨ Wide Move Select Exit Customizing the Picture Your LCD TV/Monitor has several setting which allow you to normal viewing, press the STILL button again. 18 Mode Picture à ¨ Custom Changing the Picture Format Brightness Contrast Sharpness You can select the picture format which best corresponds...
... the P.SIZE (Picture Size) button on the remote control. or + button repeatedly. To return to control picture quality: Brightness, Contrast, Sharpness, Color, Tint. Mode Picture à ¨ Custom Brightness Contrast Sharpness Color Tint Size à ¨ Wide Move Select Exit Customizing the Picture Your LCD TV/Monitor has several setting which allow you to normal viewing, press the STILL button again. 18 Mode Picture à ¨ Custom Changing the Picture Format Brightness Contrast Sharpness You can select the picture format which best corresponds...
Owners Instructions
Page 20
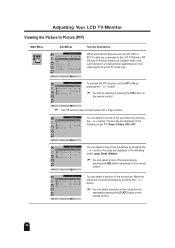
...: TV, Video, S-Video, DVD, DTV. The sources are connected to the LCD TV/Monitor, PIP (Picture-In-Picture) allows you to On by pressing the - The sizes are displayed in a small window superimposed on the remote control. You can select a size of the sub picture. or + button. or + button. ➣ You can do directly by pressing the PIP button on the remote control. 20 or + button. ➣ You can select a position of...
...: TV, Video, S-Video, DVD, DTV. The sources are connected to the LCD TV/Monitor, PIP (Picture-In-Picture) allows you to On by pressing the - The sizes are displayed in a small window superimposed on the remote control. You can select a size of the sub picture. or + button. or + button. ➣ You can do directly by pressing the PIP button on the remote control. 20 or + button. ➣ You can select a position of...

Owners Instructions
Page 25
... Image Image Lock Position Color Adjust Recall ¨¨¨ ¨¨ 1024x768 48kHz 59Hz Move Select Exit PC Image Brightness à ¨ Contrast Size Expanded 1 Function Descriptions Use the œ / √ buttons to adjust the brightness or contrast without affecting PC RGB's brightness or contrast. The sizes are displayed in the following order: Expanded 1, Expanded 2, Normal. ➣ You can select a image size by pressing the P.SIZE (Picture Size) button repeatedly on the remote control. 25 Adjusting Your LCD TV/Monitor...
... Image Image Lock Position Color Adjust Recall ¨¨¨ ¨¨ 1024x768 48kHz 59Hz Move Select Exit PC Image Brightness à ¨ Contrast Size Expanded 1 Function Descriptions Use the œ / √ buttons to adjust the brightness or contrast without affecting PC RGB's brightness or contrast. The sizes are displayed in the following order: Expanded 1, Expanded 2, Normal. ➣ You can select a image size by pressing the P.SIZE (Picture Size) button repeatedly on the remote control. 25 Adjusting Your LCD TV/Monitor...

Owners Instructions
Page 26
...; buttons to adjust the positions (Horizontal/Vertical). Move Select Exit œ H-Position √ œ V-Position √ ➣ The AUTO button allows to self-adjust to your preference. Image Lock & Position Main Menu Sub-Menus Function Descriptions PC Image Image Lock Position Color Adjust Recall ¨¨¨ ¨¨ 1024x768 48kHz 59Hz Move Select Exit Image Lock is used to center the image on the screen. Use the H-Position menu to fine tune and get the best image by removing noises...
...; buttons to adjust the positions (Horizontal/Vertical). Move Select Exit œ H-Position √ œ V-Position √ ➣ The AUTO button allows to self-adjust to your preference. Image Lock & Position Main Menu Sub-Menus Function Descriptions PC Image Image Lock Position Color Adjust Recall ¨¨¨ ¨¨ 1024x768 48kHz 59Hz Move Select Exit Image Lock is used to center the image on the screen. Use the H-Position menu to fine tune and get the best image by removing noises...

Owners Instructions
Page 27
... (Red, Green, Blue) by pressing the - This function may change the width of selected option. Then press the - or + button to fine tune and get the best image by removing noises that create unstable images with the factory default values. 27 The following color modes are replaced with jitters and shimmers. Using Automatic Color Settings You can select a color mode which best corresponds to center the image on the screen. Adjusting Your LCD TV/Monitor...
... (Red, Green, Blue) by pressing the - This function may change the width of selected option. Then press the - or + button to fine tune and get the best image by removing noises that create unstable images with the factory default values. 27 The following color modes are replaced with jitters and shimmers. Using Automatic Color Settings You can select a color mode which best corresponds to center the image on the screen. Adjusting Your LCD TV/Monitor...

Owners Instructions
Page 29
... long periods. 29 This system saves energy by referring to normal operation when horizontal and vertical sync return. For energy conservation, turn your LCD TV/Monitor Off when you move the computer's mouse or press a key on your Video card user guide as video may not be displayed, with just the Power LED blinking. Mode HDTV Format VGA SVGA XGA SXGA UXGA WUXGA (241MP) Resolution 1280 x 720p 1920 x 1080i...
... long periods. 29 This system saves energy by referring to normal operation when horizontal and vertical sync return. For energy conservation, turn your LCD TV/Monitor Off when you move the computer's mouse or press a key on your Video card user guide as video may not be displayed, with just the Power LED blinking. Mode HDTV Format VGA SVGA XGA SXGA UXGA WUXGA (241MP) Resolution 1280 x 720p 1920 x 1080i...

Owners Instructions
Page 30
... Vertical frequency: 55~85Hz x Adjust the horizontal and vertical position. x The LCD TV/Monitor is on the keyboard. x Check that the power cord is firmly connected and the LCD TV is using your PC or video board is off "Check Signal Cable" message "Sync. What you may appear to your computer utility program to the PC or video sources. You need the monitor driver software Suggested Actions x Ensure that the display resolution and frequency from WWW pages: http://www.samsung-monitor...
... Vertical frequency: 55~85Hz x Adjust the horizontal and vertical position. x The LCD TV/Monitor is on the keyboard. x Check that the power cord is firmly connected and the LCD TV is using your PC or video board is off "Check Signal Cable" message "Sync. What you may appear to your computer utility program to the PC or video sources. You need the monitor driver software Suggested Actions x Ensure that the display resolution and frequency from WWW pages: http://www.samsung-monitor...

Owners Instructions
Page 31
... audio cable is still too low after turning the control to both the audio-in port on your sound card. x Adjust the Treble and Bass to configure the channel system automatically. x If the volume is firmly connected to its maximum, check the volume control on your LCD TV/Monitor and the audio-out port on the computer sound card or software program. x Check the volume level. x Select "Channel auto program" to appropriate level. Troubleshooting - x Check the volume...
... audio cable is still too low after turning the control to both the audio-in port on your sound card. x Adjust the Treble and Bass to configure the channel system automatically. x If the volume is firmly connected to its maximum, check the volume control on your LCD TV/Monitor and the audio-out port on the computer sound card or software program. x Check the volume level. x Select "Channel auto program" to appropriate level. Troubleshooting - x Check the volume...

Owners Instructions
Page 32
... Frequency Response 32 211MP 241MP 21.3" Diagonal 24.06" Diagonal 432(H) x 324(V) mm 518.4(H) x 324(V) mm a-si TFT active matrix 0.27 (H) x 0.27 (V) mm 80/80/80/80 (L/R/T/B) 30 ~ 85 kHz 55 ~ 85 Hz 16,777,216 colors 1600 x 1200 @ 60 Hz 1920 x 1200 @ 60 Hz H/V Separate, TTL, P. Technical and Environmental Specifications Model Panel Size Display Size Type Pixel pitch Viewing Angle Frequency Horizontal Vertical Display color Display Resolution Maximum Mode Input Signal Sync...
... Frequency Response 32 211MP 241MP 21.3" Diagonal 24.06" Diagonal 432(H) x 324(V) mm 518.4(H) x 324(V) mm a-si TFT active matrix 0.27 (H) x 0.27 (V) mm 80/80/80/80 (L/R/T/B) 30 ~ 85 kHz 55 ~ 85 Hz 16,777,216 colors 1600 x 1200 @ 60 Hz 1920 x 1200 @ 60 Hz H/V Separate, TTL, P. Technical and Environmental Specifications Model Panel Size Display Size Type Pixel pitch Viewing Angle Frequency Horizontal Vertical Display color Display Resolution Maximum Mode Input Signal Sync...


