
User Manual (ENGLISH)
Page 8
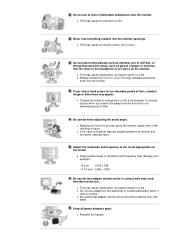
... that adaptor should not be in injury. Do not insert metal objects such as pieces of time, residual image or blurriness may damage your eyesight. 15 inch - 1024 x 768 17,19 inch - 1280 x 1024 Be careful that adapter should not be wet. z Change the mode to energy save or set a screensaver...
... that adaptor should not be in injury. Do not insert metal objects such as pieces of time, residual image or blurriness may damage your eyesight. 15 inch - 1024 x 768 17,19 inch - 1280 x 1024 Be careful that adapter should not be wet. z Change the mode to energy save or set a screensaver...
User Manual (ENGLISH)
Page 16
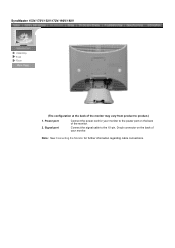
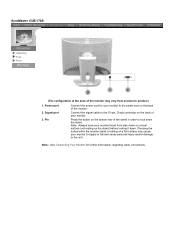
Note: See Connecting the Monitor for your monitor. Connect the signal cable to the 15-pin, D-sub connector on the back of your monitor to product.) 1. Power port 2. SyncMaster 153V/173V/152V/172V/193V/192V Unpacking Front Rear (The configuration at the back of the monitor may vary from product to the power port on the back of the monitor. Signal port Connect the power cord for further information regarding cable connections.
Note: See Connecting the Monitor for your monitor. Connect the signal cable to the 15-pin, D-sub connector on the back of your monitor to product.) 1. Power port 2. SyncMaster 153V/173V/152V/172V/193V/192V Unpacking Front Rear (The configuration at the back of the monitor may vary from product to the power port on the back of the monitor. Signal port Connect the power cord for further information regarding cable connections.
User Manual (ENGLISH)
Page 17
... the Monitor for your monitor to topple or fall and cause personal injury and/or damage to the unit. Connect the signal cable to the 15-pin, D-sub connector on the back of your monitor faced front side down on a level surface (not resting on the bottom rear of the monitor...
... the Monitor for your monitor to topple or fall and cause personal injury and/or damage to the unit. Connect the signal cable to the 15-pin, D-sub connector on the back of your monitor faced front side down on a level surface (not resting on the bottom rear of the monitor...

User Manual (ENGLISH)
Page 18
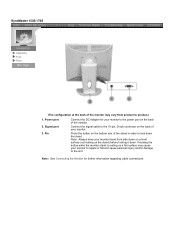
Signal port 3. Pin Connect the power cord for further information regarding cable connections. Connect the signal cable to the 15-pin, D-sub connector on the back of your monitor to the power port on the back of the monitor. Press the button on a flat surface ...
Signal port 3. Pin Connect the power cord for further information regarding cable connections. Connect the signal cable to the 15-pin, D-sub connector on the back of your monitor to the power port on the back of the monitor. Press the button on a flat surface ...

User Manual (ENGLISH)
Page 19
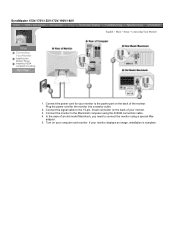
In the case of an old model Macintosh, you need to the 15-pin, D-sub connector on the back of your monitor displays an image, installation is complete. Connect the signal cable to connect the monitor using the D-.... 3. Plug the power cord for your computer and monitor. Connect the monitor to the power port on the back of the monitor. SyncMaster 153V/173V/152V/172V/193V/192V Connecting the Monitor Installing the Monitor Driver Installing VESA compliant mounting 1. Connect the power cord for the monitor into a nearby outlet. 2. Turn...
In the case of an old model Macintosh, you need to the 15-pin, D-sub connector on the back of your monitor displays an image, installation is complete. Connect the signal cable to connect the monitor using the D-.... 3. Plug the power cord for your computer and monitor. Connect the monitor to the power port on the back of the monitor. SyncMaster 153V/173V/152V/172V/193V/192V Connecting the Monitor Installing the Monitor Driver Installing VESA compliant mounting 1. Connect the power cord for the monitor into a nearby outlet. 2. Turn...

User Manual (ENGLISH)
Page 20
... the signal cable to connect the monitor using the D-SUB connection cable. 4. Turn on the back of an old model Macintosh, you need to the 15-pin, D-sub connector on your monitor. 3. Connect the DC Adapter for the monitor into a nearby outlet. 2.
... the signal cable to connect the monitor using the D-SUB connection cable. 4. Turn on the back of an old model Macintosh, you need to the 15-pin, D-sub connector on your monitor. 3. Connect the DC Adapter for the monitor into a nearby outlet. 2.

User Manual (ENGLISH)
Page 21
Connect the monitor to the 15-pin, D-sub connector on the back of your computer. 4. Turn on the back of your monitor to connect the monitor using the D-SUB connection cable. 5. ...
Connect the monitor to the 15-pin, D-sub connector on the back of your computer. 4. Turn on the back of your monitor to connect the monitor using the D-SUB connection cable. 5. ...
User Manual (ENGLISH)
Page 39
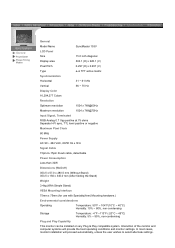
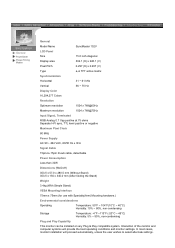
... cases, monitor installation will provide the best operating conditions and monitor settings. General PowerSaver Preset Timing Modes General Model Name SyncMaster 153V LCD Panel Size 15.0 inch diagonal Display area 304.1 (H) x 228.1 (V) Pixel Pitch 0.297 (H) x 0.297 (V) Type a-si TFT active matrix Synchronization Horizontal 31 ~ 61 kHz Vertical 56 ~ 75 Hz Display...
... cases, monitor installation will provide the best operating conditions and monitor settings. General PowerSaver Preset Timing Modes General Model Name SyncMaster 153V LCD Panel Size 15.0 inch diagonal Display area 304.1 (H) x 228.1 (V) Pixel Pitch 0.297 (H) x 0.297 (V) Type a-si TFT active matrix Synchronization Horizontal 31 ~ 61 kHz Vertical 56 ~ 75 Hz Display...
User Manual (ENGLISH)
Page 43
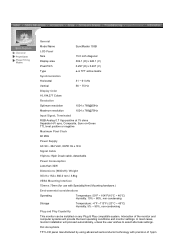
... Plug and Play Capability This monitor can be installed on any Plug & Play compatible system. General PowerSaver Preset Timing Modes General Model Name SyncMaster 152V LCD Panel Size 15.0 inch diagonal Display area 304.1 (H) x 228.1 (V) Pixel Pitch 0.297 (H) x 0.297 (V) Type a-si TFT active matrix Synchronization Horizontal 31 ~ 61 kHz Vertical 56 ~ 75...
... Plug and Play Capability This monitor can be installed on any Plug & Play compatible system. General PowerSaver Preset Timing Modes General Model Name SyncMaster 152V LCD Panel Size 15.0 inch diagonal Display area 304.1 (H) x 228.1 (V) Pixel Pitch 0.297 (H) x 0.297 (V) Type a-si TFT active matrix Synchronization Horizontal 31 ~ 61 kHz Vertical 56 ~ 75...

User Manual (ENGLISH)
Page 51
... can be installed on any Plug & Play compatible system. Interaction of 1ppm General PowerSaver Preset Timing Modes General Model Name SyncMaster 153S LCD Panel Size 15.0 inch diagonal Display area 304.1 (H) x 228.1 (V) Pixel Pitch 0.297 (H) x 0.297 (V) Type a-si TFT active matrix Synchronization Horizontal 31 ~ 61 kHz Vertical 56 ~ 75 Hz Display...
... can be installed on any Plug & Play compatible system. Interaction of 1ppm General PowerSaver Preset Timing Modes General Model Name SyncMaster 153S LCD Panel Size 15.0 inch diagonal Display area 304.1 (H) x 228.1 (V) Pixel Pitch 0.297 (H) x 0.297 (V) Type a-si TFT active matrix Synchronization Horizontal 31 ~ 61 kHz Vertical 56 ~ 75 Hz Display...
User Manual (ENGLISH)
Page 55
... Capability This monitor can be installed on any Plug & Play compatible system. General PowerSaver Preset Timing Modes General Model Name SyncMaster 153B LCD Panel Size 15.0 inch diagonal Display area 304.1 (H) x 228.1 (V) Pixel Pitch 0.297 (H) x 0.297 (V) Type a-si TFT active matrix Synchronization Horizontal 31 ~ 61 kHz Vertical 56 ~ 75 Hz Display...
... Capability This monitor can be installed on any Plug & Play compatible system. General PowerSaver Preset Timing Modes General Model Name SyncMaster 153B LCD Panel Size 15.0 inch diagonal Display area 304.1 (H) x 228.1 (V) Pixel Pitch 0.297 (H) x 0.297 (V) Type a-si TFT active matrix Synchronization Horizontal 31 ~ 61 kHz Vertical 56 ~ 75 Hz Display...

User Manual (ENGLISH)
Page 72
...accordance with IEC320 style terminations. IC Compliance Notice This Class B digital apparatus meets all requirements of the Canadian Interference-Causing Equipment Regulations of Samsung 3351 Michelson Drive, Suite #290, Irvine, CA92612 USA Tel) 949-975-7310 Fax) 949-922-8301 Warning User must use only...blades) plug cap. If necessary, consult your dealer or an experienced radio/television technician for help. These limits are designed to Part 15 of the following warning: Note: This equipment has been tested and found to comply with the limits for compliance could void the ...
...accordance with IEC320 style terminations. IC Compliance Notice This Class B digital apparatus meets all requirements of the Canadian Interference-Causing Equipment Regulations of Samsung 3351 Michelson Drive, Suite #290, Irvine, CA92612 USA Tel) 949-975-7310 Fax) 949-922-8301 Warning User must use only...blades) plug cap. If necessary, consult your dealer or an experienced radio/television technician for help. These limits are designed to Part 15 of the following warning: Note: This equipment has been tested and found to comply with the limits for compliance could void the ...

User Manual (SPANISH)
Page 60
...7310 Fax) 949-922-8301 Warning User must use shielded signal interface cables to operate the equipment. The party responsible for product compliance: SAMSUNG ELECTRONICS CO., LTD America QA Lab of the following warning: Note: This equipment has been tested and found to comply with the limits ... energy and, if not installed and used in a residential installation. z Consult the dealer or an experienced radio/TV technician for connection to Part 15 of ICES-003. Government Printing Office, Washington, DC 20402, Stock Number 004-000-00345-4. z Connect the equipment into an outlet on , the...
...7310 Fax) 949-922-8301 Warning User must use shielded signal interface cables to operate the equipment. The party responsible for product compliance: SAMSUNG ELECTRONICS CO., LTD America QA Lab of the following warning: Note: This equipment has been tested and found to comply with the limits ... energy and, if not installed and used in a residential installation. z Consult the dealer or an experienced radio/TV technician for connection to Part 15 of ICES-003. Government Printing Office, Washington, DC 20402, Stock Number 004-000-00345-4. z Connect the equipment into an outlet on , the...

User Manual (ENGLISH)
Page 17
Connect the signal cable to the 15-pin, D-sub connector on the back of the monitor may vary from product to the power port on the back of the monitor. Note: See Connecting Your Monitor for your monitor. SyncMaster 153V/173V/152V/172V/193V/192V Unpacking Front Rear (The configuration at the back of your monitor to product.) 1. Signal port Connect the power cord for further information regarding cable connections. Power port 2.
Connect the signal cable to the 15-pin, D-sub connector on the back of the monitor may vary from product to the power port on the back of the monitor. Note: See Connecting Your Monitor for your monitor. SyncMaster 153V/173V/152V/172V/193V/192V Unpacking Front Rear (The configuration at the back of your monitor to product.) 1. Signal port Connect the power cord for further information regarding cable connections. Power port 2.

User Manual (ENGLISH)
Page 18
... (The configuration at the back of the monitor may cause your monitor to topple or fall and cause personal injury and/or damage to the 15-pin, D-sub connector on the bottom rear of the stand in order to product.) 1. Power port 2.
... (The configuration at the back of the monitor may cause your monitor to topple or fall and cause personal injury and/or damage to the 15-pin, D-sub connector on the bottom rear of the stand in order to product.) 1. Power port 2.
User Manual (ENGLISH)
Page 19
... back of the stand in order to product.) 1. Pin Connect the power cord for further information regarding cable connections. Connect the signal cable to the 15-pin, D-sub connector on a flat surface may vary from product to lock down . Press the button on the stand) before locking it down the stand...
... back of the stand in order to product.) 1. Pin Connect the power cord for further information regarding cable connections. Connect the signal cable to the 15-pin, D-sub connector on a flat surface may vary from product to lock down . Press the button on the stand) before locking it down the stand...
User Manual (ENGLISH)
Page 20
...Connect the monitor to connect the monitor using the D-SUB connection cable. 4. In the case of your computer and monitor. SyncMaster 153V/173V/152V/172V/193V/192V Connecting Your Monitor Installing the Monitor Driver Installing VESA compliant mounting English > Main > Setup > Connecting Your Monitor 1. Turn... the back of an old model Macintosh, you need to the Macintosh computer using a special Mac adaptor. 5. If your monitor to the 15-pin, D-sub connector on your monitor. 3. Plug the power cord for your monitor displays an image, installation is complete. Connect the power...
...Connect the monitor to connect the monitor using the D-SUB connection cable. 4. In the case of your computer and monitor. SyncMaster 153V/173V/152V/172V/193V/192V Connecting Your Monitor Installing the Monitor Driver Installing VESA compliant mounting English > Main > Setup > Connecting Your Monitor 1. Turn... the back of an old model Macintosh, you need to the Macintosh computer using a special Mac adaptor. 5. If your monitor to the 15-pin, D-sub connector on your monitor. 3. Plug the power cord for your monitor displays an image, installation is complete. Connect the power...

User Manual (ENGLISH)
Page 21
... for the monitor into a nearby outlet. 2. Connect the signal cable to the power port on the back of the monitor. If your monitor to the 15-pin, D-sub connector on the back of your computer and monitor. Plug the power cord for your monitor displays an image, installation is complete. SyncMaster...
... for the monitor into a nearby outlet. 2. Connect the signal cable to the power port on the back of the monitor. If your monitor to the 15-pin, D-sub connector on the back of your computer and monitor. Plug the power cord for your monitor displays an image, installation is complete. SyncMaster...

User Manual (ENGLISH)
Page 22
...). Plug the power cord for your monitor displays an image, installation is complete. 1. In the case of your monitor. 3. Connect the signal cable to the 15-pin, D-sub connector on the back of the monitor.
...). Plug the power cord for your monitor displays an image, installation is complete. 1. In the case of your monitor. 3. Connect the signal cable to the 15-pin, D-sub connector on the back of the monitor.

User Manual (ENGLISH)
Page 40
General PowerSaver Preset Timing Modes General Model Name SyncMaster 153V LCD Panel Size 15.0 inch diagonal Display area 304.1 (H) x 228.1 (V) Pixel Pitch 0.297 (H) x 0.297 (V) Type a-si TFT active matrix Viewing Angle 140/120(H/V) Synchronization Horizontal 31 ~ 61 kHz Vertical ...
General PowerSaver Preset Timing Modes General Model Name SyncMaster 153V LCD Panel Size 15.0 inch diagonal Display area 304.1 (H) x 228.1 (V) Pixel Pitch 0.297 (H) x 0.297 (V) Type a-si TFT active matrix Viewing Angle 140/120(H/V) Synchronization Horizontal 31 ~ 61 kHz Vertical ...

