User Manual
Page 2
...AND VISITORS AWAY. Be sure switch is in doubt, use the next heavier gauge. Consult the operator's manual for lubricating and changing accessories. DISCONNECT TOOLS. Before further use only extension cords with padlocks, master switches, or by an authorized service center .... USE THE RIGHT DIRECTION OF FEED. Rubber gloves and nonskid footwear are removed from tool before servicing, or when changing attachments, blades, bits, cutters, etc., all instructions listed below, may result in any other conditions that keys and adjusting wrenches are recommended ...
...AND VISITORS AWAY. Be sure switch is in doubt, use the next heavier gauge. Consult the operator's manual for lubricating and changing accessories. DISCONNECT TOOLS. Before further use only extension cords with padlocks, master switches, or by an authorized service center .... USE THE RIGHT DIRECTION OF FEED. Rubber gloves and nonskid footwear are removed from tool before servicing, or when changing attachments, blades, bits, cutters, etc., all instructions listed below, may result in any other conditions that keys and adjusting wrenches are recommended ...
User Manual
Page 3
... CORDS PERIODICALLY. GENERAL SAFETY RULES NEVER USE IN AN EXPLOSIVE ATMOSPHERE. Repair or replace a damaged or worn cord immediately. Do not change the plug in any solvents to a workbench or table at a time. Never use common sense. Do not use only identical replacement parts. ... DO NOT OPERATE A TOOL WHILE UNDER THE INFLUENCE OF DRUGS, ALCOHOL, OR ANY MEDICATION. WHEN SERVICING use blades with the blade touching the workpiece. If damaged, have repaired by securely tightening the miter lock handle. Stay constantly aware of the saw with incorrect ...
... CORDS PERIODICALLY. GENERAL SAFETY RULES NEVER USE IN AN EXPLOSIVE ATMOSPHERE. Repair or replace a damaged or worn cord immediately. Do not change the plug in any solvents to a workbench or table at a time. Never use common sense. Do not use only identical replacement parts. ... DO NOT OPERATE A TOOL WHILE UNDER THE INFLUENCE OF DRUGS, ALCOHOL, OR ANY MEDICATION. WHEN SERVICING use blades with the blade touching the workpiece. If damaged, have repaired by securely tightening the miter lock handle. Stay constantly aware of the saw with incorrect ...
User Manual
Page 4
.... SAVE THESE INSTRUCTIONS. Any slip can result in contact with the path of the saw blade. ALWAYS release the power switch and allow the saw blade to stop before moving workpiece or changing settings. NEVER operate the miter saw on the floor or in a crouched position. NEVER..., or should any electrical component fail to perform properly, shut off tool and wait for saw blade to loosen and could cause the saw blade to come to a complete stop before moving workpiece or changing settings. THIS TOOL should break, bend, or fail in or near the cutting path...
.... SAVE THESE INSTRUCTIONS. Any slip can result in contact with the path of the saw blade. ALWAYS release the power switch and allow the saw blade to stop before moving workpiece or changing settings. NEVER operate the miter saw on the floor or in a crouched position. NEVER..., or should any electrical component fail to perform properly, shut off tool and wait for saw blade to loosen and could cause the saw blade to come to a complete stop before moving workpiece or changing settings. THIS TOOL should break, bend, or fail in or near the cutting path...
User Manual
Page 10
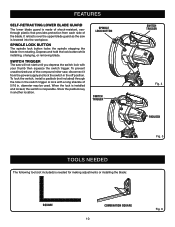
... each side of 5/16 in the off position. Depress and hold the lock button while installing, changing, or removing blade. SPINDLE LOCK BUTTON SWITCH TRIGGER SWITCH TRIGGER Fig. 4 PADLOCK Fig. 5 TOOLS NEEDED The following tool (not included) is lowered into the workpiece. To lock the ... another location. To prevent unauthorized use of the compound miter saw will not start until you depress the switch lock with a long shackle of the blade. Store the padlock key in the switch trigger. diameter may be used. SWITCH TRIGGER The saw , disconnect it from the power supply and lock ...
... each side of 5/16 in the off position. Depress and hold the lock button while installing, changing, or removing blade. SPINDLE LOCK BUTTON SWITCH TRIGGER SWITCH TRIGGER Fig. 4 PADLOCK Fig. 5 TOOLS NEEDED The following tool (not included) is lowered into the workpiece. To lock the ... another location. To prevent unauthorized use of the compound miter saw will not start until you depress the switch lock with a long shackle of the blade. Store the padlock key in the switch trigger. diameter may be used. SWITCH TRIGGER The saw , disconnect it from the power supply and lock ...
User Manual
Page 21
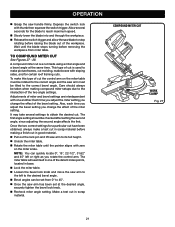
...; Pull out the lock pin and lift saw arm to its full height. Unlock the miter table. Rotate the miter table until the blade stops turning before removing the workpiece from 0° to obtain the desired cut in scrap material before raising the... a bevel angle at the desired angle, securely tighten the bevel lock knob. Recheck miter angle setting. Each time you adjust the miter setting you change the effect of cut is a cut in scrap material. OPERATION Grasp the saw arm to the left or right as you rotate the control...
...; Pull out the lock pin and lift saw arm to its full height. Unlock the miter table. Rotate the miter table until the blade stops turning before removing the workpiece from 0° to obtain the desired cut in scrap material before raising the... a bevel angle at the desired angle, securely tighten the bevel lock knob. Recheck miter angle setting. Each time you adjust the miter setting you change the effect of cut is a cut in scrap material. OPERATION Grasp the saw arm to the left or right as you rotate the control...


