Ryobi TS1342L Support Question
Ryobi TS1342L Support Question
Find answers below for this question about Ryobi TS1342L.Need a Ryobi TS1342L manual? We have 4 online manuals for this item!
Question posted by studjim on March 8th, 2014
How To Change The Blade Guard On A Ryobi Circular Saw
The person who posted this question about this Ryobi product did not include a detailed explanation. Please use the "Request More Information" button to the right if more details would help you to answer this question.
Current Answers
Related Ryobi TS1342L Manual Pages
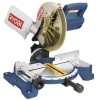
English Manual - Page 3

... listed below, may result in injury.
NEVER STAND ON TOOL. Normal sparking of the tool, a guard or other part that it is damaged must be properly repaired or .... Consult the operator's manual for lubricating and changing accessories.
DISCONNECT TOOLS. Sharp blades minimize stalling and kickback.
Blade coasts after being turned off when plugging in ...
English Manual - Page 4
...the proper outlet. Do not operate tool when you are secure.
BE SURE BLADE PATH IS FREE OF NAILS.
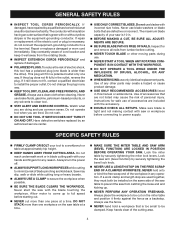
SPECIFIC SAFETY RULES
FIRMLY CLAMP OR BOLT your saw arm (bevel function) by an...against the fence as a backstop. Do not change the plug in .
Before making contact with or without yellow stripes is green with saw with your hands and fingers for safe use...
English Manual - Page 5
... SAW before moving workpiece or changing settings. ALWAYS secure this tool, loan them frequently and use of the saw blade.
ALWAYS release the power switch and allow familiarity (gained from frequent use to instruct other users. This could cause the saw without guards in or near the cutting path of the blade.
NEVER move into the blade...
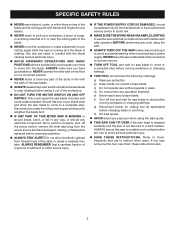
English Manual - Page 9
.... A metal piece, slightly thinner than 90°. Saw Blade Path The area over, under, behind, or in contact with both a miter and a bevel angle.
Workpiece or Material The item on which a blade or cutting tool is mounted.
FPM or SPM Feet per minute (or strokes per minute), used to feed the workpiece through cut...
English Manual - Page 10
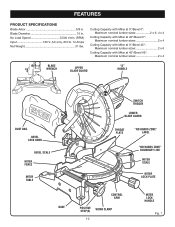
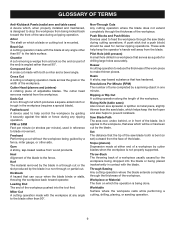
FEATURES
PRODUCT SPECIFICATIONS
Blade Arbor 5/8 in .
Blade Diameter 10 in . No Load Speed 5,500 r/min. (RPM) Input 120 ...45°/Bevel 45°: Maximum nominal lumber sizes 2 x 4
blade wrench
Upper Blade Guard
"D" Handle
DUST BAG Bevel
Lock Knob
Bevel Scale MITER Fence
Miter Table
BASE
Switch Trigger
Lower blade guard
throat plate
"NO HANDS ZONE" LABEL
"NO HANDS ZONE" BOUNDARY...
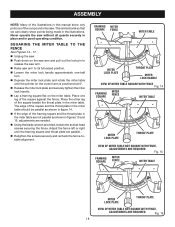
English Manual - Page 11
.... A blade wrench is also larger providing additional support.
11
Saw Arm
Lock Pin
mITER LOCK HANDLE
recessed area
Saw arm Locked in .
The left side is packed with your miter saw . It will cut is located in the recessed area to quickly stop adjustment screws have been provided on the tool and in . When used...
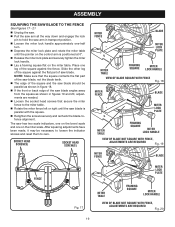
English Manual - Page 12
... of shock-resistant, seethrough plastic that provides protection from each side of the compound miter saw, disconnect it from rotating.
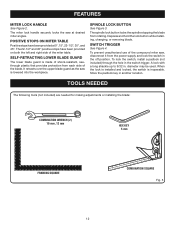
It retracts over the upper blade guard as the saw at 0°, 15°, 22-1/2°, 30°, and 45°. TOOLS NEEDED
The following tools (not included) are needed for making adjustments or installing the...
English Manual - Page 13
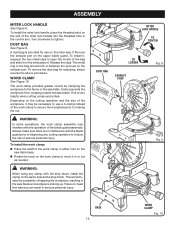
...saw has been shipped with the tool: Miter Lock Handle Dust Bag Work Clamp
DUST BAG
Blade Wrench Operator's Manual
MITER LOCK HANDLE
BLADE WRENCH
WORK CLAMP
Fig. 6
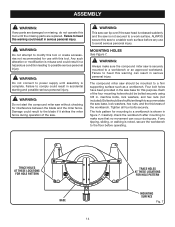
WARNING:
The use of the saw...material until you have carefully inspected and satisfactorily operated the tool.
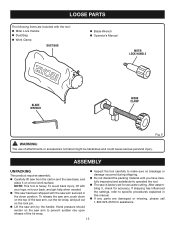
The saw arm, push down position. LOOSE PARTS
The following items...
English Manual - Page 14
... for interference between the blade and the miter fence. WARNING:
Always make sure that no movement can tip over if the saw head is released suddenly and the saw is misuse and could ... Failure to power supply until the missing parts are damaged or missing, do not operate this tool until assembly is noted, secure the workbench to the floor before any parts are replaced.
Tighten...
English Manual - Page 15
... the stop block, install the clamp on the upper blade guard. This will eliminate the possibility of the bag and slide it in the saw blade. A dust bag is very helpful when cutting compound miters...may interfere with the stop block. Always make sure there is no interference with the blade guard prior to beginning any clamp with the operation of the work clamp assembly may be ...
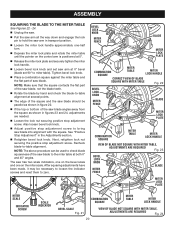
English Manual - Page 16
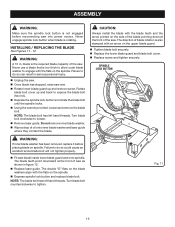
... hand threads. Fig. 11
16 WARNING:
A 10 in serious personal injury.
Unplug the saw. Once blade has stopped, raise saw . Rotate
blade bolt cover up and remove screw.
The blade teeth point downward at the front of saw blade inside lower blade guard and onto spindle. Turn blade bolt clockwise to tighten. The direction of oil onto inner...
English Manual - Page 17
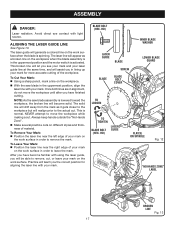
...away from the mark as a broken line on the workpiece.
With the saw blade assembly is lowered toward the workpiece, the broken line will assist you the correct ...the actual cut . This is activated.
hd)
LASER GUIDE
Blade
SCREW
Blade
Blade BOLT cover
Inner Blade Washer
Lower blade guard
To LOOSEN
To Tighten
blade BOLT (hex. aligning the laser guide line
See Figure 13....
English Manual - Page 18
... Loosen the miter lock handle approximately one leg of the compound miter saw without all guards securely in place and in the miter table.
The edge of the square and...and rotate the miter table until the framing square and throat plate are needed.
Using the blade wrench provided, loosen the socket head screws securing the fence.
Adjust the fence left or right until the...
English Manual - Page 19
...: Make sure that the square contacts the flat part of the saw blade, not the blade teeth. The edge of the saw blade angles away from the square as shown in figures 19 and 20...approximately one-half
turn. Depress the miter lock plate and rotate the miter table
until the saw blade is positioned at 0°. Release the miter lock plate and securely tighten the miter
lock...
English Manual - Page 20
... lock nut securing the positive stop adjustment screw. Note: The above procedure can be used to check blade squareness of the saw blade, not the blade teeth.
Rotate the blade by hand and check the blade-to bring saw blade into alignment with the square. See "Positive Stop Adjustment" in the Adjustments section.
Retighten bevel lock...
English Manual - Page 21
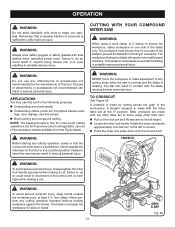
... down with side shields when operating power tools. ings, door casings, and fine joinery Bevel cutting and compound cutting Note: The blade provided is made with the miter table set...Never operate the miter saw arm to its full height. Loosen the miter lock handle. Failure to heed this warning can result in serious personal injury. from the Ryobi dealer. for the following...
English Manual - Page 28
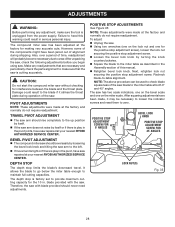
...61550; Loosen the bevel lock knob by turning the knob counterclockwise. Square the blade to zero. Note: These adjustments were made at the factory and normally do not require readjustment.... readjustment will probably become necessary due to make sure the tool is play in the pivot, have saw repaired at your nearest RYOBI AUTHORIZED SERVICE CENTER. Positive Stop Adjustment Screw FOR
0°...
English Manual - Page 32
Compound Miter Saw
TS1342L - To reduce your exposure to these exposures varies, depending on a plate attached to provide all pertinent facts when you do this tool will be found on... repair parts, always give the following information:
• MODEL NUMBER
TS1342L
• SERIAL NUMBER
Ryobi® is a registered trademark of Ryobi Limited used under license.
987000-329 2-18-08 (REV:02)
...
Repair Sheet - Page 3
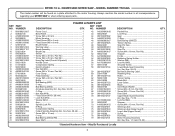
... PART
NO. Key Nos. 59-61 1 No Hands Warning Label 1 Retaining Ring 1 Roller 1 Torsion Spring 1 Blade Bolt 1 Laser Guide 1 Blade 1 Inner Blade Washer 1 * Screw (M4 x 9 mm, Pan Hd 1 * Screw (M5 x 10 mm, Pan Hd 4 Data Label 1 Upper Blade Guard Assembly (Inc. COMPOUND MITER SAW - RYOBI 10 in all correspondence regarding your MITER SAW or when ordering repair parts.
Repair Sheet - Page 5
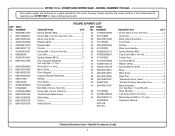
... Assembly (Inc. MODEL NUMBER TS1342L
The model number will be ...Miter Table 1
44 089100207113
Fence 1
987000329
Safety Guard 1
8-05-08 (Rev:01)
DESCRIPTION
QTY...Blade Wrench (M35 x 115 mm 1
Operator's Manual
* Standard Hardware Item - Always mention the model number in . KEY PART NO.
KEY PART NO. COMPOUND MITER SAW - RYOBI 10 in all correspondence regarding your MITER SAW...
Similar Questions

How Do I Replace The Spring On My Ts1342l 10 Lower Blade Guard
(Posted by golfesxu 10 years ago)

Is It Possabile To Buy A Replacement Blade Guard For A 210 Compound Mitre Saw
(Posted by jeronomoe6 11 years ago)

Ryobi Circular Saw
I got problem on my ryobi circular saw, whenI press the switch button its working but the problem is...
I got problem on my ryobi circular saw, whenI press the switch button its working but the problem is...
(Posted by haliliphikes 12 years ago)

Blade Guard Assembly
For life of me I can not get the blade guard in correct position for the saw to cut strait. I even w...
For life of me I can not get the blade guard in correct position for the saw to cut strait. I even w...
(Posted by hadifallah 12 years ago)

Lower Blade Guard Ts1342l Miter Saw
How do I replace the spring on my TS1342L 10" lower blade guard?
How do I replace the spring on my TS1342L 10" lower blade guard?
(Posted by MRELVIS 12 years ago)