

User Manual (English)
Page 2
... to scroll windows up the mouse 5 Using the mouse 10 Using the Mouse Suite software 12 Troubleshooting 25 Legal notices 26 One-Year Limited Warranty 29 Introduction Congratulations on your documents and web pages. Rocketfish RF-MSE12 Desktop 2.4G Laser Mouse Contents Introduction 2 Features 2 ...Setting up and down and side-to-side. The smooth navigation is a more efficient way to navigate through your purchase of the RocketFish Desktop 2.4G Laser...
... to scroll windows up the mouse 5 Using the mouse 10 Using the Mouse Suite software 12 Troubleshooting 25 Legal notices 26 One-Year Limited Warranty 29 Introduction Congratulations on your documents and web pages. Rocketfish RF-MSE12 Desktop 2.4G Laser Mouse Contents Introduction 2 Features 2 ...Setting up and down and side-to-side. The smooth navigation is a more efficient way to navigate through your purchase of the RocketFish Desktop 2.4G Laser...
User Manual (English)
Page 3
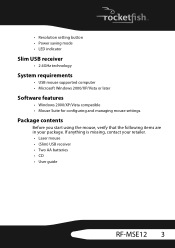
... your package. Package contents Before you start using the mouse, verify that the following items are in your retailer. • Laser mouse • (Slim) USB receiver • Two AA batteries • CD • User guide RF-MSE12 3 • Resolution setting button • Power saving... mode • LED indicator Slim USB receiver • 2.4GHz technology System requirements • USB mouse supported computer • Microsoft Windows 2000/XP/Vista or later Software...
... your package. Package contents Before you start using the mouse, verify that the following items are in your retailer. • Laser mouse • (Slim) USB receiver • Two AA batteries • CD • User guide RF-MSE12 3 • Resolution setting button • Power saving... mode • LED indicator Slim USB receiver • 2.4GHz technology System requirements • USB mouse supported computer • Microsoft Windows 2000/XP/Vista or later Software...

User Manual (English)
Page 4
... indicators The following table describes the status indicators on , battery level normal (illuminates for 1 minute). Low battery (flashes for 5 seconds). Connection in use). LED Color Mouse Green Red USB Receiver Green Red Description Mouse is in progress (flashing). 4 Wireless connection active and operating correctly (lit when...
... indicators The following table describes the status indicators on , battery level normal (illuminates for 1 minute). Low battery (flashes for 5 seconds). Connection in use). LED Color Mouse Green Red USB Receiver Green Red Description Mouse is in progress (flashing). 4 Wireless connection active and operating correctly (lit when...
User Manual (English)
Page 5
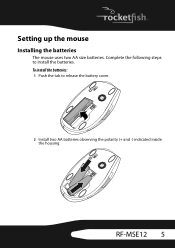
Complete the following steps to release the battery cover. 2 Install two AA batteries observing the polarity (+ and -) indicated inside the housing. To install the batteries: 1 Push the tab to install the batteries. RF-MSE12 5 Setting up the mouse Installing the batteries The mouse uses two AA size batteries.
Complete the following steps to release the battery cover. 2 Install two AA batteries observing the polarity (+ and -) indicated inside the housing. To install the batteries: 1 Push the tab to install the batteries. RF-MSE12 5 Setting up the mouse Installing the batteries The mouse uses two AA size batteries.

User Manual (English)
Page 6
... CD into an available USB jack on your computer. 2 If this is the first time you have connected the USB receiver to install the Mouse Suite software on the CD. 6 If the software does not start automatically, double-click Setup.exe located in the bin folder on your computer...'s CD or DVD drive. p Installing the Mouse Suite software Complete the following steps to your computer, the Found New Hardware Wizard starts automatically. The software starts automatically. To install the...
... CD into an available USB jack on your computer. 2 If this is the first time you have connected the USB receiver to install the Mouse Suite software on the CD. 6 If the software does not start automatically, double-click Setup.exe located in the bin folder on your computer...'s CD or DVD drive. p Installing the Mouse Suite software Complete the following steps to your computer, the Found New Hardware Wizard starts automatically. The software starts automatically. To install the...

User Manual (English)
Page 8
Connecting the mouse Connecting the mouse to a PC After you install the batteries and the Mouse Suite software, your mouse is ready to a PC: 1 Make sure that the USB receiver is installed, the Setup Complete screen opens. 6 Click Finish. 5 Click Next. Note: You must reboot your computer. 8 To connect the mouse to use. The program takes a few moments to install. When the program is inserted into an available USB jack on your computer before using the Mouse Suite.
Connecting the mouse Connecting the mouse to a PC After you install the batteries and the Mouse Suite software, your mouse is ready to a PC: 1 Make sure that the USB receiver is installed, the Setup Complete screen opens. 6 Click Finish. 5 Click Next. Note: You must reboot your computer. 8 To connect the mouse to use. The program takes a few moments to install. When the program is inserted into an available USB jack on your computer before using the Mouse Suite.
User Manual (English)
Page 9
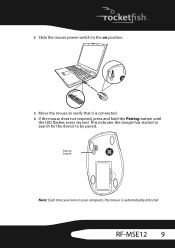
2 Slide the mouse power switch to the on your computer, the mouse is connected. 4 If the mouse does not respond, press and hold the Pairing button until the LED flashes every second. RF-MSE12 9 This indicates the dongle has started to search for the device to verify that it is automatically detected. Pairing button Note: Each time you turn on position. 2 3 Move the mouse to be paired.
2 Slide the mouse power switch to the on your computer, the mouse is connected. 4 If the mouse does not respond, press and hold the Pairing button until the LED flashes every second. RF-MSE12 9 This indicates the dongle has started to search for the device to verify that it is automatically detected. Pairing button Note: Each time you turn on position. 2 3 Move the mouse to be paired.

User Manual (English)
Page 10
... that the keyboard/mouse USB function has been turned on the mouse is automatically disabled while the mouse is low, the LED flashes red for one minute. Note: Some older PCs do not support the USB keyboard/mouse in use for more information. Using the mouse status indicator The Laser Mouse has a battery ...status LED. Using the mouse Note: The scroll wheel on in the BIOS. Status LED 10 When the battery is ...
... that the keyboard/mouse USB function has been turned on the mouse is automatically disabled while the mouse is low, the LED flashes red for one minute. Note: Some older PCs do not support the USB keyboard/mouse in use for more information. Using the mouse status indicator The Laser Mouse has a battery ...status LED. Using the mouse Note: The scroll wheel on in the BIOS. Status LED 10 When the battery is ...
User Manual (English)
Page 11
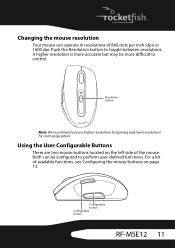
... For a list of the mouse. Both can operate in resolutions of 800 dots per inch (dpi) or 1600 dpi. A higher resolution is more difficult to control. Configurable button Configurable button RF-MSE12 11 Using the User Configurable Buttons There are two mouse buttons located on the left ...side of available functions, see Configuring the mouse buttons on page 13. Changing the mouse resolution Your mouse can be more accurate but may be ...
... For a list of the mouse. Both can operate in resolutions of 800 dots per inch (dpi) or 1600 dpi. A higher resolution is more difficult to control. Configurable button Configurable button RF-MSE12 11 Using the User Configurable Buttons There are two mouse buttons located on the left ...side of available functions, see Configuring the mouse buttons on page 13. Changing the mouse resolution Your mouse can be more accurate but may be ...

User Manual (English)
Page 12
... is divided into six tabs. Or, if the mouse icon is not in the system tray indicates the USB receiver and mouse are three common buttons: • Click OK to save your system tray, click Start > Settings > Control Panel > RocketFish to exit the dialog box without saving. 12 Under... each tab to open the context menu, then click Adjust Mouse Properties. Using the Mouse Suite system tray icon The mouse icon in your settings and close the dialog box. • Click...
... is divided into six tabs. Or, if the mouse icon is not in the system tray indicates the USB receiver and mouse are three common buttons: • Click OK to save your system tray, click Start > Settings > Control Panel > RocketFish to exit the dialog box without saving. 12 Under... each tab to open the context menu, then click Adjust Mouse Properties. Using the Mouse Suite system tray icon The mouse icon in your settings and close the dialog box. • Click...
User Manual (English)
Page 13
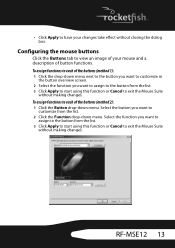
...without making changes. Select the button you want to customize from the list. 3 Click Apply to start using this function or Cancel to exit the Mouse Suite without closing the dialog box. Select the function you want to assign to the button from the list. 2 Click the Function drop-down ... a description of button functions. To assign functions to each of the buttons (method 1): 1 Click the drop-down menu. RF-MSE12 13 Configuring the mouse buttons Click the Buttons tab to each of the buttons (method 2): 1 Click the Button drop-down menu next to the button you want to ...
...without making changes. Select the button you want to customize from the list. 3 Click Apply to start using this function or Cancel to exit the Mouse Suite without closing the dialog box. Select the function you want to assign to the button from the list. 2 Click the Function drop-down ... a description of button functions. To assign functions to each of the buttons (method 1): 1 Click the drop-down menu. RF-MSE12 13 Configuring the mouse buttons Click the Buttons tab to each of the buttons (method 2): 1 Click the Button drop-down menu next to the button you want to ...

User Manual (English)
Page 14
...Escape key. Minimize Window Minimizes the active window. Quick/Auto Scroll Scrolls the page up and down when held and the mouse is only available when the selected function has a configurable setting. Shift Emulates pressing the Shift key. 14 Click this screen include:... Field/Button Mouse Use Default Button Function Settings Description Select your mouse. Forward Move to the clipboard. Close Window Closes the active window. My Computer Opens the My Computer window....
...Escape key. Minimize Window Minimizes the active window. Quick/Auto Scroll Scrolls the page up and down when held and the mouse is only available when the selected function has a configurable setting. Shift Emulates pressing the Shift key. 14 Click this screen include:... Field/Button Mouse Use Default Button Function Settings Description Select your mouse. Forward Move to the clipboard. Close Window Closes the active window. My Computer Opens the My Computer window....
User Manual (English)
Page 15
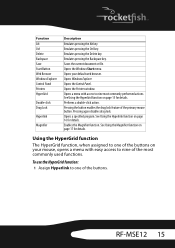
... Magnifier function on page 15 for details. Using the HyperGrid function The HyperGrid function, when assigned to nine of the buttons. RF-MSE12 15 Function Alt Ctrl Delete Backspace Save Start Button Web Browser Windows Explorer Control Panel Printers HyperGrid Double-click Drag Lock Hyperlink Magnifier... lock feature of the buttons on page 16 for details. Emulates pressing the Ctrl key. Opens your mouse, opens a menu with access to one of the primary mouse button. Opens the Printers window. See Using the Hyperlink function on your default web browser. Emulates pressing...
... Magnifier function on page 15 for details. Using the HyperGrid function The HyperGrid function, when assigned to nine of the buttons. RF-MSE12 15 Function Alt Ctrl Delete Backspace Save Start Button Web Browser Windows Explorer Control Panel Printers HyperGrid Double-click Drag Lock Hyperlink Magnifier... lock feature of the buttons on page 16 for details. Emulates pressing the Ctrl key. Opens your mouse, opens a menu with access to one of the primary mouse button. Opens the Printers window. See Using the Hyperlink function on your default web browser. Emulates pressing...
User Manual (English)
Page 16
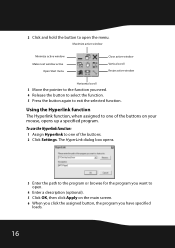
The HyperLink dialog box opens. 3 Enter the path to the program or browse for the program you want to one of the buttons on your mouse, opens up a specified program. Using the Hyperlink function The Hyperlink function, when assigned to open the menu. Maximize active window Minimize active window Make next ...
The HyperLink dialog box opens. 3 Enter the path to the program or browse for the program you want to one of the buttons on your mouse, opens up a specified program. Using the Hyperlink function The Hyperlink function, when assigned to open the menu. Maximize active window Minimize active window Make next ...
User Manual (English)
Page 17
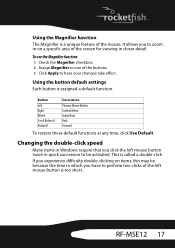
RF-MSE12 17 It allows you have your changes take effect. To use the Magnifier function: 1 Check the Magnifier checkbox. 2 Assign Magnifier to one of the buttons. 3 Click Apply to have to perform two clicks of the left mouse button twice in quick succession to be because the time ...Forward To restore these default functions at any time, click Use Default. If you experience difficulty double-clicking on a specific area of the mouse. Using the Magnifier function The Magnifier is called a double-click. Changing the double-click speed Many items in closer detail. Using the ...
RF-MSE12 17 It allows you have your changes take effect. To use the Magnifier function: 1 Check the Magnifier checkbox. 2 Assign Magnifier to one of the buttons. 3 Click Apply to have to perform two clicks of the left mouse button twice in quick succession to be because the time ...Forward To restore these default functions at any time, click Use Default. If you experience difficulty double-clicking on a specific area of the mouse. Using the Magnifier function The Magnifier is called a double-click. Changing the double-click speed Many items in closer detail. Using the ...
User Manual (English)
Page 18
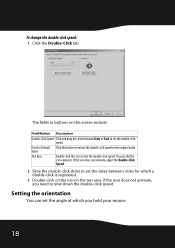
... slow down the double-click speed. If the icon does not animate, you need to set the delay between clicks for which you hold your mouse. 18
... slow down the double-click speed. If the icon does not animate, you need to set the delay between clicks for which you hold your mouse. 18
User Manual (English)
Page 19
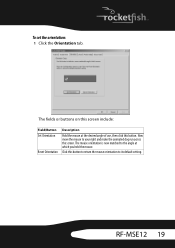
The mouse orientation is now matched to the angle at the desired angle of use, then click this button. The fields or buttons on this button to return the mouse orientation to your right and make the animated dog run across the screen. Click this screen include: Field/Button Set Orientation Reset Orientation Description Hold the mouse at which you held the mouse. RF-MSE12 19 Now move the mouse to its default setting. To set the orientation: 1 Click the Orientation tab.
The mouse orientation is now matched to the angle at the desired angle of use, then click this button. The fields or buttons on this button to return the mouse orientation to your right and make the animated dog run across the screen. Click this screen include: Field/Button Set Orientation Reset Orientation Description Hold the mouse at which you held the mouse. RF-MSE12 19 Now move the mouse to its default setting. To set the orientation: 1 Click the Orientation tab.
User Manual (English)
Page 20
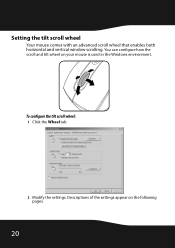
Setting the tilt scroll wheel Your mouse comes with an advanced scroll wheel that enables both horizontal and vertical window scrolling. You can configure how the scroll and tilt wheel on the following pages. 20 To configure the tilt scroll wheel: 1 Click the Wheel tab. 2 Modify the settings. Descriptions of the settings appear on your mouse is used in the Windows environment.
Setting the tilt scroll wheel Your mouse comes with an advanced scroll wheel that enables both horizontal and vertical window scrolling. You can configure how the scroll and tilt wheel on the following pages. 20 To configure the tilt scroll wheel: 1 Click the Wheel tab. 2 Modify the settings. Descriptions of the settings appear on your mouse is used in the Windows environment.
User Manual (English)
Page 24
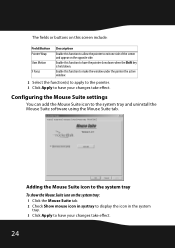
... settings You can add the Mouse Suite icon to have your changes take effect. 24 The fields or buttons on this screen include: Field/Button Pointer Wrap Slow Motion X Focus Description .... 2 Select the function(s) to apply to the pointer. 3 Click Apply to exit one side of the screen and appear on the system tray: 1 Click the Mouse Suite tab. 2 Check Show mouse icon in systray to display the icon in the system tray. 3 Click Apply to the system tray and uninstall the...
... settings You can add the Mouse Suite icon to have your changes take effect. 24 The fields or buttons on this screen include: Field/Button Pointer Wrap Slow Motion X Focus Description .... 2 Select the function(s) to apply to the pointer. 3 Click Apply to exit one side of the screen and appear on the system tray: 1 Click the Mouse Suite tab. 2 Check Show mouse icon in systray to display the icon in the system tray. 3 Click Apply to the system tray and uninstall the...
User Manual (English)
Page 25
RF-MSE12 25 A confirmation message displays. 3 Click Yes to uninstall or No to work. If it glows red, it indicates the battery power is compatible. • Check to default settings. Once the Mouse Suite (see if the batteries in your system's BIOS if the mouse fails to cancel. Troubleshooting If you may ... battery power. • Contact your dealer for support with any other questions you have . If you are set to see Installing the Mouse Suite software on page 6) is installed on a clean, flat, non-slippery surface in your system is low. Make sure the polarity of your...
RF-MSE12 25 A confirmation message displays. 3 Click Yes to uninstall or No to work. If it glows red, it indicates the battery power is compatible. • Check to default settings. Once the Mouse Suite (see if the batteries in your system's BIOS if the mouse fails to cancel. Troubleshooting If you may ... battery power. • Contact your dealer for support with any other questions you have . If you are set to see Installing the Mouse Suite software on page 6) is installed on a clean, flat, non-slippery surface in your system is low. Make sure the polarity of your...


