
Warranty (English)
Page 1
... instruction • Installation • Set up adjustments • Cosmetic damage • Damage due to you. The Warranty Period lasts for one year (365 days), beginning on the date you place the product in its original packaging or packaging that provides the same amount of the product in its sole option): (1) repair the product with new or rebuilt comparable products or parts. Make...
... instruction • Installation • Set up adjustments • Cosmetic damage • Damage due to you. The Warranty Period lasts for one year (365 days), beginning on the date you place the product in its original packaging or packaging that provides the same amount of the product in its sole option): (1) repair the product with new or rebuilt comparable products or parts. Make...
Warranty (English)
Page 2
THIS WARRANTY GIVES YOU SPECIFIC LEGAL RIGHTS, AND YOU MAY ALSO HAVE OTHER RIGHTS, WHICH VARY FROM STATE TO STATE OR PROVINCE TO PROVINCE. Distributed by Rocketfish to service the product • Products sold as fuses or batteries • Products where the factory applied serial number has been altered or removed REPAIR REPLACEMENT AS PROVIDED UNDER THIS WARRANTY IS YOUR EXCLUSIVE REMEDY. ROCKETFISH SHALL NOT BE...
THIS WARRANTY GIVES YOU SPECIFIC LEGAL RIGHTS, AND YOU MAY ALSO HAVE OTHER RIGHTS, WHICH VARY FROM STATE TO STATE OR PROVINCE TO PROVINCE. Distributed by Rocketfish to service the product • Products sold as fuses or batteries • Products where the factory applied serial number has been altered or removed REPAIR REPLACEMENT AS PROVIDED UNDER THIS WARRANTY IS YOUR EXCLUSIVE REMEDY. ROCKETFISH SHALL NOT BE...

User Manual (English)
Page 2
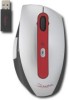
... buttons 2 The smooth navigation is a more efficient way to navigate through your purchase of the RocketFish Desktop 2.4G Laser Mouse. Rocketfish RF-MSE12 Desktop 2.4G Laser Mouse Contents Introduction 2 Features 2 Setting up and down and side-to-side. Your mouse features an innovative tilt scroll wheel that allows you to scroll windows up the mouse 5 Using the mouse 10 Using the Mouse Suite software 12 Troubleshooting 25 Legal notices 26 One-Year Limited Warranty...
... buttons 2 The smooth navigation is a more efficient way to navigate through your purchase of the RocketFish Desktop 2.4G Laser Mouse. Rocketfish RF-MSE12 Desktop 2.4G Laser Mouse Contents Introduction 2 Features 2 Setting up and down and side-to-side. Your mouse features an innovative tilt scroll wheel that allows you to scroll windows up the mouse 5 Using the mouse 10 Using the Mouse Suite software 12 Troubleshooting 25 Legal notices 26 One-Year Limited Warranty...
User Manual (English)
Page 3
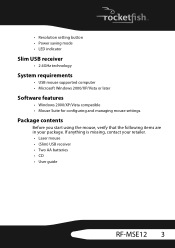
... System requirements • USB mouse supported computer • Microsoft Windows 2000/XP/Vista or later Software features • Windows 2000/XP/Vista compatible • Mouse Suite for configuring and managing mouse settings. If anything is missing, contact your package. Package contents Before you start using the mouse, verify that the following items are in your retailer. • Laser mouse • (Slim) USB receiver • Two AA batteries • CD • User guide RF-MSE12 3
... System requirements • USB mouse supported computer • Microsoft Windows 2000/XP/Vista or later Software features • Windows 2000/XP/Vista compatible • Mouse Suite for configuring and managing mouse settings. If anything is missing, contact your package. Package contents Before you start using the mouse, verify that the following items are in your retailer. • Laser mouse • (Slim) USB receiver • Two AA batteries • CD • User guide RF-MSE12 3

User Manual (English)
Page 4
... (flashes for 5 seconds). LED Color Mouse Green Red USB Receiver Green Red Description Mouse is in progress (flashing). 4 Wireless connection active and operating correctly (lit when mouse is turned on the mouse and receiver. Connection in use). Identifying components 1 2 3 6 4 5 7 Item Description 1 Left button 2 Right button 3 Tilt/scroll wheel button 4 Status LED 5 Resolution button 6 Programmable button A 7 Programmable button B Identifying status indicators The following table describes the status indicators on , battery level normal (illuminates for 1 minute...
... (flashes for 5 seconds). LED Color Mouse Green Red USB Receiver Green Red Description Mouse is in progress (flashing). 4 Wireless connection active and operating correctly (lit when mouse is turned on the mouse and receiver. Connection in use). Identifying components 1 2 3 6 4 5 7 Item Description 1 Left button 2 Right button 3 Tilt/scroll wheel button 4 Status LED 5 Resolution button 6 Programmable button A 7 Programmable button B Identifying status indicators The following table describes the status indicators on , battery level normal (illuminates for 1 minute...
User Manual (English)
Page 5
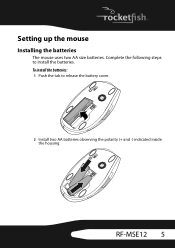
To install the batteries: 1 Push the tab to install the batteries. Complete the following steps to release the battery cover. 2 Install two AA batteries observing the polarity (+ and -) indicated inside the housing. RF-MSE12 5 Setting up the mouse Installing the batteries The mouse uses two AA size batteries.
To install the batteries: 1 Push the tab to install the batteries. Complete the following steps to release the battery cover. 2 Install two AA batteries observing the polarity (+ and -) indicated inside the housing. RF-MSE12 5 Setting up the mouse Installing the batteries The mouse uses two AA size batteries.

User Manual (English)
Page 6
... start automatically, double-click Setup.exe located in the bin folder on your computer. Cancel the Wizard, then follow the steps below. 3 Insert the provided CD into an available USB jack on your computer. 2 If this is the first time you have connected the USB receiver to install the Mouse Suite software on the CD. 6 The software starts automatically. To install the Mouse Suite: 1 Insert the USB receiver...
... start automatically, double-click Setup.exe located in the bin folder on your computer. Cancel the Wizard, then follow the steps below. 3 Insert the provided CD into an available USB jack on your computer. 2 If this is the first time you have connected the USB receiver to install the Mouse Suite software on the CD. 6 The software starts automatically. To install the Mouse Suite: 1 Insert the USB receiver...

User Manual (English)
Page 8
The program takes a few moments to use. Connecting the mouse Connecting the mouse to a PC After you install the batteries and the Mouse Suite software, your mouse is ready to install. When the program is inserted into an available USB jack on your computer before using the Mouse Suite. Note: You must reboot your computer. 8 To connect the mouse to a PC: 1 Make sure that the USB receiver is installed, the Setup Complete screen opens. 6 Click Finish. 5 Click Next.
The program takes a few moments to use. Connecting the mouse Connecting the mouse to a PC After you install the batteries and the Mouse Suite software, your mouse is ready to install. When the program is inserted into an available USB jack on your computer before using the Mouse Suite. Note: You must reboot your computer. 8 To connect the mouse to a PC: 1 Make sure that the USB receiver is installed, the Setup Complete screen opens. 6 Click Finish. 5 Click Next.
User Manual (English)
Page 9
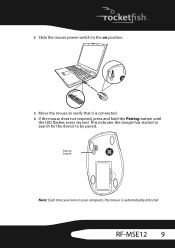
This indicates the dongle has started to search for the device to be paired. RF-MSE12 9 Pairing button Note: Each time you turn on position. 2 3 Move the mouse to verify that it is automatically detected. 2 Slide the mouse power switch to the on your computer, the mouse is connected. 4 If the mouse does not respond, press and hold the Pairing button until the LED flashes every second.
This indicates the dongle has started to search for the device to be paired. RF-MSE12 9 Pairing button Note: Each time you turn on position. 2 3 Move the mouse to verify that it is automatically detected. 2 Slide the mouse power switch to the on your computer, the mouse is connected. 4 If the mouse does not respond, press and hold the Pairing button until the LED flashes every second.

User Manual (English)
Page 10
Using the mouse status indicator The Laser Mouse has a battery status LED. Note: The mouse enters a power-saving mode when not in use for one minute. When the battery is pairing. You should change the batteries immediately. Status LED 10 Using the mouse Note: The scroll wheel on in BIOS/DOS environment. Note: Some older PCs do not support the USB keyboard/mouse in the BIOS. See your computer user guide for more information. Turning...
Using the mouse status indicator The Laser Mouse has a battery status LED. Note: The mouse enters a power-saving mode when not in use for one minute. When the battery is pairing. You should change the batteries immediately. Status LED 10 Using the mouse Note: The scroll wheel on in BIOS/DOS environment. Note: Some older PCs do not support the USB keyboard/mouse in the BIOS. See your computer user guide for more information. Turning...
User Manual (English)
Page 11
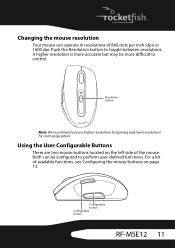
... Buttons There are two mouse buttons located on the left side of available functions, see Configuring the mouse buttons on page 13. Changing the mouse resolution Your mouse can be more accurate but may be configured to toggle between resolutions. Configurable button Configurable button RF-MSE12 11 Push the Resolution button to perform user-defined functions. Both can operate in resolutions of 800 dots per inch (dpi...
... Buttons There are two mouse buttons located on the left side of available functions, see Configuring the mouse buttons on page 13. Changing the mouse resolution Your mouse can be more accurate but may be configured to toggle between resolutions. Configurable button Configurable button RF-MSE12 11 Push the Resolution button to perform user-defined functions. Both can operate in resolutions of 800 dots per inch (dpi...

User Manual (English)
Page 12
... view related settings. Using the Mouse Suite software Starting Mouse Suite To start using Mouse Suite: • Double-click the Mouse icon in the system tray or right-click the icon to open the context menu, then click Adjust Mouse Properties. Using the Mouse Suite system tray icon The mouse icon in the system tray indicates the USB receiver and mouse are three common buttons: • Click OK to save your system tray, click Start > Settings > Control Panel > RocketFish to start using the software. Under each...
... view related settings. Using the Mouse Suite software Starting Mouse Suite To start using Mouse Suite: • Double-click the Mouse icon in the system tray or right-click the icon to open the context menu, then click Adjust Mouse Properties. Using the Mouse Suite system tray icon The mouse icon in the system tray indicates the USB receiver and mouse are three common buttons: • Click OK to save your system tray, click Start > Settings > Control Panel > RocketFish to start using the software. Under each...

User Manual (English)
Page 14
... primary mouse button for a list of the following functions to each button on page 14 for selecting and dragging. (Standard left-click) Context Menu Opens the context menu. (Standard right-click) Back Move to previous page. Next Window Makes the next window active. Cut (Ctrl+X) Cuts the selected item or text to the clipboard. Redo (Ctrl+Y) Redo the previous action. Quick/Auto Scroll Scrolls...
... primary mouse button for a list of the following functions to each button on page 14 for selecting and dragging. (Standard left-click) Context Menu Opens the context menu. (Standard right-click) Back Move to previous page. Next Window Makes the next window active. Cut (Ctrl+X) Cuts the selected item or text to the clipboard. Redo (Ctrl+Y) Redo the previous action. Quick/Auto Scroll Scrolls...
User Manual (English)
Page 15
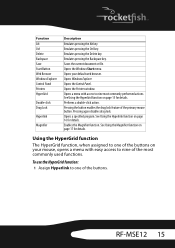
... Backspace Save Start Button Web Browser Windows Explorer Control Panel Printers HyperGrid Double-click Drag Lock Hyperlink Magnifier Description Emulates pressing the Alt key. Emulates pressing the Delete key. Saves the current document or file. Opens Windows Explorer. Pressing again disables drag lock. Emulates pressing the Backspace key. See Using the Magnifier function on page 16 for details. RF-MSE12 15 Opens a specified program. Emulates...
... Backspace Save Start Button Web Browser Windows Explorer Control Panel Printers HyperGrid Double-click Drag Lock Hyperlink Magnifier Description Emulates pressing the Alt key. Emulates pressing the Delete key. Saves the current document or file. Opens Windows Explorer. Pressing again disables drag lock. Emulates pressing the Backspace key. See Using the Magnifier function on page 16 for details. RF-MSE12 15 Opens a specified program. Emulates...
User Manual (English)
Page 16
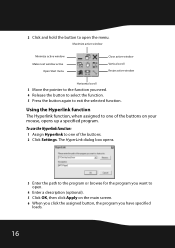
2 Click and hold the button to open . 4 Enter a description (optional). 5 Click OK, then click Apply on your mouse, opens up a specified program. To use the Hyperlink function: 1 Assign Hyperlink to the function you have specified loads. 16 Maximize active window Minimize active window Make next window active Open Start menu Close active window Vertical scroll Resize active window Horizontal scroll 3 Move the pointer to one of the buttons. 2 Click Settings. The HyperLink dialog...
2 Click and hold the button to open . 4 Enter a description (optional). 5 Click OK, then click Apply on your mouse, opens up a specified program. To use the Hyperlink function: 1 Assign Hyperlink to the function you have specified loads. 16 Maximize active window Minimize active window Make next window active Open Start menu Close active window Vertical scroll Resize active window Horizontal scroll 3 Move the pointer to one of the buttons. 2 Click Settings. The HyperLink dialog...
User Manual (English)
Page 17
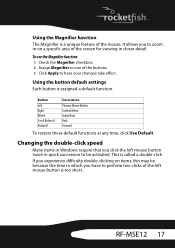
... on items, this may be activated. RF-MSE12 17 Changing the double-click speed Many items in Windows require that you click the left mouse button is a unique feature of the screen for viewing in closer detail. If you have your changes take effect. Using the button default settings Each button is called a double-click. Button Left Right Wheel Scroll Button A Button B Description Primary Mouse Button Context Menu Quick/Auto Back Forward To restore these...
... on items, this may be activated. RF-MSE12 17 Changing the double-click speed Many items in Windows require that you click the left mouse button is a unique feature of the screen for viewing in closer detail. If you have your changes take effect. Using the button default settings Each button is called a double-click. Button Left Right Wheel Scroll Button A Button B Description Primary Mouse Button Context Menu Quick/Auto Back Forward To restore these...
User Manual (English)
Page 21
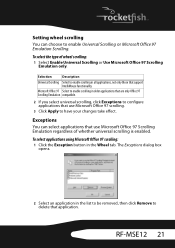
... box opens. 2 Select an application in the Wheel tab. Selection Description Universal Scrolling Select to enable Universal Scrolling or Microsoft Office 97 Emulation Scrolling. To select applications using Microsoft Office 97 scrolling: 1 Click the Exception button in the list to be removed, then click Remove to have your changes take effect. To select the type of whether universal scrolling is enabled. RF-MSE12 21 Setting wheel scrolling...
... box opens. 2 Select an application in the Wheel tab. Selection Description Universal Scrolling Select to enable Universal Scrolling or Microsoft Office 97 Emulation Scrolling. To select applications using Microsoft Office 97 scrolling: 1 Click the Exception button in the list to be removed, then click Remove to have your changes take effect. To select the type of whether universal scrolling is enabled. RF-MSE12 21 Setting wheel scrolling...
User Manual (English)
Page 25
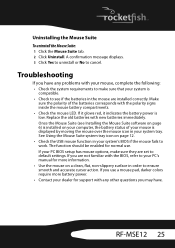
... with new batteries immediately. If it glows red, it indicates the battery power is displayed by moving the mouse over the mouse icon in your PC BIOS setup has mouse options, make sure that your mouse is low. RF-MSE12 25 If you have . Make sure the polarity of your system is compatible. • Check to see if the batteries in order to default settings. Troubleshooting If...
... with new batteries immediately. If it glows red, it indicates the battery power is displayed by moving the mouse over the mouse icon in your PC BIOS setup has mouse options, make sure that your mouse is low. RF-MSE12 25 If you have . Make sure the polarity of your system is compatible. • Check to see if the batteries in order to default settings. Troubleshooting If...
User Manual (English)
Page 29
... Limited Warranty Rocketfish Products ("Rocketfish") warrants to you. If service of Products and parts are not returned to you, the original purchaser of this new RF-MSE12 ("Product"), that you own your original receipt and the Product to the store you sell or otherwise transfer the Product. Make sure that the Product shall be purchased from . This warranty does not cover: • Customer instruction • Installation • Set up...
... Limited Warranty Rocketfish Products ("Rocketfish") warrants to you. If service of Products and parts are not returned to you, the original purchaser of this new RF-MSE12 ("Product"), that you own your original receipt and the Product to the store you sell or otherwise transfer the Product. Make sure that the Product shall be purchased from . This warranty does not cover: • Customer instruction • Installation • Set up...
User Manual (English)
Page 30
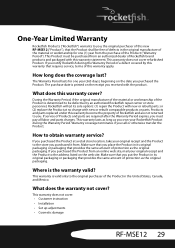
... TO THE WARRANTY PERIOD SET FORTH ABOVE AND NO WARRANTIES, WHETHER EXPRESS OR IMPLIED, WILL APPLY AFTER THE WARRANTY PERIOD. THIS WARRANTY GIVES YOU SPECIFIC LEGAL RIGHTS, AND YOU MAY ALSO HAVE OTHER RIGHTS, WHICH VARY FROM STATE TO STATE OR PROVINCE TO PROVINCE. Contact Rocketfish: For customer service please call 1-800-620-2790 www.rocketfishproducts.com Distributed by Best Buy Purchasing...
... TO THE WARRANTY PERIOD SET FORTH ABOVE AND NO WARRANTIES, WHETHER EXPRESS OR IMPLIED, WILL APPLY AFTER THE WARRANTY PERIOD. THIS WARRANTY GIVES YOU SPECIFIC LEGAL RIGHTS, AND YOU MAY ALSO HAVE OTHER RIGHTS, WHICH VARY FROM STATE TO STATE OR PROVINCE TO PROVINCE. Contact Rocketfish: For customer service please call 1-800-620-2790 www.rocketfishproducts.com Distributed by Best Buy Purchasing...


