
Warranty
Page 1
...Misuse • Abuse • Negligence • Commercial purposes/use, including but not limited to any part of the Product, including the antenna • Display panel damaged by an authorized Rocketfish repair center or store personnel, Rocketfish will (at www.bestbuy.com or www.bestbuy.ca and...8226; Damage due to incorrect operation or maintenance • Connection to an incorrect voltage or power supply • Attempted repair by Rocketfish to obtain warranty service? Call agents may not function normally.) • Failures or Damage caused by any person not authorized by ...
...Misuse • Abuse • Negligence • Commercial purposes/use, including but not limited to any part of the Product, including the antenna • Display panel damaged by an authorized Rocketfish repair center or store personnel, Rocketfish will (at www.bestbuy.com or www.bestbuy.ca and...8226; Damage due to incorrect operation or maintenance • Connection to an incorrect voltage or power supply • Attempted repair by Rocketfish to obtain warranty service? Call agents may not function normally.) • Failures or Damage caused by any person not authorized by ...

User Manual
Page 1
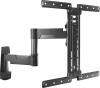
FPO) RF-HTMF19 ASSEMBLY GUIDE/GUÍA DE ENSAMBLAJE Before using your new product, please read these instructions to 55" TV WALL MOUNT MONTAJE DE PARED PARA TELEVISOR DE 32 A 55 PULG.(Spanish - Antes de usar su producto nuevo, lea este instructivo para prevenir cualquier daño. 32" to prevent any damage.
FPO) RF-HTMF19 ASSEMBLY GUIDE/GUÍA DE ENSAMBLAJE Before using your new product, please read these instructions to 55" TV WALL MOUNT MONTAJE DE PARED PARA TELEVISOR DE 32 A 55 PULG.(Spanish - Antes de usar su producto nuevo, lea este instructivo para prevenir cualquier daño. 32" to prevent any damage.

User Manual
Page 3
...RF-HTMF19 ENGLISH Introduction Congratulations on your TV and accessories must be capable of supporting five times the weight of your purchase of the installation, contact Customer Service or call : 1-800-620-2790 3 Keep these directions, or have doubts about the safety of a high-quality Rocketfish product. Rocketfish... is not responsible for damage or injury caused by incorrect installation or use . • Improper installation may cause property damage or personal injury. ...
...RF-HTMF19 ENGLISH Introduction Congratulations on your TV and accessories must be capable of supporting five times the weight of your purchase of the installation, contact Customer Service or call : 1-800-620-2790 3 Keep these directions, or have doubts about the safety of a high-quality Rocketfish product. Rocketfish... is not responsible for damage or injury caused by incorrect installation or use . • Improper installation may cause property damage or personal injury. ...

User Manual
Page 10
.... STEP 2 - Select the screws that is too short may damage your TV. Using hardware that the screws have adequate threads to secure the brackets to your TV to accommodate your TV. However..., using a screw that fit: M4 × 12 mm screws (01) M4 × 35 mm screws (01) ...01) M8 × 25 mm screws (01) M8 × 35 mm screws (01) M8 × 50 mm screws (01) Use the M4 washers (02) for M4 screws and M6/M8 washers (02) for your TV requires, test various sizes by hand threading the...
.... STEP 2 - Select the screws that is too short may damage your TV. Using hardware that the screws have adequate threads to secure the brackets to your TV to accommodate your TV. However..., using a screw that fit: M4 × 12 mm screws (01) M4 × 35 mm screws (01) ...01) M8 × 25 mm screws (01) M8 × 35 mm screws (01) M8 × 50 mm screws (01) Use the M4 washers (02) for M4 screws and M6/M8 washers (02) for your TV requires, test various sizes by hand threading the...

User Manual
Page 11
... over the holes in the brackets that spacers are required in STEP 2 (01) through the washers. RF-HTMF19 STEP 3 - Attach the horizontal brackets to your TV CAUTION: To avoid personal injury or property damage, do not use power tools. 1 Align the holes you noted on the horizontal brackets (04) with the screw holes...
... over the holes in the brackets that spacers are required in STEP 2 (01) through the washers. RF-HTMF19 STEP 3 - Attach the horizontal brackets to your TV CAUTION: To avoid personal injury or property damage, do not use power tools. 1 Align the holes you noted on the horizontal brackets (04) with the screw holes...
User Manual
Page 12
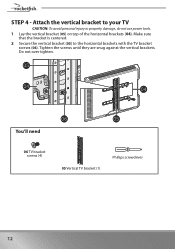
Make sure that the bracket is centered. 2 Secure the vertical bracket (05) to your TV CAUTION: To avoid personal injury or property damage, do not use power tools. 1 Lay the vertical bracket (05) on top of the horizontal brackets (04). Attach the vertical bracket to the horizontal brackets with the TV bracket screws (06). Do not over tighten. STEP 4 - Tighten the screws until they are snug against the vertical brackets. You'll need 06 TV bracket screws (4) 05 Vertical TV bracket (1) Phillips screwdriver 12
Make sure that the bracket is centered. 2 Secure the vertical bracket (05) to your TV CAUTION: To avoid personal injury or property damage, do not use power tools. 1 Lay the vertical bracket (05) on top of the horizontal brackets (04). Attach the vertical bracket to the horizontal brackets with the TV bracket screws (06). Do not over tighten. STEP 4 - Tighten the screws until they are snug against the vertical brackets. You'll need 06 TV bracket screws (4) 05 Vertical TV bracket (1) Phillips screwdriver 12

User Manual
Page 13
... location Note: Your TV should be 0.6 in below the center of the Vertical TV bracket and the center point of the screen from the ground). RF-HTMF19 STEP 5 - When the center slot of the Vertical TV bracket (05). The center of the Vertical TV bracket is NOT the same as the center... of the Vertical TV bracket is used, the top hole in . (43.6 cm) 13 You will be high enough so your holes, visit our online height-finder at: http://bestbuy.selectionassistant.com...
... location Note: Your TV should be 0.6 in below the center of the Vertical TV bracket and the center point of the screen from the ground). RF-HTMF19 STEP 5 - When the center slot of the Vertical TV bracket (05). The center of the Vertical TV bracket is NOT the same as the center... of the Vertical TV bracket is used, the top hole in . (43.6 cm) 13 You will be high enough so your holes, visit our online height-finder at: http://bestbuy.selectionassistant.com...

User Manual
Page 15
Tape the mounting template to the wall. 3 Drill two pilot holes through the mounting template to a depth of the mounting template (07) at the height you determined in . (5.5 mm) 4 Move the cover out away from the arm assembly wall plate. 08 15 RF-HTMF19 2 Align the center of 2 3/4 in. (70 mm) using a 7/32 in. (5.5 mm) diameter drill bit, then remove the mounting template. (69 mm) (257.3/5/34m2inim.n(7)0 mm) 7/32 in the previous step and make sure that it is level.
Tape the mounting template to the wall. 3 Drill two pilot holes through the mounting template to a depth of the mounting template (07) at the height you determined in . (5.5 mm) 4 Move the cover out away from the arm assembly wall plate. 08 15 RF-HTMF19 2 Align the center of 2 3/4 in. (70 mm) using a 7/32 in. (5.5 mm) diameter drill bit, then remove the mounting template. (69 mm) (257.3/5/34m2inim.n(7)0 mm) 7/32 in the previous step and make sure that it is level.
User Manual
Page 17
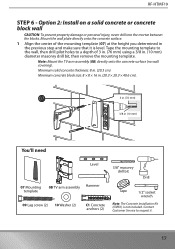
... injury, never drill into the mortar between the blocks. Mount the wall plate directly onto the concrete surface. 1 Align the center of 3 in. (76 mm) using a 3/8 in the previous step and make sure that it . 17 Tape the mounting template to the wall, then drill pilot holes to request it is... Service to a depth of the mounting template (07) at the height you determined in . (10 mm) diameter masonry drill bit, then remove the mounting template. RF-HTMF19 STEP 6 -
... injury, never drill into the mortar between the blocks. Mount the wall plate directly onto the concrete surface. 1 Align the center of 3 in. (76 mm) using a 3/8 in the previous step and make sure that it . 17 Tape the mounting template to the wall, then drill pilot holes to request it is... Service to a depth of the mounting template (07) at the height you determined in . (10 mm) diameter masonry drill bit, then remove the mounting template. RF-HTMF19 STEP 6 -

User Manual
Page 18
2 Insert the concrete wall anchors (C1) (see Concrete Installation Kit CMK1 (not included) on page 8) into the pilot holes and use a hammer to make sure that the anchors are flush with the concrete surface. C C 3 Move the wall plate cover out away from the wall plate. 18
2 Insert the concrete wall anchors (C1) (see Concrete Installation Kit CMK1 (not included) on page 8) into the pilot holes and use a hammer to make sure that the anchors are flush with the concrete surface. C C 3 Move the wall plate cover out away from the wall plate. 18

User Manual
Page 21
Select the height you want by choosing the appropriate slot in the vertical TV bracket. CAUTION: To avoid possible personal injury or equipment damage, you want HEAVY! You may need assistance with the locking screw (11). Select the height you must use the locking screw (11) to secure your TV to the TV arm assembly with this step. 3 Secure your TV on the arm assembly. RF-HTMF19 2 Hang your TV to the TV arm assembly. 21
Select the height you want by choosing the appropriate slot in the vertical TV bracket. CAUTION: To avoid possible personal injury or equipment damage, you want HEAVY! You may need assistance with the locking screw (11). Select the height you must use the locking screw (11) to secure your TV to the TV arm assembly with this step. 3 Secure your TV on the arm assembly. RF-HTMF19 2 Hang your TV to the TV arm assembly. 21

User Manual
Page 22
Manage cables • Fully extend the TV arm assembly (08) to provide enough slack, then route cables along the arms, inserting them into the channels on the arms to provide a clean look to your TV is in place, tighten the tilt tension knob to keep your TV in . hex key (not provided). • Loosen the tension knob with your fingers, adjust the tilt angle, then tighten the knob to prevent unwanted movement. STEP 9 - Additional tension can be applied by using a 3/16 in place. 08 22 STEP 8 - Adjust the tilt Note: After your installation.
Manage cables • Fully extend the TV arm assembly (08) to provide enough slack, then route cables along the arms, inserting them into the channels on the arms to provide a clean look to your TV is in place, tighten the tilt tension knob to keep your TV in . hex key (not provided). • Loosen the tension knob with your fingers, adjust the tilt angle, then tighten the knob to prevent unwanted movement. STEP 9 - Additional tension can be applied by using a 3/16 in place. 08 22 STEP 8 - Adjust the tilt Note: After your installation.

User Manual
Page 26
... God, such as you own your original receipt and the Product to any Best Buy store. Warranty coverage terminates if you sell the covered Rocketfish-branded product, this warranty cover? What does the warranty not cover? For this warranty statement. How long does the coverage last? During the...parts; The Warranty Period lasts for that provides the same amount of the Product. What does this Limited Lifetime Warranty shall terminate for the useful life of the Product beginning on the receipt you place the Product in its sole option): (1) repair the Product with this warranty to...
... God, such as you own your original receipt and the Product to any Best Buy store. Warranty coverage terminates if you sell the covered Rocketfish-branded product, this warranty cover? What does the warranty not cover? For this warranty statement. How long does the coverage last? During the...parts; The Warranty Period lasts for that provides the same amount of the Product. What does this Limited Lifetime Warranty shall terminate for the useful life of the Product beginning on the receipt you place the Product in its sole option): (1) repair the Product with this warranty to...

User Manual
Page 27
RF-HTMF19 • Negligence • Commercial purposes/use, including but not limited to use in a place of business or in communal areas of a multiple dwelling condominium or apartment complex, or otherwise used in a place of other than a private home. • Unauthorized modification of any contact including but ...operation or maintenance • Connection to an incorrect voltage or power supply • Attempted repair by any person not authorized by Rocketfish to service the Product • Products sold "as is a trademark of Best Buy and its affiliated companies. *Distributed by any...
RF-HTMF19 • Negligence • Commercial purposes/use, including but not limited to use in a place of business or in communal areas of a multiple dwelling condominium or apartment complex, or otherwise used in a place of other than a private home. • Unauthorized modification of any contact including but ...operation or maintenance • Connection to an incorrect voltage or power supply • Attempted repair by any person not authorized by Rocketfish to service the Product • Products sold "as is a trademark of Best Buy and its affiliated companies. *Distributed by any...

