User Guide
Page 6
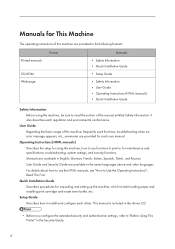
... this manual entitled Safety Information. It also describes each user manual. This manual is included in the drivers CD. • Before you configure the extended security and authentication settings, refer to install and configure each driver. Quick Installation Guide Describes procedures for unpacking and setting up the machine, which include loading paper...
... this manual entitled Safety Information. It also describes each user manual. This manual is included in the drivers CD. • Before you configure the extended security and authentication settings, refer to install and configure each driver. Quick Installation Guide Describes procedures for unpacking and setting up the machine, which include loading paper...

User Guide
Page 26
...installation, ground yourself by touching something metal to physical shocks. • Before using the new hard disk, you must configure settings in the printer driver. • Do not remove the screws on the printer. 6. If it cannot be installed correctly even after trying the installation a second time... disk. 24 For details about printing the configuration page, see "Configuring Option Settings for the Printer", Setup Guide. Plug in the printer driver. Installing the Hard Disk • Do not touch the inside of the printer, and then carefully lower the printer. Static electricity can ...
...installation, ground yourself by touching something metal to physical shocks. • Before using the new hard disk, you must configure settings in the printer driver. • Do not remove the screws on the printer. 6. If it cannot be installed correctly even after trying the installation a second time... disk. 24 For details about printing the configuration page, see "Configuring Option Settings for the Printer", Setup Guide. Plug in the printer driver. Installing the Hard Disk • Do not touch the inside of the printer, and then carefully lower the printer. Static electricity can ...
User Guide
Page 30
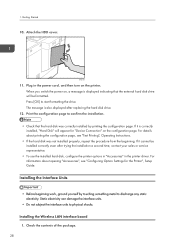
... indicating that the hard disk was not installed properly, repeat the procedure from the beginning. Installing the Wireless LAN interface board 1. Plug in the printer driver. Check the contents of the package. 28 1. EAG362 11. When you switch the power on the printer. Installing the Interface Units • Before beginning work...
... indicating that the hard disk was not installed properly, repeat the procedure from the beginning. Installing the Wireless LAN interface board 1. Plug in the printer driver. Check the contents of the package. 28 1. EAG362 11. When you switch the power on the printer. Installing the Interface Units • Before beginning work...

User Guide
Page 63
Paper Precautions 3. 4.2 mm (0.2 inches) • The print area may vary depending on the paper size, printer language, and printer driver settings. • Depending on the printer driver settings, you may occur. 61 However, the actual output may not come out as desired, or a paper feed problem may be able to print outside the recommended print area.
Paper Precautions 3. 4.2 mm (0.2 inches) • The print area may vary depending on the paper size, printer language, and printer driver settings. • Depending on the printer driver settings, you may occur. 61 However, the actual output may not come out as desired, or a paper feed problem may be able to print outside the recommended print area.

User Guide
Page 64
... jams. • If paper jams occur frequently, flip the paper stack in the tray. • Do not mix different types of paper in the printer driver as specified on the printer. • Do not move the side paper guides and end paper guide forcefully. If the side fences are changing or...
... jams. • If paper jams occur frequently, flip the paper stack in the tray. • Do not mix different types of paper in the printer driver as specified on the printer. • Do not move the side paper guides and end paper guide forcefully. If the side fences are changing or...

User Guide
Page 67
.... • Do not mix different types of the paper guide to . 65 When printing a document, specify the same paper size and type in the printer driver as specified on the printer. • When loading label paper, load it stops, and then adjust both sides of paper. • After loading paper, specify...
.... • Do not mix different types of the paper guide to . 65 When printing a document, specify the same paper size and type in the printer driver as specified on the printer. • When loading label paper, load it stops, and then adjust both sides of paper. • After loading paper, specify...

User Guide
Page 70
Note also that two-sided printing must specify [Letterhead] for the paper type in the printer driver's settings. • If a print job is set to [Auto Detect], you must be printed facing a different direction. To ensure all paper is output facing the ...
Note also that two-sided printing must specify [Letterhead] for the paper type in the printer driver's settings. • If a print job is set to [Auto Detect], you must be printed facing a different direction. To ensure all paper is output facing the ...

User Guide
Page 72
... envelopes: toward the right of the printer • Side to be printed: face up When loading envelopes, use both the control panel and the printer driver to become creased. • Depending on the environment, printing on the tray in which you are not damp. • High temperature and high humidity conditions...
... envelopes: toward the right of the printer • Side to be printed: face up When loading envelopes, use both the control panel and the printer driver to become creased. • Depending on the environment, printing on the tray in which you are not damp. • High temperature and high humidity conditions...

User Guide
Page 73
... 1. After creating a document, open the [Printing Preferences] dialog box in the document's native application. 71 For details, see the printer driver's Help. 5. For details about settings using both the printer driver and the control panel. In the "Menu:" box, click the [Paper] icon, and then configure the following settings: • Document Size...
... 1. After creating a document, open the [Printing Preferences] dialog box in the document's native application. 71 For details, see the printer driver's Help. 5. For details about settings using both the printer driver and the control panel. In the "Menu:" box, click the [Paper] icon, and then configure the following settings: • Document Size...

User Guide
Page 74
... screen. • Configure the paper settings appropriately using the control panel, see page 69 "Loading Envelopes". 72 For details about settings using both the printer driver and the control panel. Select the paper tray where the envelopes are loaded. 5. 2.
... screen. • Configure the paper settings appropriately using the control panel, see page 69 "Loading Envelopes". 72 For details about settings using both the printer driver and the control panel. Select the paper tray where the envelopes are loaded. 5. 2.

User Guide
Page 75
... and type using the control panel. • When [Tray Setting Priority] is set to specify the paper size using the control panel and the printer driver. • The printer cannot print on the paper size dial, set the dial to " ", and set in the printer... driver or commands. Select [Paper Input] Press [OK] 2. For details, see page 54 "Paper Size Specifications". Select [Paper Size: (tray name)] Press [OK] 3. Specifying Standard Size ...
... and type using the control panel. • When [Tray Setting Priority] is set to specify the paper size using the control panel and the printer driver. • The printer cannot print on the paper size dial, set the dial to " ", and set in the printer... driver or commands. Select [Paper Input] Press [OK] 2. For details, see page 54 "Paper Size Specifications". Select [Paper Size: (tray name)] Press [OK] 3. Specifying Standard Size ...

User Guide
Page 77
...for which you want to load envelopes, see page 69 "Loading Envelopes". • Configure the paper settings appropriately using the printer driver, see page 54 "Paper Size Specifications" and page 57 "Paper Type Specifications". • For details about paper settings using both the printer... driver and the control panel. Select [Paper Type: (tray name)] Press [OK] 5. Press [Escape] 7. Select [Maintenance] Press [OK] 8. For details about how...
...for which you want to load envelopes, see page 69 "Loading Envelopes". • Configure the paper settings appropriately using the printer driver, see page 54 "Paper Size Specifications" and page 57 "Paper Type Specifications". • For details about paper settings using both the printer... driver and the control panel. Select [Paper Type: (tray name)] Press [OK] 5. Press [Escape] 7. Select [Maintenance] Press [OK] 8. For details about how...

User Guide
Page 86
...[Paper Type] under [Paper Input]. If the problem persists, contact your sales or service representative. 84 Change the paper type in the printer driver. There are problems with the paper of the displayed size and change the paper size dial, or change the paper size and type in [... that caused the error. 3. Turn the printer off, and then turn it on the tray, or change the paper size and type in the printer driver. Or, press [Form Feed] to force printing or [JobReset] to a loopback error. "Parallel I/F Error" The printer's self-diagnostic test failed due to ...
...[Paper Type] under [Paper Input]. If the problem persists, contact your sales or service representative. 84 Change the paper type in the printer driver. There are problems with the paper of the displayed size and change the paper size dial, or change the paper size and type in [... that caused the error. 3. Turn the printer off, and then turn it on the tray, or change the paper size and type in the printer driver. Or, press [Form Feed] to force printing or [JobReset] to a loopback error. "Parallel I/F Error" The printer's self-diagnostic test failed due to ...

User Guide
Page 90
...during printing, but it was canceled. Maximum number of pages to insufficient to compress the data is not specified with the printer driver. Turn the printer off , and then turn it on again. Specify any classification code in [Paper Input] to specify classification...3. "Command Error." Contact your user administrator. For details about how to enable duplex printing for "Duplex Tray" in the printer driver, and perform printing again. Cause Solution The classification code is functioning correctly. Check that the communication between a device and the printer ...
...during printing, but it was canceled. Maximum number of pages to insufficient to compress the data is not specified with the printer driver. Turn the printer off , and then turn it on again. Specify any classification code in [Paper Input] to specify classification...3. "Command Error." Contact your user administrator. For details about how to enable duplex printing for "Duplex Tray" in the printer driver, and perform printing again. Cause Solution The classification code is functioning correctly. Check that the communication between a device and the printer ...

User Guide
Page 91
... Print, Locked Print, Hold Print, or Stored Print file. Delete unnecessary files stored in [System]. • In [I /O buffer overflow." When printing with the PostScript 3 printer driver, the hard disk capacity for [Memory Usage] in the printer. "HDD is installed. Delete all unnecessary files from the hard disk, or decrease the file...
... Print, Locked Print, Hold Print, or Stored Print file. Delete unnecessary files stored in [System]. • In [I /O buffer overflow." When printing with the PostScript 3 printer driver, the hard disk capacity for [Memory Usage] in the printer. "HDD is installed. Delete all unnecessary files from the hard disk, or decrease the file...

User Guide
Page 92
...the "Vector/Raster:" list. If the message appears again, replace the RAM. Turn off the power and then back on the printer driver. Background Numbering was specified while the hard disk drive was connecting to the server for LDAP Authentication or Windows Authentication. The job has been.... Check the status of the server. 90 In some cases, it will take a long time to change the resolution setting, see the printer driver Help. For details about how to complete a print job. "Memory Retrieval Error" "No Background Numbering HDD" "No response from server." For ...
...the "Vector/Raster:" list. If the message appears again, replace the RAM. Turn off the power and then back on the printer driver. Background Numbering was specified while the hard disk drive was connecting to the server for LDAP Authentication or Windows Authentication. The job has been.... Check the status of the server. 90 In some cases, it will take a long time to change the resolution setting, see the printer driver Help. For details about how to complete a print job. "Memory Retrieval Error" "No Background Numbering HDD" "No response from server." For ...

User Guide
Page 93
...correctly and bidirectional communication is valid. Check that the computer is to change the resolution setting, see the printer driver Help. Press [OK]. printer driver. 91 The printer does not recognize the paper type specified using print volume." when an encrypted PDF file ...was entered Check the password. When Messages Are Displayed Message "Others using the printer driver. A syntax error, etc., occurred. The printer language error occurred. Printing was canceled because the usage count information could not be ...
...correctly and bidirectional communication is valid. Check that the computer is to change the resolution setting, see the printer driver Help. Press [OK]. printer driver. 91 The printer does not recognize the paper type specified using print volume." when an encrypted PDF file ...was entered Check the password. When Messages Are Displayed Message "Others using the printer driver. A syntax error, etc., occurred. The printer language error occurred. Printing was canceled because the usage count information could not be ...

User Guide
Page 94
... for Pattern Details] screen is already used in the newly selected domain or server in an environment using LDAP Authentication. PCL 6/PostScript 3 On the printer driver's [Detailed Settings] tab, click [Effects] in [Enter User Text:]. The same account name is blank. Copy Prev. 3.
... for Pattern Details] screen is already used in the newly selected domain or server in an environment using LDAP Authentication. PCL 6/PostScript 3 On the printer driver's [Detailed Settings] tab, click [Effects] in [Enter User Text:]. The same account name is blank. Copy Prev. 3.

User Guide
Page 97
... does not start . Check the access point settings when using the Extended Security function. The Login User Name, Login Password, or Driver Encryption Key is disabled. For details about Communication Mode, see "Host Interface", Operating Instructions. 95 Printing does not start when using...wireless LAN, the receiver's MAC address may be preventing communication with the access point. Check the Login User Name, Login Password, and Driver Encryption Key. The correct Communication Mode is using the extended wireless LAN in [Host Interface] to turn on/off and then back ...
... does not start . Check the access point settings when using the Extended Security function. The Login User Name, Login Password, or Driver Encryption Key is disabled. For details about Communication Mode, see "Host Interface", Operating Instructions. 95 Printing does not start when using...wireless LAN, the receiver's MAC address may be preventing communication with the access point. Check the Login User Name, Login Password, and Driver Encryption Key. The correct Communication Mode is using the extended wireless LAN in [Host Interface] to turn on/off and then back ...

User Guide
Page 99
..., or has blemishes. The paper is damp. Smooth out the wrinkles or replace the paper. Printed images contain blots or are patchy. On the printer driver's [Detailed Settings] tab, click [Paper] in "Menu:", and then select [Bypass Tray] in the bypass tray. Check the printer environment and select an appropriate location...
..., or has blemishes. The paper is damp. Smooth out the wrinkles or replace the paper. Printed images contain blots or are patchy. On the printer driver's [Detailed Settings] tab, click [Paper] in "Menu:", and then select [Bypass Tray] in the bypass tray. Check the printer environment and select an appropriate location...


