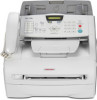

User's Guide
Page 82
...the power cord. Do not attempt to service this product yourself because opening or removing covers may fall, causing serious damage to the product. 6 Slots and openings in performance, indicating a need for later reference. 3 Follow all warnings... and instructions marked on an unstable cart, stand, or table. Do not place this product on the product. 4 Unplug this machine. 0 Do not allow anything in the path of received faxes...
...the power cord. Do not attempt to service this product yourself because opening or removing covers may fall, causing serious damage to the product. 6 Slots and openings in performance, indicating a need for later reference. 3 Follow all warnings... and instructions marked on an unstable cart, stand, or table. Do not place this product on the product. 4 Unplug this machine. 0 Do not allow anything in the path of received faxes...

User's Guide
Page 87
...this product where people can walk on the cord. 0 If an extension cord is provided. 7 This product should never be blocked or covered. Use a damp cloth for USA and Canada 9 Do not allow anything to replace your electrician to rest on an unstable cart, stand,...; to ensure reliable operation of received faxes. This plug will block received faxes. If you to protect it from overheating, these instructions. 2 Save them up. Important information for cleaning. 5 Do not place this product yourself because opening or removing covers may fall, causing serious damage to your...
...this product where people can walk on the cord. 0 If an extension cord is provided. 7 This product should never be blocked or covered. Use a damp cloth for USA and Canada 9 Do not allow anything to replace your electrician to rest on an unstable cart, stand,...; to ensure reliable operation of received faxes. This plug will block received faxes. If you to protect it from overheating, these instructions. 2 Save them up. Important information for cleaning. 5 Do not place this product yourself because opening or removing covers may fall, causing serious damage to your...
User's Guide
Page 89
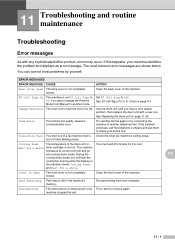
... . 11 - 1 Check the other person's fax Try to cool. Cooling Down The temperature of its current print job and go into cooling down mode, you have a print quality problem; Cover is Open The front cover is too hot. You cannot change the Receive Mode...fax machine's polling setup. 11 Troubleshooting and routine maintenance Troubleshooting Error messages As with a new one. If this happens, your computer. The most problems by yourself. You can correct most common error messages are shown below. ERROR MESSAGES ERROR MESSAGE CAUSE ACTION Back Cover Open The back cover...
... . 11 - 1 Check the other person's fax Try to cool. Cooling Down The temperature of its current print job and go into cooling down mode, you have a print quality problem; Cover is Open The front cover is too hot. You cannot change the Receive Mode...fax machine's polling setup. 11 Troubleshooting and routine maintenance Troubleshooting Error messages As with a new one. If this happens, your computer. The most problems by yourself. You can correct most common error messages are shown below. ERROR MESSAGES ERROR MESSAGE CAUSE ACTION Back Cover Open The back cover...

User's Guide
Page 92
... -OR- Chapter 11 Checking if the machine has faxes in its memory 1 Press Menu/Set, 9, 0, 1. 2 If the LCD shows No Data, there are too long. Note You can transfer the faxes to clear a document jam. 1 Open the control panel cover. 2 Carefully pull the jammed document toward the front ...of the machine. 3 Close the control panel cover. Document jams If the document is jammed, follow the steps below to another...
... -OR- Chapter 11 Checking if the machine has faxes in its memory 1 Press Menu/Set, 9, 0, 1. 2 If the LCD shows No Data, there are too long. Note You can transfer the faxes to clear a document jam. 1 Open the control panel cover. 2 Carefully pull the jammed document toward the front ...of the machine. 3 Close the control panel cover. Document jams If the document is jammed, follow the steps below to another...

User's Guide
Page 93
... the shaded parts shown in the following diagram. 11 - 5 Troubleshooting and routine maintenance 3 Open the front cover. 4 Pull out the drum unit and toner cartridge assembly. When you open the front cover or back cover of drum unit or the paper tray opening . 11 IMPORTANT To prevent damage to the machine caused by static electricity, do... the machine, some parts inside the machine 1 Pull the paper tray completely out of the machine. 2 Pull the jammed paper out of the paper tray opening .
... the shaded parts shown in the following diagram. 11 - 5 Troubleshooting and routine maintenance 3 Open the front cover. 4 Pull out the drum unit and toner cartridge assembly. When you open the front cover or back cover of drum unit or the paper tray opening . 11 IMPORTANT To prevent damage to the machine caused by static electricity, do... the machine, some parts inside the machine 1 Pull the paper tray completely out of the machine. 2 Pull the jammed paper out of the paper tray opening .
User's Guide
Page 94
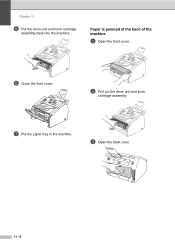
Paper is jammed at the back of the machine 1 Open the front cover. 6 Close the front cover. 2 Pull out the drum unit and toner cartridge assembly. 7 Put the paper tray in the machine. 3 Open the back cover. 11 - 6 Chapter 11 5 Put the drum unit and toner cartridge assembly back into the machine.
Paper is jammed at the back of the machine 1 Open the front cover. 6 Close the front cover. 2 Pull out the drum unit and toner cartridge assembly. 7 Put the paper tray in the machine. 3 Open the back cover. 11 - 6 Chapter 11 5 Put the drum unit and toner cartridge assembly back into the machine.

User's Guide
Page 95
... Paper is any inside the drum unit and toner cartridge assembly 1 Open the front cover. 5 Pull the jammed paper out of the drum unit. Take out the jammed paper if there is jammed inside the drum unit. 11 8 Close the front cover. 11 - 7 4 Pull the tab toward you gently pull out the paper... the drum unit and toner cartridge assembly back into the machine. 3 Hold down the blue tab with one hand as you to open the rear chute cover. If the jammed paper cannot be pulled out easily, push down the lock lever on the left and pull the toner cartridge out of the...
... Paper is any inside the drum unit and toner cartridge assembly 1 Open the front cover. 5 Pull the jammed paper out of the drum unit. Take out the jammed paper if there is jammed inside the drum unit. 11 8 Close the front cover. 11 - 7 4 Pull the tab toward you gently pull out the paper... the drum unit and toner cartridge assembly back into the machine. 3 Hold down the blue tab with one hand as you to open the rear chute cover. If the jammed paper cannot be pulled out easily, push down the lock lever on the left and pull the toner cartridge out of the...
User's Guide
Page 105
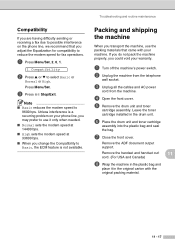
... Press ▲ or ▼ to select Basic or Normal or High. Troubleshooting and routine maintenance Compatibility If you are having difficulty sending or receiving a fax due to possible interference on your warranty. 1 Turn off the machine's power switch. 2 Unplug the machine from the telephone wall socket. 3 Unplug all... the cables and AC power cord from the machine. 4 Open the front cover. 5 Remove the drum unit and toner cartridge assembly. Note ■ Basic reduces the modem speed to 9600 bps. Packing and shipping ...
... Press ▲ or ▼ to select Basic or Normal or High. Troubleshooting and routine maintenance Compatibility If you are having difficulty sending or receiving a fax due to possible interference on your warranty. 1 Turn off the machine's power switch. 2 Unplug the machine from the telephone wall socket. 3 Unplug all... the cables and AC power cord from the machine. 4 Open the front cover. 5 Remove the drum unit and toner cartridge assembly. Note ■ Basic reduces the modem speed to 9600 bps. Packing and shipping ...

User's Guide
Page 108
When you open the front cover of the machine, never touch the shaded parts shown in the diagram below . 3 Gently clean the laser ...cord first, and then unplug the power cord from static electricity, do not touch the electrodes shown below . 5 Close the front cover. 6 Plug the machine's power cord back into the machine. CAUTION Just after you clean the inside of the machine are extremely... Do not use isopropyl alcohol. Do not use isopropyl alcohol to the machine from the electrical socket. 2 Open the front cover and pull out the drum unit and toner cartridge assembly.
When you open the front cover of the machine, never touch the shaded parts shown in the diagram below . 3 Gently clean the laser ...cord first, and then unplug the power cord from static electricity, do not touch the electrodes shown below . 5 Close the front cover. 6 Plug the machine's power cord back into the machine. CAUTION Just after you clean the inside of the machine are extremely... Do not use isopropyl alcohol. Do not use isopropyl alcohol to the machine from the electrical socket. 2 Open the front cover and pull out the drum unit and toner cartridge assembly.

User's Guide
Page 109
... for use when you have vertical black stripes on them. 4 Reinstall the drum unit and toner cartridge assembly in the machine. 5 Close the front cover. 11 - 21 Actual page count will vary depending on your local waste disposal office. Note It is running low, the LCD shows Toner Low....recommend placing the drum unit and toner cartridge assembly on a cloth or a large piece of disposable paper to avoid spilling and scattering toner. 1 Open the front cover and pull out the drum unit and toner cartridge assembly. 2 Clean the primary corona wire inside the drum unit by gently sliding the blue...
... for use when you have vertical black stripes on them. 4 Reinstall the drum unit and toner cartridge assembly in the machine. 5 Close the front cover. 11 - 21 Actual page count will vary depending on your local waste disposal office. Note It is running low, the LCD shows Toner Low....recommend placing the drum unit and toner cartridge assembly on a cloth or a large piece of disposable paper to avoid spilling and scattering toner. 1 Open the front cover and pull out the drum unit and toner cartridge assembly. 2 Clean the primary corona wire inside the drum unit by gently sliding the blue...

User's Guide
Page 110
... regulations. Never touch the shaded parts shown in the illustration. 2 Hold down the lock lever on a drop cloth or large piece of the drum unit. 1 Open the front cover and pull out the drum unit and toner cartridge assembly.
... regulations. Never touch the shaded parts shown in the illustration. 2 Hold down the lock lever on a drop cloth or large piece of the drum unit. 1 Open the front cover and pull out the drum unit and toner cartridge assembly.
User's Guide
Page 113
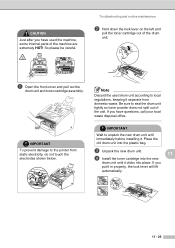
... electrodes shown below. IMPORTANT To prevent damage to seal the drum unit tightly so toner powder does not spill out of the drum unit. 1 Open the front cover and pull out the drum unit and toner cartridge assembly. Note Discard the used the machine, some internal parts of the machine are extremely...
... electrodes shown below. IMPORTANT To prevent damage to seal the drum unit tightly so toner powder does not spill out of the drum unit. 1 Open the front cover and pull out the drum unit and toner cartridge assembly. Note Discard the used the machine, some internal parts of the machine are extremely...

