
Maintenance Manual
Page 28
... RPCSTM printer driver, sheets of the loaded paper on the control panel or with the printer driver. Paper and Other Media C Press the {U} or {T} key to display the target paper tray, and then press the {# Enter} key. D Press the {U} or {T} key to display [Paper Type], and then press the {# En- When using the control panel or printer driver. See p.31 "Specifying custom size paper for the Bypass Tray". ❒ If you load thick paper, OHP transparencies, or envelopes, make the settings...
... RPCSTM printer driver, sheets of the loaded paper on the control panel or with the printer driver. Paper and Other Media C Press the {U} or {T} key to display the target paper tray, and then press the {# Enter} key. D Press the {U} or {T} key to display [Paper Type], and then press the {# En- When using the control panel or printer driver. See p.31 "Specifying custom size paper for the Bypass Tray". ❒ If you load thick paper, OHP transparencies, or envelopes, make the settings...

Maintenance Manual
Page 31
... printing with a printer driver other than the RPCSTM printer driver, you already made them using the control panel. A Press the {Menu} key. Menu: Paper Input The paper selection menu appears. The initial screen appears. F Check [Bypass Size] appears, and then press the {# Enter} key. For details about two seconds, the display returns to make settings using the control panel if you must make the settings using the printer driver. Specifying custom size paper for the Bypass Tray ❒ The paper size selected using...
... printing with a printer driver other than the RPCSTM printer driver, you already made them using the control panel. A Press the {Menu} key. Menu: Paper Input The paper selection menu appears. The initial screen appears. F Check [Bypass Size] appears, and then press the {# Enter} key. For details about two seconds, the display returns to make settings using the control panel if you must make the settings using the printer driver. Specifying custom size paper for the Bypass Tray ❒ The paper size selected using...
Maintenance Manual
Page 41
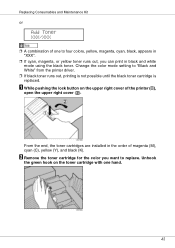
..., you want to "Black and White" from the printer driver. ❒ If black toner runs out, printing is not possible until the black toner cartridge is replaced. From the end, the toner cartridges are installed in black and white mode using the black toner. Change the color mode setting to replace. Replacing Consumables and Maintenance Kit or Add Toner XXX/XXX ❒ A combination of one hand. 41 Unhook the green hook on the upper right cover of magenta (M), cyan...
..., you want to "Black and White" from the printer driver. ❒ If black toner runs out, printing is not possible until the black toner cartridge is replaced. From the end, the toner cartridges are installed in black and white mode using the black toner. Change the color mode setting to replace. Replacing Consumables and Maintenance Kit or Add Toner XXX/XXX ❒ A combination of one hand. 41 Unhook the green hook on the upper right cover of magenta (M), cyan...

Maintenance Manual
Page 97
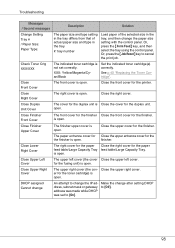
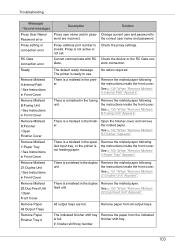
... or service representative. ed toner(s). Replace the toner cartridge (C). Add Toner: Yellow The printer is out of the certificate auto- To check the radio signal , select Infrastructure in the interface settings. If the matically has failed. Troubleshooting Error & Status Messages on the Control Panel This section explains what to do when a particular message appears. ❖ Messages (in alphabetical order) Messages / Second messages Description Solution Add staples The stapler is out of the indicat- Job...
... or service representative. ed toner(s). Replace the toner cartridge (C). Add Toner: Yellow The printer is out of the certificate auto- To check the radio signal , select Infrastructure in the interface settings. If the matically has failed. Troubleshooting Error & Status Messages on the Control Panel This section explains what to do when a particular message appears. ❖ Messages (in alphabetical order) Messages / Second messages Description Solution Add staples The stapler is out of the indicat- Job...
Maintenance Manual
Page 98
... finisher upper cover is open . for the duplex unit. DHCP assigned Cannot change An attempt to change after setting DHCP dress, subnet mask or gateway to cancel the print job. See p.40 "Replacing the Toner Cartridge". Troubleshooting Messages / Second messages Description Solution Change Setting Tray # / Paper Size: Paper Type: The paper size and type setting in the tray differs from that of actual paper size and type in the tray. #: tray number Load paper of the selected size in the tray, and then change the paper size setting with the control panel. is open . is open . XXX...
... finisher upper cover is open . for the duplex unit. DHCP assigned Cannot change An attempt to change after setting DHCP dress, subnet mask or gateway to cancel the print job. See p.40 "Replacing the Toner Cartridge". Troubleshooting Messages / Second messages Description Solution Change Setting Tray # / Paper Size: Paper Type: The paper size and type setting in the tray differs from that of actual paper size and type in the tray. #: tray number Load paper of the selected size in the tray, and then change the paper size setting with the control panel. is open . is open . XXX...
Maintenance Manual
Page 99
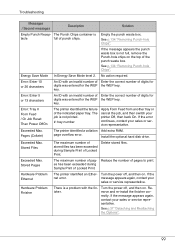
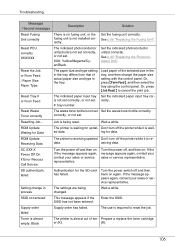
... required. page overflow error. Reduce the number of the indicated paper tray. Hardware Problem Ethernet The printer identified an Ether- Turn the power off , and then on. See p.37 "Detaching and Reattaching the Options". 99 The Punch Chips container is not printed. #: tray number Apply Form Feed from another tray or cancel the job, and then switch your sales or service representative. Empty the punch waste box. Energy Save Mode In...
... required. page overflow error. Reduce the number of the indicated paper tray. Hardware Problem Ethernet The printer identified an Ether- Turn the power off , and then on. See p.37 "Detaching and Reattaching the Options". 99 The Punch Chips container is not printed. #: tray number Apply Form Feed from another tray or cancel the job, and then switch your sales or service representative. Empty the punch waste box. Energy Save Mode In...
Maintenance Manual
Page 103
...:Dup.Feed Unit" Appears". work connection. Troubleshooting Messages / Second messages Description Solution Proxy User Name/ Password error Proxy user name and/or pass- See p.142 "When "Remove Misfeed R:Finisher" Appears". finisher shift tray. #: finisher shift tray number 103 See p.150 "When "Remove Misfeed Y:Paper Tray" Appears". Remove Paper All Output Trays All output trays are incorrect. Remove the misfed paper following fied input tray, or the printer is not active or not set. Remove Misfeed Z1:Duplex Unit / See Instructions in Front Cover There...
...:Dup.Feed Unit" Appears". work connection. Troubleshooting Messages / Second messages Description Solution Proxy User Name/ Password error Proxy user name and/or pass- See p.142 "When "Remove Misfeed R:Finisher" Appears". finisher shift tray. #: finisher shift tray number 103 See p.150 "When "Remove Misfeed Y:Paper Tray" Appears". Remove Paper All Output Trays All output trays are incorrect. Remove the misfed paper following fied input tray, or the printer is not active or not set. Remove Misfeed Z1:Duplex Unit / See Instructions in Front Cover There...
Maintenance Manual
Page 106
... tray using the control panel. ROM Update Waiting for Data The printer is receiving updated Don't turn off and then on . ed data. SC XXX-X Power Off On If Error Reoccur Call Service Turn the power off the printer while it is being changed. Turn the power off and then back on again. Turn the power switch off , and then on . Wait a while. Load paper of the selected size in the tray, and then change in the tray...
... tray using the control panel. ROM Update Waiting for Data The printer is receiving updated Don't turn off and then on . ed data. SC XXX-X Power Off On If Error Reoccur Call Service Turn the power off the printer while it is being changed. Turn the power off and then back on again. Turn the power switch off , and then on . Wait a while. Load paper of the selected size in the tray, and then change in the tray...
Maintenance Manual
Page 115
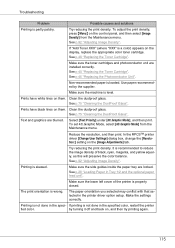
... Toner Cartridge". Select [Text Priority] under [4C.Graphic Mode], and then print. The print orientation is skewed. If printing is properly closed. Prints have black lines on the control panel, and then select [Image Density] from the Maintenance menu. See p.92 "Adjusting Image Density". See p.45 "Replacing the Photoconductor Unit". Clean the dustproof glass. Printing is partly patchy. Troubleshooting Problem Possible causes and solutions Printing is not done in the specified color, restart the printer fied color. Make...
... Toner Cartridge". Select [Text Priority] under [4C.Graphic Mode], and then print. The print orientation is skewed. If printing is properly closed. Prints have black lines on the control panel, and then select [Image Density] from the Maintenance menu. See p.92 "Adjusting Image Density". See p.45 "Replacing the Photoconductor Unit". Clean the dustproof glass. Printing is partly patchy. Troubleshooting Problem Possible causes and solutions Printing is not done in the specified color, restart the printer fied color. Make...

Maintenance Manual
Page 116
... the RPCSTM printer driver. Black areas and lines are not pure black In the RPCSTM printer driver [Change User Settings] dialog box, set [Print priority] to [K (Black)]. See p.20 "Loading Paper". 116 For details, see the printer driver Help. Troubleshooting Problem Possible causes and solutions The color changes considerably when you adjust the color on the [Image Adjustments] tab to [Quality]. On the [Print Quality] tab, set [Gray reproduction (Text/Line Art):] on the [Balance Adjustments] tab of the RPCSTM printer driver [Change User Settings] dialog...
... the RPCSTM printer driver. Black areas and lines are not pure black In the RPCSTM printer driver [Change User Settings] dialog box, set [Print priority] to [K (Black)]. See p.20 "Loading Paper". 116 For details, see the printer driver Help. Troubleshooting Problem Possible causes and solutions The color changes considerably when you adjust the color on the [Image Adjustments] tab to [Quality]. On the [Print Quality] tab, set [Gray reproduction (Text/Line Art):] on the [Balance Adjustments] tab of the RPCSTM printer driver [Change User Settings] dialog...

Maintenance Manual
Page 118
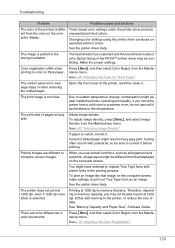
... Image Density from actual paper size. Set the desired output tray using the control panel. Check the paper guide of the paper tray is locked. Make the image density darker. The color gradation has changed. Color gradation during color printing changes slightly, depending on the control panel, and load paper of factors. Check the settings on a number of the correct size and feed direction. See p.28 "Loading Paper in the printer driver's [Change User Settings] dialog box. RPCS Select [K (Black)] for Gray Reproduction in color tones. To adjust image density, press {Menu...
... Image Density from actual paper size. Set the desired output tray using the control panel. Check the paper guide of the paper tray is locked. Make the image density darker. The color gradation has changed. Color gradation during color printing changes slightly, depending on the control panel, and load paper of factors. Check the settings on a number of the correct size and feed direction. See p.28 "Loading Paper in the printer driver's [Change User Settings] dialog box. RPCS Select [K (Black)] for Gray Reproduction in color tones. To adjust image density, press {Menu...
Maintenance Manual
Page 119
... Troubleshooting Problem Possible causes and solutions The color of the printout is memory intensive. Press {Menu}, and then select Color Regist. The control panel error message stays on the com- The print image is hazy gray. The print side of data. from the Maintenance menu. from that image on thick paper. Toner based color settings under the printer driver produce ent from a cold room to the temperature. If you may be able to replace True Type fonts...
... Troubleshooting Problem Possible causes and solutions The color of the printout is memory intensive. Press {Menu}, and then select Color Regist. The control panel error message stays on the com- The print image is hazy gray. The print side of data. from the Maintenance menu. from that image on thick paper. Toner based color settings under the printer driver produce ent from a cold room to the temperature. If you may be able to replace True Type fonts...

Maintenance Manual
Page 120
... optional hard disk drive installation, see "Attaching the Hard Disk Drive", Setup Guide. performed with a password set, set the password of the size set to 0 MB if the memory unit is not when paper of the PDF file using PDF Before printing, embed the font in the System Menu to 16 MB, value of the [RAM Disk] to be performed only control panel and printing is removed. Direct Print, characters are missing or misshapen. When a message indicating a paper size appears, either load paper of printing using the [PDF: Change PW] menu in the paper tray...
... optional hard disk drive installation, see "Attaching the Hard Disk Drive", Setup Guide. performed with a password set, set the password of the size set to 0 MB if the memory unit is not when paper of the PDF file using PDF Before printing, embed the font in the System Menu to 16 MB, value of the [RAM Disk] to be performed only control panel and printing is removed. Direct Print, characters are missing or misshapen. When a message indicating a paper size appears, either load paper of printing using the [PDF: Change PW] menu in the paper tray...
Setup Guide
Page 11
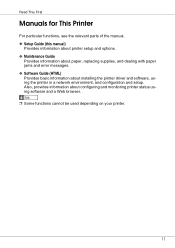
... installing the printer driver and software, using software and a Web browser. ❒ Some functions cannot be used depending on your printer. 11 Read This First Manuals for This Printer For particular functions, see the relevant parts of the manual. ❖ Setup Guide (this manual) Provides information about printer setup and options. ❖ Maintenance Guide Provides information about paper, replacing supplies, and dealing with paper jams and error messages. ❖ Software Guide (HTML) Provides basic information about configuring and monitoring printer status using the printer...
... installing the printer driver and software, using software and a Web browser. ❒ Some functions cannot be used depending on your printer. 11 Read This First Manuals for This Printer For particular functions, see the relevant parts of the manual. ❖ Setup Guide (this manual) Provides information about printer setup and options. ❖ Maintenance Guide Provides information about paper, replacing supplies, and dealing with paper jams and error messages. ❖ Software Guide (HTML) Provides basic information about configuring and monitoring printer status using the printer...

Setup Guide
Page 14
.... 14 Guide to the Printer ❒ If printed A3 short-edge feed or 11×17 short-edge feed sheets fall off the standard tray, raise the fence to replace the toner cartridge. 8. Upper right cover Open this out to a network. 11. Plug cables such as the memory unit, user account enhance unit, or printer hard disk. Vent This helps keep internal components from overheating. Ethernet port Use a network interface cable to connect the printer to load paper in the bypass tray when...
.... 14 Guide to the Printer ❒ If printed A3 short-edge feed or 11×17 short-edge feed sheets fall off the standard tray, raise the fence to replace the toner cartridge. 8. Upper right cover Open this out to a network. 11. Plug cables such as the memory unit, user account enhance unit, or printer hard disk. Vent This helps keep internal components from overheating. Ethernet port Use a network interface cable to connect the printer to load paper in the bypass tray when...

Setup Guide
Page 20
... lit if there is data to be replaced. 4. {Job Reset} key When the printer is online, press this key to print data received in Energy Saver mode. 7. Guide to increase or decrease values on the display when making settings. For details about error messages, see Maintenance Guide. 2. {U} {T} keys Use these keys to the Printer Control Panel 1. Display Displays current printer status and error messages. the yellow light indicates a potential error during printing. Toner End LED The color of 10. 3. Power indicator This indicator...
... lit if there is data to be replaced. 4. {Job Reset} key When the printer is online, press this key to print data received in Energy Saver mode. 7. Guide to increase or decrease values on the display when making settings. For details about error messages, see Maintenance Guide. 2. {U} {T} keys Use these keys to the Printer Control Panel 1. Display Displays current printer status and error messages. the yellow light indicates a potential error during printing. Toner End LED The color of 10. 3. Power indicator This indicator...

Setup Guide
Page 49
... 1000-sheet paper feed unit, or 2000-sheet large capacity tray. (Paper Feed Unit Type 7300, Paper Bank Type 7300) Attach the paper feed unit to the bottom of the printer. Installing Options IEEE 1284 Interface Board Type A USB Host Interface Unit Type 7300 User Account Enhance Unit Type E Camera direct print card Type 7300 : Available option : Standard equipment Basic model printer Duplex unit standard model printer ❒ Only one of the three types of paper feed unit can be installed at once. B Install the SDRAM module. (Memory Unit Type C) Install the module to the user account...
... 1000-sheet paper feed unit, or 2000-sheet large capacity tray. (Paper Feed Unit Type 7300, Paper Bank Type 7300) Attach the paper feed unit to the bottom of the printer. Installing Options IEEE 1284 Interface Board Type A USB Host Interface Unit Type 7300 User Account Enhance Unit Type E Camera direct print card Type 7300 : Available option : Standard equipment Basic model printer Duplex unit standard model printer ❒ Only one of the three types of paper feed unit can be installed at once. B Install the SDRAM module. (Memory Unit Type C) Install the module to the user account...

Setup Guide
Page 138
..." on as an Administrator. ❒ Only the printer driver, and not the SmartDeviceMonitor for Client is English. Using Quick Install, the PCL printer driver and RPCS printer driver and SmartDeviceMonitor for Client, is installed when using this software using USB, see Software Guide. The default interface language is installed under network environment, and TCP/IP port will be set. ❒ To install printer driver under USB, parallel, or 1394 connection. A Quit all applications currently running. Log on the...
..." on as an Administrator. ❒ Only the printer driver, and not the SmartDeviceMonitor for Client is English. Using Quick Install, the PCL printer driver and RPCS printer driver and SmartDeviceMonitor for Client, is installed when using this software using USB, see Software Guide. The default interface language is installed under network environment, and TCP/IP port will be set. ❒ To install printer driver under USB, parallel, or 1394 connection. A Quit all applications currently running. Log on the...
Setup Guide
Page 139
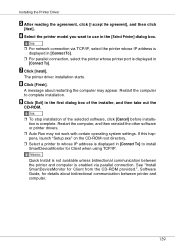
... software, click [Cancel] before installation is complete. F Select the printer model you want to whose printer port is displayed in [Connect To] to complete installation. A message about bidirectional communication between the printer and computer is enabled via TCP/IP, select the printer whose IP address is displayed in [Connect To]. ❒ For parallel connection, select the printer whose IP address is displayed in the [Select Printer] dialog box. ❒ For network connection via parallel connection...
... software, click [Cancel] before installation is complete. F Select the printer model you want to whose printer port is displayed in [Connect To] to complete installation. A message about bidirectional communication between the printer and computer is enabled via TCP/IP, select the printer whose IP address is displayed in [Connect To]. ❒ For parallel connection, select the printer whose IP address is displayed in the [Select Printer] dialog box. ❒ For network connection via parallel connection...

Setup Guide
Page 140
... hard disk drive, and then launch "Setup.exe" to complete the installation. Auto Run may not work under certain operating system setting. If this is displayed. F Click [Finish] when the installation is the case, launch "Setup.exe" on the CD-ROM root directory to your Web browser, a simpler version of the Operating Instructions Manual does not correctly display correctly, open folder "MANUAL\MAN\US_ENG\ (SETUP or MAINTE or SOFTWARE...
... hard disk drive, and then launch "Setup.exe" to complete the installation. Auto Run may not work under certain operating system setting. If this is displayed. F Click [Finish] when the installation is the case, launch "Setup.exe" on the CD-ROM root directory to your Web browser, a simpler version of the Operating Instructions Manual does not correctly display correctly, open folder "MANUAL\MAN\US_ENG\ (SETUP or MAINTE or SOFTWARE...


