Hardware Guide
Page 1
For safe and correct use this manual carefully before you use , be sure to the Printer 2 Installing Options 3 Connecting the Printer 4 Configuration 5 Paper and Other Media 6 Replacing Consumables and Maintenance Kit 7 Cleaning the Printer 8 Adjusting the Printer 9 Troubleshooting 10 Removing Misfed Paper 11 Appendix Read this machine and keep it handy for future reference. Hardware Guide 1 Guide to read the Safety Information before using the machine.
For safe and correct use this manual carefully before you use , be sure to the Printer 2 Installing Options 3 Connecting the Printer 4 Configuration 5 Paper and Other Media 6 Replacing Consumables and Maintenance Kit 7 Cleaning the Printer 8 Adjusting the Printer 9 Troubleshooting 10 Removing Misfed Paper 11 Appendix Read this machine and keep it handy for future reference. Hardware Guide 1 Guide to read the Safety Information before using the machine.
Hardware Guide
Page 11
... the Bypass Tray 97 Switching between Paper Trays 104 6. Adjusting the Printer Adjusting the Color Registration 143 Correcting the Color Gradation 145 Set the Gradation Correction Value 146 Viewing the Color Calibration Sample Sheet and Gradation Correction Sheet .....149 Resetting the gradation correction...Bottle 120 Replacing the Maintenance Kit 123 Before Replacing...123 Replacing the Friction Pad 124 Replacing the Paper Feed Roller 126 Replacing the Transfer Roller 128 Replacing the Fusing Unit 130 Replacing the Dustproof Filter 132 7. Cleaning the Printer Cautions to the ...
... the Bypass Tray 97 Switching between Paper Trays 104 6. Adjusting the Printer Adjusting the Color Registration 143 Correcting the Color Gradation 145 Set the Gradation Correction Value 146 Viewing the Color Calibration Sample Sheet and Gradation Correction Sheet .....149 Resetting the gradation correction...Bottle 120 Replacing the Maintenance Kit 123 Before Replacing...123 Replacing the Friction Pad 124 Replacing the Paper Feed Roller 126 Replacing the Transfer Roller 128 Replacing the Fusing Unit 130 Replacing the Dustproof Filter 132 7. Cleaning the Printer Cautions to the ...
Hardware Guide
Page 12
Troubleshooting Error & Status Messages on the Control Panel 155 Panel Tone...157 Printer Does Not Print 158 Checking the port connection 160 Other Printing Problems 162 Additional Troubleshooting 168 10.Removing Misfed Paper ...172 When the Paper Misfeed Message Appears (Cover Z 175 11.Appendix Moving and Transporting the Printer 177 Moving the Printer 178 Consumables ...179 Toner Cartridge ...179 Waste Toner Bottle 180 Photo Conductor Unit 180 Intermediate Transfer Unit (Transfer Unit 181 Maintenance Kit ...181 Specifications...182 Mainframe ...182 Options ...185 INDEX...189 x 9.
Troubleshooting Error & Status Messages on the Control Panel 155 Panel Tone...157 Printer Does Not Print 158 Checking the port connection 160 Other Printing Problems 162 Additional Troubleshooting 168 10.Removing Misfed Paper ...172 When the Paper Misfeed Message Appears (Cover Z 175 11.Appendix Moving and Transporting the Printer 177 Moving the Printer 178 Consumables ...179 Toner Cartridge ...179 Waste Toner Bottle 180 Photo Conductor Unit 180 Intermediate Transfer Unit (Transfer Unit 181 Maintenance Kit ...181 Specifications...182 Mainframe ...182 Options ...185 INDEX...189 x 9.
Hardware Guide
Page 117
...- Important ❒ When handling toner cartridges, never stand them upside down. ❒ Store toner cartridges in a place with large amounts of chil- Replacing Consumables and Maintenance Kit Replacing the Toner Cartridge R WARNING: • Do not incinerate spilled toner or used or unused) and the toner cartridge out of reach of water. If...
...- Important ❒ When handling toner cartridges, never stand them upside down. ❒ Store toner cartridges in a place with large amounts of chil- Replacing Consumables and Maintenance Kit Replacing the Toner Cartridge R WARNING: • Do not incinerate spilled toner or used or unused) and the toner cartridge out of reach of water. If...

Hardware Guide
Page 118
...and white using black toner. Replacing Consumables and Maintenance Kit ❖ When to replace the toner cartridge If any of the toner cartridge indicators on the display: "Add Toner: (color)" • A combination of one to four colors, yellow, magenta, cyan, black, appears in "(color)". • If cyan, magenta, or ...yellow toner runs out, you cannot print in black and white or color until the black toner cartridge is empty, replace the indicated toner cartridge. Change the color mode setting to Black and White using the printer driver. • If black toner runs out, you can print in...
...and white using black toner. Replacing Consumables and Maintenance Kit ❖ When to replace the toner cartridge If any of the toner cartridge indicators on the display: "Add Toner: (color)" • A combination of one to four colors, yellow, magenta, cyan, black, appears in "(color)". • If cyan, magenta, or ...yellow toner runs out, you cannot print in black and white or color until the black toner cartridge is empty, replace the indicated toner cartridge. Change the color mode setting to Black and White using the printer driver. • If black toner runs out, you can print in...

Hardware Guide
Page 120
... on the display. Holding the toner cartridge horizontally ( ) with the Toner cartridge Recycling Program, whereby are col- Pull the locking lever toward you purchased the printer, or with a sales or service representative. 108 Doing so results in toner leak. lected used toner cartridges. AQC009S G Turn the locking lever to the triangle.... For details, consult with the dealer where you , until it locks into place. 6 AQC011S Do not repeatedly install and remove toner cartridges. Replacing Consumables and Maintenance Kit F Install the toner cartridge.
... on the display. Holding the toner cartridge horizontally ( ) with the Toner cartridge Recycling Program, whereby are col- Pull the locking lever toward you purchased the printer, or with a sales or service representative. 108 Doing so results in toner leak. lected used toner cartridges. AQC009S G Turn the locking lever to the triangle.... For details, consult with the dealer where you , until it locks into place. 6 AQC011S Do not repeatedly install and remove toner cartridges. Replacing Consumables and Maintenance Kit F Install the toner cartridge.

Hardware Guide
Page 122
From the right, the units are installed as shown. Turn the green lever counterclockwise to replace. Replacing Consumables and Maintenance Kit C Turn the two green levers counterclockwise ( ), and then slowly open the inner cover ( ). AQC013S The photo conductor units are attached in the order of black (K), magenta (M), cyan (C), and yellow (Y). 6 AET137S D Remove the photo conductor unit you want to unlock the unit. (The black photo conductor unit is used in this example.) 110 AET138S
From the right, the units are installed as shown. Turn the green lever counterclockwise to replace. Replacing Consumables and Maintenance Kit C Turn the two green levers counterclockwise ( ), and then slowly open the inner cover ( ). AQC013S The photo conductor units are attached in the order of black (K), magenta (M), cyan (C), and yellow (Y). 6 AET137S D Remove the photo conductor unit you want to unlock the unit. (The black photo conductor unit is used in this example.) 110 AET138S

Hardware Guide
Page 124
Do not remove the tape yet. AET142S I Check the installation position of the photo conductor unit. 112 Install the unit where the colored labels correspond. 6 AQC71S J Install the photo conductor unit with the opening, and then slowly insert the unit, until it stops. AET143S Take care that nothing comes into contact with the surface of the photo conductor unit. Align the tip of the photo conductor unit with the tape still attached. Replacing Consumables and Maintenance Kit H Remove the protecting cover.
Do not remove the tape yet. AET142S I Check the installation position of the photo conductor unit. 112 Install the unit where the colored labels correspond. 6 AQC71S J Install the photo conductor unit with the opening, and then slowly insert the unit, until it stops. AET143S Take care that nothing comes into contact with the surface of the photo conductor unit. Align the tip of the photo conductor unit with the tape still attached. Replacing Consumables and Maintenance Kit H Remove the protecting cover.

Hardware Guide
Page 126
Doing so results in ( ) and then turning the two green levers clockwise ( ). The printer starts calibration. Wait until it stops. P Plug in the power cable, and then turn off the power during calibration. Do not turn on the display panel. Wait until "Ready" appears on the power. Replacing Consumables and Maintenance Kit N Close the inner cover. AQC014S O Carefully close the left cover. Lock the inner cover by pressing in malfunction. 6 114
Doing so results in ( ) and then turning the two green levers clockwise ( ). The printer starts calibration. Wait until it stops. P Plug in the power cable, and then turn off the power during calibration. Do not turn on the display panel. Wait until "Ready" appears on the power. Replacing Consumables and Maintenance Kit N Close the inner cover. AQC014S O Carefully close the left cover. Lock the inner cover by pressing in malfunction. 6 114

Hardware Guide
Page 128
AQC015S E Turn the green lever of the transfer unit counterclockwise to unlock the unit. 6 AET138S F Pull out the handle of the unit appears. Grasp the handle and the green le- These may stain your hands or clothes. 116 ver firmly, and then slowly pull out the transfer unit, until the green line marked on the transfer unit. AET147S Do not touch any protruding areas on the upper surface of the transfer unit. Replacing Consumables and Maintenance Kit D Carefully open the printer's front cover (A) by pulling the left and right side levers.
AQC015S E Turn the green lever of the transfer unit counterclockwise to unlock the unit. 6 AET138S F Pull out the handle of the unit appears. Grasp the handle and the green le- These may stain your hands or clothes. 116 ver firmly, and then slowly pull out the transfer unit, until the green line marked on the transfer unit. AET147S Do not touch any protruding areas on the upper surface of the transfer unit. Replacing Consumables and Maintenance Kit D Carefully open the printer's front cover (A) by pulling the left and right side levers.

Hardware Guide
Page 130
Replacing Consumables and Maintenance Kit J Hold both upper handles, and then slide the transfer unit along the guide rails into the printer. K When the upper handles touch the printer body, lower the handles, and then push in the transfer unit, until it stops. 6 AET954S L Turn the green lever clockwise to insert the unit. AET146S M Carefully close the front cover (A). 118 AET953S The upper handles must be raised to lock the unit.
Replacing Consumables and Maintenance Kit J Hold both upper handles, and then slide the transfer unit along the guide rails into the printer. K When the upper handles touch the printer body, lower the handles, and then push in the transfer unit, until it stops. 6 AET954S L Turn the green lever clockwise to insert the unit. AET146S M Carefully close the front cover (A). 118 AET953S The upper handles must be raised to lock the unit.
Hardware Guide
Page 132
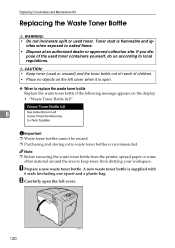
... toner bottle from the printer, spread paper or some other material around the area to naked flame. • Dispose at an authorized dealer or approved collection site. nites when exposed to keep toner from dirtying your workspace. A new waste toner bottle is flammable and ig- Replacing Consumables and Maintenance Kit Replacing the Waste...
... toner bottle from the printer, spread paper or some other material around the area to naked flame. • Dispose at an authorized dealer or approved collection site. nites when exposed to keep toner from dirtying your workspace. A new waste toner bottle is flammable and ig- Replacing Consumables and Maintenance Kit Replacing the Waste...

Hardware Guide
Page 134
Replacing Consumables and Maintenance Kit G Insert the projection part into the pivot inside the left cover. 122 AET156S H The green lever will slide automatically when the waste toner bottle is set. 6 AET157S I Check the waste toner bottle is correctly locked. J Carefully close the left cover, and then place the waste toner bottle in the horizontal position.
Replacing Consumables and Maintenance Kit G Insert the projection part into the pivot inside the left cover. 122 AET156S H The green lever will slide automatically when the waste toner bottle is set. 6 AET157S I Check the waste toner bottle is correctly locked. J Carefully close the left cover, and then place the waste toner bottle in the horizontal position.

Hardware Guide
Page 135
...hour after power off before replacing the Maintenance Kit. Replace them according to replace the Maintenance Kit Replace Maintenance Kit if the following messages appear on the display: • "Replace Maintenance Kit." 6 Before Replacing The Maintenance Kit contains parts for maintaining the printer. Touching these parts will result in ... pulling the plug from the socket. A Turn off the power, and then unplug the power cable. Replacing the Maintenance Kit Replacing the Maintenance Kit R WARNING: • Do not risk electric shock by handling the power cord or plug with wet hands. B...
...hour after power off before replacing the Maintenance Kit. Replace them according to replace the Maintenance Kit Replace Maintenance Kit if the following messages appear on the display: • "Replace Maintenance Kit." 6 Before Replacing The Maintenance Kit contains parts for maintaining the printer. Touching these parts will result in ... pulling the plug from the socket. A Turn off the power, and then unplug the power cable. Replacing the Maintenance Kit Replacing the Maintenance Kit R WARNING: • Do not risk electric shock by handling the power cord or plug with wet hands. B...

Hardware Guide
Page 136
... while pressing the catches. The following procedure shows how to lose the friction pad. 124 ZKEM170E The friction pad may come loose. Replacing Consumables and Maintenance Kit Replacing the Friction Pad Replace all the friction pads in the tray. Be careful not to replace the tray's friction pad (Tray 1). The friction pad...
... while pressing the catches. The following procedure shows how to lose the friction pad. 124 ZKEM170E The friction pad may come loose. Replacing Consumables and Maintenance Kit Replacing the Friction Pad Replace all the friction pads in the tray. Be careful not to replace the tray's friction pad (Tray 1). The friction pad...

Hardware Guide
Page 137
Replacing the Maintenance Kit D Turn the paper tray right way up . F Follow the same procedure to lose the friction pad spring. Place the spring over the central prong of ...
Replacing the Maintenance Kit D Turn the paper tray right way up . F Follow the same procedure to lose the friction pad spring. Place the spring over the central prong of ...

Hardware Guide
Page 138
... roller installed in toner leakage. ❒ Do not put the printer on both sides, and lift slowly. R CAUTION: • The printer weights approximately 50 kg (110.3 lb.). Important ❒ Make sure the printer is equipped with the optional Paper Feed Unit, do not move the... or dropping it backward or forward while moving the print- The printer will result in the printer. 126 AET402S Replacing Consumables and Maintenance Kit Replacing the Paper Feed Roller Replace all feed rollers including the printer and the optional Paper Feed Unit(s). B Slide the green lock ...
... roller installed in toner leakage. ❒ Do not put the printer on both sides, and lift slowly. R CAUTION: • The printer weights approximately 50 kg (110.3 lb.). Important ❒ Make sure the printer is equipped with the optional Paper Feed Unit, do not move the... or dropping it backward or forward while moving the print- The printer will result in the printer. 126 AET402S Replacing Consumables and Maintenance Kit Replacing the Paper Feed Roller Replace all feed rollers including the printer and the optional Paper Feed Unit(s). B Slide the green lock ...

Hardware Guide
Page 139
... it carefully into the printer, until it stops. If you have two paper feed units installed, also replace both paper feed rollers. E Place paper in the paper trays and additional removed paper trays. Then, return the green lock lever to replace the paper feed roller. Replacing the Maintenance Kit C While sliding the green...
... it carefully into the printer, until it stops. If you have two paper feed units installed, also replace both paper feed rollers. E Place paper in the paper trays and additional removed paper trays. Then, return the green lock lever to replace the paper feed roller. Replacing the Maintenance Kit C While sliding the green...

Hardware Guide
Page 140
Replacing Consumables and Maintenance Kit Replacing the Transfer Roller A Carefully open the printer's front cover (A) of the transfer roller. AQC018S B Pinch the green clips on both ends of the transfer roller. 6 AET163S Do not touch the roller area of by pulling left and right side levers. C Pull out the transfer roller. 128 AET164S It may stain your hands or clothes.
Replacing Consumables and Maintenance Kit Replacing the Transfer Roller A Carefully open the printer's front cover (A) of the transfer roller. AQC018S B Pinch the green clips on both ends of the transfer roller. 6 AET163S Do not touch the roller area of by pulling left and right side levers. C Pull out the transfer roller. 128 AET164S It may stain your hands or clothes.

Hardware Guide
Page 141
Replacing the Maintenance Kit D Insert the new transfer roller by placing its underside edge into the grooves shown in step B. 6 AET166S The transfer roller appears insecurely set, but this is intentional. F Close the front cover (A). 129 AET165S E Secure the transfer roller using the green fastening clips mentioned in the illustration.
Replacing the Maintenance Kit D Insert the new transfer roller by placing its underside edge into the grooves shown in step B. 6 AET166S The transfer roller appears insecurely set, but this is intentional. F Close the front cover (A). 129 AET165S E Secure the transfer roller using the green fastening clips mentioned in the illustration.


